Skynet connection setup. Internet provider SkyNet (SkyNet): description of services, contacts, connection and customer reviews. The remoteness of the resource from you
Initially, you will need to connect the router to the network.
1) The cable with the Internet coming from the side of the staircase must be inserted into the "INTERNET" socket.
2) The short cable (or any other Lan connection cable) that comes with the router must be inserted into any of the "LAN" sockets.
3) Connect the router to a 220v network with a power supply. Check its operability by the state of the indicators on its front panel - the lamps can burn with constant or alternating green fire
I) Indicator of connection to the network 220v;
II) Indicator of connection to the Internet;
III) Wireless indicator;
Iv) 1,2,3,4 - LAN connection indicators.
Setting up an internet connection and a wireless network.
A) On the computer that you connected to the router, log into an Internet browser (Internet Explorer, Mozilla FireFox, Opera, Google Chrome). In the address bar, write the address of your router: 192.168.1.1
B) In the appeared window of the router interface, you will need to enter the account name and password. The factory settings use the default name: "Admin" and password: "1234" (as an option, password may be missing).
Internet connection setup.
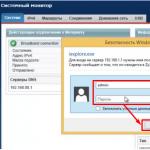
V) Usually, after entering the router interface, you will be taken to the page "System Monitor of the KEENETIC LITE Internet Center"(You can enter this menu, including by clicking the icon " Monitor"in the upper left corner of the screen). On this page you will need to find in the" Internet connection"The MAC address of the device (the address of the network card of your router by which the provider company identifies you). You will need to write it down and give it to the technical support staff to bind to the system. Binding is carried out within 10-15 minutes, this is due to the frequency of database updates MAC addresses in the network.I recommend writing this address down or sticking it on the back panel of the router, so as not to search for a long time later.

D) After this manipulation, you will need to enter the " Internet", subsection" Connection". "Configuring IP Settings"column must be selected" Automatic", check the box next to" Obtain DNS server addresses automatically". Then use the" Apply

Setting up a wireless network.
D) Enter the section " Wi-Fi network", subsection" Compound". Check the box next to the phrase" Set up a wireless access point", set the parameter value" SSID"(parameter specifying the name of your wireless network). Then use the" Apply"at the bottom right of the screen.

E) Enter the section " Wi-Fi network", subsection" Security". In field " Authentication", use the encryption option" WPA2-PSK". Fill in the field" Network Key (ASC II)"desired password for the wireless network (the password must contain at least 8 letters of the Latin alphabet or numbers)... Then use the " Apply"at the bottom right of the screen.
The World Wide Web is a unique information field that provides its users with material on various topics. With its help, business people develop their business, students find material for self-education, children play educational games, and all together - communicate, have fun, learn the news.
Almost any answer to your question can be found on the Global Network. Here you can find a wealth of background information in any direction from various sources: dictionaries, instructions, maps, transport schedules and work of institutions, and much more. It is impossible to list all the advantages. They need to be assessed by everyone personally. Therefore, do not delay, but connect to the Internet today!
There are a huge number of providers in St. Petersburg. One of them is SkyNet, which provides its subscribers with high-speed Internet and a variety of local resources. And our company will help you in the preliminary adjustment of computer equipment and create satisfactory conditions for uninterrupted signal transmission in this room.
Setting up a router and the Internet for the SkyNet provider
We will configure the router and synchronize the operation of devices in the local network. And you can use the Internet anywhere in your apartment or office.
Our company provides maintenance of computer equipment at home. To do this, you just need to issue a call to the master at home by phone. This will not only save you time, but also the budget for the delivery of equipment in both directions.
Modern television is also moving forward. Qualified specialists of our company will adjust your devices to be able to watch TV programs in IPTV format. High-quality image, sound, availability of additional functions for stopping and resuming transmissions at a convenient time will pleasantly surprise you.
Our company will help you in solving any technical issues related to setting up computer equipment at affordable prices!
The cost of our services
| Name of service | Price |
|---|---|
| Calling the master at home within 2 hours (St. Petersburg) | is free |
| Urgent call of the master | RUB 300 |
| Router firmware | RUB 500 |
| Installing / Configuring Wi-Fi Router | from 500 rubles |
| Set password / hide network | RUB 350 |
| Connect up to 2 Wi-Fi devices | RUB 300 |
| Setting up a local network for 1 PC | from 200 rubles. |
| Turnkey setup | |
| Installing and configuring a Wi-Fi router / router (If you have a router) | 1200 RUB |
| Wi-Fi router ASUS RT-N12 (data transfer rate 300 Mbps) + delivery, installation and configuration of the router | RUB 2,600 |
| Wi-Fi router D-Link DIR-815 (data transfer rate 600 Mbps) + delivery, installation and configuration of the router | RUB 3300 |
| Additional services | |
| Connecting and setting up the TV to the Internet | from 1000 rubles. |
| Configuring client DC | 450 RUB |
| Port forwarding on a router / router | RUB 350 |
There are five ports on the back of the TP-Link TL-WR841ND wireless router, one of which is labeled WAN - you need to connect a SkyNet cable to it.
Also, a short network cable is included with the device: connect it one of the LAN ports on the router with the network card of your computer or laptop. The setup can be done without using a wired connection, via Wi-Fi, but if possible, use a wired connection.
To enter the web interface of TP-Link TL-WR841ND settings, launch any browser and enter 192.168.0.1 or tplinklogin.net in the address bar, when you are asked to enter your login and password - use admin as your login and admin as your password. Note that the default login information is on the sticker on the bottom of the wireless router.
After logging in, you should be on the main page of the router settings. On some devices, it is present only in the English version, we will describe the Russian-language menu.
The easiest way to configure the router is using the quick setup function.
To do this, select the Quick setup menu item and click the Next button.

Select the Connection Type PPPoE / PPPoE Russia and click the Next button.

Fill in the fields for setting up the connection. The Username must be taken from the Registration Card to the agreement, which is issued upon connection. The username on this card is recorded in the table in the LOGIN column. Fill in the Password and Confirm Password fields, also from the Registration Card to the agreement from the PASS table field. Specify Dynamic IP as the secondary connection and click Next.

In the Wireless mode setting, you must set the Wireless Network Name to distinguish your router from the routers installed in neighboring apartments. Change the Wireless Password if necessary. The default wireless password is on a sticker on the bottom of the wireless router. Password must be 8 or more characters, English upper and lower case letters and numbers are allowed. Click the Next button.

Click the Finish button. The router is configured.
If for some reason the router cannot be configured in the quick setup mode, you need to configure it manually.

To do this, open the Network menu item and find WAN in it. Select the Connection Type PPPoE / PPPoE Russia. Enter the settings of the PPPoE Connection from the Registration Card to the contract. Specify Dynamic IP as the Secondary connection. Select the WAN connection mode and select Connect on Demand and the Maximum idle time - 0, so that the router is always connected to the Internet. Click the Save button.

To configure the wireless network, go to the menu item Wireless mode - Wireless settings. We set the Name of the wireless network to distinguish our router from the routers installed in neighboring apartments. Click the Save button.

Wireless password. The default wireless password is on a sticker on the bottom of the wireless router. Click the Save button.
The configuration of the wireless router is completed.
Learn to configure the D-Link dir-300 NRU router, subject to receiving the settings from the provider's router via DHCP.
Initially, you will need to connect the router to the network.
1) The cable with the Internet coming from the side of the staircase must be inserted into the "INTERNET" socket.
2) A short cable (or any other Lan connection cable) that comes with the router must be inserted into any of the "LAN" sockets
3) Connect the router to a 220v network with a power supply. Check its operability by the state of the indicators on its front panel - the lamps can burn with constant or alternating green fire.
I) Indicator of connection to the network 220v;
II) Internet connection indicator;
III) Wireless indicator;
IV) 1,2,3,4 - LAN connection indicators.
Setting up an internet connection and a wireless network.
A) On the computer that you connected to the router, log into an Internet browser (Internet Explorer, Mozilla FireFox, Opera, Google Chrome). In the address bar, write the address of your router: 192.168.0.1

B) In the appeared window of the router interface, you will need to enter the account name and password. The factory settings are using the default name: "admin" and password: "admin". Sometimes the password does not exist at all, in this case it will not be a problem to log into the router, and the user has to manually configure the password in the router interface.
Internet connection setup.
C) Select the "Network" section, the "WAN" subsection.

1) Set "Connection Type" to IPoE (default).
2) In the "Physical layer" column, your MAC address is indicated (the address of the network card of your router by which the provider company identifies you), you will need to write it down and give it to the technical support staff. The binding is carried out within 10 - 15 minutes, this is due to the frequency of updating the base of MAC addresses in the network.
3) In the "IP Settings" column, the network settings should be obtained automatically.
4) If you have not changed the settings, then at this step there is no point in saving them. But, in the event that changes have been made, then you will need to press the "Change" button in the lower right corner of the screen.

Setting up a wireless network.
G) Select the "Wi-Fi" section.
1) In the subsection "Basic settings" you will need to give the name of your wireless network in the "SSID" column, click the "Change" button in the lower right corner of the screen.

2) In the "Security Settings" subsection, you will need to set WPA2-Personal in the "Network Authentication" column, then enter the password for the wireless network in the "PSK Encryption Key" column (it must consist of 8 or more English letters and / or numbers). Press the "Change" button in the lower right corner of the screen.
Let's consider setting up Asus routers using the RT-AC66U model as an example.
1. Connect to one of the yellow LAN ports of the router with a network cable or wireless Wi-Fi.
2. In the address bar of your browser, enter 192.168.1.1 and press Enter.
3. Enter login: admin, password: admin.
(If this login / password is not suitable, then enter the ones that were set earlier or reset the settings to the factory settings. To do this, hold down the Reset button () for 10 seconds with a needle, a match, a toothpick, a thin rod, etc. with LAN ports.).
4. Download the software for your router if you want to improve performance and reliability. To do this, go to Asus website... Enter the model of your router in the search field. Choose your model and hardware revision among the proposed ones, which you can see on the sticker at the bottom of the router. Go to the "Support" category. Then go to the Drivers & Utilities category. Specify any operating system from the list. Expand the Software list. Select the topmost firmware and click "Global" on it. Unzip the downloaded file.
5. Select "Administration" in the "Advanced Settings" category, then go to the "Firmware Update" tab.

6. Click on the "Select file" button and specify the path to the file that you downloaded and unpacked.
7. Now click "Submit" and wait for the router to update (2-5 minutes).
8. Enter login: admin, password: admin.
9. Select "Wireless Network" in the "Advanced Settings" category. Enter a name for your Wi-Fi network in the "SSID" field. Select the type of encryption in the "Authentication Method" field (WPA2-Personal recommended). Enter your Wi-Fi password in the WPA Pre-Shared Key field. Click Apply.

10. Select "Local Area Network" in the "Advanced Settings" category. Go to the "IPTV" tab. Select "Enable" for "Enable efficient multicast forwarding (IGMP Proxy)" and select "Enable" for "Enable efficient multicast forwarding (IGMP Snooping)". If you have devices that do not support the reception of our television using the multicast protocol, then you need to enter the port number (for example 4022) in the "UDP proxy (Udpxy)" field. Click Apply.

11. Select "Internet" in the "Advanced Settings" category. If you are setting up a router from a computer that is connected by cable and on which the Internet is running, if you connect the cable directly, then select the "Clone MAC" button in the "MAC address" item and select "Apply". Otherwise, you need to dictate the MAC address of your router by calling us at 49-35-00.

Your router is now set up and ready to go.