Buy, Ubiquiti NanoStation M2 street, all-weather access point and subscriber station WiFi and AirMax with delivery, mail.
Access point Ubiquiti NanoStation M2 has a significant range, which reaches 13 kilometers. The model with a prefix Loko, this figure is several times smaller. Ubiquiti access point NanoStation Loco M2 provides a confident signal only within a radius of two kilometers. However, in fact, their differences completely end there, because otherwise they are almost identical. Also, they have nothing to do with the procedure for entering parameters in the interface, so using the guide below, you can configure Ubiquiti for both models.
Connection procedure
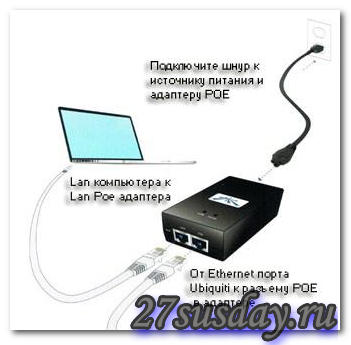
Obviously, before the NanoStation2 setup process is started, the device must be properly connected. To do this, use one wire to connect the router connected to the computer to the M2 NanoStation power supply, and connect the Main port to the POE socket of the unit with another wire, as shown in the image below.
Preparing the computer for work
For Ubiquiti NanoStation M2, the network card of the computer is configured in the same way as for the Loko model. The most reliable option for the configuration procedure is a wired connection, rather than by Weifai. Therefore, the variant of connecting via a router cable to a PC will be described below. The setup consists of the following sequential steps:
Entering settings for the access point
The sequential action algorithm consists of the following steps:
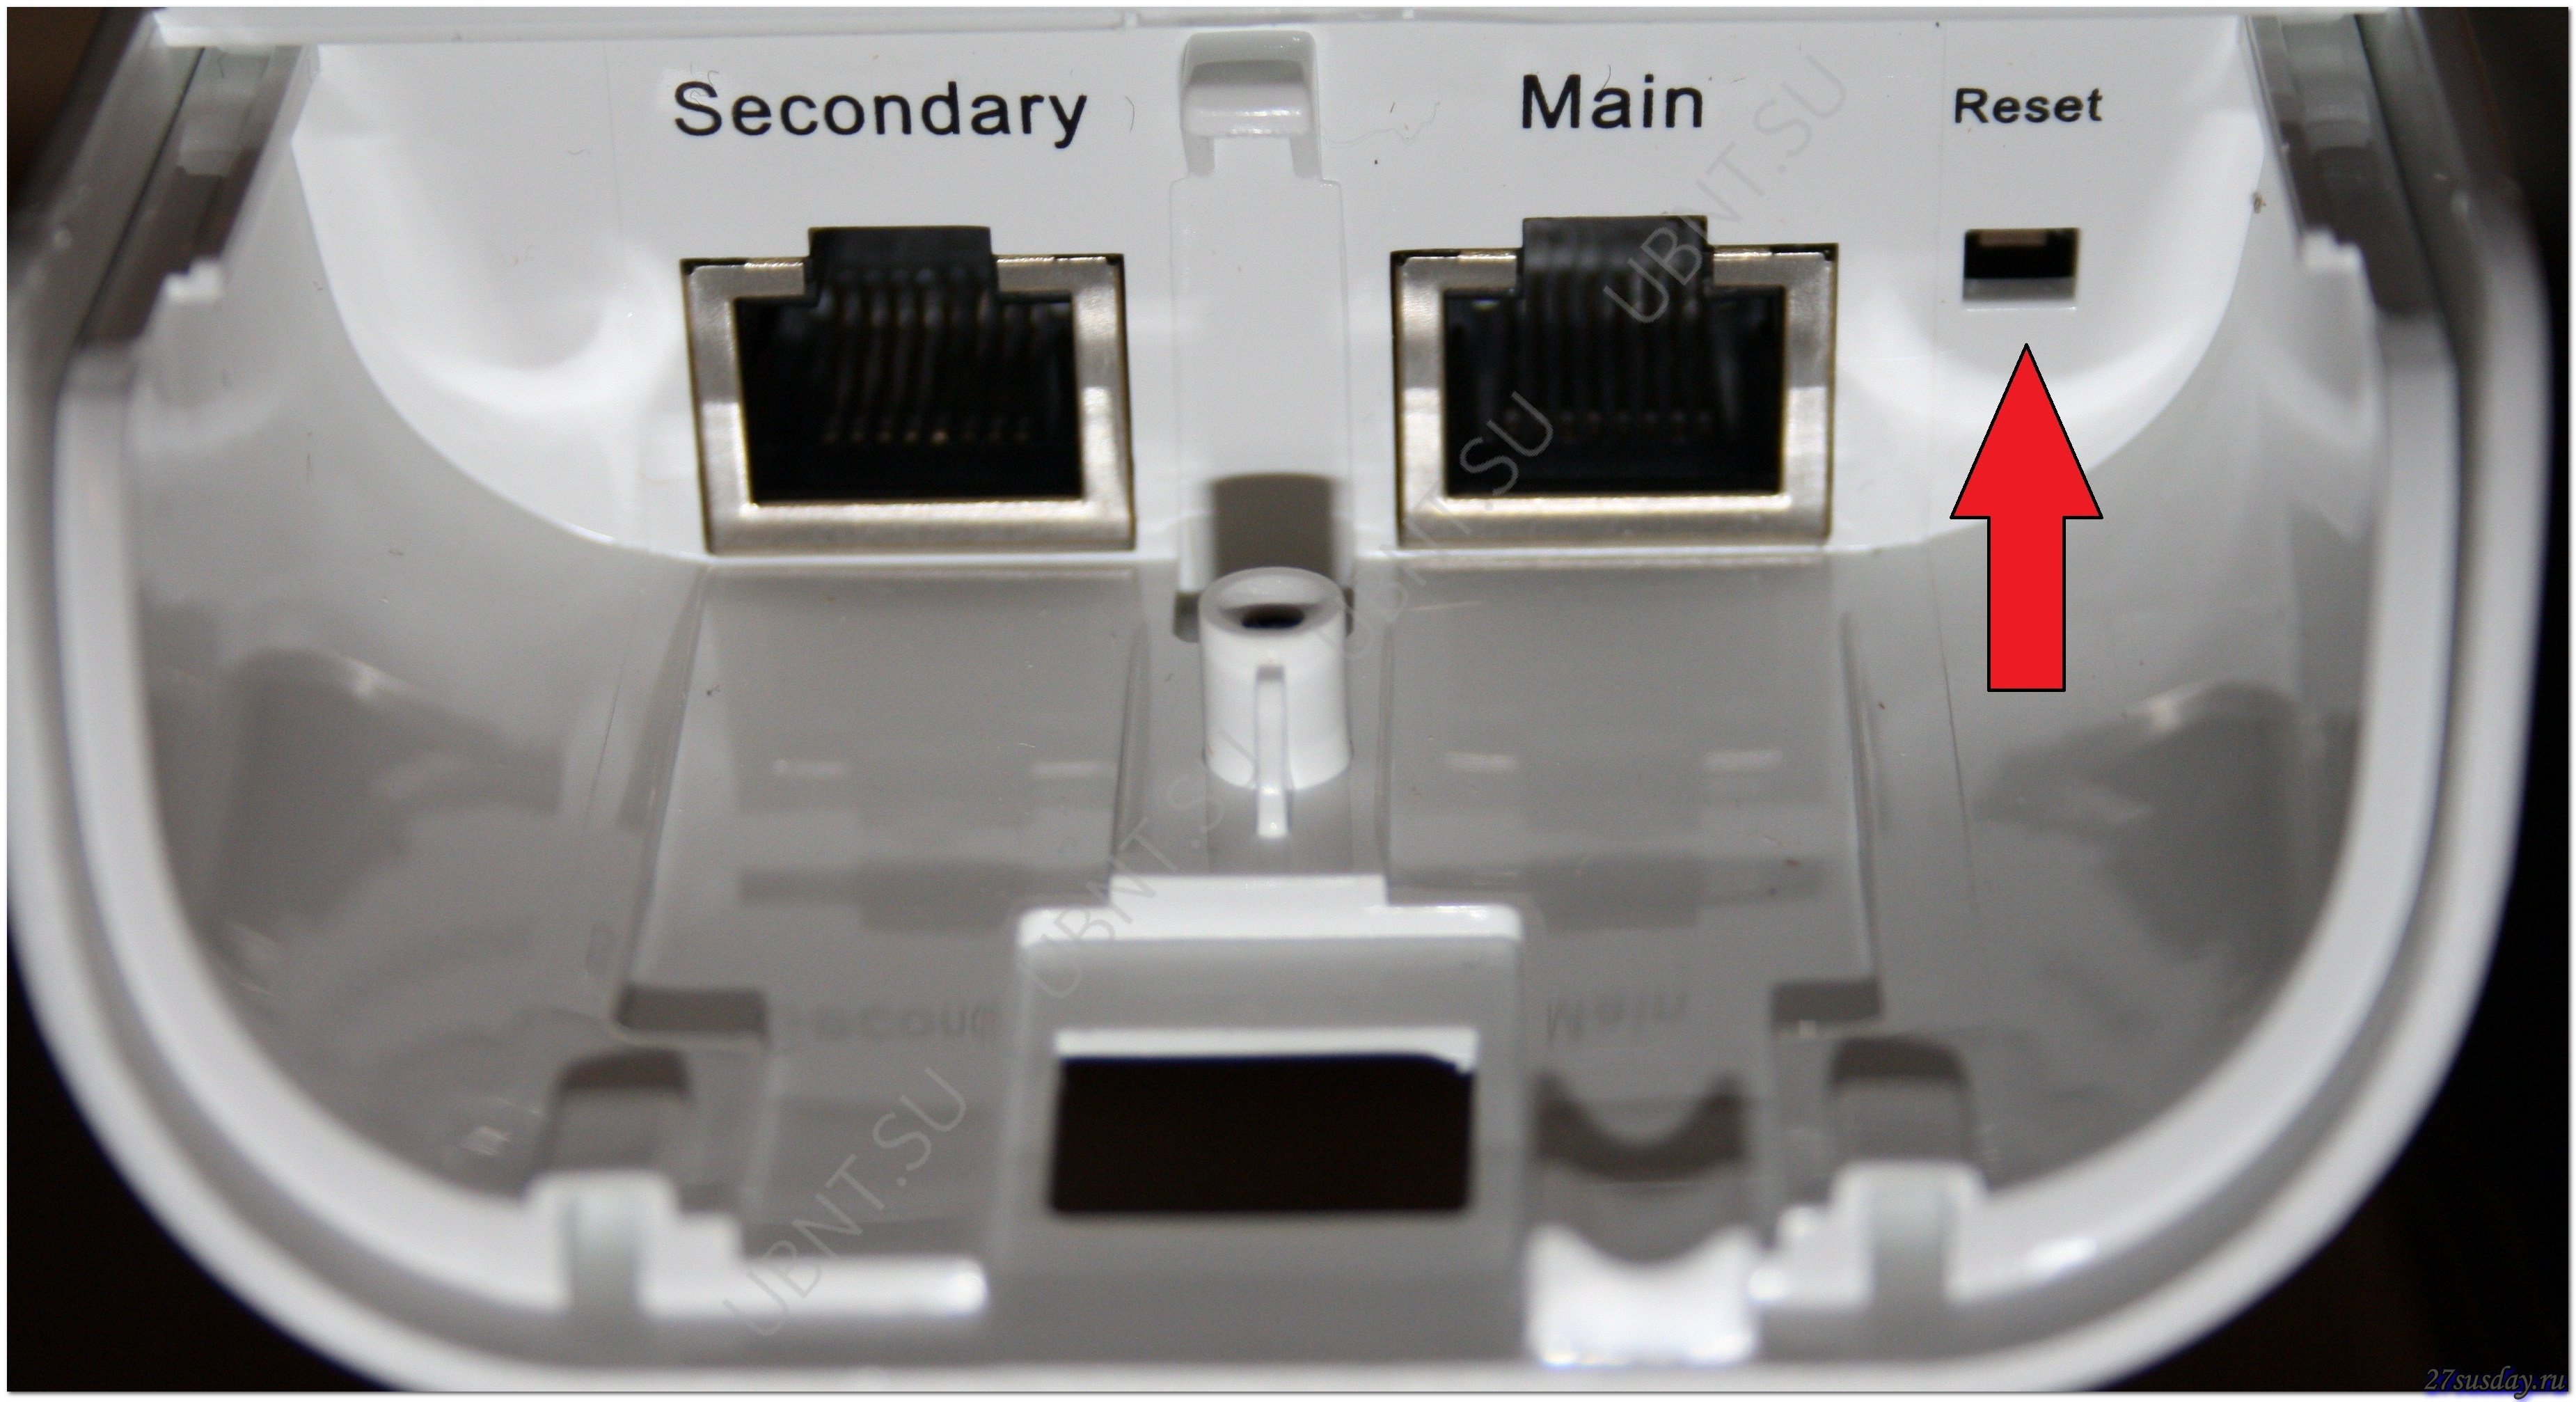
Note: If the name and password do not work, you will need to reset the device. To do this, you should use the special "Reset" button on the device case.
Press it and hold for about 15 seconds. After this procedure, the authorization parameters set by the device manufacturer will again apply.
Entering parameters for the Bridge mode
The following steps must be taken:
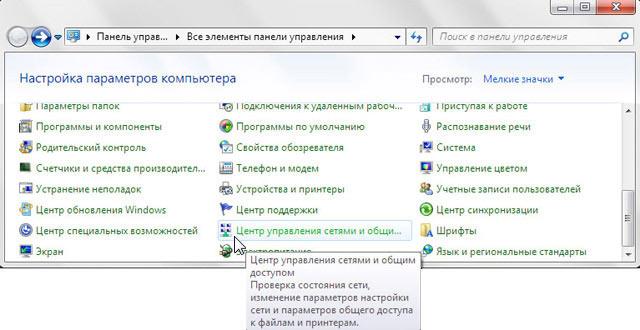
How do I find the "IP" of the home network station?
To do this, you need to install a special application "Device Discovery Tool" in the PC. Then, right after the program starts, it will automatically search for IP and display it on the monitor. 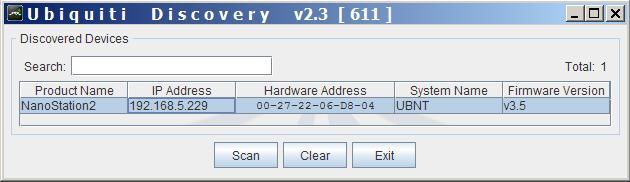
Access Point Security
Any adjustments to the parameters should only be available to the owner of the device, so you need to know how to change it. For this purpose, only a few steps need to be performed:
- Login to the "System" section;
- Go to the tab "Administrative Account", where you can print your own imaginary complex access code;
- After that, click "Change" to save the corrections;
- In the last box, click "Apply";
- Done! Now network security is ensured, and the point functions normally.
Engineers of the company Ubiquiti Networks are pleased to offer the most demanding consumer all-weather access point - Nanostation M2, made in a sealed plastic case. The device has a rich functionality and allows you to solve a wide variety of wireless access tasks.
| Download Firmware (v5.6.2) AirMax (.bin) |
Customize NanoStation | Certificate for NanoStation | Comparative Review NanoStation M2 |

Nanostation M2 access point represents Wi-Fi 2.4Ghz a 600 milliwatt transmitter with an integrated sector MIMO 2 × 2 antenna with a gain of 11dBi: very impressive, especially considering more than a modest size and weight of just 400 grams. The access point is equipped with an Atheros MIPS 24KC processor with a clock speed of 400Mhz and random access memory volume of 32MB. The device is equipped with PoE-injector, which will allow you to power Nanostation M2 using a twisted pair, and a screed for mounting on the pipe. Interesting option - under the lid in addition to the main LAN-port is one additional. Because it has PoE power support, it will be very convenient to connect to Nanostation M2 network IP camera.
Like other devices from the company Ubiquiti, Nanostation M2 Support, which allows to prevent collisions when wireless data transmission over a distance. Intelligent scheduler will give the opportunity to assign high priority to video and voice traffic, as well as assign priorities to individual clients. There are three main options for using a wireless access point Nanostation M2.
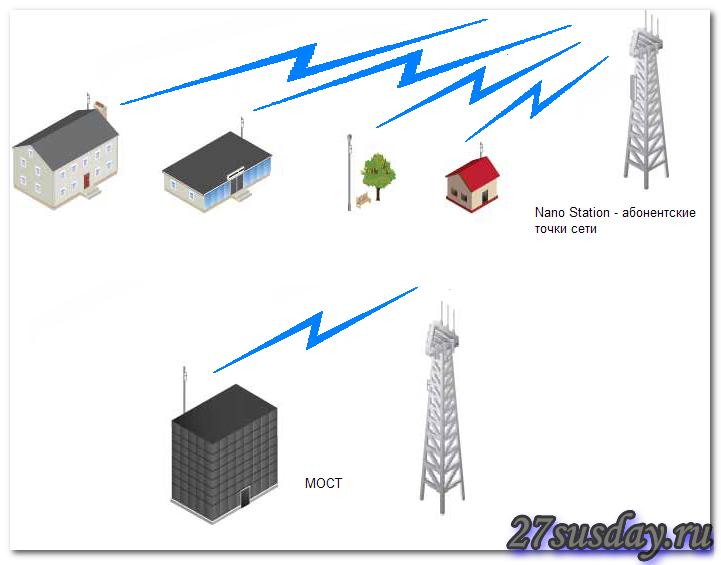
- As an access point Since the integrated antenna has a horizontal sector of 55 degrees, it will be very appropriate to apply Ubiquiti Nanostation M2 as an access point. This will enable you to connect wireless clients to it at a distance of up to 7 kilometers. The flexibility in tuning and the impressive power of the device will help build an entire network, as a Station using the same or their "little brothers" - access points. Such infrastructure will be applicable for the organization of wireless access in settlements or will allow to connect remote branches together with the central office.
- As a wireless client If the task is to connect to a remote access point several kilometers away, you can implement it using Nanostation M2. The compactness of the device, the ability to operate smoothly under different climatic conditions give a wide range of possibilities for its installation on the client side. Attractiveness in the financial aspect makes Nanostation M2 a very interesting contender for the role of an inexpensive and high-performance device for wireless access to the network.
- In "Point-to-point" mode Also Nanostation M2 is irreplaceable in the organization. What could be easier than using two such devices to connect to the Internet cottage in a small distance from the city. Also, this mode will be very useful for providers: if there are several clients in a small house that need to be connected to the network. With such an infrastructure, a bridge can be Nanostation M2and further communications within the building are carried out in a wired manner. In addition, stability and outdoor performance of the device will be decisive factors in the construction of backbone wireless channels.
Working Nanostation M2 governed by software product Air OS - a flexible tool for configuring the access points of the company Ubiquiti. A user-friendly interface and convenient configuration help to quickly and efficiently solve wireless access tasks. Nanostation M2.
Engineers Ubiquiti demonstrated how important it is nowadays to follow the balance of "price-quality" relentlessly. Access point Nanostation M2 combines a number of advantages - it has a powerful transmitter and a sensitive antenna with small dimensions, and is all-weather, which will be indispensable for residents of harsh climatic zones. The availability of the device in a financial aspect will also attract a lot of potential consumers.
Specifications Ubiquiti NanoStation M2
| CPU | Atheros MIPS 24KC, 400 MHz |
| RAM | 32 MB SDRAM, 8MB Flash |
| Network Interface | 2х10 / 100 BASE-TX (cat.5, RJ-45), Ethernet interface |
| Certificate of conformity | FCC 15.247, IC, CE |
| Channel width | 5/10/20/40 MHz |
| Working range | 2412-2462 MHz (802.11b / g / n) |
| Transmitter Power | 26dBm, + / -2dB |
| RX Sensitivity | 97dBm + / -2 dB |
| Antenna | 10.4 ~ 11.2 dBi double polarization |
| Coverage Area | Up to 6 km (with the minimum channel width) |
| TCP / IP Throughput | up to 150 Mbit / s + |
| Maximum power consumption | 8 W |
| Power Supply | 24 V, 0.5 A (12 W). Comes with an injector |
| Method of nutrition | PoE. The voltage is supplied via Ethernet (pair 4 and 5 - positive, 7 and 8 - negative) |
| Vibration tests | ETSI300-019-1.4 |
| Humidity | from 5 to 95% (with condensation) |
| Working temperature | from -30 to +80 С |
| Dimensions | 29.4 cm x 8 cm x 3 cm |
| The weight | 0.4 kg |

: 2.4 GHz. It is used to distribute the Internet to 30 subscribers or as a client on the same M2. With the help of it you can, for example, deploy a network over a small city in a very short time. The station itself is very well recommended, there is no negative feedback about it.
Setting up an access point for Ubiquiti Nanostation.
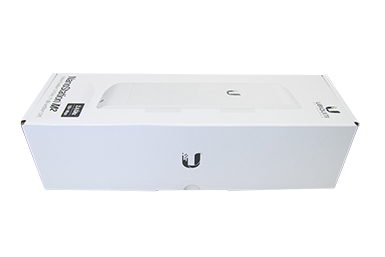
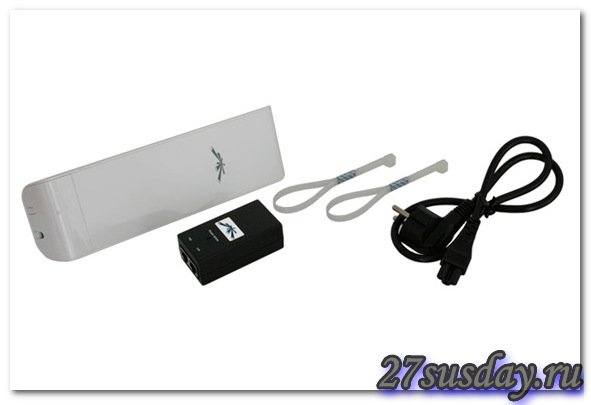
The point is delivered in a normal box. The manufacturer indicates that it can be used both inside the house and outside. Inside the box we find a small manual, a point directly, a power supply unit of a new sample (in new models there was a Reset button, which was sometimes very scarce), a 220 V power cable and clamps for mounting to a bracket.
For connection two cables, an injector are taken. The cable that is connected to the LAN connector is inserted in the network card our computer. The second cable is inserted first into the POE connector, the second end to the point. On model M2 2 connectors, we insert into the main connector. If you have a Loca version, then the connector will be one.
If we power the point, the power indicator will light up. The LAN1 indicator does not light up until we connect the computer. Until we switched to the computer, say a few words about the point itself.
First, the power is supplied by twisted pair, which means that no additional power is needed to the point. Secondly, it is made of plastic, which allows using it in any weather. If you are going to distribute the Internet from it to the same points, then you will have the opportunity to use airMAX technology, which allows you to greatly improve your connection.
Customize
The point is connected, the computer is turned on. To begin with, we need to go into the control panel and register with IP pens. The default antenna is 192.168.1.20, DHCP is off. We must register the IP in the properties of our wired connection. For peace of mind, you can make sure that the point is pinged.
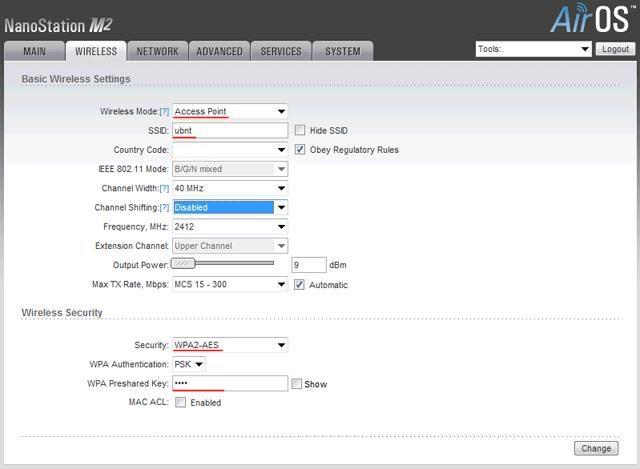
In the browser, type our address. The default login and password are ubnt and ubnt. In the Country column, select the Complance Test line. The language is English, we accept the terms of use and enter the control panel via the "Login" button. Why did we choose the Complance Test? The fact is that this mode allows you to select absolutely any channel, maximum power and any other parameters set by hand. In each country there are restrictions on the use of frequencies, we want to be free people. In versions from 5.5.8 removed Complance Test, so it is not worth bothering with it. Conversely, if your firmware is higher - you can flip to a lower one. Work on non-standard frequencies without Complance Test is impossible. Sooner or later, any channel is hammered, so depriving yourself of unnecessary frequencies is at least stupid.
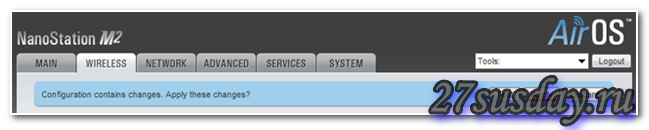
We'll look at the various modes of operation, but first we'll deal with more general things. It's better to change the default user name and password to the admin area. Sometimes it's better to somehow generate passwords, if you put them from the bald, then sooner or later you will forget or lose the necessary data. Also change the network name, it will be useful in monitoring. Here you can swap the firmware or merge some configuration file, you can also specify latitude and longitude, but this is again for monitoring. The main thing is to change the default login and password, it's mandatory. Click Change and Aplly, then the settings are applied, and the antenna will reboot, it will take a minute to wait.
Ubiquiti Nanostation M2 router mode
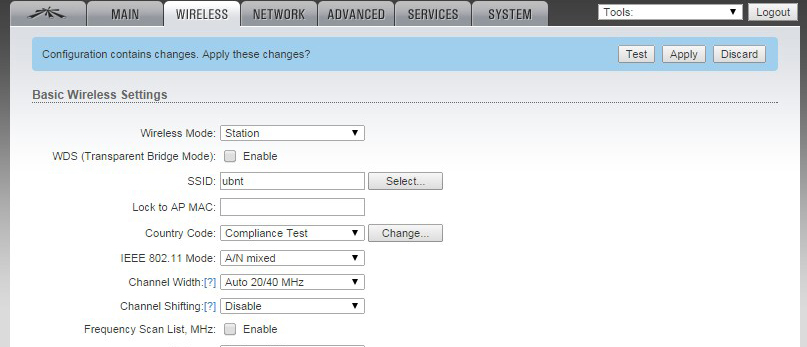
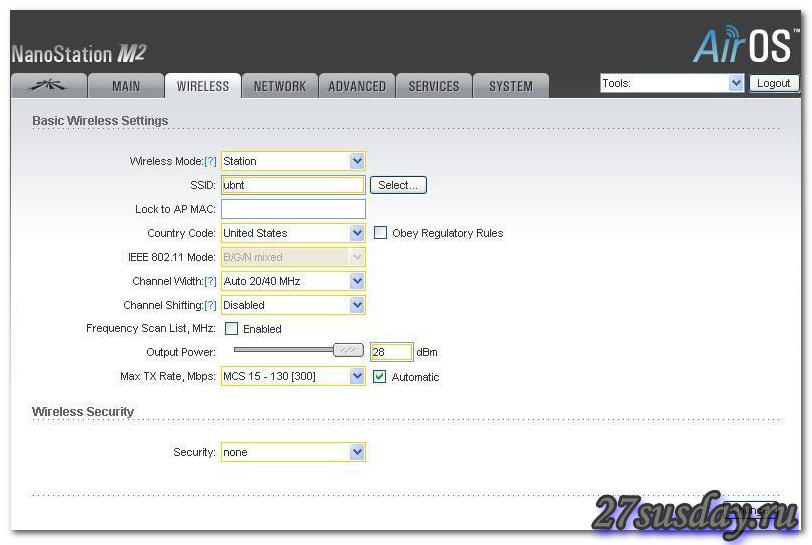
Now we will not consider the situation when the connection is established, working from the provider. We consider that we are an ordinary user. Go to the Wireless tab. For the point to work as a router, you must select the mode of operation as an Access Point. You can specify a transparent mode so that there are no problems. SSID is the name of your access point. If you make a bridge, you better hide the name. Since we are doing public Wi-Fi, we will not hide it. We leave the country unchanged. Regarding the width of the channel: now most devices support a width of 40 MHz, but still there are such wonders of Chinese thought that do not support the fortieth, so it makes sense to reduce the bandwidth to 20 MHz. Network mode we leave B / G / N, most likely, it and can not be changed. You can select a channel. Here, of course, expanse. We have 13 channels in our country, which start at a frequency of 2401 Mhz. It is not recommended to use channels 12 and 13, because there are owners of apple equipment brought from the US in a gray manner. In the US, 11 channels, 11 and 12 simply do not work. The first channel is usually busy, the sixth channel is not bad: 2427 MHz, you can also just scan the air. We select the channel and the output power. In the open area can be twisted to the maximum. If you are not making a public point, then we put encryption: choose the type and set the password. Click Change.

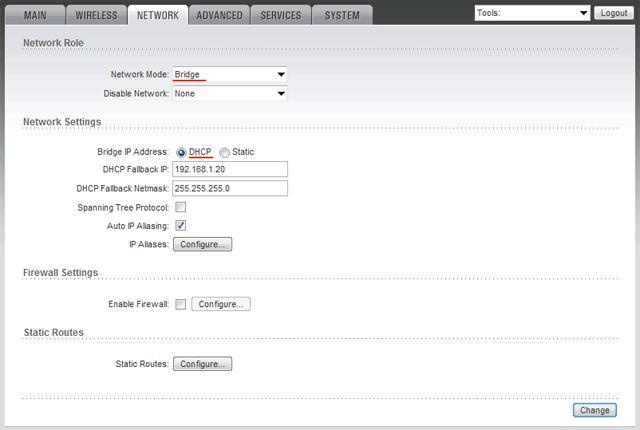
Go to the Network tab. Choose the mode of the router. WAN Interface leave BRIDGE0. IP is obtained by DHCP. We will stick it into the home router and the IP to control the antenna it will receive by DHCP from the router. Enable DHCP, IP can be left the same or changed if it is. Let's see that NAT was enabled, in the screenshot there is an error. Click Change.
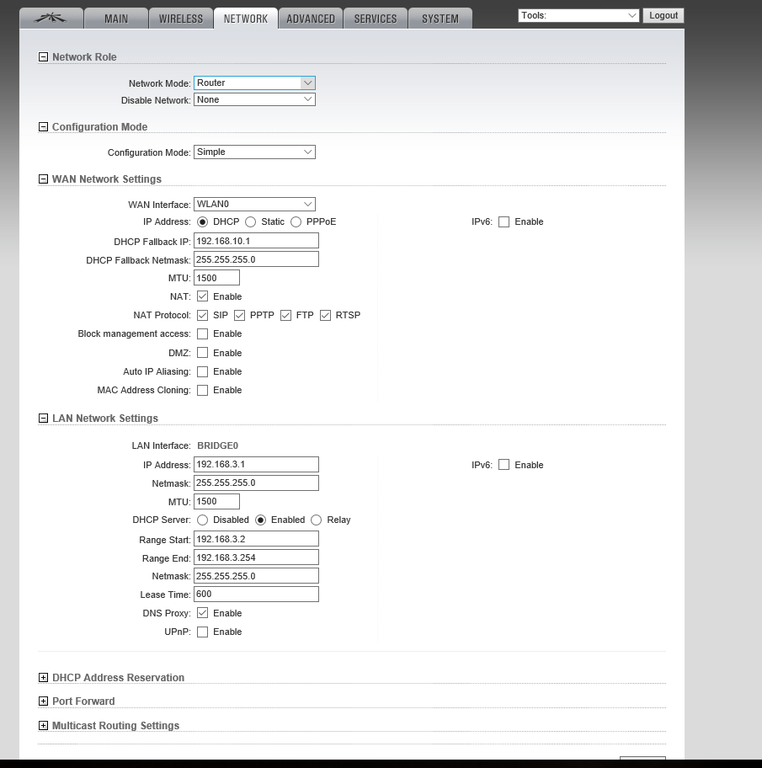

We disconnect the computer from the LAN connector and insert the cable with the Internet into it. We must see our network in the list of available. We connect to the network and make sure that the computer will receive IP by DHCP.
We go to the menu for controlling the antenna for the new IP. We are authorized with a new login and password. We see that the antenna is operating in the router mode, there is one connection - it's us. Perhaps the device will request an update of the firmware, but we do not want to lose the magnificent "country", so we ignore the messages.
Go to Main and watch what information is available for us. There is a speed schedule, connected clients, visible MAC, client signal is visible, distance usually lies, speed, connection time, last connected IP are visible. On the first six MAC signs you can find out the manufacturer of the computer or phone of this connected scoundrel. You can view all the information on it, how many picks up and takes at all.
Bridge access point
In this mode, the point will "flush" the connection and the IP will give out the provider's router or switch. This method is suitable if we want to sell Wi-Fi. In billing, you can write MAC addresses of our customers and collect money from them.
Customize. The mode is not router, but bridge. There is a situation like this, some people miss this: you need to make sure that after manipulating the antenna you can control it. If we use a router that will give IP to everyone, then install DHCP and nothing else. And if we want to sell the Internet, we have some kind of billing, then we need to drive the LAN address of our Ubiquiti, that is, register it in billing, issue a simple tariff, you can, in general, with an illegal Internet connection, if only an internal IP was issued in the network of the provider. We set the receipt of the controlling IP by DHCP. Let's Change, the settings for Wireless remain the same, Apply, wait until the point reboots.
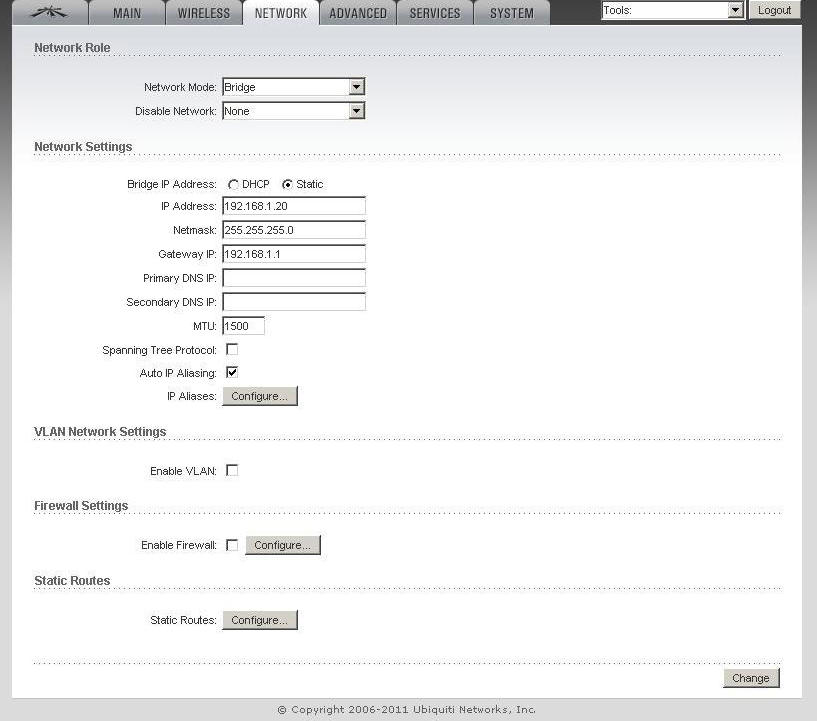
We connect again to the point. We have already got another IP, but we do not know the manager of the IP. We go to the admin area of our router and look at the clients. Find yourself and copy the IP. We go to the control panel under this address. Log in to the admin area, make sure that everything works. Now the IP address is managed by our home router.
Station
In Station mode, our Ubiquiti Nanostation M2 can not only transmit, but also receive the Internet. We set the station mode and scan the air. With our "country" scanning will be long. Why is this necessary? The station is very powerful, the signal can be received from ordinary Wi-Fi from a neighboring house, for example. Choose any available connection from available and click Change. Delete the registered IP in the control panel, we get IP, you can go to the admin area from this address. Correct the IP inside the admin area, if there is no connection.
The first models of "nano-stations" from Ubiquiti were intended for a niche market, referred to as: inexpensive and efficient subscriber equipment wi-fi networks. New models of equipment such as NanoStation M and NanoStation Loco M adopt the same concepts, but include many innovations, such as: improved design, support for wi-max, AirMax protocol (i.e., time sharing protocol), and more.
The price is getting lower, the performance is better (while maintaining the "old" form factors), and the line of NanoStation M models becomes more in demand than the predecessors, remaining an ideal solution for private microwave networks.
Unlike the standard protocol wi-fi or wi-max, multi-user access with time sharing "AirMax" in the models ubiquiti nanostation M2 (M5) - allows the client to send and receive data using the "time slot" (which is controlled by the database services). The method of time slots excludes the so-called "collisions" (resulting from the "invisibility" of the subscriber), while the "base" tries to maximize the effectiveness of the network. In this technology, it is possible to change (ie - configure) most parameters: throughput, response time, and network - it turns out to be much more scalable (if to compare with wi-fi or wi-max).

In the technology of allocation of temporary "slots" from ubiquiti, the subscriber's adjustable priority is additionally used, which makes it possible to transmit video or voice in real time (with no "frieze").
Specifications
The wireless subscriber unit ubiquiti nanostation M2 can operate in one of the modes:
- subscriber point of the network (including, with wi-Max 802.11n protocol, or - networks with AirMax technology);
- base station (above standards) with an angle of exposure of 60 degrees;
- terminal for the organization of the bridge "point-to-point" (using the protocol 802.11n).
The device has a built-in MIMO class antenna 2x2 with an irradiation angle of up to 60 degrees, and an amplification of 10 dB. The built-in transmitter power (2.4 GHz band) is 400 milliwatts. Actually, the radio part differs from the predecessor (from nanostation 2) only by the design of the antenna (which here has somewhat less amplification, but - compatibility with wi-Max due to the technology of double polarization MIMO 2x2).
Connector for an external antenna (also, unlike its predecessors) - there is already no. Although, the sense of its availability would still not be great (for a 360-degree wi-Max antenna, the transmitter power is insufficient). Built-in passive antenna, in itself has good parameters.
The communication range (in bridge, point-to-point mode) with two such devices is 15 kilometers. At observance of requirements: an open locality, a choice of "narrow" frequency band, and some others.
But in the city, in more "difficult" wave transmission conditions, the communication range (distance to the base station) can be no more than 2-3 km (when working with the 802.11n protocol).
In general, the conclusion can be made as follows: if you need wi-Max - you buy M2 (with built-in MIMO antenna); if enough 802.11 b or g - you can buy nanostation 2 ("previous", without the letter "M").
AirMax technology, ubiquiti in its time developed to work only with MIMO antennas (ie, as in the nanostation M2). However, with the usual 802.11 b or g - all this also works (in nanostation 2, AirMax "appeared" with the release of the latest firmware).
Parameters "M2"
- Range: 2.4 GHz
- Irradiation angle: not less than 60 Degrees
- Transmitter output power: 0.4 watts
- Characteristics of the PoE (power) unit: 24 Volts; 0.5 Amperes (12 Watts)
- Power consumption of the device: no more than 8 W
- Data transfer rate (real): up to 117 Mbit / s, Rx + Tx (802.11n protocol without encryption)
Note: the speed was measured in bridge mode, the distance is 1 km, without re-reflections / interference. In Tx mode (transfer), the value is 123 Mbps.
Complete set and connection
The access point is connected to any PC (laptop) via a LAN cable. Only, not directly (although the device has an Ethernet response interface), but through a power supply unit called the "PoE unit":
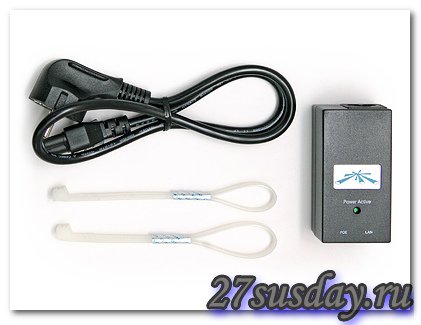
As you can see, there are no signal cables in the kit. They will have to buy (or - "compress") on their own (for the length that you need). The connection scheme looks like this:
I must say, such a scheme, that is, "power supply by signal cable," is used in all devices of this company, without exception. The "power supplies" themselves different devices - do not differ (but are designed for different power: 12 W / 24 Watt). For ubiquiti nanostation M2, a PoE power supply with a power output of 12 W is suitable.
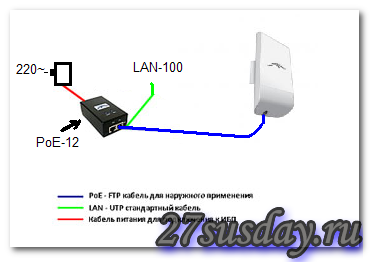
The connection of the PoE unit and the main unit is done with the cable "ftp" (note that this cable differs from the "normal" twisted pair LAN-100Mb). After all connections are made, connect the LAN-100 connector to the network card of the computer. Then, turn on the power (220V). The device needs 2-3 minutes to boot.
The terms
Station - the mode of operation as a subscriber point (the client station of the network).
Access Point is an 802.11 base station (access point).
WDS (Wireless Distribution System) - technology to increase coverage wireless network by combining several Access Points into one network, and - the main thing here - without the need for a wired connection between them.
Configuring devices via the web interface
Actually, how to configure devices from ubiquiti, nanostation M2 (including) - many, probably, know. And the "base station" mode allows you to start working by changing the "minimum" of the default settings. In the web-interface we go to the IP address indicated on the box (192.168.1.20).
As login / password, use "ubnt" (without quotes).
Once we go into the web interface - see the Main tab:
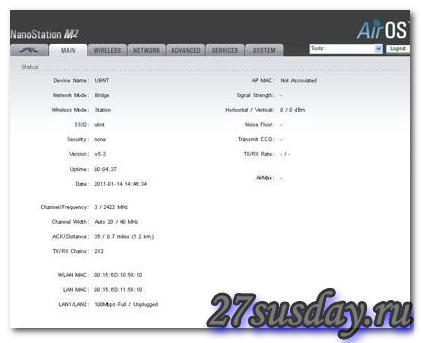
Which, in general, is not needed now. Go to "Wireless":
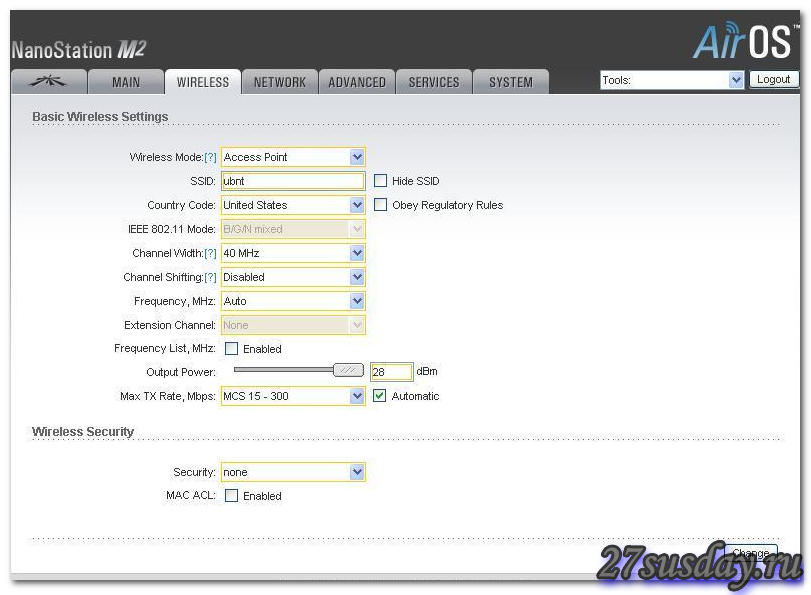
Choose the mode: "Access Point". SSID is the name of the wireless network (which you are "creating" now). Country Code - can be left, and can be changed to "Molvania" (which will give access to all frequencies in the 2.4 GHz band).
We put the transmitter power ("Output Power") to maximum. If encryption is used, select the type.
To save the changes, press the "Change" button, then - "Apply" (appears in the upper right corner).

Note: after "Apply", the device performs 2 actions - memorization of settings; reboot.
We configured the access point as the base station for the 802.11 b / g / n network.
Activating AirMax mode
1. Go to the far left of the tab, turn on the tick «airMAX Enable»:
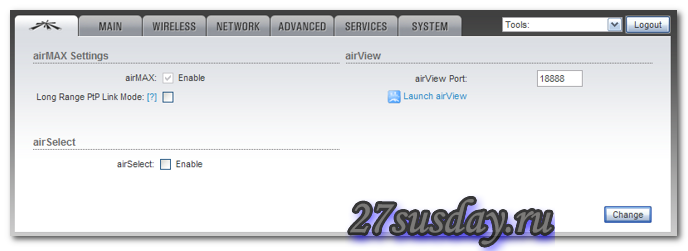
2. In principle, airMAX now - will work (you can click "Change", "Apply").
To see what radio frequencies are occupied by other points, start (on this tab) the AirView service (blue inscription on the right). You will be shown the spectrum of the ether:
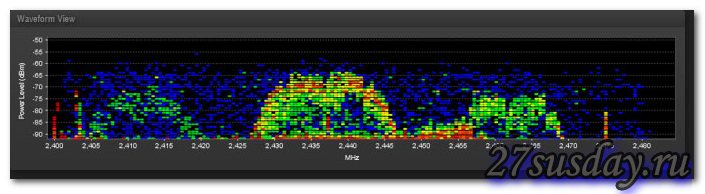
For more "fine-tuning" (and increasing the speed of exchange with the base station), you can change: "Channel Width" - the bandwidth, and the power of radiation - also (this is all - the "WIRELESS" tab).
Another thing is that at the moment (when you set up the access point), the spectrum type is one, and at another time it can change (for example, other networks turn on, etc.). In general, there is room for customization - there is (if you get bored - you can return the values "as it was").
Note: If AirMax is enabled on the base station, the remaining (subscriber) points - will automatically select this mode (when connected to this network).
For "novice" administrators of a wireless network with AirMax, the mode of functioning of AirSelect (tick "airSelect Enable") is intended.
After switching on, the operator can select the frequency grid (and - the length of the time slot, "Hop Interval"):
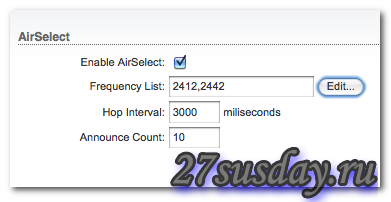
From the Frequency List, the device automatically selects the least noisy channel. When changing this, the base station itself will notify users (each subscriber). And how many times is "Announce Count".
In this - just the main "snag". The value should be selected experimentally. Too big - it can not be. At the same time, most likely, there will be users who have a network with "switching" will periodically disappear (you need to switch - and the subscriber "did not reach"). And, if - so, the best solution is to refuse to use AirSelect.
In conclusion, we can say: your network should not interfere with others (then - no one will prevent it).
Instead of ubiquiti nanostation M2, devices with higher transmitter power are suitable for building a base station, including the inclusion of an external antenna: Rocket M2, for example.
Note: the use of devices without registration in the 2.4 GHz band is allowed if: the transmitter power does not exceed 100 milliwatts; the network is located within a single building (structure). Other options for use - in the absence of registration, violate the law (that is, not legal).
Setting in "subscriber point" mode
The steps for connecting the device and entering into the web interface are the same as those discussed above (you need to go to the "Main" tab).
Immediately go to the "Wireless" tab, choose the mode of operation - "Station":
After that, additional items appear on the tab. Country code - it's better to change to "Molvania".
Click the "Select" button. We see a list of available access points (base stations):
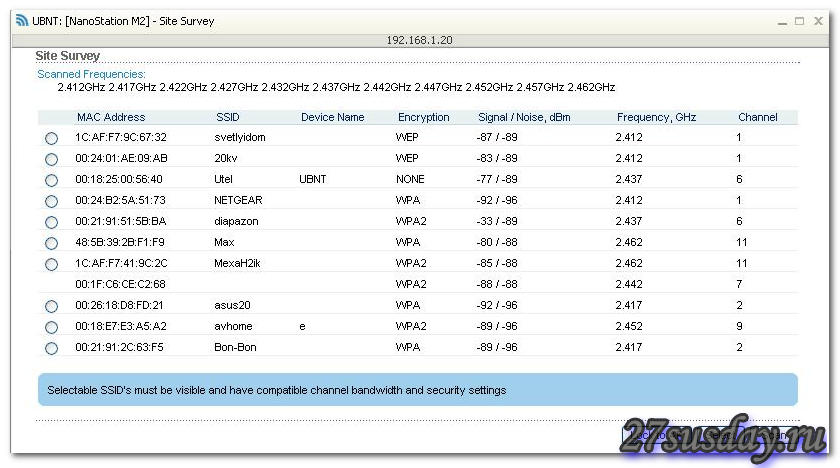
Opposite to what we need, we put a point. Click "Lock to AP" (this is mandatory). And then click "Select" (confirming your choice).
On the "Wireless" tab: to save the changes, click "Change" (and - "Apply").
After that, we again "throw" on the "Main" tab (but, already - with a nice indicator):
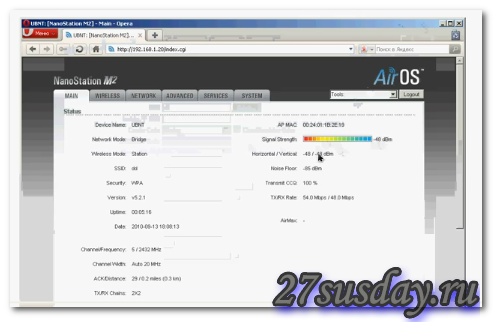
The indicator shows the level of the base station.
Note: if the base station uses encryption, the subscriber will be asked to enter the key (the encryption mode will be determined automatically). Successful settings!
Installing an IP Network Card for Your Computer
Did all the connections (as indicated in the figure), and want to get into the web-interface:
But when typing in the browser line of the standard "IP" - wrote that "not available"? It's okay - it's easy, we did not set up a PC network card! In the very ubiquiti nanostation M2, now you do not need to configure anything.
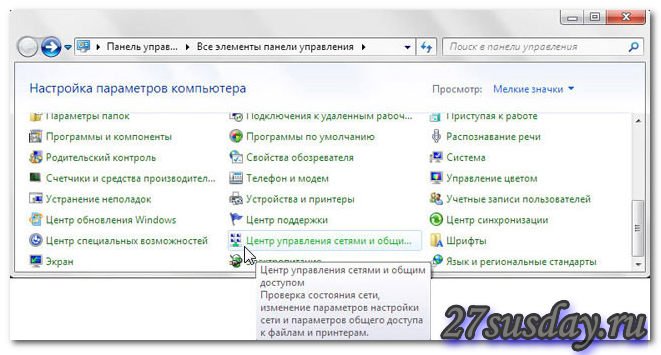
Go to the "Control Panel", select "Network Management Center ..." (as in the figure):
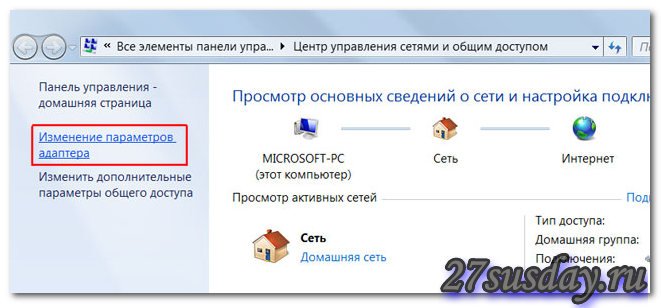
Click on "Change adapter settings":
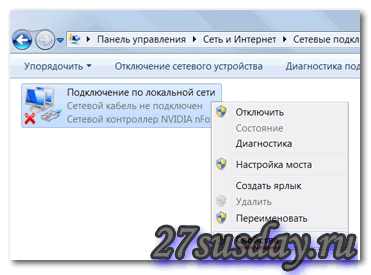
Then, right-click - to "Local Area Connection ...", and in the menu - select "Properties":
That's all. Now we can configure (as you wish) a network card for the PC:
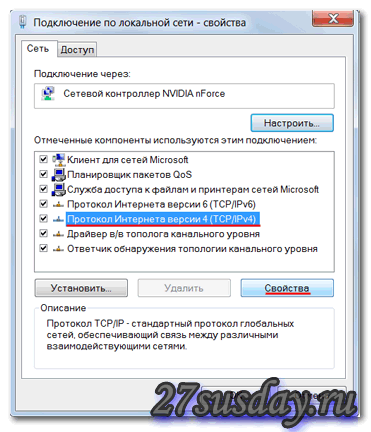
Select (the left button) the line shown in the figure ("Protocol ..."), click on "Properties". The following window opens:

And we will do it exactly as shown (static IP-address, 192.168.1.21, for example, and mask - with the last "zero").
"Ok", "Apply" - and now, even without rebooting the computer, everything should be in order (we can go to the web-interface, restarting only the browser).
We hope the reader understands why we chose this IP address of the network card and the subnet mask.
If desired, you can change the IP and the access point itself. For what, in the web interface ubiquiti nanostation M2, go to the tab Network (and - change IP):
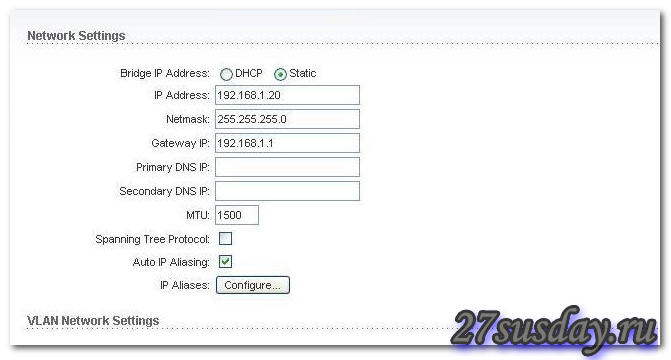
Gateway IP is the address of the router, through which the Internet is usually accessed (for the subscriber "localhost" - usually, it is not relevant).
Do not forget that the changes will take effect only after the "Change" - "Apply".
The access point is able to work in networks with dynamic IP (local DHCP networks). Description of setting "dynamic" local Area Networks - is beyond the scope of this review. We will say here only: in DHCP networks, you can find the IP of the access point itself from the mac address. For this, there is a Device Discovery Tool.
Downloading it here (www.ubnt.com/support/downloads/utilities), and having preinstalled the java environment (www.java.com/ru/) - let's start, we will see:
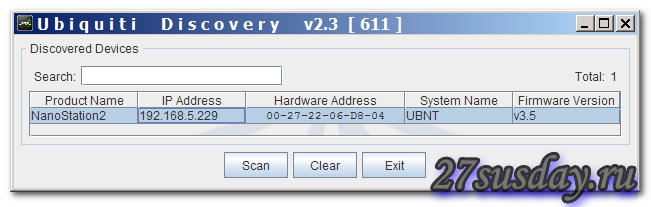
That is, we learn the IP, by which it is possible to get into the web-interface (the program recognizes only devices with mac-addresses of ubiquiti company).
We hope that everything said in this chapter is understandable to the user. A local (wired) network is one (that is discussed here), and wireless is another. At a minimum, go to the web interface - it should work. If not, press the "reset" button located on the device case (under the cover). IP address - will become "standard", but - the rest of the settings will be reset.
FAQ (question-answer)
- Can the ubiquiti nanostation M2 be used for outdoor installation?
The manufacturer says that "yes", that is, it is possible. The case is waterproof, the operating temperature range is acceptable. Only, in this case, it is strongly recommended to include the station in the "grounding" PoE unit (for more details, see the review "nanostation 2").
Note: if there is no "good" grounding, as you are sure - then with a street installation, it is better not to "bother" at all.
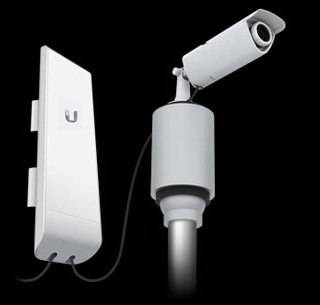
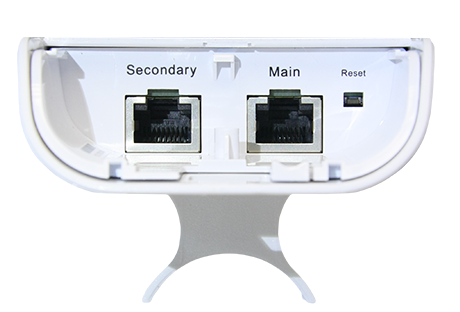
- How does the video camera connect to the "Secondary" connector?
The IP camera connection can be performed either with an external power supply (the "Secondary" port is a LAN port) or with a "cable" (software "enabling" the PoE option). In the second case, an ftp-standard cable is used.
It should be remembered that the bundled PoE unit delivers 24 Volts (and 0.5 A maximum), that is, 12 watts. The access point itself, consumes 8W. If the power for the camera is not enough - you can put the unit PoE-24W. But the voltage (24 Volts) is also not suitable for all "third-party" devices. Be careful when choosing equipment.
The access point (subscriber station) may need to be included in the router mode (Network tab, Network Mode - "Router" line). In this mode, nanostation m2 will "distribute" IP addresses to all devices on the local network.
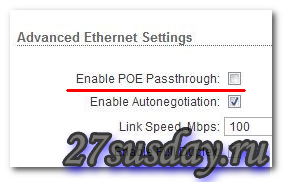
Power to the "secondary" port: Advanced tab, tick "Enable PoE Passthrough":
Nevertheless, the force of more than 1 A through one "device" - it is better not to do (therefore, the produced "blocks" have a power of up to 24 W) ...
We hope that the information will be useful to the user. The official website of the company is ubnt.com.