Connecting hdmi to the motherboard. How to enable HDMI on a laptop. About the goals pursued
A pressing problem for many users today is expanding the image from a personal computer to a home plasma display. “We connect the TV to the computer via HDMI, but there is no image,” - this is exactly how negative sounds come from the mouths of computer equipment owners.
In this article, the reader will become acquainted not only with the method of connecting an additional display to a PC or laptop, but will also learn about the correct equipment settings. He will also be interested in recommendations from experts in the field of IT technologies.
About the goals pursued
The larger the diagonal of the LCD screen, the more comfortable it is to view multimedia and the better the image detail in games and software. A film on a TV from a computer will allow you to see the smallest details, and a fan of a dynamic toy will feel the reality of the events taking place on the plasma screen. In fact, there are many advantages of using such a symbiosis, and all of them relate to the comfortable work or leisure of the user.
In recent years, many users have become interested in Internet television. Why pay money to the provider if you can watch your favorite channels for free from the official website of the television company? Therefore, the question is: “How to connect a computer to a TV?” sounds more and more often in the media. But so far things are going badly with ready-made solutions.
Computer hardware capabilities
It’s better to start with the technical capabilities of a personal computer or laptop. The fact is that it is not enough to buy an HDMI cable for your computer. It will be possible to connect to the TV only if there is an appropriate digital video output on the PC. Therefore, the user needs to familiarize himself with all the outputs of the system unit and find the desired port. It can be located on the video card or on the motherboard of the computer and on one of the ends of the mobile laptop.

There are devices that do not have an HDMI connector. It is quite possible to find VGA (D-Sub) video output or DVI digital ports with DisplayPort on old ones. Here everything depends to a large extent on the TV, which should have similar inputs. Having selected the right cable for your TV, you will always find the opportunity to output an image from your computer.
TV availability
But modern liquid crystal devices with HDMI ports have no problems - all manufacturers provide their equipment with a popular interface. Often they are not limited to one port at the factory and provide the user with the opportunity to connect several sources to output images via HDMI.
Larger LCD displays have a slightly different problem. We are talking about the resolution of the reproduced image and the frame rate. Before connecting a computer and a TV via HDMI, the user needs to familiarize themselves with the technical characteristics of both devices, compare their video signal transmission capabilities and find a parameter that will be supported by both the plasma and the PC. Often, all equipment manufacturers strive to ensure that equipment supports FullHD resolution (1920x1080) at a frequency of 60 Hz. True, there are exceptions that create problems for users.
Operation of devices of different generations
In situations involving connecting two devices with different interfaces (HDMI, VGA), users are often surprised why the computer does not see the TV via HDMI. The explanation is simple - it is impossible to connect equipment of different generations by combining analog and digital signals with one cable. In such situations, no adapter will solve the problem - you need a converter that can decode the signal at the hardware level.

Fortunately, foreign auctions offer ready-made solutions that can solve all users’ problems with video signal transmission between devices of different generations. The cost of one converter is in the range of 20-30 USD. That is, which attracts a potential buyer. All the necessary cables for video transmission are always included with the converter, so the algorithm for solving the problem is simple: buy a converter and connect the TV to the computer via HDMI.
When the required interface is not available
Not all computers and TVs have an HDMI port - that's a fact. But you shouldn’t get upset ahead of time, since with obsolete devices the problem can always be solved. The fact is that old equipment is focused on transmitting an analog signal. Although this technology lags behind in terms of image quality, it has an order of magnitude fewer problems with the compatibility of different standards. Combining S-Vidio, VGA or RCA interfaces is much easier than converting to digital.
The user just needs to buy a cable for the TV and connect both devices. There are also many inconveniences that users will have to face. Firstly, audio cannot be transmitted over an interface cable. Accordingly, you need to buy another cable. Secondly, during operation, the sound card of a computer or laptop will not be able to create an individual audio stream for the TV. Accordingly, you can forget about the convenience of sharing a computer and TV.
The right approach to buying a cable
Problems may also arise for the user when choosing the wrong HDMI cable. The fact is that a digital video signal is not capable of being transmitted over long distances via cable without loss of quality. Therefore, the future owner needs to decide on the length before buying an HDMI cable for a computer to a TV.

The main thing is to always remember that the longer the quality cable, the higher its cost. It is necessary to measure the distance between the PC and the liquid crystal display (of course, not in line of sight, but taking into account the installation) and find a cable of the appropriate length on the market. Yes, it is customary for buyers to purchase wires with a reserve, but it should be small, since often the excess is rarely in demand - more often they just collect dust behind the TV or behind the computer. The main thing here is to find a middle ground in terms of the “cost - cable length” ratio.
Real offers from manufacturers
It is not easy to choose a cable for a TV of the HDMI-HDMI form factor on the market. Any buyer can verify this for himself; just look at the prices and assortment. It is logical to assume that expensive accessories have a high price only because they are made by serious brands. There is truth to this, but as a rule of thumb, the more expensive the HDMI cable, the less likely it is that the video signal will deteriorate over a long distance. In fact, you have to pay for quality. Chinese consumer goods have no place in the domestic market.
IT experts recommend paying attention to the brand name (for example, Prolink, Cablexpert, Viewcon, Belkin), as well as focusing on the quality of the winding and the presence of ferrite filters near the connectors (barrels near the contacts). If an HDMI cable is required, the length of which exceeds 30 meters, then the user cannot do without a signal amplifier. The device is expensive, but copes with the assigned tasks 100%.
Physical connection of two devices
This article is not about potential difference from a school physics course, but the user still needs to know that there is a small electrical charge on the video ports when the equipment is plugged into the mains. Naturally, when connecting two devices, equipment with a large charge will transfer energy through the cable to the port of the connected device. Often the TV turns out to be more powerful, which, when connected, burns the output on the computer’s video card. Therefore, before connecting your computer to the TV via HDMI, you need to turn off the power to one of the devices (unplug the plug from the socket). Naturally, this problem avoids all users who have grounding in their home.
Another problem that the buyer may encounter is the lack of a video signal when connecting the cable or the image transmission with noise. There is no need to touch the settings of your TV or computer - 99% of the time the problem is a low-quality cable. It needs to be replaced. In general, experts recommend checking the HDMI cable directly in the store to avoid connection problems.
TV settings
It will not be difficult for the owner of the liquid crystal display to press the “Source” button on the device’s remote control and select the desired signal source. All ports on the TV panel are registered and numbered, so all that remains is to combine the software part with the hardware part. Don't expect the PC image to appear on the screen right away. The main thing here is to get the display ready to receive a video signal. This will complete the setup of connecting the TV to the computer via HDMI. All that remains is to configure the video output of your PC or laptop.

Many users are owners of home theaters and other video and audio equipment that is connected to an LCD TV. Naturally, a situation may arise when all HDMI ports are busy. Many users are unlikely to want to physically rearrange the HDMI cable when working with a computer, so another solution is proposed. The video signal from the laptop can be transmitted to a tuner or receiver. In fact, there is no difference, since manufacturers use a single standard for transmitting images via HDMI.
Modern platforms
When it comes to the Windows 10 or MacOS operating systems, there are practically no configuration issues. The user only needs to restart the computer for the device to detect and connect the new display. The more modern the technology, the more effective the automatic tuning is - often via HDMI the signal is transmitted from the computer to the TV in FullHD format with a frequency of 60-65 Hz.
But there are exceptions, and they are primarily related to the video device driver. Therefore, there is no need to try to make the TV work correctly from the remote control; only fine-tuning the video card will help here. The main thing is to always remember that you need to change the parameters not global, but just one port, otherwise, through negligence, you can destroy the signal to the PC monitor, which will be very difficult to restore.
Working with drivers
Making a TV work like a computer monitor via HDMI, although difficult, is quite possible. There are many ways to do this, which the reader will get to know. Owners of the Windows operating system versions 7,8 and 10 need to go to the control panel and select “Screen”.
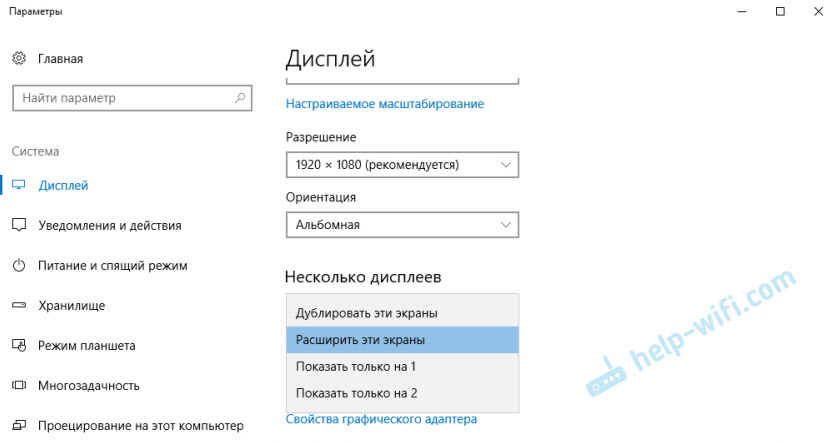
By going to the “Setting screen parameters” tab, the user will find that the operating system has already detected the connected TV, but is not yet transmitting the image to it. The Multiple Displays option allows you to connect your TV as an additional monitor to your computer. The list contains several options from which the user is asked to make a choice:
- Duplicate these screens. The contents of the computer desktop will be displayed on the TV screen, and all actions performed by the user will be visible on both displays.
- Expand these screens. The most interesting setting that allows you to virtually increase the desktop area (both vertically and horizontally).
- Show on screen no. Manually assigning a port for video output is not popular among users.
Driver configuration features
It's easy to send a signal to a TV, but adjusting the picture quality and transferring sound from a computer to a TV is not so easy. First, you need to decide on the extension of the desktop - diagonally or vertically. Experts recommend focusing on the physical location of the TV in the room relative to the PC monitor. On the control panel, in the “Screen Resolution” menu, you need to use the mouse to place icon No. 2 relative to icon No. 1 so that it is convenient to move desktop objects between displays.

The second step is to adjust the TV screen resolution. The main thing here is to select a parameter that is supported by the connected display, otherwise a failure will occur and the video output port will be disabled. By clicking the "Advanced Settings" button, the user can select the display refresh rate, however, IT experts do not recommend changing the frequency unless the video card and TV support the 4K (144 Hz) standard. After making all the settings, you need to save the changes and exit the control panel.
Tricks with sound transmission
All users know that an HDMI cable transmits not only high-quality images, but also sound, but there is no corresponding setting in the display resolution settings. With audio transmission, everything is simple - at the hardware level, the sound is sent to an additional screen along with the video. That is, the user just needs to move the video player window onto the TV display with the mouse. The sound will be muted in the computer speakers, but the sound will be activated in the TV speakers.
It is worth noting that a mobile device or computer is capable of supporting several video devices connected via HDMI at the hardware level, transmitting different images to them and providing them with sound. True, there are exceptions, and they depend on the video adapter and sound card. Low-performance devices sometimes malfunction; they simply do not have enough power to process digital video signals and high-quality audio.
Alternative driver setup
Not only Windows tools can configure video transmission to the TV screen. Owners are given the opportunity to ensure high-quality transmission using a video adapter driver (Nvidia or Radeon). The setup algorithm is still the same: we connect the TV to the computer via HDMI and set the HDMI signal source from the remote control.
But then the proprietary software of the video card manufacturer is used. Going to the control panel of the Nvidia Geforce Experience or AMD Catalyst Control Center application, you need to find the “Display” tab. One of the sub-items of this menu is responsible for setting up multiple displays.
Feedback from users
Often, when connecting a TV to a computer or laptop, device owners encounter problems that they try to solve together in the media. Most of the negativity that is found in reviews is associated with low-quality HDMI cables that were purchased at foreign auctions or in stores at a low price. A greedy person pays twice - all users who decide to save on buying an HDMI cable need to know about this.

After adjusting display settings and saving, did the image on the main monitor disappear? This is the second problem that users often have to face. The reason is quite simple - the parameters of the main monitor have undergone changes. There is only one recommendation here - when connecting a TV to a computer, you need to control your actions. Number 1 in the system is always the main monitor - its settings cannot be changed. You can do whatever you want with the remaining numbers (2,3,4).
Finally
Yes, in order to create convenience for yourself, the user needs a little time and investment. You simply cannot do without this. There are instructions that spell out all the steps, they need to be followed clearly:
- buy an HDMI cable;
- configure the video adapter driver;
- enjoy watching.
The algorithm is simple, but there is a lot of work to be done. In fact, there is nothing complicated, the main thing is to follow the recommendations of experts and carry out strictly specified actions. Only after receiving an image from a computer or laptop on the TV screen and making sure that there is sound transmission, can you go into additional settings and make fine adjustments.
Hello everyone! The “seven” has many of its own “proprietary” problems, which ordinary users are not always able to deal with. But we will help you with this! So, the topic of today's lesson is setting up an HDMI cable.
We will look at how to connect the cable;
What settings in Windows need to be activated;
At the end of the article there is a detailed Video instruction.
After you have connected the HDMI cable to your laptop/computer and TV, right-click on the “Desktop” and select “Screen Resolution” from the drop-down menu. By the way: the moment you connect the cable, you will see a window in which the “Screen Settings” field and a circle, divided into two parts, with digital designations 1 and 2. Set the settings in the required fields, such as: “Screen ", "Permission", etc. Next, in the “Multiple Screens” field, set the “Duplicate these screens” function. Now click on the “Apply” and “Ok” button. This way you activate all the necessary settings for an adequate image.

Let's move on to the sound settings on the TV: these settings are made on the computer! Click on “Start” - “Control Panel”. In the system settings window that opens, select “Hardware and Sound”. Click on it and select the options “Sound” - “Manage sound devices”. By clicking on it, you get a separate “Sound” window. In this window you should see an icon for the TV connected to your computer, for example “Samsung”. A little lower in the same window you will see the “Speakers” option. We move the cursor over the TV icon (namely the TV, not the speaker) and right-click. A menu will appear in which we select the line “Use as default”. Attention: if everything was done correctly, a green “bird” should appear in the window near the TV. If you want to turn off the sound, you can turn it off in the “Speakers” window: right-click, select the “Set as default” line and click on it. This is such a strange pattern. However, this is how things work. Click “Apply” and “Ok”. By the way, it’s probably no longer a secret to you that you don’t have to buy a GPS navigator if you have an Android phone, all you need is
I answer all questions in detail.Friends! Everything you do on the computer, watch movies, cartoons, chat on Skype, play, view photos, slides or Internet pages in a browser, all this will be shown on the screen of your TV if the TV is connected to the computer via an HDMI cable. Nowadays, almost any TV has an HDMI input, and most produced video cards have an HDMI output.
The HDMI interface was invented in order to connect two high-tech digital devices (which are undoubtedly your computer and TV) and transfer information from device to device without loss of quality. Such transmitted information can be an image and multi-channel high-quality sound. If you have a movie or cartoon on your computer, in any HD, Blu-ray or AVI, MOV, MPG, MP4 format, then you can watch it all on your TV. There are slides or photos, please look. I’m not talking about games, because I’m not a supporter of them; they take up a lot of time from young people, which can be spent on studying. We connect the TV to the computer via HDMI with a second monitor To connect the computer to the TV we will use an HDMI cable, it looks like this and can be up to 20 meters long, choose the cable of the length you need.

For example, let’s take a Samsung TV, a not entirely new 4 series (LED type), purchased several years ago, but it already has two connectors for connecting HDMI devices.

The computer that we will use to connect to the TV was also purchased about three years ago, it has an Nvidia video card installed and also has an HDMI connector.

As I already said, our TV has two HDMI connectors. With the TV turned off, connect the HDMI cable to the HDMI 2 connector,

We connect the reverse end of the cable to the HDMI connector of the video card of the desktop computer. The computer, in turn, is already connected to the monitor (also Samsung SyncMaster 971P) with a DVI cable.

We turn on the computer and TV. There may not be an image on the TV right away, instead we see the following message: “Cable not connected” “Check cable connections and source parameter” or “Weak signal or no signal”

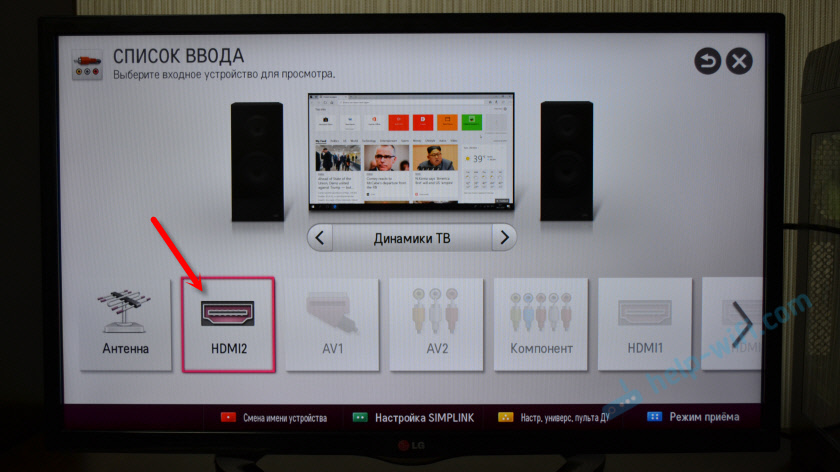
On Samsung TVs, to display a list of all available video sources, you need to press the Source button on the remote control.

A menu appears on the TV, in this menu, using the remote control, select the HDMI 2 connector,


Now, on our TV, an exact copy of our computer’s desktop should appear. But again there is nothing, the same error appears on a black screen. So we go to the “Screen Resolution” settings. Right-click on the desktop and select “Screen Resolution”.

As we can see in the window that appears, our main screen is set to the second (2) Samsung SyncMaster 971P monitor, and in the “Multiple Screens” parameter we have set “Display desktop only on 2 monitor”, which is why the image is only present on the computer monitor screen, but it's not on the TV

We bring everything in this window to this state. Select a parameter
Multiple screens: "Duplicate these screens"
In the “Screen” parameter, “Multiple monitors” is automatically set, click Apply and OK.

The desktop of our computer appears on the TV.

The resolution of our small Samsung TV is 1366 x 768. If your computer monitor supports this resolution, then it will automatically be set to the same resolution of 1366 x 768. If not, then either the TV or monitor will have the wrong resolution. For example, my Samsung SyncMaster 971P monitor has a maximum resolution of 1280x1024. When using a TV and a computer monitor at the same time, the main thing for me is to set the resolution on the TV correctly, otherwise why would I connect it then. I set the resolution to 1366 x 768 on my Samsung TV, the image is perfect.

And on a computer monitor such a resolution of 1366 x 768 looks like this.

And nothing can be done here. If you want the perfect image on your TV and computer monitor, then they must support the same screen resolution, that is, have the same characteristics. There is no sound on the TV after connecting the TV to the computer via HDMI Friends! Don't forget that the HDMI interface transmits video and sound over one cable, and we can specify in the operating system settings to use the TV's built-in speakers for sound output.
Let's fix the problem by using a TV instead of a monitor. Go to Start->Control Panel->

Hardware and Sound->Sound

If you don’t have anything in this field, right-click on an empty space and in the menu that appears, check the “Show disabled devices” items. "Show connected devices"
Now we look at the name of our TV, in my case it is Samsung, we need to turn it on and turn off the rest. Right-click on Realtek and select Disable.

We also turn off the speakers.
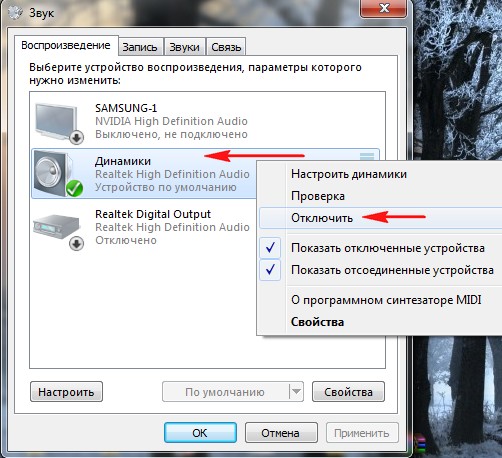
Samsung – Enable, Apply and OK.
I decided to prepare a separate article in which I will tell in detail and show with an example how to connect a TV to a regular desktop computer using an HDMI cable. The topic is relevant, and I am often asked about it. In fact, it’s nothing complicated. But there are some nuances that we will try to understand in this article.
Almost every TV, even not the newest one, has at least one HDMI input. And in the computer, on the back panel of the system unit there is an HDMI output. This means that we can easily connect a PC to a TV using a regular HDMI cable, which can probably be bought in every digital equipment store.
Why connect them? Everything is very simple. The TV can work as a monitor. That is, you can display images from a computer on a TV screen. The TV can be used as the main or second monitor. This means that the image from the PC will be displayed on the screen of a regular monitor and TV at the same time. Or only on TV. It depends on your tasks. It should be noted that HDMI outputs not only images, but also sound.
I myself, and other users, most often connect a PC to a TV to watch movies on the big screen, or to play games. You can also connect a gamepad to your computer and play on the big screen. Some people use TVs instead of monitors. They work with documents, surf the Internet, etc. But it seems to me that this is not very convenient. And your eyes get tired faster. For constant work at the computer, it is better to use a monitor. And connect the TV to watch movies, photos, games, etc.
The connection process will be the same for TVs from different manufacturers: LG, Samsung, Sony, Philips, Panasonic, Ergo, Hitachi, etc. Just as there will be no significant differences in the Windows settings. Yes, the settings in Windows 10, Windows 8, Windows 7 are slightly different, but not critical. I'll show you everything.
If you have a laptop, you can do everything according to this article:.
Preparation: check the HDMI ports on the TV and computer, select a cable
First we need to check if our devices have the necessary ports. We also need an HDMI cable to connect. Let's look at everything in more detail. If you have everything, then you can proceed directly to connection and configuration.
If you have ports on both devices and have a cable, then you can connect.
We connect the TV to the computer using an HDMI cable
You just need to take a cable, connect it to the HDMI output on your computer and the HDMI input on your TV.
Important! Devices must be connected when they are turned off and the power is off. There is a risk of burning the ports. There are such cases.
If you connect the TV as a monitor, that is, a single screen, then the diagram will look something like this:

Let's also consider another case when a TV and monitor are connected at the same time.
TV as a second monitor for a PC
The monitor can also be connected via HDMI (like mine in the photo below), via DVI, or even via VGA. As a result, two screens will be connected to the PC.

We sorted out the connection. Most likely, in your case there will already be a system unit with a monitor connected to it. And all you need to do is connect a TV to it.
Select HDMI input as signal source in TV settings
Most often, after connecting and turning on the devices, there is no image on the TV. A message like “No signal”, “No signal source selected” or something like that will appear. On the TV you need to select the signal source. The port where we connected the cable.
To do this, your TV remote must have a separate “SOURCES” or “INPUT” button.

After clicking on it, a menu should open in which you can select the signal source. You can see which port on your TV you connected the cable to (each port has its own number). Or simply select an active source. The process itself may vary depending on the TV. I have an old LG.
The image from the computer should appear on the TV. This will be either a copy of what is displayed on the monitor (if there is one), or a blank desktop (expand).
The main thing is that the picture from the computer appeared on the TV screen. Next, in the Windows settings we can change the image output mode. There are several of them there.
Setting up an HDMI-connected TV in Windows
The screen resolution is adjusted automatically in most cases. So in Windows settings we can only change the multi-display mode. This is only relevant when a monitor and TV are connected to the PC. If there is only one display, then these settings are not needed.
The easiest way to change mode in Windows 10, Windows 8 and Windows 7 is a keyboard shortcut Win+P.

After clicking on them, the "Project" menu will appear. In the top ten it looks like this:

In Windows 7 like this:

Let's look at each mode in more detail.

In most cases, these settings are quite sufficient.
Additional screen options
To open them, just right-click on an empty area of the desktop. In Windows 10 you need to select "Display Settings", and in Windows 7 - "Screen Resolution".

A settings window will open where you can see how many screens are connected to the computer.

You can also define them (by clicking on the "Define" button), change the resolution of each screen and operating mode (which I talked about above).
In Windows 7, the settings of a TV connected via HDMI look like this:

We figured out how to set up the image on the computer.
What to do if the sound from the computer does not go to the TV?
This happens very often. The picture appeared on the TV, but there was no sound. It is not there at all, or it sounds from a speaker system connected to the computer. If you want the sound to come through the TV, then first check that the sound on the TV is not muted or distorted.

Your TV should be in the list of devices. You need to right-click on it and set “Use as default”.
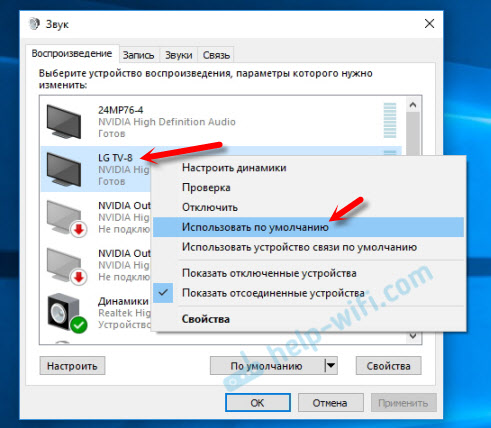
If the TV is not in the list, then right-click on the empty area and check the boxes next to two items: “Show disconnected devices” and “Show disconnected devices.”

If this does not help, and there is still no sound from the PC on the TV, then try reinstalling the video card driver. Just download it and start the installation. At this moment, let the HDMI cable be connected to the computer.
I showed how to check these settings in Windows 7 in the article. Be sure to watch it and read the comments. There is a lot of useful information there.
I have never encountered a problem with audio output via HDMI. No matter how many times I connected, everything worked immediately after connecting. But there is such a problem.
Connecting a 4k TV to a computer. Ultra HD over HDMI
If you have an Ultra HD TV (aka 4k) and a video card supports this resolution, then there is a chance to get a beautiful and clear image. I checked, everything works. I have a 4k TV from Philips. And the computer has a GeForce GTX 750Ti video card, which supports resolutions up to 4096x2160.
There are a lot of nuances there. I'm not a gamer, so I'll try to explain as best I can. The fact is that it is possible to output a 4k image via HDMI, and I succeeded. But most likely we will get a frame refresh rate of 30 Hz. Which is very little. To get 60 Hz, we need a video card with HDMI 2.0 and the same cable. This is why DVI cables are used to connect to 4k monitors. But I haven’t seen anything on DVI TVs.
I connected everything, started the computer, and saw that the image on the TV was somehow strange, the colors were wrong. Perhaps this is only in my case.

Everything is resolved very simply. First, I tried in the TV settings to disable UHD (Ultra HD) for the HDMI port to which the PC is connected. The image became normal, but the resolution turned out to be normal, 1920x1080. Therefore, this method is not very suitable for us.
To get a real 4k image with natural colors, you just need to change the screen resolution to the maximum 3840x2160 in the display properties in Windows 10.
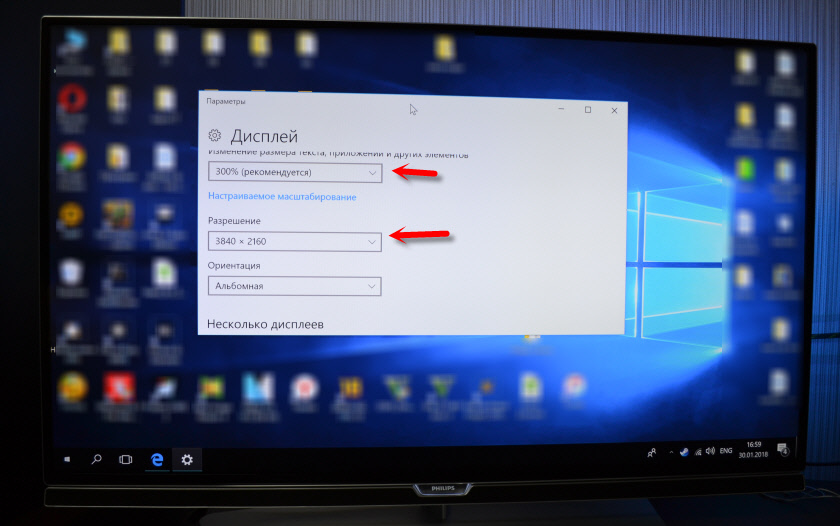
The image immediately became normal. The scale was also automatically set to 300%. Otherwise everything would be very small. It can be changed if necessary. I haven't tried playing at this resolution. But I think that this is not real. Moreover, the video card on my computer is not the newest and not the most powerful.
I look forward to your comments. Ask questions and don’t forget to share tips. Best wishes!
Question: There is no image when connecting the monitor to the motherboard (HDMI)
Motherboard asus z170-a. When connected to a video card, everything works. I couldn't find any drivers for Asus. What can be wrong?
Answer:
Message from user5353
Question: PCI express 2.0 with GTX 960 - when connected to the motherboard the monitor is in standby mode
I recently purchased an MSI GTX 960 video card. And when I connect it to the motherboard, the monitor is in standby mode. At first I thought it was because of the power supply because it was 460 watts, then I changed it to 550 watts. Still the same problem, I tried the old video card and everything worked. I decided to look at the system requirements of the video card and found that it requires PCI EXPRESS 3.0, and I have 2.0. I tried the gtx 960 at work and everything worked there. Tell me, could such a defect be caused by this?
Answer: update the bios on the motherboard
there have already been a lot of topics, it helped everyone
Question: Connecting power to the motherboard
There is a motherboard not msi b250m pro-vd
Power connection via 24pin and 8pin
But there is no 8 pin connector on the power supply. Is it possible to somehow connect power using the existing connectors?
Connectors are 6+2 and 4 pin
Ps: Processor intel core i5 7400
Power supply atx 600 pnr
Answer:
Message from little_2
Will it be enough?
Will. This processor is not so powerful in terms of power consumption and heat dissipation.
Question: HDMI connection: The monitor keeps turning off and then turning on again
please tell me: asrock h170 pro4 motherboard with built-in video card. The monitor can only be connected via avg+HDMI adapter, because... The motherboard only has an HDMI connection. There is no video card. The monitor keeps turning on and off. When connecting to a TV, it's the same.
The cable is working fine: I connected it to the laptop via HDMI - everything worked. Fine. (used 2 cables: AVG+HDMI, HDM+HDMI).
P.S. tell me how to fix it? M. payment 2 days. At the same time, I brought it from the service center - after a complete diagnosis. There was a manufacturing defect, they said the Bios was completely reset, the rest was said to be normal. Monique and the TV flicker every 1-2 seconds, and you can’t really see anything in the BIOS either. constant flickering.
Answer: magirus, if only they charged me for diagnostics - which should be free. Although they wrote what the reason was on the receipt. You'll have to go to them again.
All PPC, Windows is loading, it starts flickering every second and the inscription appears on Monica: Out of Rage! - and no longer loads.
Added after 2 hours 37 minutes
Correction, video is built into the processor. I didn’t take a video card, so I connected the Monica via MP.
Hi all. The following problem arose: when I start the system unit, the speaker starts beeping continuously for 10-15 seconds, then a reboot follows and in a circle. In this case, no signal is sent to the monitor. I tried to run it without RAM and listen to the speaker signal. The speaker signal is a different beep, but the system still reboots. And sometimes the beeping of the speaker may not even occur when I changed the RAM slots and it did. I tried resetting the BIOS, it didn't help. I started it without a processor, the motherboard does not reboot in this case. I tried to install another processor, the speaker still beeps and reboots.
Relatives brought the system unit and said that the computer went out while playing Skyrim. Just like that. I hope I explained everything clearly)
Motherboard: Gigabyte GA-EP43-UD3L
Answer: The keyboard is not connected to the system unit)
Added after 2 minutes
Tomorrow I'll try to get another power supply. There were other motherboards at home. I used them to check the performance of the power supply. I connected the power supply and tried to start it without RAM to find out the functionality of the board. Without RAM, the speaker began to squeak, after connecting the RAM, the squeaking stopped and that was it. Although I’m not sure about the functionality of these boards, since they are old, and they also refuse to show the image on the monitor(
Added after 21 hours 16 minutes
Guys, thank you all. I identified the problem) It was a RAM issue. When I removed the plate the signals simply changed.
Today I borrowed a working RAM from a friend and checked it. Everything worked)
Question: The difference between the integrated graphics core of the processor and the graphics card built into the motherboard
Hi all!
Please explain the difference between the integrated graphics core of the processor and the video card built into the motherboard.
I still have a few questions about this (all of the below assumes you don't have a discrete graphics card).
1. As I understand it, in order for the motherboard to have ports for video output, it must have a built-in video card. Or not necessarily?
2. Is it possible to display video on the monitor if there is only integrated. graph. core in the processor (no video card in the motherboard)?
3. Will performance increase in the presence of both an integrated graphics core in the processor and a video card built into the motherboard?
Thank you all so much in advance for your time.
Answer:
Message from thedriveee
Please explain the difference between the integrated graphics core of the processor and the video card built into the motherboard.
You re-read this question yourself, it contains the answer.
Message from thedriveee
I still have a few questions about this (all of the below assumes you don't have a discrete graphics card).
Yes, if you don't need one.
Message from thedriveee
1. As I understand it, in order for the motherboard to have ports for video output, it must have a built-in video card. Or not necessarily?
In order to display images from these ports, you need to have an integrated graphics core in the processor or on the motherboard.
Message from thedriveee
2. Is it possible to display video on the monitor if there is only integrated. graph. core in the processor (no video card in the motherboard)?
Possibly, if the motherboard supports image output from the processor core graph.
Message from thedriveee
3. Will performance increase in the presence of both an integrated graphics core in the processor and a video card built into the motherboard?
Modern Intel does not have integrated devices on the board, everything is in processors. I don’t know whether it’s possible to use the built-in percentage and the one on the board together on AMD. I think no. The integration on the board is very weak. You can only get a picture from them, nothing more.
Message from thedriveee
Thank you all so much in advance for your time.
Thanks for wasting our time
Question: 3 monitors at the same time - VGA + HDMI + laptop monitor
Hi all.
Very often, laptops have two connectors for image transmission, VGA and HDMI. The question is, is it possible to work simultaneously on a laptop monitor and two connected monitors?
I tried to connect two VGA monitors using this scheme, one via an HDMI adapter, but only two work at the same time. I tried it on two different laptops, on two different OS (Windows 7, Winodws 10).
Perhaps someone knows how to make three monitors work simultaneously?
Added after 23 minutes
Video card on one of the ATI Radeon HD7670M laptops