Step-by-step instruction. How to reinstall Windows on an Asus laptop? Step-by-step instructions Windows 7 cannot be installed on an asus laptop
Today I’ll tell you the epic story of how I installed Windows 7 on a laptop Asus X55A, which already had Windows 8 installed. The task looks trivial. What could be simpler, demolish 8 and put up 7. But it turned out to be more interesting and more difficult, this work took much more time than I expected.
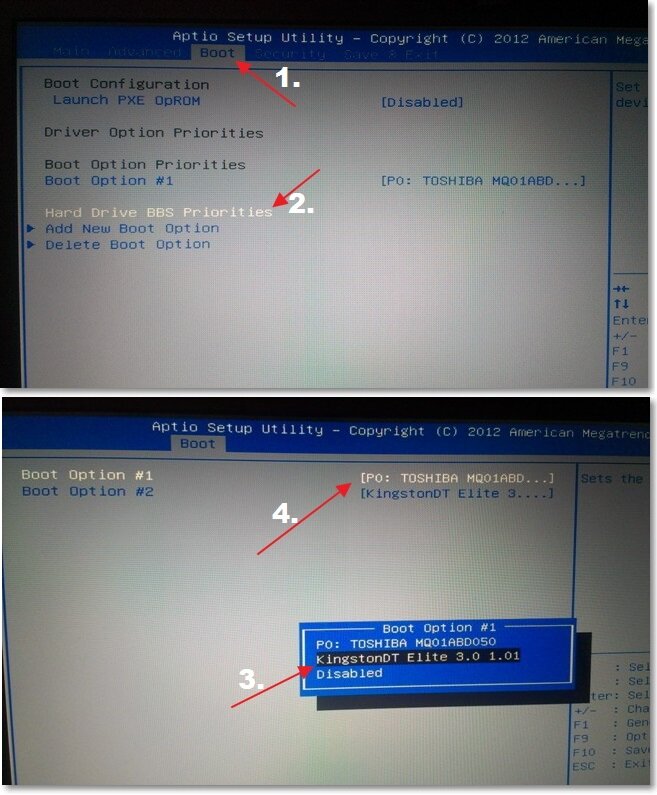
The first problem arose when I tried to boot from the DVD drive. There was simply no choice as to what to boot from. In principle, no problem, go to the BIOS and... There is also no choice of devices. This puzzled me a little. The hard drive is registered and you are prompted to add a device. Well, then what is the Internet for, not for sitting on social networks.


After carefully studying this issue, I am sharing the solution to this problem. In the BIOS settings, in the “boot/boot” tab, you need to enable “ Launch CSM". In the “security” tab, disable “ Secure Boot Control". Save changes and exit. Press "F2" to enter BIOS settings again. And here it is, a menu familiar to the eye, with a choice of devices to boot. Boot from the installation disk and install Windows 7.
Here the next ambush awaited me. At the first reboot, the laptop simply froze. The choice of 64/32 did not help either. Everything stopped at loading the drivers for the hard drive. I had to spend quite a lot of time again to understand what the problem was.
It turned out that it was tough the disk is formatted as GPT and accordingly, Windows 7 refused to install. You can find many tips on how to convert a disk to preserve the information you need. In my case, there was nothing valuable in the laptop, so I simply formatted the entire disk. This turned out to be not enough; I also had to clean the boot sectors using Acronis Disk Director from the remnants of Windows 8.
That's the whole story. For the most part, many of the problems we face are not unique. But they require time and effort to find a solution that suits a particular case. I hope my article will help someone)
Despite all the efforts of software developers at Microsoft to come up with something better than the simple and functional Windows 7, they have not yet succeeded. Yes, with a clear conscience we can say that those who have at least once managed to work on a laptop with this operating system are unlikely to want to return to their old Windows XP or even to the brand new Windows 8. But what to do if, as a reward, your laptop ASUS failed to get such an OS? What? Yes, install it on your PC and forget about the problem; installing OS Windows 7 on an ASUS laptop is not difficult!
Step No. 1: Prepare the PC for OS installation
Where does one begin to reinstall any operating system on a laptop? Right! With appropriate preparation for it. Note that in order to reinstall Windows, you should initially take care of performing two extremely important actions:
- prepare drivers for an ASUS laptop;
- copy valuable data from your hard drive.
In principle, each task is clear as daylight. In particular, in order to prepare drivers for an ASUS laptop, just download them from the official website (www.asus.com/ru/) of the manufacturer and write them to a disk or flash drive:

At the same time, no matter how wonderful the Windows 7 system is, it would be stupid to sacrifice your thesis / annual report / family archive and other valuable documents stored on the C drive in your laptop for the sake of it. In this case, when planning to reinstall the operating system, you should first copy the data from the hard drive to a flash drive or DVD. To do this, just use Windows Explorer and the notorious combination of Ctrl + C and Ctrl + V buttons on the keyboard.
However, if you don’t want to part with, for example, the licensed Windows 8 operating system, you can even install it on an SSD. You can read about this “difficult” process in detail.
Step No. 2: Burn a bootable USB flash drive
Note that you can install, as in principle reinstall, Windows 7 on an Asus laptop not only from a flash drive, but also from a disk. There will be virtually no difference in installation (reinstallation) from this. However, based on the fact that many modern ASUS laptop models do not have drives, even if you have a licensed disk with Windows 7, it will not be easy to use it directly. At the same time, a USB connector is available on absolutely all PCs. So, as you can see, the option with a flash drive will be universal.
What are we doing? First, download the original image of Windows 7 from the Internet or copy it from the installation disk to your computer. Then install the UltraISO program and run it in testing mode (“Trial period”). In it, through the menu “File” - “Open ...” we add a virtual image of Windows 7 for recording:

Now we insert the USB flash drive into the computer on which the Windows 7 image will be installed, open the “Boot” section in the UltraISO program and click the “Burn image...” item. Next, select USB-HDD as the recording method in the new window and click “Format”:

The next step is to give permission to the program to format the flash drive, and then select “Burn” in the new window:

Did you encounter any difficulties with this? Do you want more? Then we move on to the next step of installing our beloved Windows 7 on an Asus laptop.
Step No. 3: Perform BIOS settings
In order to install Windows 7 on an ASUS laptop without any problems, you will need to make a number of settings in the BIOS. First, of course, you need to enter it. How to do it? When the computer boots, press Del / F2 / Tab+F2 / Shift+F2 on the keyboard.
In the same tab, find the Launch CSM item and select the Enabled option instead of Disabled for this option. Next, go to the Security section adjacent to Boot and deactivate the Secure Boot Control option using the Disabled parameter. Press F10, save the settings (YES) and exit the BIOS. Now all that remains is to directly install (reinstall) the OS on the ASUS laptop.
Step No. 4: Install the operating system
So, after all the preparatory steps have been completed, all that remains is to install the prepared image of Windows 7 on the laptop. In principle, this process will begin the very minute the computer exits the BIOS. A window will appear on the screen, which will notify you that you need to press any key to load the flash drive. What are we doing? Click, of course, and immediately go to setting up Windows. First of all, select the language, click “Next”, and then “Install”:

After this, we read and agree to the license terms, and then select “Full installation” as an option for installing (reinstalling) Windows 7 on a laptop in a new window:

Now we decide on the disk on which we want to reinstall Windows 7, click on it with the mouse, click “Disk Setup”, and then “Format”:


Note that at this stage Windows 7 may ask you to install drivers. No problem? Of course not, we worried about them at the very beginning. Now we just download them ourselves, using the prompts on the screen:

Step #5: Select custom settings and complete the installation
In principle, in order to reinstall Windows 7 on an Asus laptop, there is only a little work left to do. What will you need? Just select the parameters we need to work on the laptop. You will have to act in this order:

In principle, with the last step the process of installing (reinstalling) Windows 7 on a laptop from ASUS will be completed. Just? What did you think? In principle, there is nothing complicated about reinstalling Windows on a computer! Enjoy your work with Windows 7!
Good day, blog visitors.
Any computer, regardless of its hardware and software used, sooner or later needs a clean installation of the operating system. This is due to various reasons - a new version has appeared, the old one has broken down, there was a desire to remove errors and others. Of course, reinstalling Windows on a laptop from Asus or any other manufacturer will help with all these issues. But today I’ll just talk about the process associated specifically with equipment from this computer giant.
If the installed operating system still allows you to work, you first need to complete three fundamentally important steps:
Prepare the necessary drivers (for video card, network). Having them, it will be possible to find the remaining elements in the future.
Scan your computer for viruses using Comodo Internet Security or AVG AntiVirus Free
Copy documents from the system disk.
If your device no longer allows you to perform the above points, try to find another one that can still be used to do this.
Important drivers for the Eee PC model or any other are located on the official website.

But copying documents from the system drive if the laptop is not working will not be so easy. If the device allows this, we move it to a safe place. If not, open the laptop, take out the hard drive and try to connect it to other equipment. We extract the necessary data.
Creating bootable portable memory( )
It’s worth saying right away that you can reinstall the OS in different ways. Previously, it was popular from a disk, since there was simply no USB memory. Immediately after their introduction, many motherboards did not support such devices. But over time, the ability to carry out the required procedure from a flash drive became available. And today this option often becomes the only one, since many models simply may not have a suitable drive.
We will consider the option without a disk, using only compact portable memory:
BIOS setup( )
Now we need to set the boot via BIOS and some other elements. To do this, we perform a number of actions:
Installation( )
Well, now let's move on to directly placing Windows 8 or any other OS version on the device:
Using the spare area( )
Also on some models, such as x54h, it is possible to use the recovery area. This is some space on the hard drive that makes it possible to restore the system without a removable disk.
Important! If, after purchasing a laptop, the operating system has already changed, most likely this will not be possible.
One of the most frequently entered queries in search engines is installing windows 7 on a laptop. This article will show you how to install Windows 7 on an Asus laptop, but after reading it you can install Windows on any other computer in the same way.
Despite the great popularity of Windows 10, many users still have a request for Windows 7. This is due to the fact that this operating system is stable and familiar to many people. The need to install Windows 7 on an Asus laptop may arise when you buy a new computer without a pre-installed system, or when an already installed system “slows down” and needs to be reinstalled. Many “computer experts” take money from inexperienced users for such a banal operation. After reading the article, you can download and install Windows 7 completely free of charge.
What you need to install Windows 7 on an Asus laptop
Before installation you will need:
- Windows 7 build (32 or 64 bit)
- flash drive with at least 4 GB
- Ultra ISO program
- the laptop itself
If you reinstall Windows 7, be sure to transfer important files to another drive.
First of all, you need to determine the bit depth of Windows 7. Here you need to know what bit depth your processor supports, 32-bit or 64-bit. If the processor is 32-bit, then there is no need to think about it - install the 32-bit version. If the processor is 64-bit, then in principle you can install both the 32-bit and 64-bit versions. But there are some nuances here:
- If the amount of RAM is 4 GB or more, install the 64-bit version
- Otherwise, if the computer has a small amount of RAM, then it is better to install 32-bit
- It is worth remembering that some programs and games only work on 64-bit OS
You can download the assembly with Windows 7 drivers for an asus laptop (on the page, select the 32-bit or 64-bit version).

After downloading the assembly, you need to take an empty flash drive with a capacity of at least 4 GB and insert it into the USB port of your computer. The next step is to burn the Windows 7 image to a USB flash drive using the Ultra ISO program. You can download the Ultra ISO program.
Install and launch the program. Select Open from the File menu. Find our downloaded image and open it.


In the new window, click the Record button. After the recording is completed, remove the flash drive and insert it into the Asus laptop.

Installing Windows 7 on an Asus laptop
Reboot the laptop and enter Bios using the F2 key.


Select the Hard Disk Drivers item and set USB as the first priority (instead of the hard drive).

Select the Boot Device Priority item and make sure that Hard Drive is the first priority.


Save the configuration and reboot.

A little theory so that you better understand what you just did.
Hard Disk Drivers is an option in the BIOS that allows you to specify the drive on which to search for the operating system. This can be a disk connected to a standard IDE/SATA controller of the chipset or a disk connected to an additional SCSI or RAID controller.
Boot Device Priority is a BIOS option. Includes parameters that determine the sequence of selection of devices from which the operating system can boot.
That is, in the first case, we are looking for which of the drives (in my case it is a hard drive and a USB drive) on which we should look for the operating system.
And in the second case, you already select a specific device from which the operating system will boot.
After the reboot, we get to the Windows installation menu, click Install.

We agree to the terms of the license agreement and click Next.

Next you need to partition the hard drive. In my case, the operating system was already installed with all the files on one partition. I want to make two sections: one for the operating system and important files, the second for everything else (music, movies, games, programs).
The first step is to format and delete the logical partition. Click Disk Settings.


We agree and click OK. Make sure you have transferred all important files!


We agree that we want to delete.

We carry out similar actions with the system partition. As a result, we should have a completely clean hard drive.

I want to allocate 32.9 GB for the operating system and files, and 200 GB for everything else. When installing Windows 7, the amount of memory is specified in megabytes. Remember that 1 GB = 1024 MB. Accordingly, I allocate 32.9 * 1024 = 33689 MB for the system. Click Create, then enter the required amount of memory and click Apply. When creating the first partition, you will be asked to create an additional system partition where the Windows bootloader will be located - I advise you to agree.


We have created the first logical partition for the system. I use the rest of the unallocated space for media content and programs.

We proceed by analogy.

Now it is important to select from all the created partitions the one on which you will install Windows 7. For me it is partition 2, I select it and click Next.

It is important after installing Windows 7 and rebooting the Asus laptop, go into the BIOS again (F2 key) and return to boot from the hard drive, not USB. To do this, go to the Boot tab, Hard Disk Drivers menu and select SATA as the first priority: 3M-ST9250320AS. After the colon is the name of my hard drive, you may have a different name, as well as two or more connected hard drives.
SATA – serial interface for data exchange with storage devices.

Save the changes and reboot.

After the reboot, you will need to perform the initial settings of Windows 7. First of all, we will indicate the user name and computer name.

We skip activation; at the end of the article I will provide a link to the Windows 7 activator.

Next, you will be asked how to install Windows 7 updates. I recommend choosing Defer decision and install updates manually. Automatic update installation interferes with the work on the laptop and has a bad effect on its performance. But this is my personal opinion, you have the right to choose any option.

The next step is setting the date and time. Choose your time zone where you are. For me this is UTC+05 Yekaterinburg.

The installation of Windows 7 on your Asus laptop is complete, enjoy your use.

We provide services for repairing and setting up computers, smartphones, tablets, wi-fi routers, modems, IP-TV, printers. High quality and inexpensive. Having a problem? Fill out the form below and we will call you back.
Making changes to BIOS and installationWindows
The reason for reinstalling Windows may be: frequent laptop freezes, deterioration of its performance and long loading times. Reinstalling the system is not at all difficult. You just need to carefully follow the instructions and not confuse anything.
Procedure
- First of all, you need to take care of the safety of the files that are most important to you. It is best to copy them to removable media or move them to a computer drive that will not be affected by the reinstallation (on which the OS is not installed).
- After that, download Windows from the official Microsoft website (or from other resources) and write it to a disk (flash drive), making the device bootable. A simple and free USB/DVD Download Tool will help you create a bootable device.
- We also recommend downloading the driver for your laptop’s network card onto a USB flash drive so that immediately after installing the OS, you can download the rest of the drivers from the Internet. Or download the so-called driver pack in advance, and you will be able to avoid problems with installing drivers.

- Now you will have to slightly adjust the BIOS settings. If you are not sure that you can do this, then the best service center for repairing ASUS equipment will always help you. To do this, restart the laptop and, before loading the operating system, press the F2 key. After which the BIOS will open. Go to the “Security” section, and in the “Secure boot” line select the “Disabled” value.

- Before exiting the BIOS, you need to check that opposite “Boot mode” in the “Advanced” - “System configuration” section is set to “UEFI boot”.

- Save the changes (“Save changes and Exit”) and restart the laptop. Immediately after this, insert the disk or USB flash drive with Windows.
- Follow the directions in the instructions. In the partitioning menu, we recommend completely formatting the hard drive on which the previous OS was installed.

- After that, install Windows on the formatted partition. Follow the instructions in Russian and no problems will arise.
If you encounter any difficulties during the installation process, watch the video tutorial at the top of this page.