Linux server to choose. Linux distributions for servers. The best Linux operating systems for servers.
The first acquaintance with any new system begins with its installation. Despite the fact that this topic is quite beaten and did not write about it just lazy, without a description of the installation process, our cycle for beginners will be incomplete. We will try not only to tell how to put the system, but also why we choose these or other settings and what they affect. We will also consider installing the server version of Ubuntu, since our cycle is intended for novice administrators, so that they can eliminate gaps in knowledge and consciously approach the perception of the rest of our materials.
This option improves performance, but has data integrity value in the event of an unsafe restart. To check the changes. To check the correctness of the work. Mount the remote directory forever! Add a line like this to the end of the file.
For installation on the client, this is the same as above. Using this protocol, file transfer is encrypted from end to end, which allows you to protect file transfer without being read or intercepted. You can encrypt the transmission, but this requires a heavy configuration.
Since the main system for our solutions is Ubuntu Server, we’ll install it. You can always get a fresh release from: http://www.ubuntu.com/download/server. We strongly recommend using only LTS versions, as the most stable and long-lasting support. Normal versions, as a rule, are a testing ground for running new technologies and may work unstable, not to mention that the support period of 9 months is absolutely unacceptable for operating server systems.
Change the listening port 22 to another one of your choice. . Add these lines to the end of the configuration file. They can be installed using the command. Repeat the same for other users. General parameters have already been defined. Add the following lines to the existing contents of the main file.
Configuring zone files
The nomenclature of permission files depends solely on the one that is configured. He should be able to easily recognize them. The main configuration parameters for zone files are. Once created, these files should be edited as follows.
The first thing you will see when booting from the installation media is the language selection menu:
 Not only the language in which the installer and the system will communicate with you depends on his choice, but also which locales will be generated. The set of locales affects not only how the characters of national alphabets will be displayed, but also the work of some programs and services that are critical to regional settings, for example, 1C Server.
Post-setup operations
After this configuration, you must perform two crucial operations. The server itself must also be configured as a proprietary client. . The server load command changes from one distribution to another. But the procedure to follow is different from one distribution to another. Now you need to test the server.
What ports should open?
You must indicate that this is specific to a well-distributed network. . Then share it by clicking on the following buttons. It is a proprietary audio conferencing software on the Internet. Then enter the super admin password. You must create a user.
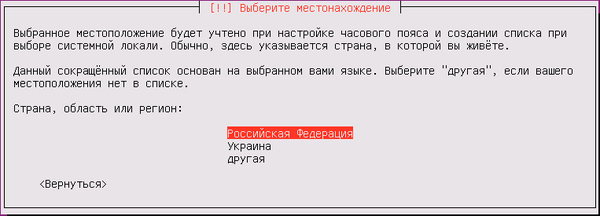
After that, the system, already in the language of your choice, will offer to switch to the installation and indicate the country it offers, based on the selected language.
 The automatic definition of the layout should be abandoned:
 And to choose the necessary layout from the list, in most cases it is enough to agree with the choice of the system:
Choose a password for your username. Enter information related to the server. Identify yourself with this user and place yourself in your folder. Download the required archive to install the server. Pay attention to the information you receive with the help of the command above!
Click "Connections" and then "Connect." When you log in, you are asked to specify a token. Go to the distribution server, which can accommodate the control panel, which takes into account the principle of free software and the process of releasing new versions of the system in accordance with the package system.
 Then you should specify the key combination to switch it. We strongly do not recommend, unless it is your personal system, to specify anything other than the default. Alt + Shift. Because it is extremely unpleasant, being in an unfamiliar system, guess what kind of combination was chosen by the administrator who installed it.
Peripherals suitable for installation
Following all the installation instructions, there should be nothing else but to connect and leave! Both are fully mature and stable, and there is no particular reason to choose one or the other, except for their specific needs and considerations according to the type of technology adopted by one or another architecture. This is a known issue that needs to be resolved in the next release. However, please read the release notes that are in the installation package.
In many of them, you can choose whether to install from an interactive command or “graphical interface”. Detailed instructions can be found in the release notes. Permanent business is not easy. It also automatically turns on when the computer is turned on. Before authentication of the operation with the server, it is better to check whether the server machine is available over the network through clients.
 The next step the system will try to get the network settings, since most networks have a DHCP server, then at this stage the system will configure the network and get access to the Internet.
 If for some reason the network settings cannot be automatically obtained, you can specify them manually or skip this step. We, solely for educational purposes, will choose the item Skip Network Setup For Now.
Make sure the server is running.
Knowing the addresses that should be different, you can use them directly. After you confirm that the server server is available to the client, you can proceed to the next step. As a service or application. It is recommended to use the service by default.
The following sections show how to manage work in each of these cases. This is the controller process. There will be an instance of this process for each open network connection to the server. These steps are described in the help here and here.
- If the symbol is green and gray, then it is controlled by the Keeper.
- If the symbol is yellow and black, it works alone.
 After that, you will need to specify the system name and user name. It should be remembered that in Ubuntu account root is disabled and the user created at this stage is authorized to upgrade his rights to the superuser using the command sudo. See our article for more details:. Also do not forget that Linux is a case-sensitive system, so the rule of good tone will be to use, including in user names, only the lower case.
In some operating systems, you even need to restart the computer. You can stop the server by right-clicking on the icon that appears on the panel and selecting the appropriate option from the menu. Shutting down via the panel icon completes the first process, waiting for connection requests, and other processes, if any, will continue to work normally until each client disconnects from the database.
Install the client only
Of course, once the listener is stopped, Others will be able to connect. This guide will show some useful utilities. To do something else, only one client installation is required. But first, you must be careful about the following. Your password should be known only to a few trusted administrators. Therefore, you do not need to use this superuser to create and populate regular databases. Instead, create permanent users of the database, providing these latest regular names and passwords to end users. Anyone who has access to a letter can damage or even completely destroy it. Users have no such need and should not be available, even for reading. They can access any object in the database only through requests to the server, and the server guarantees that such requests have the appropriate permission to access it, otherwise they reject it. In this mode of operation, users must have appropriate access rights to the database file. If this creates problems, it is best to reserve access to the security database only to the server process. Therefore, users have to connect through the network layer. Aliases also allow you to reorder the database, leaving unchanged client connection strings. Of course, including it, it must also be specified in the database connection string if you want to use this alias. The default value is All, that is, no restrictions. At this point, you need to restart the server. . As mentioned in previous lessons, the web server should be able to handle not only static pages, but also dynamic pages.
 The proposal to encrypt the home directory should also be refused.
Then specify the current time zone. This setting should be approached responsibly, since an incorrectly set time zone can lead to incorrect operation of a number of services or lead to the appearance of unreliable information in applications, for example, in the calendar or task scheduler, especially if data is used by users located in other time zones. At the same time, it is important to choose your own time zone, and not the corresponding one by the offset from GMT. This is necessary so that in case of a change in the time zones in your country, the system correctly applies the updates.
To do this, run the following command. To make sure the installation, we can run the command. And we write the following code. Access the page you just created in your browser by typing the following address. We can see that what is printed is outside the scope of the code that we wrote.
Let's look at some of the controlled parameters, focusing our attention on those that may be of interest to change. They will be installed based on the resources of your computer, but they are always well-indicated to avoid blocking on the server caused by script problems. Error handling and logging In this section, we find the parameters that handle errors and logs. Writing more information is better, but when it is completed And a website located on the Internet is vital to minimize error information, as this information can be used for computer attacks that greatly risk the security of our site and related information. . Resource constraints . The choice fell on poor Andrea, who saw a heavy burden on his head.
 In Russian realities, it may happen that the distribution kit was released earlier than the time zone changes were made, and there is no actual belt in the list, which is what we see in the figure above. In this case, you should choose the belt that was before the transfer of hours and after installing and updating the system to use the recommendations from our article:
In fact, he told him that he would do it, so whoever was the cause of his evil cry. All commands will be executed through the terminal, so you need to know at least the base. Okay, let's start by opening the terminal! You will be prompted to install additional software.
Check the success of the installation by opening a browser and entering the address bar. A page will appear with the message “It works!”. First, let's change the user running the server. We will also restrict access to the server from the local computer only for obvious security reasons, since this, as already mentioned, is the development server.
After setting the time, we proceed to the most crucial stage - setting up the disk. The system offers several options, among which is automatic marking. In most cases, we select this item. If we talk about a single disk, then we see no point in splitting it into sections, with the exception of desktop systems, where it is worth making a separate section / home.
Restrict access to the local computer only
Save and close the file, leaving the rest unchanged. Now change the root document of the server. And we open another configuration file. In this file we are looking for a string. Then we will try to replace. We install everything with the help of the command. As usual, we will confirm with the “Enter” installation the necessary additional packages.
Avoid starting servers automatically when you start your computer.
During installation, you will be prompted to install a web server on which the program will be installed. And insert the # character at the beginning of the lines. To begin. Cloud is one of the hottest problems in computer science in recent years. This concept is so extensive and has such diverse forms that it is often difficult to conclude it in a strict definition. Of course, there are many services built-in and based on the use of the Internet, which allows you to manage and organize content and information in a flexible, secure and user-friendly way.
In loaded systems, it makes sense to carry out data sections, for example, / var / www or / opt / zimbraon separate disk arrays. If you want to install the system on software RAID, then refer to the article:. In other cases, feel free to choose an automatic partitioning without LVM, in this case a swap partition will be created on the disk ( swap) The size in units of GB and the root partition for the rest of the space.
One consequence is that the reality of a small business is necessarily forced to play the role of a “client” and almost never a cloud. Obviously, there are huge hardware resources for creating a cloud system. In fact, this not only allows you to upload documents, but also create them through online editors and share them with users.
It also includes a number of plug-ins, with which you can manage your contacts, schedules and many other actions. Always given and under the control of the owner; Synchronization and sharing of all types of information; Access your data using any device and operating system. The ductility of the project is evident at the installation stage; In fact, there are three procedures.
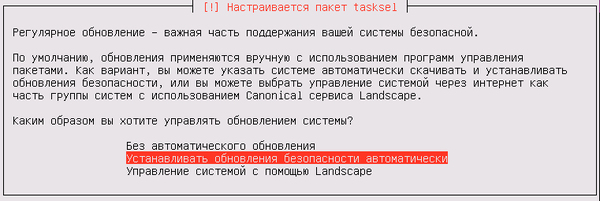
 Another important issue is installing updates. On the one hand, updates allow for timely shutting down vulnerabilities and keeping the system up to date, on the other hand, an uncontrolled update is quite capable of causing serious disruptions. What to do - you choose. We prefer to install updates on responsible systems, after they are tested on a dedicated system, but if you configure the router, you can enable updates.
 Having established the basis of the system, the installer will ask you to choose software sets for installation. You can select the necessary roles at this stage and get the system ready for configuration. Is it bad, especially for a novice administrator? Poorly! And this is why: with this approach, the system remains for the administrator a “black box”, there is no idea about the purpose of individual packages, their role and impact on the system as a whole. Therefore, we recommend to abandon the proposed options and install the required packages manually. This will help you to better understand the system and the interaction between its components. And when you begin to feel in a Linux environment like a fish in water, you decide whether you need to install software automatically.
Therefore, we choose nothing and (by pressing Tab) go to item Continue.

While the system is installed, you can quickly run away, pour yourself a cup of coffee, even on not very powerful systems, this operation does not take much time.
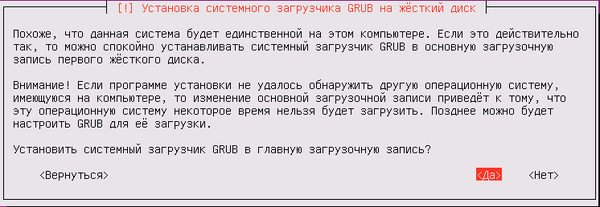
At the end of this process, the installer will ask you to install a bootloader, you should agree with this offer, unless you are planning a system with some kind of "tricky" boot system:
 After that, you will be asked to reboot the system, the installation will be completed on this, and a full-fledged server operating system will be at your disposal.
So, the first entry into the system, we would not write about it, if it were not for the reader's response, which showed that at this moment, many had difficulty. So, in Linux systems, the process of entering a password is not visually displayed in any way, you just need to type the desired combination of characters and press Enter, although outwardly the system behaves as if nothing is happening. This behavior is inherited from UNIX systems and pursues security objectives so that an attacker cannot find out the length of your password.

After you are logged in, the first thing you should do is configure your network. As you remember, we didn’t make any adjustments at the installation stage, so we don’t have the opportunity to install additional packages and we should get out of the situation with what is available. By default, the system has a text editor. nano, it is not as convenient as the built-in editor mc, but you need to be able to use it, just in case of such situations.
First of all, we will increase our rights to the superuser:
And open the editor configuration file with network settings:
Nano / etc / network / interfaces
And we will bring its contents to the following form:
Auto lo
iface lo inet loopback
auto eth0
iface eth0 inet static
address 192.168.44.62
netmask 255.255.255.0
gateway 192.168.44.2
dns-nameservers 192.168.44.2 8.8.8.8
First section auto lo sets the settings for the loopback interface and is already present in the file. The second section sets the external network interface settings. eth0 to work with a static address. The options are clear and do not require any clarification, addresses, of course, are taken solely for example. If your server has several network adapters, then you should register a section for each of them.
Suppose we want to get the settings of the second eth1 network adapter via DHCP, for this we add a section:
Auto eth1
allow-hotplug eth1
iface eth1 inet dhcp
Let's dwell on the options auto and auto-hotplug. The first one indicates to initiate the connection at boot, and the second triggers the hot reconnection tracking mechanism and initiates the receipt of an address when this event occurs.
Having finished editing the file, you should exit the editor by Ctrl + Xaffirmatively ( Y) responding to an offer to write a file.
 Then restart the computer:
If done correctly, the system will get access to the network and the Internet. You can check this with the ping command:
Ping ya.ru
Abort command execution should be a combination Ctrl + C, remember this combination, it will come in handy more than once.
You can view the network interface settings using the command
Ifconfig
 The same team can find out exactly which network cards the system sees and under what names, for this, use the parameter Hwaddrthat represents the MAC address of the network card.
Before proceeding with further configuration, the system should be updated; to do this, we will again raise the rights to the superuser and update the list of packages with the command:
Apt-get update
Then update the system with the command:
Apt-get upgrade
 We carefully study the output of the command, as we can see, for some reason, three packages are not updated, in this case they are kernel packages. Therefore, we will try to update them manually. To do this, run the command:
Apt-get install linux-generic
Which will install the new kernel and dependency packages to it. After upgrading the system is also recommended to reboot.
After the reboot, install the administration tools: package ssh for remote server access and file manager mc, which greatly simplifies the work with the system.
Apt-get install ssh mc
To run mc, use a simple command:
if you want to run it with superuser privileges.
Working with him is quite simple, those who worked in DOS with the managers of Norton Commander or Volkov Commander should not have any difficulties at all.
 Navigation is carried out by arrows, the transition between the panels key Taband key selection Insert. The main actions are shown below, the numbers next to them indicate the number of the function key responsible for this action, for example, F4 - Edit, F8 - Delete, F10 - Exit. You can always minimize, and then expand, mc keyboard shortcut Ctrl + O and access the console.
 In the window that opens, use the arrows to go to the option Built-in editor and select it with the key Space. To confirm the settings and exit, press Further.
 This will allow you to immediately use the built-in editor for editing configuration files more convenient than nano.
 In conclusion, we will check the possibility of remote connection, for this we will use the popular utility PuTTY (download). In the latest version, it is enough just to specify the IP address or domain name of the server:
 However, just in case, check in Window - Translation connection coding, it must be specified UTF-8.

At this point, the installation and server pre-configuration can be considered complete and put into the server cabinet, after which you can start setting up the necessary server roles using one of our instructions, or continue the experiments to further study the system.
This material focuses on the basics of the operating system. Linux server. From this material you will learn why you should use Linux as a server, and also get the necessary initial knowledge that will be useful to you to start working with servers based on this OS.
First, let's talk about why you should use Linux as a server operating system. Many people are so accustomed to Windows that they don’t even want to hear about Linux, I mean even custom Linux versions with beautiful and comfortable desktops. And to the question, why don't you want to use Linux? All respond: " yes he is kind of clumsy!», « " and so on. But in fact, to all users who are so categorical to Linux, I want to say that Linux is a very friendly operating system, and you just have to understand it a little and you will understand everything.
Now I want to list some linux advantages over Windows, and also dispel some myths:
- Linux is an absolutely free operating system ( with the exception of some paid distributions), unlike Windows;
- There are almost no viruses in Linux;
- Everyone who says that " Programs that I use in Windows are not installed on Linux", You think, why should they be installed !!! After all, this is a completely different OS, there are their own programs! You can also say about Windows that " programs that run on Linux are not installed on Windows", For Linux, there are many of their programs are not inferior to Windows-kim, and many software manufacturers release their products for both Windows and Linux.
- Linux is more productive, especially the server version of the operating system. I explain, server Linux operating systems without front-end, and most of the resources ( more than a half!!!) just takes the OS interface, i.e. visual shell ( today, widespread and versions of Windows without a graphical interface).
- Linux OS almost does not hang, ( i mean the operating system itself). For example, everyone encountered a situation where everything in Windows stops, you cannot help but move the mouse, even you cannot press ctrl + alt + del, and you have to reboot. Linux is arranged in such a way that such a situation is excluded, except in one case when you yourself cause such a situation.
- With regards to the Linux server OS, it is fairly simple to configure, unlike Windows analogs, in which there are a lot of different kinds of pribombas, which are not so easy to understand. The Linux system itself and all its services are configured by editing configuration files. These are ordinary text files, knowing their location and format, you can customize any distribution, even if you have no tools at hand, except a text editor.
I do not want to popularize the Linux OS and somehow belittle Windows, but in some cases there is no better option than using the Linux operating system. Until some time, I also thought that Linux was somehow not ours, but when I ran into this OS, I was just pleasantly surprised.
We now turn directly to the basics of Linux Server. For example, we will use the Linux Ubuntu Server 10.10 distribution.
Basic Linux Server Settings
Describe the installation process for Ubuntu Server 10.10. I will not, because it is not more complicated, and maybe even easier than installing Windows, the only thing I ask to do during the installation process is with " Choosing the software to install"Mark the installation" Openssh server". This is so that you can later connect to this computer remotely using an ssh client ( for example, PuTTY). And at the same time you will have full access to the operating system from any computer on your network, since the monitor is usually not tangled to the server and the server itself is located in a dedicated room for servers ( server room).
In the window " Setting user accounts and passwords»Enter your login and set it a password.
After installation, you boot for the first time, and the OS management console appears in front of your eyes. To begin, enter your login, press enter, and then the password in order to enter the OS itself. You will be logged in as a newly created user who does not have root privileges.
Configuring users in Linux
ROOT - standard Linux superuser, which has maximum rights. By the way, unlike Windows, in which administrator rights are not the highest ( there is still a system), but the root rights are the highest and if you work as root and perform any actions, no one will ask you " Do you really want to do this?"As in Windows for example, and at once we say, kill the system, without any questions there. But, anyway, we first need to activate this user, because in the future we will need superuser rights ( Tip: always work as a regular user until you need to switch to root mode), by default, root is disabled. Activating the root account is done as follows, just set the password for root.
Sudo passwd root
The system will ask you to enter the password of the user you are working under, and only then you will enter a new password for the future root and repeat it.
Once we started talking about users, then let's learn how to create them. It is done this way.
Sudo useradd -d / home / testuser -m testuser
- sudo is a utility that grants the user some administrative privileges;
- useradd is a utility that adds a user to the system;
- -d - option to set the home directory for the user;
- / home / testuser - home directory path;
- -m - option to create a home directory;
- testuser is the name of our new user.
Now we set the password for the new user.
Sudo passwd testuser
Network Setup in Linux
Now that we have dealt with users a little, we need to configure the network, it is quite possible that a DHCP server has already done this, but perhaps you want to set static ip addresses, gateway addresses and DNS ( that in principle for the server naturally).
To do this, edit the following file.
Sudo nano / etc / network / interfaces
- nano is the standard linux editor;
- interfaces - the file responsible for the network configuration.
Having opened this file, you will see something like the following, or rather, it will look like this in the end if you need static IP addressing on this computer.
This is where the network interfaces are available. For more information, see interfaces (5). # The loopback network interface auto loop if the loopback # The network interface auto eth0 iface the eth0 inet static address 192.168.1.2 netmask 255.255.255.0 gateway
Here eth0 - this is your network connection, there may be a lot of them depending on how many network cards you have, Static says that this is a static ip address, if it was dynamic, then DHCP was specified instead of static. Well, the rest, probably, everything is clear.
- Address - computer ip address;
- Netmask - subnet mask;
- Gateway is the default gateway.
Save the file by pressing ctrl + o and then exit the ctrl + x editor.
Now you need to assign a DNS server, this is done by editing the following file.
Sudo nano /etc/resolv.conf
Type or change the following.
Nameserver 192.168.1.100 nameserver 192.168.1.200
Where, 192.168.1.100 and 192.168.1.200 are the addresses of our DNS servers, if you have only one dns server, specify only one line.
When we have all configured, we need to restart our network interfaces, this is done as follows.
Sudo /etc/init.d/networking restart
Installing Software on Linux Server
In Linux, programs are installed quite differently than in Windows, so the knowledge that you had when working with Windows, you are not assistants here. In Linux, all software is stored in Repositories - it is a kind of storage for software packages special for Linux, which is located on the Internet, and is available in free online distribution, or on CDs. In order to update your repositories ( already installed Linux), You need to run the following command ( assuming you have internet connection).
Sudo apt-get update
Now that we have updated the standard repositories, we can install something, I suggest installing the file manager, one of the most common in Linux is Midnight commander (MC). There is a slight resemblance to FAR, which is used in Windows. Programs in Linux server are installed as follows.
Sudo apt-get install mc
Where, mc is our program that we want to install, i.e. Our file manager is Midnight Commander.
After installation, you can try this program, it is launched simply, enter the program name in the console, i.e. mc and hit enter.
I think this is enough for the basics, in the following articles (Basic commands of the Linux Ubuntu Server terminal) we will already talk more specifically about the settings of any services ( demons). In the meantime, that's all.