How to remotely delete data from an Android phone. How to reset data (hard reset, factory reset) on Samsung Galaxy How to delete all data on an Android phone
There's only one thing worse than losing your phone: a lost device with a lot of personal data on it. If the thought of someone else gaining access to your apps, email, or secret plans for world domination scares you, then we have a solution. Here's how to remotely delete data from Android phones.
Make sure you can delete your data while your phone is still with you
If you want to be able to remotely wipe your phone, there are two settings you need to enable before your phone goes missing. They should be enabled by default, but it's worth checking to be sure.
Go to Google Settings > Security > Android Device Manager. Find Remote Lock and Reset and make sure the feature is enabled.
The second switch that needs to be activated is also located on the Android Device Manager screen: find Remote device search, and make sure that the function is active. If these options are not enabled, Device Manager will not be able to locate the device.

Android Device Manager works on tablets too, but if you have multiple user accounts, only the person registered as the owner of the tablet can configure Android Device Manager settings.
Taking slightly different measures is also a good idea: don't store anything important on the MicroSD card (remote erase can't erase that either), make sure you have a strong code or complex locking pattern, and consider investing in an app, e.g. , AirDroid or Lookout. Both apps offer a remote wipe feature, but they can also transfer sensitive data before deleting it.
How to remotely wipe your phone
Oh no! Your phone is missing! It's time to take action, and by action we mean Android Device Manager. You can access Android Device Manager in two ways: through the Android Device Manager app on another Android device, or through the Android Device Manager website.
Once you are logged in, Android Device Manager will try to find the missing device. If it is possible to receive a signal, you will see the location on the map. You will also see three options: call, block or clear. If your device is disconnected or can't get a signal, Android Device Manager will report its location when it connects to Wi-Fi or a cellular network.
At this point, you can erase everything on your phone, but we highly recommend trying less drastic solutions before deleting everything. Try in this order:
Use Android Device Manager to Make Your Phone Ring
More often than not, people simply forget where they left their phone and lose it; they are stolen less often. To eliminate this option, use Android Device Manager to force your phone to ring at maximum volume for five minutes. This will allow you to find your phone if it falls on the floor of your car or is hidden in one of your children's slippers.
 Try this before you go all out - lost phones are often simply found in a different location
 Changing the lock screen
There is a second light option for you - changing the screen lock so that when the phone turns on next time, your message will be on it. "GIVE ME MY PHONE BACK" will probably be counterproductive, but a "Please call me" message with a modest reward may work.

Have you tried this? Did not help? OK. It's time to delete your data.
Delete your data
Using the Clear function will completely erase all data from your phone or tablet remotely. This is the same as a factory reset, meaning all your settings, music, photos and apps (except the SD card) will be deleted. As with blocking, if the missing phone is turned off, then when it is connected to the network, this option will remotely erase everything from it.

If you are afraid to use this option, then you should go to your Google account and deny access to your missing phone. We would also recommend changing passwords for online services. The chances of your lost phone falling into the hands of criminals and them gaining access to all your data are slim, but it won't take you long to use this feature.
What should I do if Android Device Manager can't connect?
If Android Device Manager can't connect, there are two more things you can try. Google Maps tracks your phone's movement history, or at least it does if you haven't turned it off in your Google Account, so you can find out where your lost phone was by visiting the Location History page and find out the time. It won't help you find out where your phone is now, but it will tell you where it has been.
Another option is to use an app like Android Lost, which works great on older Android devices. This is one of the few solutions that can be installed remotely, so it's a good option if you haven't enabled the above Android Device Manager features. The app and website look terrible but work well, although the device still needs to be online via a cellular or Wi-Fi connection.
Have you used Android Device Manager, AirDroid or Lookout to find or clean up your lost phone? Share with us in the comments.
Why do you need a data reset?
Resetting device data (factory reset, hard reset, factory reset) is deleting all data from a smartphone or tablet: contacts, messages, downloaded applications, photos, music, mail settings, alarm clocks. After the reset, the smartphone or tablet returns to its factory state.
Typically, data reset is done in the following cases:
- Before selling or transferring the device to another person;
- If some problem occurs on the device that cannot be fixed by other means;
- After updating the device software (firmware).
What to do before resetting your data
1. Copy important information from your device.
During the reset, the device memory will be cleared and all data will be deleted. If there is any important data, make a copy of it.
2. Remove your Google account from your device.
If you do not do this, then when you turn on the device after a reset, you will be asked for the account that was on the device before the reset. Without entering this account, you will not be able to turn on the device.
The first way to reset data is through the menu
The second way to reset data is using buttons
This method is used when a smartphone or tablet does not turn on or the screen is locked.

If your device doesn't turn on after resetting, you need a Google Account
If after resetting the device does not turn on (freezes)
Contact the Samsung service center; you will need to reinstall the firmware using the engineering method.
Have you decided to change your phone to a more modern one and sell your old one? Don't forget to reset your phone before selling it. We will talk about resetting a Samsung Galaxy phone, but this function is also available in other phones. You can, of course, simply delete all contacts, clear photos, delete history in browsers, delete applications, but firstly it will take a lot of time and secondly you may miss something and your personal data may go to the new owner of the phone, it’s good if there is nothing there important. This article will teach you how to reset your device to remove all personal and app data using Samsung Galaxy.
WHAT IS THE ARTICLE ABOUT?
Actions
1. Open the application menu
- This is a menu of all applications installed on your device.
2. Click "Settings"

3. Scroll down and tap "Backup" and "Reset"

- This option will open your phone's reset menu.
- If you don't see this option in the Settings menu, look for Main Controls. On some devices there will be a Reset option in this submenu.
4. Click "Factory Data Reset"

- This will open a new page.
5. Click "RESET DEVICE"

- This button will delete all your personal information and downloaded applications. You will need to confirm your action on the new page.
- Consider backing up your data before performing a factory reset. You will not be able to recover old data after a reset unless it was backed up.
6. Click "DELETE ALL"

- This button will confirm your action and reboot your device. Resetting your settings will destroy all your personal and app data.
- In older versions of Android, this button may appear as "Delete everything"
- Resetting your device may take some time. Your device will restart once the reset is complete.
Why do you need a data reset?
- Resetting device data (factory reset, hard reset, factory reset) - deleting all data from a smartphone or tablet: contacts, messages, downloaded applications, photos, music, mail settings, alarm clocks, etc.
- After the reset, the smartphone or tablet returns to the form it had when purchased (factory condition).
What to do before resetting your data
- Save important data. All unsaved data cannot be restored after a reset.
Questions and answers
What to do if after resetting the device does not turn on (freezes when turned on)
- Contact the Samsung service center; you will need to reinstall the firmware using the engineering method.
Warnings
- Remove your Google account from your device. If you do not do this, then when you turn on the device after a reset, you will be asked for the account that was on the device before the reset.
- This change appeared in Android starting from version 5.1 at the initiative of Google.
- If you have forgotten or do not know the password for your Google account, you can unlock your device at a Samsung service center. You must have documents confirming the purchase with you (receipt, completed warranty card, loan agreement).
- If there are no documents, you cannot unlock the device.
If you are wondering how to completely wipe your Android phone, most likely you have lost your mobile device and want to delete all your personal data so that it does not go to another person. Or you are going to sell your Android smartphone, and for the same purpose you want to delete personal files from the internal memory of your phone.
In any case, cleaning your Android phone is not particularly difficult. We will tell you about several ways you can do this.
How to completely wipe an Android phone remotely
If you have lost your Android smartphone and want to clear it of your personal photos, videos, files and other data, you can use a special service from Google. To do this you need:

Keep in mind that once you click the "Delete Data" button, you will not be able to undo the process and your personal files will be permanently deleted.
How to completely wipe your Android phone through the settings menu
This method is used in cases where you have a smartphone in your hands and you can go to the settings menu. The Android operating system offers a special function to completely clean your smartphone. Now we will tell you how you can use this feature. 
- Turn on your smartphone and open the main screen.
- Go to your smartphone settings.
- Next, go to the “Restore and Reset” section.
- Click on the "Reset settings" option.
- After that, click the “Reset phone settings” button.
After some time, the smartphone will be completely cleaned. Now you can safely sell your smartphone without worrying that the new owner will have access to your personal data.
We hope that our instructions on how to completely clean an Android phone helped you deal with the problem.
The average phone serves its owner for about 2-3 years, then it is usually given to relatives for use or put up for sale. And along with it, the secrets of the former owner fall into the wrong hands.
Don’t want your personal photos, documents, contacts, letters, website history, call logs and SMS to end up in the hands of strangers? Read how to completely clean your Android and iOS phone before selling it.
Deleting data from Android
Android smartphones store user information in three places: in their own memory, on removable media (SD cards and SIM cards) and in linked accounts. If the owner usually remembers about removable media, then the rest is very often left without due attention. Resetting to factory settings, which is most often limited to before sale, does not erase everything. Once you dig deeper, your confidential data is no longer just yours.
So, to properly prepare your phone for sale or transfer to a new user, do the following:
- Remove SIM and SD cards.
- Copy the necessary information from the device’s memory to another medium.
- Sign out of all applications and Internet services that you used on your device.
- Delete remaining contacts, SMS, mail, web browser history.
- Delete all accounts associated with your phone, not just your main Google account.
- If you have root rights, remove them.
- Clear your memory with complete data destruction tools.
- Restore your device to factory settings.
Logging out of accounts
The first and second points, as a rule, do not cause any difficulties for anyone, so let's start right away with the third and fourth.
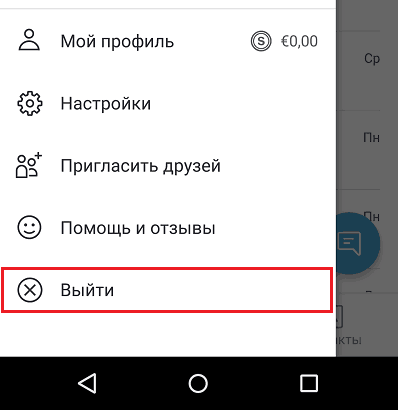
Take the time to launch every application and web resource on your phone where autologin is configured (automatic login) and press the exit button. Especially in applications that will remain on the device after a factory reset. This measure may seem unnecessary to you, but it is better to spend 10 minutes than to later rely on the decency of the new owner.
Cleaning contacts, SMS and browser history
Launch the application " Contacts", mark everything that is here (after removing the SIM cards, only what is stored on the phone will remain here) and tap the trash can icon.

Do the same with saved SMS and website browsing history in the browser, which will remain on the phone after recovery.

We delete email accounts and correspondence
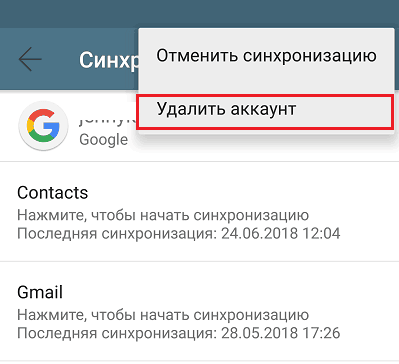
Launch the application " MailGmail", open the list of mailboxes registered in it and click " Account management».

Tap the first account line, go to the menu hidden behind the three dots and select " Delete" Do the same with the other accounts, leaving one linked to Google Play. You will need it to further clean your phone.
Deleting accounts is convenient because it works on almost any Android smartphone, regardless of modification and firmware version.
Remove Root rights
To remove root rights (if they do not come from the factory, which is found on some strongly Chinese gadgets), they usually use the same application with which they were obtained.
 Removing root rights in the Kingroot application.
 If you have difficulty finding the option “ Unroot"in your application, use the instructions for it or the universal utility Universal Unroot. The utility will help you check whether the deletion was successful Root Checker. But, unfortunately, the developers of both do not guarantee their successful operation on all devices.
After removing root privileges, reboot your phone.
Clearing the device memory
Before the final step - restoring the phone to its factory state, it is very advisable to erase all personal data from the storage so that it cannot be restored.
Below is an incomplete list of free applications from the Google Plat Market that successfully cope with this task:
We do a rollback to factory settings
Hurray, we're almost there! All that remains is to return the device to its condition as after purchase. To do this, go to its settings and open the “ Recovery and reset" Tap " Reset».

Once again, make sure that the page that opens next lists all your accounts remaining on the device. To complete the operation, click " Reset your phone».

If this reset method suddenly becomes unavailable, you can perform it from the Recovery menu. It opens by pressing a combination of buttons, individual for each brand of device, with the phone turned off (to clarify what exactly to press, it is best to look at the instructions for the device). The option is called wipe data/factory reset.
After restoring factory settings, the smartphone is ready for sale.
Deleting data from iOS
Releasing iPhone and iPad user data is easier and faster. Of course, their owners also need to remember to remove the SIM card and copy valuable data from the device’s memory to the cloud or other media, but the rest is literally 3 touches of the screen.
So, to reset an iPhone based on iOS 11-12 to the state it was after purchase, do the following:
- Open settings and go to the " Basic».
- Tap " Reset" at the bottom of the screen. Enter your Apple ID password if prompted.

- Select the option " Erase content and settings" If necessary, update your iCloud backup.

- If you don't need a copy, just click " Erase" and wait for the operation to complete.
That's all. Your iPhone is also ready to pass into the hands of a new owner.