Is it difficult to reinstall Windows 7. Reinstalling Windows for dummies: detailed instructions
Most laptop users are faced with situations where they need to reinstall the operating system, often while keeping the licensed Windows. This publication discusses several methods of how to reinstall Windows 7 on a laptop, and also talks about the nuances of the process of installing the OS on laptops from different manufacturers.
Restoring the system using a Windows 7 backup
Most mobile computer manufacturers create backup storage for 7 distributions or any other OS. Reinstalling Windows 7 on a laptop from these memory areas is done using built-in utilities.
To start the reinstallation, reboot your laptop and press:
- for Windows on an HP laptop on F11;
- on an ASUS laptop on F9, boot immediately when you start;
- for Windows 7 on a Lenovo laptop on F11;
- On an Acer laptop, the key combination Alt + F10 is suitable;
- for Windows 7 on a SAMSUNG laptop on F4.
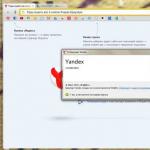
After pressing the desired key, instead of the standard Windows 7 boot, the OS recovery interface will open:
After downloading the program, follow the instructions to restore Windows.
But remember that all settings will be reset, and data from the previous copy of the system may be deleted.
Reinstalling from disk
When reinstalling from disk, remember that to restore the license you need to use a distribution kit with exactly the same OS as was installed previously. You can find out the version of the installed system on a sticker, which is usually located on the back of the laptop. By the way, the license key for your copy of Windows is also located there.

Remember that when you reinstall, a new operating system is deployed from the disk, and to avoid problems in the future, you should delete the data from the previous Windows.
This is accomplished by formatting the system partition, so take care in advance to transfer all the necessary data from the selected hard drive volume to install Windows. It is not advisable to transfer installed programs, since this will lose connection with the registry, and many of them may not start. Don't be lazy, install them again after replacing the OS.
The installation disk distribution does not include drivers for all laptops, so download the drivers for your device in advance from the manufacturer’s official resource. If this is not done, then after installation there is a high probability of the following problems occurring:
- The network card does not work;
- Wi-Fi does not work;
- Applications do not launch.
If you reinstalled the OS without this, then to troubleshoot network equipment you will have to download the driver distribution using another computer and transfer them using removable media, so before reinstalling, do not forget to play it safe and download drivers for the network card and Wi-Fi module.
To begin the installation process, insert the disc into the drive and restart your laptop. After your computer starts, open the boot menu and select boot from DVD.

This dialog is called up on most laptops using the F12 key, and on HP devices the combination F9 + Esc is used.
Often on older computers this function is missing, so you will need to open the BIOS and edit the boot priority yourself. To go to the BIOS on laptops, manufacturers use the following keys:
- Acer, Asus, Samsung, Lenovo - F2;
- hp - F10 + Esc .
If the brand of your device is not in this list, then find out the actual key for it on the window that loads when you turn on the PC.

The BIOS interface from different manufacturers is not similar in appearance, but the sequence of actions for changing the boot priority is almost identical. Navigation through the windows of a running BIOS of all versions is carried out using the arrows on the keyboard and the Enter, Esc, +, - keys.
Sequence of actions for BIOS AMI:

Sequence of action for BIOS Phoenix-Award:

Windows installation
After making a change to the BIOS and rebooting, a dialog will appear with the message: “Press any key to boot from CD or DVD.”

Further installation of Windows 7 is not difficult, do the following:
- Press any keyboard key.
- Wait until the file unpacker completes; a screen with the entry “Windows is loading files...” is displayed.

- In the dialogue " Windows installation» Specify the language and click on the Next button.

- In the window that appears, click on the large Install button.

- Select the version of the system to install that has a license code. You will need to enter it after reinstalling Windows 7.

- Agree to the licensing terms.

- Select installation method - " Full installation».

- Select the drive volume on which you are going to install the OS and prepare it by clicking on the item " Disk setup».
 There are situations when a reserved drive partition is present in the list; be sure to select another volume.
  If you have disks with a capacity of more than 250 GB, it is worth splitting them into several. Typically, a separate partition of up to 100 GB in size is allocated for system installation.
- Format the selected drive partition. A warning will appear that all information on it will be deleted. Confirm your consent, because you have previously saved all the necessary data. Wait for the installation to complete and click on Next.

- Wait for the installation process to complete; on average, it lasts from fifteen to twenty-five minutes, the duration depends on the configuration of the laptop.

- Fill in the fields provided with your username and PC name.

- Protect your account with a password, or you can skip this step.

- Enter the key copied from the sticker on your laptop.

- Select your security options.

- Set the date and time.

- If you have a network connection, specify the connection type.

Reinstalled Windows is ready to go. If you changed the boot priorities in the BIOS, return the hard drive to first place in the list, otherwise the computer will constantly try to start from the DVD.
Reinstallation from a flash drive
Many compact PCs, such as netbooks, do not have a DVD drive. Therefore, the question arises of how to properly reinstall Windows 7 on them. The answer is simple - use removable media.
To reinstall from a flash drive, you need to download the Windows 7 distribution image in ISO format and write it to this media using a special utility. Remember, in order to properly reinstall a licensed Windows system, you need to download a container with the same OS version. The flash drive itself must have a capacity of at least four gigabytes.
Burning Windows to media using the most popular utility among analogues Ultra ISO is performed according to the following algorithm:

The installation flash drive is ready, but to start the installation, you need to select " USB-HDD" How to set up the BIOS is described above, all steps are similar, you just need to select another entry from the available list. Further installation is no different from installing Windows 7 from DVD.
Often after reinstalling Windows does not work. To solve this problem, take another OS distribution and repeat the installation process. In addition, many users ignore the need to format the partition and reinstall the seven on a disk that already has an installed copy of the system. Avoid this as it can also cause problems.
Conclusion
This article covered reinstalling Windows 7 in several ways. If there is no backup copy, then this procedure should be carried out from a disk on which exactly the same version of the OS is recorded. Some laptops do not have a CD-ROM, so reinstallation can only be done using external media, for example, a flash drive.
Video on the topic
Installing an operating system is something that every confident PC user should be able to do. Many people overestimate this matter and in vain consider it very complicated and difficult to accomplish, because in reality it is not so. Installing Windows is more likely to take some time than it is so complicated
What is the difference between installation and reinstallation?
Installing an operating system differs from reinstalling it in that it involves installing it for the first time, i.e. On the computer where the operating system is being installed, this same operating system is not currently installed. Reinstallation involves installing the operating system on a computer where it is already installed - the installation is carried out as if on top of the old one, or with formatting of the local disk C.
How to install/reinstall Windows 7?
It is possible to start reinstalling this operating system both from the system itself and from the BIOS.
Installation from BIOS
1. Boot sequence in BIOS
First, check the boot sequence in the computer in the BIOS. To get into the BIOS settings, when you turn on the computer, continuously press the “del” key until your BIOS window appears, where the boot sequence of elements will be displayed in the “boot” tab. Make sure the DVD drive boots first, at least before the hard drive. This step is not so necessary, since, probably, the manufacturer will already have everything set up as it should be..
2. Start of installation.
Insert the operating system disc into the drive and restart the computer. After performing this action, during the loading phase, white text will appear on a black screen, starting something like this " Press any key to boot from CD or DVD..", do not miss this moment, since the text is displayed for just a few seconds. When it appears, click any key to start downloading. Then wait and do not touch or press anything; the installation files will be copied and the installer will start for some time.
3. Installation
In the window that appears, select your language and click " Further", then " Install". Then select " Full installation". The installer will ask you to select a local disk where you want to install the system. In the same window, you can also format the disk, which will mean completely deleting all data from the local disk. Suitable for those who do not have important data, or important data has been copied, and so or if your computer is infected with viruses. After selecting the drive, click " Further"The installation has begun.
4.Complete installation
After the automatic preboot, the first boot of the operating system will follow, during which you will need to specify a Username ( Think of anything: Elena, Ivan, Stick) and PC Name (Come up with something too), after which if you have an Activation key, enter it in the appropriate field, otherwise click on the “Skip” button. Set the time, date and other settings.
5. Installing drivers and software
Despite the fact that all the main drivers are installed automatically along with Windows 7 itself, you can update them by downloading the latest versions from the manufacturers' websites. Insert the disk that came with your laptop and install all the drivers that are provided on it (Bluetooth, Wi-Fi, Card-Reader). For a PC, you must have drivers on separate disks that should come with your equipment (Printers, Mice, etc.), also insert these disks and install the drivers.
Installing Windows 7 from the system
From Windows, the operating system is installed almost the same, only with a difference in the first steps.
1.2. Start the installation.
With the computer turned on, insert the disk with the operating system into the drive and start the installation. Select the version of Windows 7 to install, if there is more than one. After continuing and a short amount of time has elapsed (Copying installation files, a reboot will occur).
3,4,5. The remaining points are exactly the same as in “Installation from BIOS” (see above)
Based on these points, you can install WIndows XP.
Find out how to reinstall Windows, keeping all your important files and settings even after a complete system crash!
It's sad but true: Windows can stop working at any, even the most inopportune, moment... For example, this happened to me literally the day before yesterday. The computer just froze and I had to turn it off using the button. After turning it on again, the system no longer booted, stuck on the very first startup screen.
All my attempts to boot into safe mode or roll back the restore point were in vain. There is only one thing left - to state the complete collapse of the operating system, which has served me for more than three years.
Reinstalling Windows is not a problem at all. Moreover, I had it with my G8 for a long time. The main problem was that on the system drive C there were a lot of programs and project files that I needed for work. But how can I save them if the system won't boot?
When should I reinstall the system?
More than once I have had to deal with users and various computer “specialists” who, at the slightest system failure, immediately say that it needs to be reinstalled. If you do not have any valuable data on Drive C, then, in principle, you can reinstall, however, it is usually better and faster.
There are two most common cases where you can avoid reinstalling the system. Both of them are associated with errors in the hard drive.
The most obvious error is that the computer displays the message “NTLDR is missing” on a black background at the very beginning of startup:
The problem is a malfunction of the bootloader and/or a failure of the master boot record on the hard drive (MBR - short for "Main Boot Record"). To solve this, the easiest way is to start the PC from a boot disk based on Windows PE (for example, Alkid LiveCD), open the command line and run two commands in turn:
- bootrec.exe /FixMBR
- bootrec.exe /FixBoot

They should restore the boot sector of the hard drive and your system will be able to boot again. The only exception is the new Windows 10, since it uses a GPT table rather than an MBR.
The second option for a hard drive or file system failure is not so obvious. It may manifest itself:
- in the form of a “blue screen of death”;
- in the form of an “endless” Windows boot;
- in the form of a computer refusing to boot, indicating a damaged file on a black screen.
You can try to fix this error through the same Command Line of the boot disk with the command:
chkdsk C: (or other drive letter)/f /r (recovery keys)
It will take you very little time to execute the above commands, but the result of their execution can bring a “fallen” system back to life without reinstallation. However, if they did not help, then most likely you will still have to reinstall Windows...
How to boot from disk
In the previous section, we already talked about the fact that to restore and reinstall Windows, it would be very desirable for you to have a boot disk. You can read more about how to create such a disk in a separate article, but here I would like to talk about how to boot a computer using them and what can be done.
To boot from a boot disk or flash drive, we first need to set the computer's boot priority using the BIOS or a special boot menu. You can access these components by holding down one of the following keys when starting the computer (depending on the model and type of motherboard):
- Delete or Del;
- Escape or Esc;
If the BIOS opens in front of you (usually a blue screen with white text), then you will need to go to the “Boot” section (on some motherboards “Advanced settings”) and in the “Boot device priority” list set the item “1st boot device” (or “First boot device”) is not a hard drive, as it may be by default, but a CD-ROM or your own flash drive (on some motherboards, in order for the system to recognize it, you need to connect it to the computer before booting):

After setting the boot path, press the F10 button and confirm saving the new settings. The computer will restart and start booting from the device you specified.
If instead of the BIOS the boot menu opens, then it’s even easier. Select the boot resource using the cursor arrows and confirm your choice by pressing Enter:

And now, regarding the capabilities of different types of boot disks:
| Boot disk type | Possibilities |
|---|---|
| Standard Windows installation disc |
|
| Windows PE LiveCD |
|
| Linux LiveCD |
|
| Specialized LiveCDs | performing any highly specialized tasks (data recovery, disk partitioning, anti-virus scanning, etc.) |
As you can see, the widest range of possibilities is provided by boot disks based on Windows PE ("Preinstallation Environment" - from the English "preinstallation environment") and it is this type of disk that I recommend to have for everyone who wants to get a universal tool for data backup and repair systems. Among the best I would name the following assemblies:
- Alkid LiveCD;
- Bart P.E.;
- Windows PE Se7enLIVE.
The first two assemblies work on Windows XP, and the second on Seven, but they can be used on any PC, since they themselves do not make any changes to the hard drive and are launched from RAM. Choose any of these LiveCDs and go...
What data should I save?
So, we have in our arsenal a non-working Windows and, for example, Alkid LiveCD. We have already tried all the commands to quickly restore the system's functionality, but our Windows still did not work... What should we do?
If there is no physical damage to the PC (the hard drive is not broken, the RAM is not burnt out, etc.), then it’s definitely time to reinstall Windows. However, before this, it is advisable to save as much as possible of the data we need that remains on the system drive (usually Drive C:).
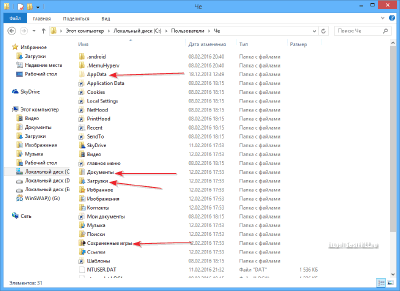
Open the disk with your Windows folder and examine its contents. If you have Windows XP or an earlier version, the contents of the system disk will look something like this:

The two key folders here are Program Files, which is where all of your programs are installed, and Documents and Settings, which is where all of your documents are stored. These two folders can weigh tens and hundreds of gigabytes, so there is no point in completely copying them. You should act selectively.
For example, from the Program Files folder it is advisable to save only the configuration files of the programs we need, which may have the extensions .INI, .XML or .DAT. It makes sense to do this only for those programs that you have configured personally and that you constantly use, and not for everyone! For example, for various notepads (like Notepad++), music player (like AIMP) or file managers.
If you do not find the necessary configuration files in the Program Files folder, they will most likely be stored in the Documents and Settings folder. Open it and look for either a folder with the name of your account or with the name “Admin”:

There will be several folders inside that may contain the necessary files:
- Desktop (actually stores all files and folders on the desktop).
- Documents, My Documents or Documents (the contents of the "My Documents" folder on the desktop).
- Application Data (stores settings and temporary files of most programs; hidden by default).
- Local Settings (another hidden folder with settings).
In Windows, starting with Vista, the root directory of Drive C looks a little different:

If you have a 64-bit system, then here you will find two Program Files folders at once (64-bit programs will be stored in the folder without additional symbols, and 32-bit ones will be stored in the folder with the subscript “(x86)”), the “ProgramData” folder , which stores some additional modules of some programs, as well as the “Users” or “Users” folder - an analogue of the Documents and Settings folder.
In the Program Files and ProgramData folders, I think you won’t get confused, but in the Users folder, you will need to find a directory with the name of your account, which will contain a number of subfolders:
Firstly, here, as in Windows XP, the Desktop and Documents are stored. Secondly, Libraries folders, for example, “Downloads”, “Music”, “Videos”, “Saved Games”, etc. Thirdly, an analogue of the Local Settings and Application Data folder called AppData with three subfolders: Local, LocalLow and Roaming, which also store settings for a number of programs.
Hello, my dear readers!
If you've ever installed a new operating system, chances are you've simply updated it. For example, from “seven” to “eight” and so on. Yesterday I tried to install the OS from scratch, and I had to do it through the BIOS settings. The matter requires care, but everyone should know these aspects. Today I will tell you how to reinstall Windows via BIOS, in different ways and from different media.
What is BIOS and what does it have to do with it?
To explain it in simple words, BIOS is a set of small programs that control the operation of your computer hardware. It is available on any PC, whether desktop or laptop. Without knowing the purpose of this or that section in it, I strongly do not recommend changing anything in it yourself. In the worst case scenario, you can simply burn the iron in your car.
For example, turn off the fan on the video card and that's it. The service will no longer help you here. But you still have to interact with the BIOS. Especially with the section that is responsible for the boot order from an optical drive, hard drive, flash drive or other device. This is necessary when installing the OS from scratch.
How to enter BIOS
Everything is very simple. This is done without a disk or flash drive. First, you need to restart your laptop. Or your desktop PC. As soon as the motherboard loading screen appears, you will see a picture like this.

Pay attention to the line that I indicated with an arrow. The default key is there DEL, and if it is pressed when such a screen appears, then you will immediately be taken to the BIOS. However, there may be other keys, for example: DELETE,F10, F11, F12, F1, F2, F3, Esc. Moreover, on some motherboards, these settings can be called up not with one key, but with a combination of them. Here are the most common ones: Ctrl+Alt+Esc, Ctrl+Alt+Ins, Ctrl+Alt+S, Ctrl+Alt+Del, Ctrl+Alt, Fn+F1, Ctrl+Ins, Ctrl+Alt+Enter. You should see a window like this.

If this doesn't happen, it means you did something wrong. Try again.
Preparing for installation

Before installing the OS, you first need to download and burn it. Which version of Windows you prefer is up to you. I will only give links to distribution kits at:
- Windows 7.
- Windows 8.
- Windows 10.
To download images you will need program for downloading torrents. Just install it and download the distribution online. If this download method is not convenient for you, I suggest Alternative option. This page has software that will help you download Windows and burn it to disk, just scroll to the bottom of the page and click here.

If you still decide to use torrents, then you will need another software to burn ISO. UltraISO. It will help you create a bootable disc or flash drive. Install it and open it.
Important: After downloading the distribution, be sure to check it for viruses, for example using Comodo Internet Security.
Let's imagine that you decide to install the operating system from a disk (don't forget to prepare it in advance). Open UltraISO and select the image of the downloaded system.

You can also do this through the menu " File».

Everything that is on the OS image should be displayed in the program window.

Next, insert a clean blank into your optical drive. Make sure that there is not a single scratch on it, otherwise it simply will not be readable. Then in the menu " tools"Click on this line.

You will see a window with a choice of drive, burning speed and the OS file itself.

Then simply press the button Write down" and wait for completion. That's it, you've just created a boot disk yourself.
Don't want to install the operating system from the DVD? I'll tell you how to do this using a USB flash drive!
Immediately insert it into the USB port and scan for viruses using AVG AntiVirus Free. Next, do the same with the UltraISO program until you select the “ tools" Now you select the “” partition and there click burn hard disk image.


In the sign that appears, select “ Yes"and wait for the end. But now you can start recording. Once the process is complete, you can remove the flash drive and proceed to installation.
Setting up BIOS for booting from media
Now let's set up the system. We go into the BIOS. You have already read above how to do this. The fact is, my dear readers, that the BIOS itself can be of two types. Award and AMI. And in each of them the setting will be different. I have written instructions for you so that you do not get confused.
Award BIOS – config for booting from disk
As soon as the blue settings screen appears, click the second line where it says - Advanced BIOS Features.

Then in the second line (First Boot Device) click Enter and select your optical drive.
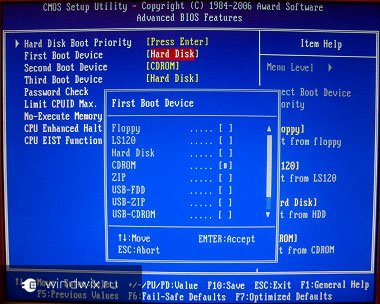
In the second line (Second Boot Device) do the same, but select the hard drive (Hard Disk).

AMI BIOS – setting for booting from disk
Here the principle is the same, but the course of action is slightly different and the interface is nicer.


In the first line we set our drive, and in the second line the hard drive. That's it, press F10.
If you decide to install Windows from a flash drive, then the algorithms are the same, but instead of the drive you select the USB-HDD line.
Everything else is the same. Reboot your PC. But don't forget to insert bootable media.
Installation process
Here is the final stage. Now that your bootable media has booted, you will see the operating system installer dialog box with a choice of language. Next you will have a window like this with a choice of installation type. Choose the full installation.

Then select the hard drive partition, format it and click “next”.

The system will do the rest itself, all you have to do is enter your username, select a region, configure the Internet and download the Dr Web Cureit antivirus. And that’s it, now you can install the operating system yourself via BIOS. Congratulations!
Conclusion
Setting up BIOS to boot from disk:
Setting up BIOS to boot from a flash drive:
Windows installation:
I want to warn you right away that it is impossible to do a complete installation of the system without a disk and flash drive! The carrier is needed in any case, so take care of this in advance.
With this I will say goodbye to you. Subscribe to my blog updates to stay up to date with the latest useful articles. Share information with your friends on social networks, because this information will be useful to absolutely everyone who has a computer! All the best to you and see you again!
Sometimes users may have a question related to how to reinstall Windows on a laptop.
The fact is that today there are quite a lot of brands of computers - HP, Asus, Lenovo, Acer and others - and there is an opinion that the reinstallation procedure will differ depending on the company.
And indeed, some points may be different. But basically the procedure is the same for everyone.
We will look at it step by step and will offer the simplest options for performing each of them. You can do everything your own way or suggest an alternative in the comments. We will be only too glad!
Step 1. Create a bootable USB flash drive
Previously, Windows installations occurred exclusively from DVDs. When Windows 7 was released, this trend continued a little, but with the release of Windows 8, and then Windows 10, this idea was completely abandoned.
Now Windows is installed exclusively from a flash drive, without a disk. An installation image of the operating system is recorded on such a small medium, from which it is then installed.
To create a bootable USB flash drive, you need to have this same image in ISO format. Therefore, download it on the Internet or borrow it from one of your friends. To burn it to a flash drive, the most convenient way is to use the UltraISO program. You can get it on the official website (here is the link).
Actually, you can choose any other tool for burning images in ISO format. But if your choice nevertheless fell on UltraISO, The recording procedure will look like this:
- Launch the UltraISO program, click on the “File” section in the upper left corner of the program window. In the drop-down menu, click "Open...". Next, specify the location of the previously downloaded system image file.

- The image will be loaded into the program and ready for further use. Click on the Self Upload section at the top. In the drop-down menu, select “Burn Hard Disk Image...”.

- In the next window, next to the inscription “Disk Drive”, indicate the letter of the flash drive on which you are going to write the image. Click the "Record" button.
Clue: To find out the letter, go to “Computer”. There you will see the flash drive and its designation.

- Wait about 5-10 minutes for the program to do its job.
That's all, the bootable USB flash drive is ready. Now you need to make sure that the computer boots from it at startup.
Step 2. BIOS/UEFI setup
First, let's talk about BIOS. To get started, you need to go to this system menu altogether. To do this, click on one of the following buttons:
- F1-F12 (any of them);
- Enter.
Actually, after this the BIOS loading will begin. And then you need to find the item responsible for the system boot queue.
In most versions, you need to go to the “Boot” tab and find “Boot Device Priority” there. And then you can put “USB Flash Drive” in the first boot location.

A similar principle is used in the H2O BIOS. There you need to go to the “Boot” tab and set the “External Device Boot” parameter to “Enabled”. It literally means "Boot from an external device".

In the AWARD BIOS, you must first go to the “Advanced BIOS Features” menu and set “USB-HDD” in the “First Boot Device” line.


In general, from the interface you can definitely find out your BIOS version and set it to boot from a flash drive.
As for UEFI, everything is much simpler here. For owners of laptops with this system menu you need to take a few simple steps, namely:
- Use search to find the “Update and Recovery” menu. In the menu on the left, go to “Recovery”.
- In the window that opens, click on the “Restart now” button.

- Please wait while options for further actions are loaded. Select the “Use device” option.
- And in the next menu, just click on the name of your storage medium from which the installation will take place.

As you can see, everything is quite simple. Of course, this option is only relevant in cases where you already have Windows 8 or 10.
If this is not the case, leave the storage media in the slot and restart the laptop again. After this, you can proceed directly to installing the operating system.
Step 3. Install OS from bootable media
Of course, depending on the version of the operating system you are installing, the steps described below may differ slightly, but basically, the steps will always be the same.
To install a new OS, you need to do the following:
- After booting the computer from the flash drive, the welcome screen will appear. In most cases, you will need to click on the “Install”, “Continue”, “Next” or something like that. In any case, click on this button.

- In the next window you need to select “Custom...”. The point is that we will need to change several parameters in the future. Although, if you do not want to do this and want the disk configuration (their number and size), components and other data to remain as is, select the “Update...” option.

- If you chose a custom installation, you will then need to change the disk configuration on your computer. It is not uncommon for a manufacturer to create 4-5 discs “just in case.” In practice, they are completely unnecessary, so it is better to delete them all and create just two - one for system data and the other for user data. On the first one we will, in fact, install our OS, and on the second we will throw photos, install games, and so on. To do this, click on each disk and click on “Delete” at the bottom.

- Then click on “Create” at the bottom. In the window that appears, specify the letter, volume and other parameters of the disk. As we said above, make one smaller, about 100 GB in volume, and the other larger - the entire remaining capacity of your hard drive. Click Next.

- In the next window, select the disk on which the OS will be installed. Click Next. In our case, this is the same small disk with a capacity of just under 100 GB.

- Then follow the installer's instructions. Usually, after this, the system itself is installed sequentially, then its components, software and updates.
This completes the reinstallation process. Below you can see the same thing clearly.