Set up tl wr841n modem. Connecting and setting up the TP-Link TL-WR841N router
Hello dear visitors to the blog site, today we will talk about how to configure a TP Link router of such popular models as wr740n, wr741nd, wr841n, wr842nd, wr941nd, wa850re, w8151n and others, let's start with....
In fact, every apartment and most private houses in the city have high-speed Internet with unlimited traffic. Having many electronic devices equipped with WiFi modules, people are increasingly paying attention to routers. It is thanks to them that you can distribute all incoming and outgoing traffic between elements of your home network, so that your tablet, computer, and every smartphone can use the Internet connection without any obstacles.
But purchasing a wireless router (such devices usually mean routers with an integrated Wi-Fi module and several ports WAN to connect the device to a computer and configure it) is not always an easy way to provide all home gadgets with the Internet. After all, without the correct connection and configuration of the router, there will be no Internet in the house at all.
This article was written to help novice users solve a problem with its configuration that arose after unpacking the router, so as not to wait for a visit from a specialist and not to have to worry about finding the necessary information on numerous sites. It describes in great detail what needs to be done to properly provide all participants in the home network with the Internet without compromising speed and at the same time encrypt all traffic. Each step of the instructions is described in detail, indicating possible problems that may arise during the setup process.
First of all, the router is connected to a computer, through which the device will be configured. After unpacking the router, you need to connect it to your laptop/computer using the included or other available crimped twisted pair network cable. To do this, we use LAN ports, of which there are usually four on the device. We connect the network cable to the WAN interface. Then connect the power plug and plug into the outlet.
After a successful connection, the operating system should automatically install the device drivers. After this, you can begin setting up the device.
How to access the settings menu?
The routers are not equipped with any additional software for ease of configuration. Everything is done in a web browser window after visiting the router configuration interface. You can enter it by following the path: “ 192.168.0.1 " Sometimes, instead of a zero, the address also contains a one. In any case, this data is printed on a label stuck to the bottom of the case and is contained in the instruction manual.

The consequence of going to this address will be a dialog box with an authorization form. The values for the “Username” and “Password” fields must be “ admin».

Depending on the browser, this window may differ in appearance and functionality (there may be a function for saving login data).
Replacing login information in the settings interface
After logging into the settings web interface, it is recommended to change your login password to a more secure one in order to increase security. Although this is not necessary. But after replacing this information, it must be remembered or written down and stored, so that the next time you visit the configuration menu you do not have to reset all settings to factory settings and set them again. This is just a waste of time.

WAN Setup - Dynamic IP
To distribute (distribute) the Internet between network devices, you need to configure data reception and transmission on the router itself. Some parameters may vary depending on the service provider and router, but in general the procedure is standard for all devices, and especially if you use dynamic IP address, which happens in most cases.

If your provider still does not provide the ability to automatically detect DNS servers, you will have to enter their addresses manually. This data must be in the contract concluded with the provider. You can also clarify them by calling the technical support number or hotline.
- In this case, check the “Use these DNS servers” checkbox and enter their addresses or only the address of the primary server.
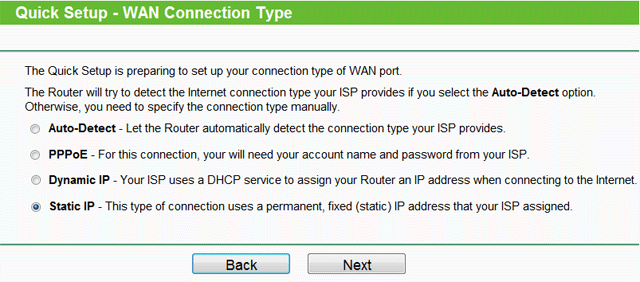
WAN Setup – Static IP
If you have an unchangeable IP (you usually have to pay to rent it), setting up a router for an inexperienced user becomes somewhat more complicated, because a lot of data will have to be entered manually.
In the “WAN connection type” field, select the “Static IP” value. Afterwards, we fill in all the fields manually, entering the data received from the provider’s representatives.

When using connection technology " PPPoE“In addition, you will have to enter the password and login for your account received from the Internet provider, and also put checkboxes in the “Secondary connection” field to indicate the type of IP address.

The remaining options are not much different from the first two and involve manually entering addresses.

Do I need to clone the MAC address?
Many providers tie the first MAC address, from which you connected to the network, to your account. Using other devices to access the network under this account is impossible or possible, but after a certain period of time (10-15 minutes or an hour). If in this case you connect the Tp Link router to the cable entering the apartment, it will be denied access to the Internet, at least for a certain time, if not completely. To get out of this situation, developers suggest replacing the personal MAC address of the router with the address of your computer/laptop.
This point should be clarified with the provider by phone or by studying the terms of the contract.
If substitution of the router MAC is still required, go to the “MAC Address Cloning” subsection in the “Network” section.

Then click on the “Clone PC MAC address” icon. As a result, the hardware address of the router will be replaced with the one that it has, but at the software level.

Setting up a Wi-Fi router
This section, for some reason, is the most interesting for beginners. Probably because it is precisely because of the distribution of the Internet via radio channel that routers are purchased.

Determining your Internet provider's network settings
Before you connect your router, you need to know what network settings are needed to connect to the Internet.
The most common types of network settings are:
- Dynamic IP— dynamic settings, issued automatically via DHCP
- Static IP— static settings, entered manually
- PPPoE— Internet access is provided via the PPPoE protocol after entering the username and password
It is assumed that you have Windows 7 installed, the provider cable is connected to the computer and Internet access is configured.
Go to "Change adapter settings".

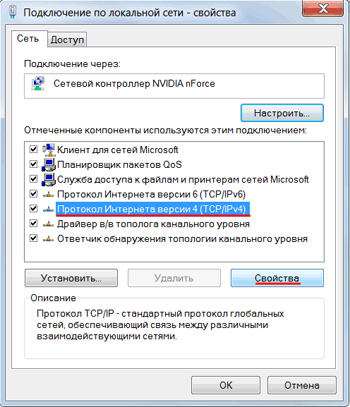
Right-click on "Local Area Connection" and select "Properties"

Click on “Internet Protocol Version 4 (TCP/IPv4)” and the “Properties” button.
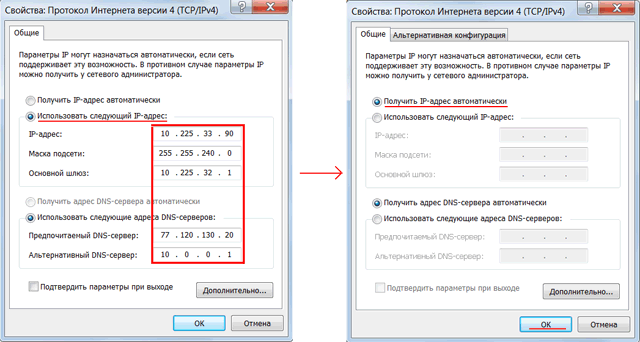
- If you have selected “Use the following IP address” and there are numbers, then write down all settings- these are the static settings of the provider ( Static IP). After that, select “Obtain an IP address automatically” and click the “OK” button.
- If you select the “Obtain an IP address automatically” option, then you receive network settings automatically - these are the dynamic settings of the provider via DHCP ( Dynamic IP).
There are providers that block access to the Internet by MAC address (you can look it up in the contract). In this case, you need to configure the router so that it has the same MAC address that is registered with the provider.
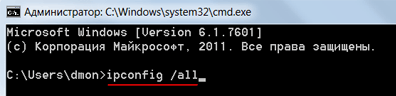
To find out the MAC address of the network card, click “Start”, in the “Search programs and files” window write the command cmd and press Enter.

We write the command in the console ipconfig /all and press Enter.
We are looking for “Ethernet adapter Connection via local network...”
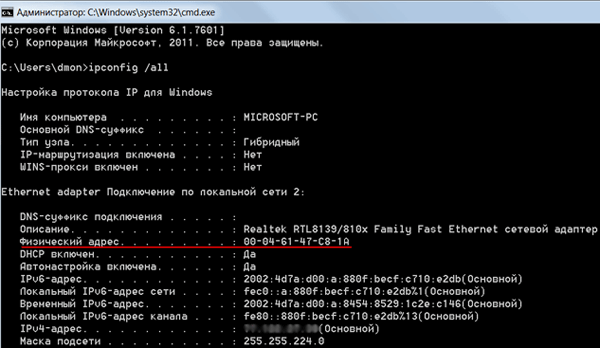
In field " Physical adress"Your MAC address of the network card is indicated. Let's rewrite it.
Connecting and setting up a TP-Link router
To set up a Tp-Link Wi-Fi router we will need:
- provider cable (Triolan, MaxNet, Vega, Volya, Airbites, or others without vpn);
- computer or laptop;
- TP-Link router, which will distribute the Internet via Wi-Fi to a laptop, TV with Wi-Fi, tablet or smartphone.
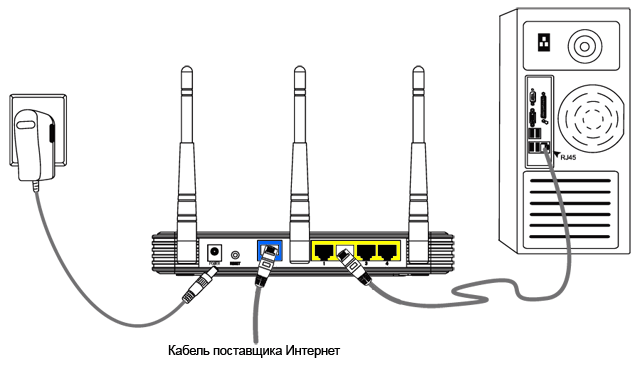
Let's connect the equipment as follows:
- Plug the power supply into the router’s “Power” connector;
- connect the Internet provider cable to the blue WAN port of the router;
- connect the computer to the router using a network cable to any yellow LAN port;
- We will connect other devices (laptop, tablet, TV with Wi-Fi, smartphone) via Wi-Fi wireless connection.
Let's move on to setting up the router.
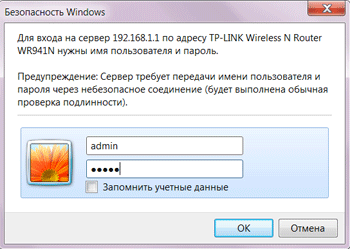
Open Internet Explorer and enter the address 192.168.1.1
Attention! The proxy server should not be specified in the browser settings
In the window that appears, enter your username admin and password admin.
On the left side of the menu, select Quick Setup Wizard Quick Setup and press the button Next.

Dynamic IP— automatic network settings of the provider via DHCP
If you receive automatic network settings, then select Dynamic IP and press the button Next.

In field SSID
In chapter Wireless Security specify the encryption type WPA-PSK/WPA2-PSK
In field PSK Password:
Finish.

Network - MAC Clone.
In field WAN MAC Address enter the MAC address.
You can also click Clone MAC Address, if in the field Your PC's MAC Address

Static IP— static network settings of the provider
If network settings need to be entered manually, then select Static IP, press the button Next.
Enter the settings:
- IP Address(IP address)
- Subnet Mask(Subnet mask)
- Default Gateway(Main gate)
- Primary DNS(Preferred DNS Server)
- Secondary DNS(Alternate DNS server)
- and press Next

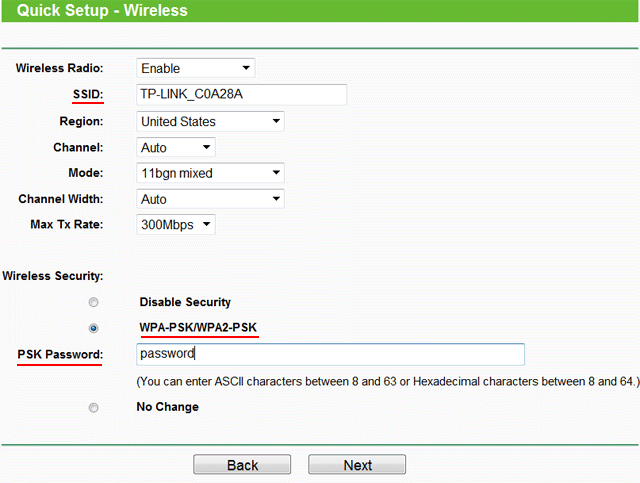
In field SSID Enter the name of the access point to connect via Wi-Fi.
In chapter Wireless Security select the encryption type WPA-PSK/WPA2-PSK
In field PSK Password: enter the password to access the Wi-Fi access point. The password must be at least 8 characters.
The next window indicates that you have successfully completed the setup. Press the button Reboot and wait for the router to reboot.

If your provider blocks access by MAC address, select from the menu on the left Network - MAC Clone.
In field WAN MAC Address enter the MAC address.
You can also click Clone MAC Address, if in the field Your PC's MAC Address the required MAC address is located.
PPPoE— Internet access using user and password
If Internet access is provided via the PPPoE protocol after entering the username and password, then select PPPoE.

Enter the settings:
- User Name:(Username)
- Password:(Password)
- Confirm Password:(Confirm password)
- and press Next

In field SSID Enter the name of the access point to connect via Wi-Fi.
In chapter Wireless Security select the encryption type WPA-PSK/WPA2-PSK
In field PSK Password: enter the password to access the Wi-Fi access point. The password must be at least 8 characters.
The next window indicates that you have successfully completed the setup.
Press the button Reboot and wait for the router to reboot.
TP-Link router security settings
To prevent anyone other than the administrator from entering the router settings, you need to change the password to enter the settings.
To do this, select from the menu on the left System Tools - Password and enter the settings:
- Old User Name: old username, enter admin
- Old Password: old password, enter admin
- New User Name: enter a new username, you can leave admin
- New Password: enter a new password
- Confirm New Password: confirm the new password

After this, press the button Save to save the password.
Connecting a laptop to the Internet
We will connect the laptop to the Internet via Wi-Fi.
To do this, select the wireless network management icon in the lower right corner of the monitor. After updating the list of wireless networks, our network should appear in it. Select it and click the “Connect” button.

In the next step, enter the password to connect to the Tp-Link router via Wi-Fi.

Enter the password you specified in the field PSK Password: in the router settings. After this, the Internet will appear on the laptop.
You can connect devices that support Wi-Fi, such as a TV, netbook, tablet, smartphone, to the Tp-Link Wi-Fi router. To do this, you need to select a Tp-Link access point in your device and enter a password.
Recovering the password to enter the settings of the TP-Link router
If you have forgotten the password to enter the settings of your Tp-Link router, you can restore the factory settings and password.
To do this, press the Reset button on the back of the router for 8-10 seconds.
For example, a router is installed in a house or apartment, but in the back room a laptop, phone or tablet has a weak signal level. At the same time, it is so weak that connection is sometimes impossible.
You can, of course, connect a more powerful Wi-Fi adapter to your laptop, but what to do with your phone and tablet? In this case, an access point that supports the operating mode will help us - repeater or repeater. Access point TL-WR740N will connect via Wi-Fi to your router and transmit the wireless signal further than a phone, tablet or other client device can. With the help of a TP-Link repeater you can boost Wi-Fi signal for your devices.
Setting up an access point in Wi-Fi repeater mode
Router TP-Link connects to a computer or laptop using a twisted pair cable. Power is connected to the access point using a power supply. The network card settings should be set to default.
After setting up the access point, the cable from the computer to the access point can be disconnected.
Open the browser Internet Explorer, Mozilla, Opera, Chrome or any other, and enter the address 192.168.0.1 . This is the default, you can also see it on the bottom of the router.
In the next window, enter your username admin, password admin.
Open the menu: Wireless mode - Setting up wireless mode - Turn on.
After - a group of text fields will appear below. Click the “Search” button

In the window that appears, click “Connection” opposite the Wifi network to which we will connect.

Select the encryption type: open, or . In the last column we enter wifi network password, which we want to connect to. We also install channel number, the same as the Wi-Fi network with which we want to create a WDS connection.

After this, save the settings by clicking the Save button. If the wifi network channel differs from the required one, you will receive the following note:
Your access point's channel does not match the bridged access point's channel, do you want to change your channel to the bridged access point's channel?
We confirm, and the channel should automatically change to the correct one.
Now all that remains is to configure wifi network security settings. Go to the menu: Wireless mode - Wireless protection. We select the encryption type and password that is used on the router to which our TP-Link repeater is connected. In our case, encryption was used.
Please note that if you use on your router, then in the fields Type, WEP Key Format, WEP Key, Key Type Settings similar to the router to which the access point will be connected must be specified. Otherwise, the TP-Link repeater will not connect to the router. Don't forget to indicate correct region where your router is located. If the source router has a different number in the channel column, then the repeater cannot connect to the router due to incorrectly specified security parameters.
After configuring the security settings, save the settings with the Save button and reboot.
Checking WDS mode activation
You can find out that the TP-Link repeater was able to connect to the router in the menu State.

Open the menu and look at the connection parameters. In field Name ()— the name of the wifi network should appear in the field MAC address- Mac of the router distributing the network, as well as channel number and other parameters.
Connecting equipment to a Wi-Fi network with WDS
You can connect to WDS Wi-Fi network smartphone with Wi-Fi, tablet or laptop. To connect a laptop to a Wi-Fi network, in the lower right corner of the screen we find the Wi-Fi connection management icon. Select our Wi-Fi network from the list and click the “Connect” button.
Enter the password to connect to the Wi-Fi network, which was set in the router settings. After this, the laptop will connect to the Wi-Fi network.
Checking the connection of devices to the Wi-Fi repeater
After connecting any wireless device (laptop, phone, tablet) to the Wi-Fi network, check that the device is connected to the repeater and not to the router. To do this, on the access point, open the menu Wireless mode - Wireless mode statistics and see the devices connected to the TP-Link repeater.
If the MAC address of your device is not in the list, and the Internet works on it, then the device has connected to the router, since at this point the router’s signal is better than the repeater’s signal. Place the access point far from the router and connect next to it. If the device still cannot connect to the access point, check that the access point is connected to the router and that its encryption type and password are set correctly in the security settings.
Basic setup of a TP Link router of any model is not particularly difficult, mainly because it uses the same type of interface. We will look at how to set up an Internet connection and a wireless network using the following device model as an example: TL-WR743ND. Moreover, the revision that you can buy now is “V2”. Let’s get started.
Router TL-WR743ND
From the appearance of the device, you can understand: only one antenna is installed, which means that the wireless network speed is limited to 150 Mbit per second. But this is theoretical (the practical limit is 3.5-4 times lower). Actually, the router is one of the younger models in the line of universal TP-Link devices. Nevertheless, the products of this brand are valued, and most importantly for their reliability. It even claims support for IGMP Proxy (for IPTV applications, that is, multicast broadcasts), however, it was not possible to find any settings for this option.
However, in general, we can conclude that the TP-Link router of the model in question will be a good choice for users who need reliability. And the availability of prices only confirms the correctness of the choice. By the way, many “TP-Link” are classified as companies from the USA, while Wikipedia tells us about a different origin of this company.
Nevertheless, we will answer the question of how to set up a TP Link router for IPTV (we are talking specifically about the “TL-WR743ND”). If you plan to view it through a computer, then you won’t have to configure anything (either it will work right away or it won’t). If it does work, then in the wireless network settings you can additionally increase the “DTIM interval”, but you won’t be able to find other “specific” settings here.
Sequence of actions before setup
Router hardware connection
The values of all router parameters can be set via the web interface. To open the latter, you must have a connection to your computer. And before setting up the TP Link router, the “LAN” port in it is connected to the computer’s network card:

Cable diagram
The sequence of actions is as follows:
- The connector of the provider cord is connected to the “Internet” port; The LAN port must be connected to the PC via a patch cord; Next, connect the power supply without pressing “On/Off”
- On the computer - check that the network card is configured correctly

Setting up a wired connection
- At the last stage - turn on the power to the router, send the computer to reboot
It is important to know: if the router was purchased after setup, you must perform a “hard reset”. After turning on the power, you need to wait a minute, then press the reset button and hold for 5 seconds (until the indicator installed next to the “power” light “blinks quickly”). The device's power can then be turned off.
Let's move on to the graphical interface
Configuring the TP Link router and any parameter in it begins with going to the web interface. You need to launch any browser on your computer and open the address: 192.168.0.1.
For those who do not like to remember numbers, TP-Link has prudently flashed the domain address into the routers: tplinklogin.net. Open it, and set the word “admin” as the login and password.

After clicking “OK”, the user sees a prompt to automatically configure the router

Interface start screen
Here, without hesitation, you need to click “Exit”. And then, without fail, on the “Operation Mode” tab – set the “AP Router” mode, click “Save”.

Operating mode: “router”
Basic router functions
Connection setup (under DHCP)
First, before setting up, you need to find out whether your Internet service provider checks the value of the subscriber's MAC address. If yes, when connecting the router, do one of the following:
- Warns the provider about a change in equipment (and, accordingly, MAC address)
- Even the youngest model, the TP Link TL WR743ND router, allows you to easily “replace” the value of your MAC
To perform any of the options, go to the “Network” -> “MAC Clone” tab:

MAC spoofing
The top line contains the real MAC value. To replace it (more precisely, copy it from the computer’s network card), click the “Clone MAC Address” button, and then “Save”.
After a few seconds, you can go to the “WAN” tab and configure the connection (by setting the “Dynamic IP” value in the top list):

Setting up a DHCP connection
Actually, you don’t have to configure anything other than the connection type. All that remains is to click “Save” and wait for the connection to connect.
The “WAN” block of the “Status” tab after connecting to the provider - contains IP addresses and the value of the network mask:

Device status tab
Happy setup!
Connection setup (under PPPoE)
Setting up a TP Link router for the Rostelecom provider allows two options. Or the device is connected to a modem configured in “router” mode (and the connection is configured “under DHCP”). Or, the modem is configured as a “bridge”, and the router is configured “for PPPoE”.
To configure the “PPPoE” connection, go to the “Network” -> “WAN” tab and set the parameter values

Setting up a PPPoE connection
Connection type – must be “Russian PPPoE”. If the subscriber is not assigned a static IP address, set the switch to “Dynamic IP” and enter the subscriber’s data (login and password).
Enabling the wireless network
Wireless network in the router - configured on the “Wireless” -> “Wireless Settings” tab. But before setting it up, go to the “QSS” tab, disable the option with the “Disable” button, and click “Save”. The Wi-Fi setup tab looks like this:

Wi-Fi network settings tab
Here you need:
- Select network name (SSID)
- Next, you definitely need to switch the region value (to Russia)
- The number and width of the radio channel – leave it in “Auto”
- Mode – set the value to “mixed”. But this setting of the TP Link WiFi router allows the use of the “11n only” value (set it if all subscriber Wi-Fi devices support the “802.11N” protocol)
- If you want to work “on a hidden name”, then you need to uncheck the “Enable SSID...”
Finally, click “Save”. Note that the wireless network will become active after the device is rebooted (use the reset button or the “System Tools” -> “Reboot” tab). Happy routing!
Wi-Fi traffic encryption
If you need to log into a Wi-Fi network using a password, and wireless traffic needs to be encrypted, you need to go to the “Wireless Security” tab


WPA/WPA2 PSK setup block
You need to configure the TP Link WiFi router to either “WPA” or “WPA2” (the value is set in the top list). The second is for Windows XP SP3 or higher.
Setting up a connection “via L2TP”
Recently, Wi-Fi has become an integral part of the user’s life and is gaining momentum at an ever faster pace, since it is a very convenient thing. Wi-Fi made it possible to use one Internet connection for several devices such as a laptop, tablet or smartphone, and also eliminated unnecessary wires in the apartment.
This article will talk about how to set up Wi-Fi at home. Namely, we will analyze how to connect and configure the router or how it is called R12 correctly; router.
What is a router for?
Many users are mistaken and initially think that the router itself is the Internet and that when you buy it at home, wireless Internet will immediately appear. But this is not true at all. In simple words, the Router is actually a “tee”, then it divides one connection into several, this is its fundamental function. That is, you should at least have wired Internet in your apartment. It connects to the router, and it, in turn, distributes it to other devices via Wi-Fi wireless communication.
So let's assume that you bought a router. Now you need to connect it to your computer. I will look at TP-LINK as an example, although they all connect in a similar way. All routers have LAN sockets on the back. This is where all the wires need to be connected.
As a rule, the wire through which the Internet comes is connected to a separate socket. It is always highlighted in a separate color. It may be blue, grey, white or yellow depending on the manufacturer, but it is always a different color from other sockets. The remaining sockets are intended for connecting other devices via wire that do not have Wi-Fi.
In our case, we connect the Internet wire to the blue connector and plug the separate wire included with the router into a laptop or computer and insert its other end into the yellow socket, preferably number 1.
So the router is connected, now let's start setting it up.
WiFi setup
Almost all routers come with an installation disk. We will use it to make the settings. So, insert the disk into the drive and wait for the installation wizard to start. If the Wi-Fi setup wizard does not start, then open “My Computer” on the desktop, find the DVD-ROM and launch it manually by double-clicking the left mouse button.

So the wizard has started. Select the model of our router (you can see it on the box or on the bottom wall of the device) and run the “Quick Installation Assistant”


In this window we check the indicator readings. It is necessary that the indicator signals correspond to the actual readings of the router. If everything matches, then we continue setting up further.


After this, a message indicating successful verification will appear. Click the “Next” button

Here we select the router connection type. We choose the most common option R12; Dynamic IP, it suits any connection.

Here we select the second item. Nowadays, connecting by MAC address is practically not used. This can be checked at home. But for this you need to have at least two devices, for example two laptops (in extreme cases, you can ask your friends). We simply connect another laptop directly to the Internet. If the Internet is working, then your connection is not to the MAC address and accordingly we need to select the second item.

In this window we need to come up with a name for our network. Enter in English. These names will be displayed in detected wireless networks on a laptop, tablet or smartphone.

Here we select the Wi-Fi protection level. Select WPA2-PSK R12; this is the most reliable protection. After that, set a password. The password must be entered in English, you can also add numbers. I advise you to make the password length at least 10 characters. This password will be needed to connect your devices wirelessly. That is, until you enter the password on the device, you will not be able to connect to the network, so no one will be able to connect to your Internet without knowing the password. This way we will protect ourselves from your neighbors using your Wi-Fi.

In this window we confirm the settings. Check the “Save settings in a text file” checkbox. This way, a text file with your Wi-Fi settings will be created on your desktop, namely, there will be the name of the network and the password for it so that you don’t forget it.