What to do if it does not connect to. What to do if the laptop does not connect to WI FI. Unidentified network - what to do
If your laptop does not connect to Wifi, says limited access or no Internet access, you should look into this problem in more detail.
There are several reasons for the problem:
- outdated or completely missing drivers on the laptop;
- failure of the Wifi card itself;
- incorrect router settings, etc.
We are looking for the culprit - a laptop or router
To understand why the laptop does not connect to the Internet via Wifi, let's look at all aspects of this issue.
The first step towards solving a problem is identifying the culprit. Problems with Wifi can be in the laptop itself, or maybe in the router. Finding the cause is important so as not to make things worse by changing all the settings.
First, try connecting another device via Wifi - phone, tablet, laptop. The Wifi button on the router should glow green. If the connection is normal on other devices, then the problem is with your laptop. And if the selected network does not work everywhere, then the cause of the problem is in the router and its settings.
If the reason is in the router, then you still need to check whether there is internet at all. Connect the cable directly to your laptop or computer. If everything works, then the problem is definitely in the router settings, and if not, contact your Internet provider to troubleshoot the problem.
Checking the network driver version
A common reason for the lack of Wifi on a laptop is an incorrectly installed or outdated network driver. This is indicated by this icon at the bottom right of the notification panel.

It shows that there are no connections available (even though there actually are). This often happens when reinstalling the system. Drivers that worked on Windows XP may not work on Windows 7, and drivers that worked on Windows 7 may not work on Windows 8.
You need to check whether the drivers are installed and, if so, their version, as follows:

- here look for the “Network adapters/boards” tab and your network adapter in it. It can be called differently, it all depends on your laptop;
If the device is there and there are no exclamation marks near it, then everything is fine with the driver.
To find out its version, you need to right-click on the driver and select “Properties”.

In the window that opens, select “Driver” and look at its development date.
Hardware enable adapter
The network device driver is working properly, but there is still no network? Or did the Internet work before, but now there are no available connections? This indicates that the network adapter on the laptop is turned off.
This is done differently on different models, but often this requires pressing the FN + F2 key combination at the same time or FN + another key with the Wifi icon drawn.
Some models have a special button on the body.
Video: How to distribute wi-fi from a laptop
You can also enable wireless networking on the system itself.
If you have Windows 7, then follow these steps:
- open "Start";
- select "Control Panel";
- "Network and Internet";
- "Network and Sharing Center";
- "Change adapter settings".

If the wireless network icon in the window that appears is colorless, this means that the network is inactive and needs to be turned on by right-clicking
To do this on Windows 8 then:
- click the “Options” button on the right panel;
- further – “Changing computer settings”;
- select "Wireless Network". It must be turned on.

You can perform the same operation as for the 7th operating system to make sure that the network is turned on.
In Windows XP it's even easier:
- "Start";
- "Control Panel";
- "Network connections";
- turn on the wireless network by right-clicking.
The activation of the adapter will be indicated by this icon on the notification panel.
Laptop stopped connecting to WiFi
If the laptop previously connected to this Wifi network, and then suddenly stopped (the settings were not changed), a virus may be the cause of the problem. It may corrupt the file or change settings. Even if the antivirus scan showed nothing, the installation of some program on the laptop could have messed up the settings.
Simply removing this program will not restore the network. Alternatively, you can delete the network connection and create it again, you can reset the router settings and connect it from scratch, you can search for a long time for the broken parameter on the laptop, but the easiest way is to restore the system to the level at which the program got into it.
Restoring the system
Starting this process:
- "Start";
- "All programs";
- "Standard";
- "Service";
- "System Restore" ;
- “Start System Restore”;

- "Further";
- select a recovery point (updating and installing programs is recorded in the registry, so in the window that opens, select the desired recovery time);
- "Further".
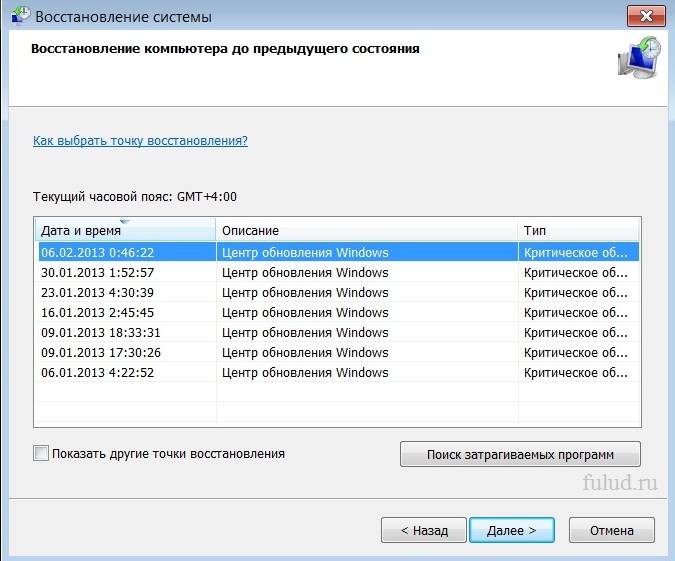
The recovery process will begin and upon completion the laptop will reboot. If the problem is a malware, then Wifi will work.
Updating hardware drivers
If, when checking the network adapter, there is an exclamation mark next to the driver icon in Device Manager, right-click on it and select “Enable”.
The absence of a driver entry means that it needs to be installed. Then you need to download it from the manufacturer’s official website. Or use the driver disk that comes with your laptop.

You can find out the name of the driver from the information in the device manager, in the description of the laptop, or using a special program.
You can update the driver by right-clicking on it and selecting “Update”. Or go to its properties and select this item there. Even if everything is fine with the driver, it is recommended to download and install it again.
Checking connection settings
To check connection settings:


When you try to connect to the selected Wifi network for the first time, a password prompt appears. Next, there should be an automatic connection to the network when you turn on the laptop. But if the laptop does not want to connect automatically and asks for a password every time, check whether the “Connect automatically” checkbox under the network name is checked.
Internet no access or limited in Windows
It happens that after connecting, identification occurs without access to the Internet via Wifi and a yellow triangle appears near the network icon on the panel:

Also, if you go to the “Network and Sharing Center”.
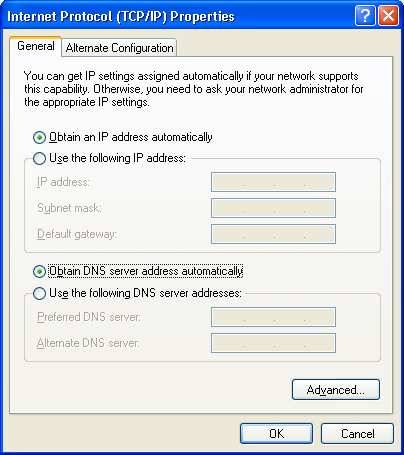
Enter the connection properties. If everything in the window looks like this and the IPv4 connection says “No network access,” the problem is incorrectly entered IP addresses or a disabled DHCP server on the router.

Check that you did not forget to check the box to receive addresses automatically. But if they are already there, then try to do the opposite - register everything manually. You can get the network address in the router settings. But basically the IP address is standard 192.168.1.X, and the DNS is 192.168.1.1.
If the connection properties show an IPv4 connection “Without Internet access,” then the DNS server addresses or router settings were entered incorrectly.
In this case, we manually change only the DNS settings, leaving the IP address automatic.

- 8.8.8.8 is Google's public DNS server;
- 77.88.8.8 – Yandex.
Some connection errors
If your laptop connects to the Internet, but sites load slowly, you might have gone too far from the router’s coverage area. And if the problem does not go away with a high Wifi signal, most likely, you are receiving many other networks and the Wifi channel is busy.
This can be changed in the router settings. The default value is 6. You can try changing it from 1 to 13 and watch the speed change. You can also try the "Auto" option.
If the laptop connects to Wifi, but does not access the Internet, and at the same time programs such as Skype and ICQ are working, check the DNS addresses. They must be automatic or registered, as in the paragraph above.
If the laptop does not immediately connect to the Internet:
- open the Start menu;
- "Control Panel";
- "System and safety";
- "Power supply";
- “Power button actions”;
- In the Shutdown Options section, uncheck “Enable Fast Startup (Recommended)”;
- "Save".
Windows was unable to connect to...
Having selected the desired network and entered the security password for it, I suddenly got the error “Windows could not connect to...”:

You can try clicking “Troubleshooting” and look at the written reason. Network devices and settings will be checked.
This message also appears due to a router error. Try rebooting both it and the laptop.
In Device Manager, in the properties of the network adapter, disable “Allow the computer to turn off this device to save power.”
Long authorization process
If, after entering the Wifi security key, while connecting to the network, the message “Obtaining an IP address” is displayed for a long time, and then the connection is disconnected and tries to connect again, this indicates an error in setting up IP addresses. In this case, you need to configure automatic acquisition of an IP address in the connection properties. And if it doesn’t help, write them manually.
Unidentified network - what to do
If the laptop does not identify the network, check whether the Internet cable is connected to the router. Reboot your router and laptop. You also need to check the IP addresses and DNS servers, as described in the above paragraphs.
>There may be several reasons for the lack of Wifi on a laptop, the main ones being an incorrectly configured router (see instructions for setting up your model), problems with the network adapter (outdated or not installed), or an incorrectly configured IP address or DNS server.
No matter how fast the modern mobile Internet is, Wi-Fi connection still remains a priority for most users. However, it is not more pleasant to encounter problems with this very connection, when the device either does not connect to Wi-Fi at all, or connects, but there is no Internet. In such situations, you should check the following basic points and settings.
1) On your Android device, go to Settings > Wi-Fi, select the network you are trying to connect to and click Forget or Delete. This is necessary if the network you are trying to connect to has a common or universal SSID. For example, some popular coffee shop chain may have the same chain name for different locations, but have a different password for connecting. In this case, the Android device tries to use the password that was suitable earlier.
2) When trying to connect to your home router, the first step in troubleshooting any problems is to reboot it. If none of the connected devices can access the Internet, contact your ISP.
3) If you are convinced that the Internet is functioning normally, but only your Android device cannot connect, then check the security settings used by your router. First try disabling them completely, if this fixes the situation, then try different security protocols (WEP, WPA-PSK, WPA2-PSK, TKIP, AES)
4) Turn off the QoS function in the router settings. It is responsible for the intelligent distribution of bandwidth between devices. For example, if you have a gaming console or TV with streaming services installed at home, the router will give priority to connecting to them, cutting off the speed of other connections.
5) Disconnect USB peripherals from the router. If you connect a hard drive or any other USB device to your router, and the port is not shielded, this may result in receiving a signal in the 2.4 GHz range.
6) Speaking about the signal range, if you have a dual-band router operating at 2.4 GHz and 5 GHz, set the settings to force the use of one of the bands. If you have a relatively old device, then it may simply not support operation at 5 GHz.7) When connecting to public networks, remember that they all require prior authorization before providing Internet access. Having connected to such a network, try to open any tab in your browser, the system should automatically redirect you to the authorization page. Make sure that you have not disabled the CaptivePortalLogin system process, which is responsible for the appearance of the authorization window. You can do this in Settings > Applications.
8) Make sure the date and time on your device are set correctly.
9) Check the "Wi-Fi" setting in sleep mode. Settings > Wi-Fi > Advanced Features. As the name suggests, this feature automatically turns off Wi-Fi to save battery power. Its incorrect operation may result in the device not connecting to Wi-Fi.
10) Turn off the Wi-Fi tethering function.
A fairly common situation among novice users for whom setting up a router is new is that after setting up according to the instructions, when trying to connect to a wireless Wi-Fi network, Windows reports that “the network settings saved on this computer do not match requirements of this network." In fact, this is not a terrible problem at all and can be easily solved. First, I will explain why this happens so that there are no questions in the future.
Update 2015: the instructions have been updated to include information on how to fix this error in Windows 10. There is also information for Windows 8.1, 7 and XP.
Why the network settings do not meet the requirements and the computer does not connect via Wi-Fi
This situation most often occurs after you have just configured the router. In particular, after setting a password for Wi-Fi in the router. The fact is that if you connected to a wireless network before you set it up, i.e., for example, you connected to a standard wireless network of an ASUS RT, TP-Link, D-link or Zyxel router that is not password protected , then Windows saves the settings of this network in order to connect to it automatically in the future. If, when setting up the router, you change something, for example, set the authentication type to WPA2/PSK and set a password for Wi-Fi, then immediately after that, Windows, using the parameters that it has already saved, cannot connect to the wireless network, and as a result You see a message stating that the settings saved on this computer do not meet the requirements of the wireless network with the new settings.
If you are sure that all of the above is not about you, then another, rare option is possible: the router settings were reset (including during power surges) or, even more rare: someone else changed the router settings. In the first case, you can proceed as described below, and in the second, you can only reset the Wi-Fi router to factory settings and configure the router again.
How to forget the Wi-Fi network in Windows 10
In order for the error indicating a mismatch between the saved and current wireless network settings to disappear, you must delete the saved Wi-Fi network settings. To do this in Windows 10, click the wireless connection icon in the notification area, and then select Network Settings.
In the network settings, in the Wi-Fi section, click “Manage Wi-Fi network settings”.

In the next window at the bottom you will find a list of saved wireless networks. Click on the one to which an error appears when connecting and click the “Forget” button so that the saved parameters are deleted.

Ready. Now you can reconnect to the network and specify the password that it has at the current time.
Fixing a bug in Windows 7, 8 and Windows 8.1
In order to fix the “network settings do not meet network requirements” error, you need to make Windows “forget” the settings that you saved and enter a new one. To do this, you need to delete the saved wireless network in the Network and Sharing Center in Windows 7 and somewhat differently in Windows 8 and 8.1.
To delete saved settings in Windows 7:
- Go to the Network and Sharing Center (via the Control Panel or by right-clicking on the network icon in the notification panel).
- In the menu on the right, select “Manage wireless networks”, a list of Wi-Fi networks will open.
- Select your network and delete it.
- Close the Network and Sharing Center, find your wireless network again and connect to it - everything will be fine.
On Windows 8 and Windows 8.1:

- Click on the wireless connection icon in the tray.
- Right-click on the name of your wireless network and select “Forget this network” from the context menu.
- Find and connect to this network again, this time everything will be fine - the only thing is that if you set a password for this network, you will need to enter it.
If the problem occurs on Windows XP:
- Open the "Network Connections" folder in the Control Panel, right-click on the "Wireless Connection" icon
- Select "Available Wireless Networks"
- Remove the network that is causing the problem connecting to it.
That's the solution to the problem. I hope you have figured out what’s going on and this situation will not present any difficulties for you in the future.
Windows 10 is the newest system from Microsoft that many users are getting help from. After such an installation, various problems may arise, but most often WiFi does not work. This can happen no matter what devices you use to access the network.
Possible reasons
WiFi not working after installing Windows 10 can be attributed to the newness of the operating system itself: it is still “raw” and requires many improvements. This was the case with most Microsoft OS - it took up to several years to cure all the “sores” and get rid of the “glitches”. Therefore, the first advice is not to rush to install the “ten”, it is better to do it after six months, or better yet, a year.
If a brand new desktop is already showing off on your monitor, but WiFi treacherously does not start, the reasons may be as follows:
- There are no suitable drivers, so the equipment cannot turn on. A common occurrence when upgrading from Windows 7 to Even if the “seven” had a working driver, it may simply be incompatible with the new OS.
- Incompatible antivirus and firewall blocking access to the Internet. This can also happen when upgrading to a new OS from an old one and already installed programs conflict with Windows 10, which, by the way, has very effective built-in protection measures.
- The hardware settings have been reset. This also happens when upgrading from “seven” to “ten”.
- Other incompatibilities between Windows 10 and third-party programs.
Whatever the reasons, they need to be addressed.
What to try first
Before delving into the operation of the system components, follow the simple steps that your Internet provider’s technical support will already advise you to do if you decide to call them. If WiFi does not work, turn off the adapter and turn it on again after 30 seconds. If you have a router, restart it too.
If the Internet does not work via a wire, simply unplug the cord for a few seconds and then put it back. In at least 5% of cases, after these actions the Internet starts working. Then it turns out that the problem was not incompatibility and the like, but a simple “glitch”.
If the wireless network does not work on your laptop, check whether the adapter is turned on. How it turns on and off depends on the brand and specific model of your laptop. Some have a special switch on the side or back, while on others this manipulation is performed using special keys.

It is also possible that the wireless adapter is turned on using special keys, but the driver responsible for their operation is not installed. In this case, you will first have to figure out why it is not in the system or it does not work, and then, perhaps, download the necessary driver on the Internet from another device.
Methods for troubleshooting wireless network problems
Resetting connection settings on reset
It is possible that WiFi does not work after resetting the network connection settings, which occurred when updating the OS to the latest version. In this case, the computer cannot obtain an IP address to access the network. To fix the problem:
- Click the network connection icon on the right side of the panel and select “Network Settings”.

- In the window that opens, on the left, select the Ethernet line, and then “Configure adapter parameters.”

- In the list of available networks that appears, select your non-working one and right-click on it and go to “Properties”.

- In the “Network” tab, check the checkboxes next to these items:

Typically, an Internet provider distributes IP addresses automatically, that is, dynamic IPs. If you have it static, then until you register it manually, the Internet, of course, does not work. To do this, select the IP version 4 item and click the “Properties” button. Selecting the “Use the following IP address” and DNS server addresses options, enter the required data.

You should keep them on a printed piece of paper or you can find them out by calling the technical support of your Internet provider. If in this case the network does not work, go to Control Panel -> Troubleshooting -> Internet Connection and start the corresponding service. It will scan the network status and maybe tell you something.
Checking for programs blocking access to the network
The first and simplest thing you can do in such a situation is to remove all third-party security applications and restart your computer. There is some possibility that they are blocking Windows 10’s free access to the network. This is done through Control Panel - Programs and Features.

In the screenshot, the arrow points to the uninstall program as an example only. If, after removing all protective third-party applications and rebooting, the network appears to be working, you don't need to do anything else.
The built-in Windows Defender is enough to combat the main ones, and the Windows 10 Firewall is highly configurable and successfully blocks online threats. If such protection seems insufficient to you, you can look for third-party antiviruses and firewalls that are officially compatible with Windows 10.
Finding incompatible software
If the network still does not work, you should start studying the list of programs installed on your hard drive. Of course, all this is relevant only after installing the system through an update. Pay special attention to the variety that can clean temporary files, change system settings and delete registry files.
The list is too long to list them all, but for the sake of the purity of the experiment, it is worth removing all such programs at once. They could change the settings of Windows 10 without taking care of the functionality of certain components.
Driver Update
Network device drivers that refuse to work after installing Windows 10 are the most common reason for WiFi failure. The only sure way to get it to work is to download the latest driver that is fully compatible with the new OS. But there is no Internet, which means you need another computer or at least a smartphone, as well as knowledge of the model of your motherboard or, if it is not built-in.
The driver must be downloaded manually from the official website of the equipment manufacturer. Don't use it. At best, it will end up clogging your system with unnecessary programs. Important: you must update not only the driver for WiFi, but also for the Ethernet card.
Clean installation
So that after updates you don’t have to struggle like this with a bunch of settings, it’s better to use a clean partition of your hard drive. Even if Wi-Fi does not work in this case, you can safely discard such options as software incompatibility or an outdated driver.
The main thing is to understand that Windows 10 still contains enough errors to produce certain “glitches”. It is even possible that your hardware is so rare that a driver for it was not written by Microsoft employees or the developers of this device.
All that remains is to make sure whether the WiFi adapter works at all by installing a different operating system. If, after installing clean Windows 7, it starts up, but after upgrading to Windows 10 it does not want to work under any manipulation, it may be easier to replace the adapter itself.
Windows 10 doesn't automatically connect to Wi-Fi? As a rule, when using the Windows 10 operating system, its work with wireless Internet, namely Wi-Fi, does not raise any questions or complaints. If you have drivers that have no problems, this is what happens. However, this is not always the case.
What's happening
Let's say you turned on your computer and entered your password. Everything is fine. Used it and turned it off. However, after turning on your PC after a while, you are faced with the need to reconfigure what turns out to be a broken connection. When working with a home network, you will agree that this is not very convenient.
What to do
After the first connection, there is already a checkmark in the “Connect automatically” box. There is no need to remove it, but if a problem occurs, you need to check for it. The next time you connect, you need to pay attention to the connection window. You can also simply perform the action of disconnecting from the network that we need.

After completing the disconnect action, connect again. In this case, you need to check the Connect automatically box. (see pic).

Does not help? Then perform the following action. Probably all you need in this situation is to try Forget Network.
How to “forget the network”
Below we will describe and show the action associated with “forgetting” the network.
It consists of the following step-by-step actions:
Selecting network parameters;
Selecting Wi-Fi control parameters;
Selecting the desired network and then “forgetting” it
What this all looks like is illustrated below.

Click on the connection and select "Network Settings".

In the window that appears, check “Manage Wi-Fi network settings” or “Manage known networks” (the name may differ depending on the build number and the number of operating system updates).
A very common situation: a user tries to connect to Wi-Fi from his phone, but nothing works. After reading the information below, you will learn why this is happening and how to solve the problem.
Initial phone check
Manufacturers are actively working to improve the stability of mobile operating systems, but from time to time any program crashes. That is why it is recommended to start solving the problem by checking the functionality of the phone. For Android, iOS and Windows Phone (Windows Mobile) the recommendations in this case are identical. Follow the sequence below.1. Restart your device and try connecting to Wi-Fi again.
2. Evaluate the number of connection signal strength indicators. If there are less than 3, try moving closer to the router or other wireless Internet source you are using to improve the quality of the connection.
3. Make sure Battery Saver mode is turned off. If necessary, connect the network adapter.
4. Turn off Bluetooth. Wireless connections may operate in the same range, which causes interference.
5. Turn off Airplane mode, if active.
6. Try to activate access to information about your location and connect to Wi-Fi - the legislation of some countries blocks connections via wireless networks when this option is inactive.
If the WiFi connection worked previously
If you have successfully used the currently problematic network in the past, delete the connection from your phone's memory. To do this, go to the list of networks, click on the problematic connection for a few seconds (until the context menu appears) and delete the connection.If all else fails, try connecting from your phone to any other available connection. Failure in this case will most likely indicate a breakdown of the radio module - only service center employees will help correct the situation.
Check if the connection is working. To do this, try connecting to it using any other device that has Wi-Fi functionality. If the connection does not work, change the router settings.
Important note! The procedure for entering the router settings varies depending on the manufacturer and model of the equipment. In most cases, to gain access you need to enter the address 192.168.0.0 or 192.168.0.1 into the address bar of your browser. The standard login and password are admin. If this doesn’t work, check the manufacturer’s instructions for the information relevant to your router.
First, try simply rebooting the router - quite often they freeze, which is why access to the Internet is blocked.
The further procedure is as follows.
First, you must ensure that the security key you entered is correct. Try entering the password to connect to the selected access point again, but more carefully, with the “Display symbols” (show password) option activated.
If you don't remember the password, check it in the router settings.
As an example, the procedure for interacting with a D-Link router is shown. In your case, everything will be almost the same; minor changes may only affect the interface, menu item names and other little things.
Once on the router settings page, do the following:
click the “Advanced settings” button;
in the Wi-Fi window, open the “Security Settings” link;
in the “PSK encryption key” line, look at the password and make sure that this is the combination you enter when trying to connect to Wi-Fi from your phone.

Secondly, make sure your router settings are correct - you need to check if DHCP is enabled. If it is turned off, the phone will not be able to obtain an IP address, which is why the connection will not work.
On the router settings page, click “Advanced settings” again and in the “Network” window, find the “LAN” category.
Enable DHCP if the function is disabled by changing the “Mode” line to the “Allow” state.

Save the changes, restart the router and try connecting to Wi-Fi from your phone.
If this does not help, there are 3 options left:
call the provider’s support service and find out whether the Internet works at all and whether any changes have been made to the connection settings;
submit your phone for repair;
have your Internet router repaired/replaced.
If our instructions did not help solve the problem, then write in the comments and we will definitely look into your problem.
Despite a number of advantages, the improved version of the IPv6 network protocol could not become widespread in a short time, but leading software companies are still paying more and more attention to it. Microsoft is no exception, whose main software product Windows 10, starting with build 1809, will require the mandatory inclusion of IPv6.
Windows 10 1809 Store and Edge browser cannot connect to the internet, check the status of the IPv6 protocol
If you update to the October build and open the Edge or Windows Store browser and see a "You are not connected" or "Check your connection" message,
Moreover, third-party browsers open pages without problems, first of all, check whether the IPv6 protocol is enabled in your network adapter settings. This is a mandatory condition; without it, neither the Store nor Microsoft Edge, and possibly other standard Windows 10 applications, will not be able to connect to the Internet.
Use the command control.exe /name Microsoft.NetworkandSharingCenter in the “Run” window to open the Network and Sharing Center, on the right, click “Change adapter settings”,

open the properties of your connection (Ethernet or Wi-Fi) in a new window,

Find the IP version (IPv6) in the list and make sure the component is checked. If not, check the box next to it, save the settings and reboot. Now Windows Store and Edge will be able to connect to the Internet.