What is SAMBA? Sharing folders and changing access to Samba directories.
First, install the package. samba:
Sudo apt install samba
Now you can set up Samba for sharing.
Samba Setup
The Samba configuration file is located along the path /etc/samba/smb.conf. The original configuration file has a significant amount of comments for documenting various configuration directives.
Not all possible options are included in the default settings file. See the man smb.conf or Samba Help manual for details.
It is a good idea to first take a look at a simple connection in order to better understand the protocol. The server responds with a pointer to the desired protocol variant, where 0 indicates the first set of protocols in the list that the client sent. In the next step, the client sends the user name to the server with the appropriate password, the name of the workgroup, and the maximum size of the transmitted data. This is followed by an indication of the maximum size of the client queue. In the same packet, the client sends the following command — a connection request.
The server sends the client a tree ID that allows the client to open, read, write, and close files. In the first run, the tools check for the presence of the required packages and offer to install them if they are not already present. In the next window, the configuration parameter of the stand-alone server is selected.
First, change or add the following value to the section. File /etc/samba/smb.conf:
Workgroup = WORKGROUP security = user
Change the name of the working group according to your settings (in Windows, by default the name of the working group is WORKGROUP).
Add a new section at the end of the file, or uncomment one of the examples for the directory to be shared:
Master - Primary Domain Controller
This name must be the same for access to shared resources. Specify the server banner. The wizard accepts a list of selected parameters before accepting a configuration. The following steps will be the same as for a standalone server, unless you also select the security mode. Domain: provides a mechanism for storing all user accounts and groups in a common repository repository. The centralized account repository is shared between domain controllers.
Declare a directory for sharing
With the help of the “Add” button we get.comment = Shared folder in Ubuntu path = / home / samba / share browsable = yes guest ok = yes read only = no create mask = 0644
comment - description of the share.
path - the path to the shared directory.
browsable - allows clients to view the contents of a shared directory.
guest ok - allows clients to connect to a share without specifying a password.
read only - whether the resource is “read only” or not.
create mask - set file permissions.
Therefore, a new entry is added. It can be changed using the "Change" button. Parameters can be edited, for example, if the catalog is visible to the public, in writing or navigation. Resource name cannot be changed. The book is titled “Using Samba,” by Robert Eckstein, David Collier-Brown, and Peter Kelly; This is his first edition. The configuration file is divided into sections, indicated by the name in brackets. To share a folder, we need to create a new section. The section name will be the name of the shared folder.
One section for a shared folder
None of the sections is required, but usually has the following sections.
- This allows you to determine how to share samba resources.
- So samba is a domain authenticator.
- This makes the samba only recognize encrypted passwords.
- A file that saves encrypted samba access passwords.
- Password server = 10.
Now you need to create a directory:
Sudo mkdir -p / home / samba / share
the -p option tells mkdir to create a full directory tree if it does not exist.
Set permissions on it:
Sudo chown nobody: nogroup / home / samba / share / sudo chmod 755 / home / samba / share /
Finally, restart the samba services to apply the new settings:
Sudo service smbd restart
Now a Ubuntu share will appear on your network and you can browse its shared directories. If your client does not automatically show your shared resources, try to contact your server by its IP address, for example, \\\\ 192.168.0.1. To verify that the file server is working, try creating a directory inside your shared resource.
Access to folder
You must first decide whether you want to work directly from the server, or if you want to work with a remote access client. Otherwise, you will need to manually manage user accounts so that they can use the necessary network services. The command line for this is as follows. Using the first command, you can add a user to network shares. After entering the username, you can add your password.
Step Three: Configure File Sharing
Reboots server settings to save changes. This file contains all administrative actions and where the general characteristics of the server are stored. With the following command you can open the file. To activate them, you need to delete only special characters. New entries can be added at the end of the file if the corresponding name in which it will be available is enclosed in brackets.
To create additional shares, create a new section. in /etc/samba/smb.conf and restart Samba. Make sure that the shared directory has been created and that it has the correct permissions.
What is Samba?
To provide access to files located on linux machines from computers running Windows, a specially designed software package that allows access to network drives and printers via SMB / CIFS protocol was developed. Samba package has client and server parts. It is free software released under the GPL license. Samba is a protocol used by Microsoft to separate files and print services. This protocol was developed in 1987 and later transferred to the Linux platform by Andrew Tridgell. Interaction in the network of computers running Windows is based on using the Server Message Block (SMB) protocol — server message blocks. The Samba package provides all the necessary tasks in these cases for opening, closing, reading, writing, searching for files, creating and deleting directories, setting a print job and deleting it from there. Its capabilities can be divided into two categories: the provision of resources (by which we mean access to printers and files) for Windows clients and access to client resources. That is, a computer running Linux can act both as a server and as a client. A huge advantage of the samba package is access control, which can be implemented either at the share level, when a resource is assigned a password and corresponding usage rules or a more advanced and flexible organization at the user level, when each user is created account on the server, where in addition to the name and password contains all the necessary information about the rights of access to the resource. Before getting access to the required resource, each user is authenticated, after which he is granted rights according to the accounts.
In the appropriate file will be the second line of the command line and, finally, those lines of parameters that will be used. Using the following command, you can add users to a group. An example of this type of command would be. To verify the above, you can use the following commands.
Configure the network to use encrypted passwords
To remove an action, use the command.
- A new window will open asking for the value 1 and closing the record.
- This will create a form file.
First, we will create a public resource without restrictions, so that any user, including guests, can access. Although these users will have read permissions.
Samba serverFor the Samba server to work, it is necessary that two daemons be launched: smbd, which provides the print service and file sharing for the Samba server clients under the control of the Windows operating system, and nmbd, which provides the NetBIOS name service. For access to clients the TCP / IP protocol is used. Samba is usually installed along with the Linux distribution. You can check by running the command: $ whereis samba. And if not installed then $ yum install samba-server |
 |
Samba clientTo access Windows network resources from Linux, you need a Samba client, and in order to assess the availability of Windows resources, just run the command / usr / bin / smbclient -L host_name. Further, the line will ask for a password, but in most cases it is enough to press Enter. The positive aspect of the Samba client is that it sees the hidden network resources perfectly, those drives whose network name ends with the $ sign.) Further work takes place by typing commands that can be used to perform all the necessary file operations. To get help, just run smb:\u003e help. |
Quite a lot of users of 1c Enterprise use the database in the file version, well, well, it really did :) and therefore you can use the Samba server for competent user interaction with the database. That will allow to restrict access, or completely close it to databases 1c.
Samba server configuration
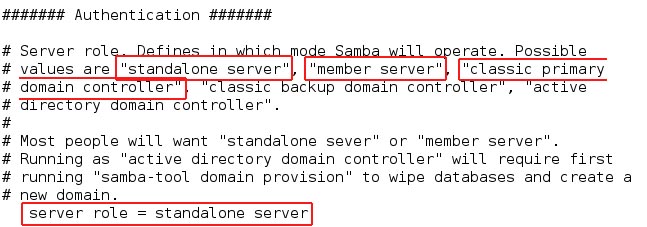
The Samba configuration file is called smb.conf and is located in the root directory / etc or / etc / samba. The Samba service reads it every 60 seconds, so changes made to the configuration take effect without rebooting, but do not apply to already established connections. The configuration file contains four sections:,, and. You can open the configuration file for editing with the command: mcedit /etc/samba/smb.conf The section contains the most common characteristics that will be used everywhere, but which, however, can then be overridden in sections for individual resources. Some of the parameters in this section are also related to the configuration of the Samba client.Section Options
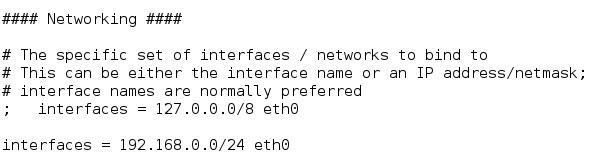
workgroup # group_name on a Windows network. netbios name # netbios name of server in local network. server string # comment string, which is visible in the local network browsing properties window. guest ok = yes # enable guest login to the server. guest ok = no # guest login is not allowed. guest account # account, under which guest login to the server is allowed. security = user # access with user-level authentication. security = share # admission is free. hosts allow # specifies the clients that are allowed to access the server. interfaces # indicates which network the server will operate on.Section Options
comment # comment in the network properties window. The browseable # determines whether a resource is visible in the browse list. writable # allows or denies writing to the home directory. create mode # defines access rights for newly created files. directory mode # defines permissions for directories.Install the SWAT web interface (Samba Web Administration Tool) to work with smb.conf
In most cases, configuring Samba is to edit the main /etc/samba/smb.conf configuration file and manage users using smbpasswd. Changes can be made in the editor mcedit, nano or kwrite. If this is unusual, you can use the SWAT web interface (Samba Web Administration Tool), which was created by the developers of the Samba package for the convenience of Linux users.You can install the samba-swat package with the command:
yum install samba-swat By default, for security purposes, SWAT is disabled and therefore we go:
mcedit /etc/xinetd.d/swat and change the value of the parameter:
disable = no To enable remote administration, you must add a valid ip to the only_from parameter. And make a restart:
service xinetd restart That's it! Samba-swat is now available at http: // localhost: 901 / and the port number can be changed in the file for security reasons:
mcedit /etc/xinetd.d/swat
As we have said, we will also create a resource that is accessible only to users belonging to a specific group of users. In this case, we will create an administrative resource that can be accessed by users of administrative groups and bosses, but only users of an administration group can write to the directory and its files.
And already in this Path we will create the resources discussed above. A resource that can be accessed only by a user from two user groups, and only members of one of these groups can write. A read-only free access resource. . Like users, shared resources will not only apply the permissions configured for these resources in the file, but will also take into account the permissions assigned to the machine directories that will constitute these shared resources.
Share folders and change access to Samba directories:
The design of our file server will adhere to the following structure:- a directory in which databases of 1c will be stored, with limited access by ip;
- other directories with access at the level of user authorization, there may be many, it all depends on the task. sudo mkdir samba # Create the Samba root folder Inside we create two more and, open smb.conf set in the parameters:
security = share # Users will not pass the authorization system. Now in the parameter we make a restriction on ip:
hosts allow 10.4.8.32 10.4.8.33 # Allow only 10.4.8.32 and 10.4.8.33 access to the directory
valid user = glavbuh geo # This is the list of users allowed to access the resource. username = glavbuh geo # The username of the glavbuh directory.
The syntax of the changed parameters can be checked with the command:
testparm /etc/samba/smb.confIt remains to create users glavbuh and geo by specifying a password to enter the directory. Add users to Samba smbpasswd -a And allow users in Samba
smbpasswd -e
If there are no errors, the services will be listed. Now from another computer located on the network, we get access to the file explorer and network equipment. We study the network from file explorer and network. We turn to the public share. We see the files inside the share.
You do not have the required permissions to save the file. As we said, the main point in favor of this application is its ease of use. After downloading the application, the only thing that will ask us is the network path in which the folder to which we want to connect is located, and the credentials of the same. Once entered, the folder will be mounted directly in the internal memory of the phone, which will require another application, such as a file browser, to access it and all its files.