How to transfer the system to a new disk. Transferring the system to another or new hard drive
Transferring Windows 7 to another hardware. A break from the old.
Sometimes it happens that it is necessary to replace old obsolete hardware with new one. Usually there are no problems with this, I removed the old one and installed the new one, with the exception of replacement. Things don't work out that easy with her. If we simply replace the board, then when loading, somewhere in the area of the flickering flags, we will see everyone’s “favorite” blue screen (BSOD) with the STOP 0x0000007B error.
As we already know, there are chipsets and controllers that install their own drivers; when replaced, the drivers in the operating system remain old, but the chipset and controllers are changed, and as a result, startup becomes impossible. Usually the problem appears due to a change in the ATA/SATA bus controller; Windows cannot independently change the controller driver during boot and loses the hard drive; startup becomes impossible.
I want to make a reservation right away, the problem does not occur in 100% of cases. When replacing within one, there is a high probability of starting the system without a blue screen (BSOD) with the STOP 0x0000007B error.
Actually, this is where the theory ends and the eternal question arises: “What to do?” I’ll say it without hesitation, there are two options for solving this problem, a simple one and a more complicated one (we’re not even considering the option of reinstalling the OS).
Option 1.
Before transferring our HDD with Windows 7 installed to new hardware, you need to use the standard utility sysprep.
Click “Start”, in the search bar (it’s at the very bottom) type CMD, in the programs found (usually the very first one), hover the cursor and right-click and run as administrator, confirm the launch. We dial: C:\ Windows\ system32\ sysprep\ sysprep. exe and press Enter(you can simply go to the file at this address and run it by double-clicking the left mouse button).
Starts System preparation program 3.14 which rolls back Windows to the first logon state, to a time when the operating system was not tied to the hardware, by removing device drivers.
After the program is completed, we replace the motherboard and other hardware, and start the computer. The process that occurs during the final stage of installing Windows OS begins. You must enter the user name (it should not be the same as the previous one, since that account already exists in the system) and computer name and complete the installation. We reboot the computer (or exit by terminating the session) and log in with your account (both the new and the old one will appear on the welcome screen). After logging in, delete the created account and its profile. Now all that remains is to install new drivers and the transfer is complete.
However, this method has a drawback: activation of Windows and most software fails, so you will need to activate everything again
This option is very simple and was considered in a compressed form. Ask why in a compressed way? It's simple, we're not looking for easy ways! It usually happens like this for me: First I change the hardware, then I realize that the OS does not want to start (this is why Option 1 is described from a theoretical point of view based on the knowledge base of Windows) and the search for a solution begins (not to rebuild the hardware back). Just for people like me, there is option two, let’s look at it in more detail.
Sooner or later, each of us discovers that there is a catastrophic lack of space on the hard drive. Acronis can transfer (clone) the installed system, as well as all applications, to a new hard drive with a larger capacity.
To migrate your system, you must first have a new hard drive installed in your computer. If your computer doesn't have room for another hard drive, you can temporarily connect one in place of the CD drive.
Acronis offers two system transfer modes: manual mode and automatic mode.
In most cases, the automatic mode capabilities are sufficient.
In this mode, you will transfer all data from the old disk (partitions, folders, files...) to the new disk. After replacing the old hard drive with a new one, the new hard drive will become bootable. The new hard drive jumper must be in the Master position. There will be only one difference between the new and old disk; the partition sizes will be larger. Everything else - the operating system, information recorded on the disc, disc labels, etc. will remain unchanged.
In manual mode, you can perform the cloning procedure more flexibly.
You can specify the method for transferring partitions and data:
Transfer partitions and data as is;
- distribute space between partitions on the new disk;
-save partitions and (data!) on the old hard drive;
-delete information from the old hard drive;
- create a new partition structure on the old disk (the data on it will be lost).
Please note that if there is a power failure during data transfer, the data transfer procedure will not be completed. The new hard drive can only be used after successful re-cloning. There will be no data on the old hard drive lost, because until the data transfer is completed, Acronis does not perform any actions with this disk other than reading.
Automatic system transfer.
Let's launch the program. Select the "Disk Utilities" category.
In the new window, select “Clone hard drive”.

The Disk Clone Wizard will appear.


Select the cloning mode "Automatic". Click "Next".


If the target disk contains partitions, select the "Delete all partitions on the target disk" radio button and click "Next". At this stage, the program creates a cloning plan and does not perform any actual actions. In the new window you will see information about the original hard drive and what structure the new hard drive will have.

Final cloning window.

Before you "Get Started", you can use the "Back" button to return to previous windows and make any necessary changes. To cancel the procedure and exit to the main program window, use the “Cancel” button.
I would like to add that you can also transfer the system by creating an image of the system disk or the entire hard drive on the original hard drive, and then using the “Recovery” function to restore it on a new hard drive, having previously connected it to the computer. However, keep in mind that the "Recovery" function cannot create partitions. This means that the partitions on the target disk intended to accommodate the data from the backup must first be created. You can use another company product to create partitionsAcronis-Acronis Disk Director Suite 10.
Finally got around to upgrading the hard drive. In addition to its 400 GB Samsung HD400LJ, I purchased another 1 TB hard drive from Samsung – HD103UJ. But this is only half the battle - it is much more important to transfer data from the first to the second, and so that nothing needs to be reinstalled and, God forbid, restored. Why migrate data? And then, I need the new screw as the main one, and I want to use the old one for storing archives.
After some thought, I developed a certain algorithm that will lead to the desired result. To accomplish this, I used Hiren's Boot CD version 9.7. It contains numerous tools for diagnosing and initially preparing the computer for operation. You can find it on the Internet on various sites, as well as on BitTorrent networks. So, the procedure was as follows:
1. The new hard drive is divided into exactly the same number of partitions as the old one. In this case, each section increases (or decreases) to the size required for work. For partitioning, I booted from Hiren's Boot CD and launched the Acronis Disk Director program. It would have been possible to use Partion Magic, which is also available there, but it has not been updated for a long time and somehow I am tormented by doubts about the reliability of its operation. And Acronis I I have already used it several times and was completely satisfied.
2. An exact copy of the logical drives of the old HDD is made to the new one using the Norton Ghost program. If partitioning and formatting took about 10 seconds, then it took about two and a half hours. Then I made a backup copy of the system. Moreover, it was not possible to copy two partitions this way - I reduced their size on the new hard drive.
3. Booted into Windows from the old hard drive to copy the remaining two partitions manually. Mostly documents and program source codes were stored there, so such an operation could be done without particularly precise synchronization tools. I reset everything to new partitions, simultaneously re-sorting the data on the others.
4. I turned off the computer, disconnected the old hard drive, left only the new one and set it to boot from it. Windows started without any problems at all. Even finding herself in a new place was not a surprise for her - having recognized all the sections, she suggested rebooting. And, what was especially pleasing, there were no problems with the partition letters - despite the new HDD, they all remained the same.
5. I turned off the computer and connected the old hard drive. Booted into Windows to check the normal operation of both HDDs. All the data was no longer there, nothing had disappeared.
6. I booted from Hiren's Boot CD to delete partitions from the old HDD. I did it again using Acronis Disk Director. The operation took a matter of seconds.
That's all. Everything turned out to be very simple and went off without a hitch. Now a 1 TB hard drive is used as the main hard drive and nothing had to be reinstalled for this. After four hours, I was able to continue working in exactly the same mode as before connecting the new HDD.
After purchasing a new HDD or SSD, the first question that arises is what to do with the operating system currently used. Not many users have the need to install a clean OS, but on the contrary, they want to clone an existing system from an old disk to a new one.
So that the user who decides to update the hard drive does not have to reinstall the operating system, it is possible to transfer it. In this case, the current user profile is saved, and in the future you can use Windows in the same way as before performing the procedure.
Usually those who want to divide the OS itself and user files into two physical drives are interested in transferring. After the move, the operating system will appear on the new hard drive and will remain on the old one. In the future, it can be removed from the old hard drive by formatting, or left as a second system.
First, the user needs to connect the new drive to the system unit and make sure that the PC has detected it (this is done through the BIOS or Explorer).
Method 1: AOMEI Partition Assistant Standard Edition
Unlike the previous two programs, in Macrium Reflect you cannot pre-allocate a free partition on the drive where the OS will be transferred. This means that user files on disk 2 will be deleted. Therefore, it is best to use a clean HDD.
- Click on the link "Clone this disk..." in the main program window.
- The Transfer Wizard will open. At the top, select the HDD from which you want to clone. By default, all drives may be selected, so uncheck the drives you don't want to use.
- Click on the link at the bottom of the window "Select a disk to clone to..." and select the hard drive to which you want to clone.
- Once you select disk 2, you can use a link with cloning parameters.
- Here you can configure the space that will be occupied by the system. By default, a partition will be created with no free space. We recommend adding at least 20-30 GB (or more) to the system partition for correct subsequent updates and Windows needs. This can be done using controls or by entering numbers.
- If you wish, you can select the drive letter yourself.
- It is not necessary to change the remaining parameters.
- In the next window you can configure the cloning schedule, but we don’t need this, so just click "Next".
- A list of actions that will be performed on the drive will be displayed, click "Finish".
- In the window asking you to make restore points, agree or reject the offer.
- The OS cloning will begin and you will be notified when completed "Clone completed", indicating that the transfer was successful.
- Now you can boot from the new drive, having first made it the main one for booting in the BIOS. How to do this, see Method 1.


We talked about three ways to transfer an OS from one drive to another. As you can see, this is a very simple process and you usually won't encounter any errors. After cloning Windows, you can check the disk's functionality by booting your computer from it. If no problems are observed, you can remove the old HDD from the system unit or leave it as a spare.
Hello friends! All topics that relate to personal data, files and settings are always very relevant. Just as relevant are the methods of preserving, transferring and restoring them. Therefore, today I want to write about how to transfer settings, accounts, program settings and files from one computer to another running the Windows operating system, in this article we will look at an example on Windows 7.
To transfer data, we will use the standard utility. In Windows Vista and Windows 7 operating systems this utility is already built-in, and for Windows XP it can be downloaded from the Microsoft website http://www.microsoft.com/ru-ru/download/details.aspx?id=7349.
How to transfer data to another computer?
Well, let's get started.
We launch the utility, for this we go to “Start”, "All programs", “Standard”, “Service” and launch .
 The utility will launch, and on the main page you can read what it can transfer. To continue, click “Next”.

Now we need to choose how we will transfer and receive data to the new computer. There are three ways:
- Using a data cable. To be honest, I still don’t understand what cable we are talking about. It seems that it’s not about the network, because the next point is data transfer using the network. As far as I know, two computers cannot be connected via USB. Well, okay, let's skip this method and move on.
- Second way. This is data transfer using the network. If you have both computers connected to the network, you can try this method.
- Well, for example, we will use the third method. It seems to me the simplest and accessible to everyone. It consists of saving files and settings in one archive, with the ability to restore data from this archive on a new computer.
Therefore we choose “External drive or USB flash drive”.

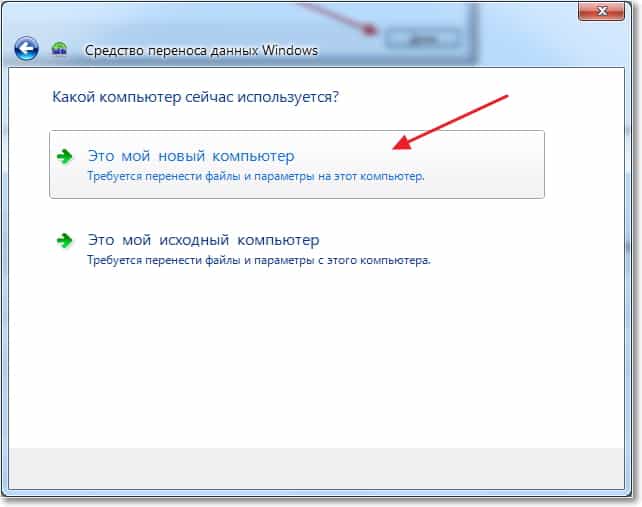
Then we need to select on which computer you ran the Data Transfer Wizard. In order to create a file of all settings and files, you need to select “This is my original computer”. We will choose the first option when we restore data on a new computer.

Now you need to wait while the program checks the possibility of transferring.

After verification, we will most likely have the opportunity to transfer general and specific account data. You can cancel some items (by clicking on “Settings”) that you do not want to transfer, such as videos or music, they take up a lot of space. Just uncheck unnecessary items and click “Next”. Make sure that the transfer file is not very large.

If you want to protect the data recovery file, then specify a password, if not, just click “Save”.

Now we just need to specify the location where we will save our file with a copy of the data. If it will be restored on another computer, then save it to a flash drive or external hard drive. And if you just want to restore it later on the same computer, you can save it to your hard drive.
Just do not save to the partition where the operating system is installed, most likely it is the local drive C. Because when you reinstall Windows, this partition will be formatted. Save it to local drive D, or E. In any case, this file can then be copied and moved wherever needed.

You need to wait until the file is saved. After saving the file, you can begin restoring data on a new computer. Or after reinstalling the operating system.

Recovering data from a file
After the file has been saved and transferred if necessary, we need to recover the data from it. There is nothing complicated here, let's run it again. Click “Next”.

We choose the third option.

We choose.
Click “Yes”.

Select the file that we saved. Click “Open”.

We can configure the elements to be transferred and click “Transfer”.

That's all, now our files and settings have been transferred to the new computer.
When and where to use data transfer?
Perhaps this should have been written at the beginning of the article. I also wanted to say a few words about when data transfer may come in handy. In the article I wrote that we are transferring data to a new computer. And this is probably the most common option; when buying a new computer, you can transfer all the data in a few clicks, and this is very convenient.
But not only buying a new computer can cause data transfer. This feature can be used, for example, when replacing a hard drive, or when reinstalling the operating system. Good luck friends!
Also on the site:
Windows 7: how to transfer files and settings to a new computer? updated: January 12, 2015 by: admin