Databases and phpMyAdmin in Denwer. Installing a database on denwer How to create a database in denwer
PhpMyAdmin is an interface that allows us to work with the database. MySql database is the main tool for creating dynamic websites.
The principle of operation is as follows: an HTML framework of the site is created and information is output from the database to certain places in the framework (for example, in the main content area) using PHP scripts, which forms the content of the site.
And in this article we will learn how to create databases on a local computer using Denver.
So, let's launch Denver and go deeper into the wilds ().
To launch we use the shortcut Start Denwer.
In the address bar of the browser we type the usual http://localhost.
Scroll the loaded page to the list of links.

Clicking on it will download, you won’t believe it, the program phpMyAdmin.
First we need to create a user for the database. The user has certain privileges (can edit, delete, create new tables and positions in the database) and is authorized using a given login and password.
When you purchase hosting from most hosting providers, a database and user account with a login and password that has all the necessary privileges is automatically created for you. On a normal hosting there is exactly the same phpMyAdmin through which you can manage tables and their contents, as well as import data from the local database to the hosting database. The login and password for accessing the database, as well as a link to phpMyAdmin, are sent by the hosting provider to your e-mail.
On the local computer, we will have to create the user ourselves.
Click on the link " Privilege" in the window phpMyAdmin and we get to a page listing all database user accounts. 
On the page " Privilege"click on the link" Add a new user».

On the page for adding a user, enter your login and password and select all the privileges, why bother with trifles.

Press the button " I went"and if everything is OK, then we see confirmation of the creation of a new user.

Now, when we work with a PHP script and connect to the database using it, we will need to use the username and password specified when creating it (the main thing is not to forget what we wrote there when creating the user).
Let's create a new table in the database for our project
Go to the main page of phpMyAdmin 
And right on the main page, enter the name of the new database, click the button “ Create». 
That's all, the base has been created. 
Information in the database is stored not just like that, but in tables. Therefore, we need to create at least one table with a certain number of fields. To do this, we will use the field “ Create a new table in the database».
Give the table a name and indicate the number of fields in this table.
Let me note this fact: there can be as many tables in the database as desired. And in order to take data from a table, you just need to indicate its name and the field from which the data is retrieved, and then insert it into the required place in the HTML framework using PHP scripts.

After pressing the button I went» the page for creating fields in the database is loaded. 
Rice. 1. Creating fields in the table.
Information in the database is stored as follows:
There is a database with a specific name (in our case new_base). The database contains tables; there can be as many of them as desired (in our case, we create a table tablica in the database new_base). Inside the table there are fields with data in cells, their number is set when creating the table (in our case we create 3 fields).
Graphically this matter can be represented as follows: 
Any table must contain a service field called primary key field. This field allows us to number the rows in the table and then access a specific row by its value in the primary key field (in our case, the role primary key fields playing field id).
Now that we're done with the theory, let's move on to creating tables in practice.
All text below refers to Fig. 1.
First let's create this much needed primary key field. Our primary key field will be the very first field. Let's go step by step:
1) Give a name to our field, for example id.
2) Select the field type. By default, the field type contains the value VARCHAR– this means untyped data, i.e. VARCHAR– these are any symbols. Text, numbers, letters - that's all VARCHAR. If we choose the type VARCHAR then in the next Length/Value input field you need to specify the maximum number of characters contained in the cell.
Another interesting data type is TEXT. Data type TEXT speaks for itself: the cells of a field of this type can contain any text characters (letters, numbers, spaces, HTML codes, etc.). But unlike the type VARCHAR type text does not need to be specified Lengths/Values. For TEXT the value length is automatically set to 65535 characters, and the input field Lengths/Values should be set empty.
And the last data type we are interested in is INT. In cells, fields like INT can only contain integer values. When specifying a field type INT you must specify the number of characters Lengths/Values.
Other data types are used very rarely. And when you feel the need to use other types of data, you will already be so developed in this direction that you yourself will know what they mean. And at this stage I will modestly keep silent about all the remaining perverted data types.
Now attention– to set the parameters of the primary key field, you must select a data type INT because the cells of this service field will contain integer data (line numbers).
3) For the primary key field we need to change the value Additionally on auto_increment. This is done so that when creating a new row, we do not need to bother entering data into the primary key field; it will be filled in automatically (a unit will be added to the value in the previous row of the primary key field - the Christmas tree increment).
4) And finally we need to put the radio switch in position Primary.
5) If desired, you can specify the value in Attributes UNSIGNED. This value indicates that the cells in this field will contain only positive numbers. This is done to optimize and reduce the memory allocated for variables.
That's all with the primary key field.
Zero– default value not null. This means that the cells of this field cannot be empty but must contain at least some value. If you need to keep the cells of a field empty (it is clear that for a primary key field this situation will arise can not no way) then change the value to null.
A few words about Lengths/Values. For field id 4 is indicated. This means that the cells of this field can contain information of no more than 4 characters (1000; 15; 9999 - can be contained, but 10,000 - cannot). A similar thing for the field info having the type VARCHAR.


Field id can be left empty, since it has the attribute auto_increment and the value 1 will be automatically written into the cell for the first field.
At the bottom of the page I click the button I went and the entry is entered into the database.
You can view the information recorded in the table by clicking on the tab Review.
Course on creating websites using engines
I decided to create a separate category to study the following three engines: WordPress, Joomla and Drupal.
Each of them has its own zest. WordPress can be called a favorite among webmasters. It’s not without reason that it’s been used for blogging since childhood. But it is not as simple as it might seem at first glance.
Joomla is the most common and very convenient for creating websites; at first everything is so confusing, but it only seems so.
Drupal is more like a lifelong love. It has great prospects and the best user support. You can create a project of any complexity.
Today we will test the WordPress engine on a local machine. This means that we do not need to buy a domain and hosting - it will all be on our computer thanks to Denver.
Denver is a program that will turn our local computer into a server. You can download the distribution from the Denver website.
True, the created site will be viewable only on this computer, and not for Internet users. But that's what we need. We will create a test site or blog to deepen our knowledge of engines and finally learn how to create a database and a MySQL user.
Creating a test site:
1 step. We install Denver.
All instructions are on the Denver website, and you can also read the forum if you have any problems.
Step 2. Create a folder to store test site files.
- To do this, go to the folder where Denver is installed, this is the default path C:\WebServers.
- Then go to the folder home and create a folder in it for our site files, for example testwp.ru. We have created a site name and it will have an address http://testwp.ru.
- Now go to the folder testwp.ru and already in it we make a folder with the name www. Here in this folder www and you need to unpack the files of WordPress or any other engine.
Step 3. Creating a database in Denver.
Step-by-step instruction.
Our engine works with the MySQL database that comes with Denver.
- Denver has created shortcuts on the desktop, find and run Start servers. Two black windows will quickly appear and disappear on the computer screen, do not disturb them, then launch the browser and type in the address bar: http://www.localhost/
- Find the title on this page Utilities, where follow the link Creating new databases and MySQL users.
- Fill out the web page that opens like this:
- MySQL Administrator Password:<оставьте пустым>
- Database name: testwp
- User login: testwp
- Password: testwp
- Repeat password: testwp
- And press the button Create a database and user.
4. The page will reload without you noticing and the following message will appear after the title: The database and new user have been created
5. So simply and quickly we created a database with the name testwp, login and password will be used to access the database testwp.
Step 4 Installing a WordPress distribution.
- Unzip the package into an empty directory. I answer where this empty directory is. This is the www folder created in Denver.
- Open wp-config-sample.php in any text editor and fill in your database connection information.
- Save the file as wp-config.php
- Download everything.
- Open http://your_site/wp-admin/install.php in your browser. This script will create the tables needed for your blog. If an error occurs, double-check your wp-config.php file and try again.
- Remember the password given to you.
- The installation script install.php will redirect you to the login page. Log in as admin with the password you created during installation. You can click on "Profile" to change your password.
This way you can create a test site on any engine.
See other thematic lessons or articles, they are also cheat sheets. These articles have already been published earlier and will greatly complement my new column: Course on creating websites using engines.
Why does your website need a database?
To understand this, you need to delve a little into how the Internet works in general.
So, when the connection is established, your browser requests the code of the page located at the address you entered. Receives this code, converts it into the page itself (text, pictures, etc.) and shows you on the screen what happened.
Where is this code stored?
Previously, websites consisted of static (unchangeable) pages. Webmasters had to code each page separately. Now there are many content management systems (CMS or site engines).
They automatically generate the source code for every page on your site. That is, you do not have to write the HTML code of the pages yourself - the engine will do it for you automatically.
I will look at different CMSs in more detail. In order not to miss this, I recommend
So, the CMS stores all the data on your site (all articles, links, user data, etc.) in a database. And when necessary, it takes them from there and uses them to generate page code. I think this is clear.
How to install a database on a local server?
First of all, we launch denwer from the “Start Denwer” shortcut on the desktop. Then go to the browser and enter in the address bar: localhost
We get to the denwera start page. Scroll the page until you see a table with links:

There we find the link: http://localhost/Tools/phpMyAdmin and click on it. We get to the phpMyAdmin control panel. At the top in the central part we see the menu. Click on the “Databases” item.

We see the heading “New database” (Create new database). Enter the name of the database in the field (must be written in Latin letters) and click the “Create” button
After which our new database appears on the left side of the page.
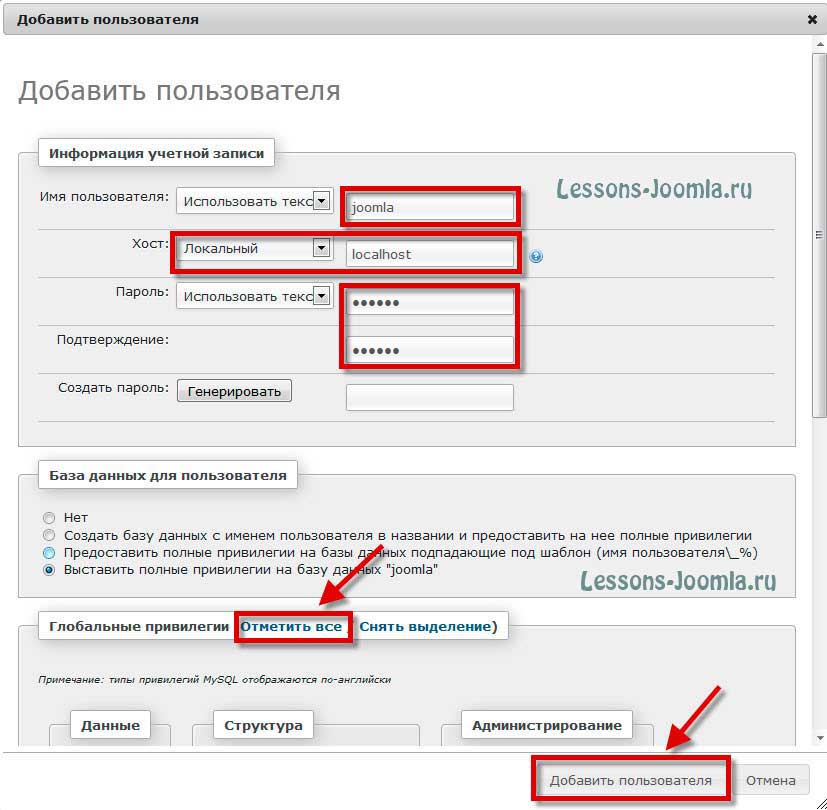
Now we need to create a user for this database. In the menu, click on “Privileges”. The Account Overview page opens.

On it we see all the users who are already registered on our local denwer server. And also below we see the “Add new user” link. Let's press it. A window of the same name opens, in which we must specify the username, host - localhost, password and password confirmation.

Attention! Don’t rush to click “Create a user”. That's not all. Scroll down the page to the “Global Privileges” heading. There we click on the “Mark all” link, check that all the boxes are checked and only then click “Create user”.

Our new user now appears on the Accounts Overview page.

And one more important point. Be sure to write down somewhere the username and password we just set up for the new user. We will need them to access the database.
That's basically it. You can close the browser. We have successfully installed the database on the denwer local server and registered a new user to access our database.
I hope the information was useful to you. It's only the beginning. I advise you not to miss anything.
(Denwer). Today we will continue our lesson from the series “ Installing and configuring a local server Denver (Denwer)" After installing Denver, the next step is to configure it. First of all, let's set up the Denver database. It uses (Free Database Management System) DBMS MySQL. To configure, the local server database is used in Denwer phpMyAdmin.
phpMyAdmin is an open-source utility written in PHP that provides full-fledged, including remote, administration of MySQL databases via a browser.
We launch Denver using the shortcut that is located on the desktop and type http://localhost/tools/ in the browser.
Click on phpMyAdmin and go to the phpMyAdmin Denver home page.

On the left side is a list of available MySQL databases in Denver. I have as many databases here as there are sites installed on Denver. Of course, you can use one database for several sites, giving each site its own prefixes. But if the hosting provider does not limit the number of databases created, it is of course better to create a separate database for each site. A phpMyAdmin Denver allows us to create an unlimited number of databases. To create a database in MySQL in Denver, go to the (databases) tab and enter the name of the database. It is better to enter a clear name so that it is not difficult to understand from the name which site this or that database belongs to. This is important when a large number of databases accumulate. I recommend creating a database with the name of the site so as not to get confused later. The adjacent drop-down menu can be left as default (comparison), or you can select from the drop-down list “ utf8_general_ci" "utf8_general_ci" is the base character set of the "UTF-8" encoding. "UTF-8" is the best encoding option to create a website in. In this case, you will not have problems with encoding, when the Cyrillic alphabet is displayed with question marks and unclear gibberish. This encoding supports both Cyrillic and even Chinese characters. Click (create).

A database with your name will appear in the left item of the phpMyAdmin panel.

Click on the name of our database and get into the database itself. Now we need to create a new user. For this we need the (privileges) tab.

Clicking on this menu takes us to the MySQL accounts page in Denwer. One account is enough for the Denver database, since our local server (localhost) is located on our computer. No one will get to it except us. But for real hosting, it is better to create a separate account. After the users table there is a link “Add user”.

By clicking on it, we go to the pop-up window for adding a new MySQL user to Denwer.
In the first field, enter your username. In the second field “Host”, select “local” from the drop-down menu; as a result, “localhost” will be automatically entered. In the following fields, enter the password as usual. In the “User Database” block we leave everything as it is and go to the “Global Privileges” block. Here we choose what privileges we will give to this user. Since we are the owner of this local server, click on the “Mark all” link and at the bottom click on “Add user”. After successfully adding a new user, again go to the “Privileges” page to make sure that a new user has been added to the Denwer database.
Now we have created the database and we can start installing CMS Joomla.
Denver provides a unique opportunity that allows you to turn your computer into a server. Unfortunately, you will have to put up with the fact that such a site or blog will function exclusively on this PC, but nevertheless, such a test site acts as a unique tool for fully understanding the engines. In addition, Denver allows you to learn how to create a database. If you also have a desire to know how to properly create a database in Denver, we recommend that you familiarize yourself with some secrets, after studying which all actions will become accessible and easy to perform.
The algorithm for creating or deleting a database in Denwer is clear even to a beginner.
If creating a database in Denwer is your top priority, there are just a few sequential steps to follow that will lead to achieving your stated goal. Of course, you will have to start by finding and downloading the Denver program itself and installing it on your computer. Only after completing this minimal preparatory work can you proceed to the next steps.
Creating a folder
Open “Computer”, go to local drive C, there you will find the WebServers folder, click on it to open it. Inside it you will see several more subfolders, among which there will also be a subfolder “Home”, move to it. Now, being in this space, you should independently create any folder in which the files necessary for the functioning of the site are supposed to be stored. In particular, we create a folder called “Testewp.ru”. This means that we have already come up with the name of the site - http://testewp.ru.

Inside the “Testewp.ru” folder we created, we need to create another folder, the name of which will consist of three letters w. In the created “www” folder, unzip the files of the engine on which your site runs, in particular, WordPress.
Database creation
Minimize, or better yet, close all unused windows. On your desktop you will find shortcuts that were created by the Denver program. Among these shortcuts, find Start servers, click on it to activate this process. Don't be alarmed by your computer screen giving you a slightly creepy wink. In particular, twice you will have to see black windows appear.
After that, open any browser and enter the link in the address bar - http: //www. localhost/. By following the link, you will find the “Utilities” parameter on the page that opens, follow it, find “Creating new MySQL databases and users.”

Now a kind of questionnaire will open in front of you, which, of course, will have to be filled out scrupulously.
It is best to fill all fields with the same phrase corresponding to the name of the site we created - testewp. It is important to leave only the first line regarding the administrator password blank. Next, all you have to do is click on the “Create database and user” button. You won’t even notice how the Denver program will reload the page on its own, after which the database will be successfully created, and you will be greeted with the corresponding phrase.
ATTENTION. As you can see, creating such a database turned out to be completely simple.
Along with the need to create a database, there is a need to delete it just as quickly. For this reason, users are actively interested in how to delete a database in Denver.
Of course, you can act as standard and simply delete the database, but then you will subsequently have to seriously pay for such a rash action, since every time you try to create a new database, you will have to encounter a warning that such a user already exists, and, accordingly, at the same time encounter a refusal.

To avoid such technical problems, it is important to follow a different path. Initially, in the program, you should click on the “Users” tab and find there what you want to delete. Next, at the very bottom of the open window, in the checkbox next to the phrase “Delete databases whose names match the user names,” check the box, and then click on the “Ok” button.
After the process is completed, Denver needs to be closed, then reopened, and only then begin to create a new base.
So, the process of creating and deleting a database can be mastered by those who carefully read the instructions at least once.