Unable to log into the Zyxel P660 web interface. Instructions for self-configuring ADSL modems P660RT2, P660RU2, P660HT2 and P660HTW2 for connecting to the Internet.
Before us is a very popular device due to its low price, which is used to distribute the Internet in offices and homes over the ADSL channel and Ethernet. Many people are interested in what stages the setting consists of. In this article we will look at this question in more detail.
Many users are attracted by the ease of use of the device.
The ZYXEL P600 series modem is highly secure and reliable to connect, and does not interfere with on-line operation. Note the following features of this device:
- One Ethernet port;
- works under the protocols UPnP, PPPoE;
- 802.1d standard;
- works with proprietary programs from ZyXEL;
- supports NAT;
- four indicators;
- DHCP server;
- support for Linux, Mac, Windows.
PC connection
The modem is connected to the computer via a patch cord, for this it is necessary to connect one end of the wire to the network interface of the “machine” and the other to the device itself. In addition, you will need an ISP cable (we connect it in WAN port). Characteristics of the modem allow you to use it via a USB interface (USB cables and patch cord are supplied with the equipment). Experts do not recommend using the second method, it can bear many difficulties in setting up (low bandwidth, the need to find drivers, etc.).
Customization
The device is configured through a simple interface. It is easy to get into it, it is only important to enter the address 192.168.1.1 in the browser and set the password (the standard for the ZYXEL P600 series is 1234).
The ZyXEL P600 series modem is a popular model that is widely used by users to connect to the Internet. Consider how the modem is configured when creating an Internet connection.
Connecting a ZyXEL P600 modem to a computer
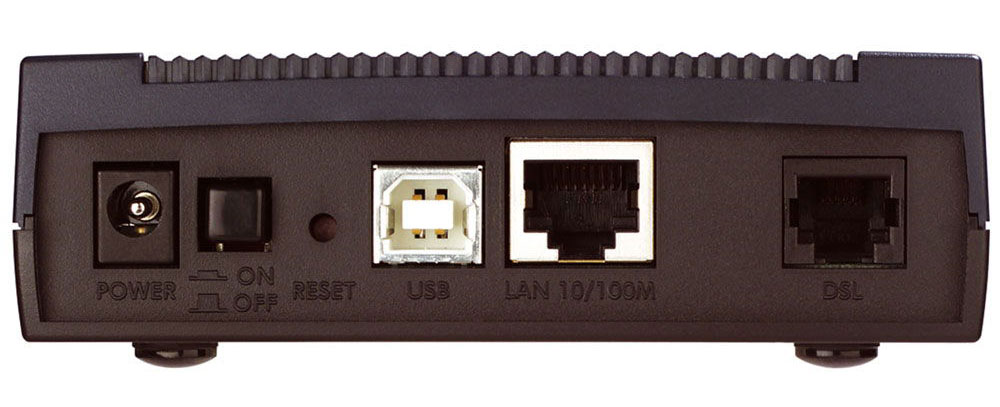
This modem can be connected to a computer or laptop in two ways: using a patch cord (patch cord) or USB cables that come with the modem. We will consider both of these methods, but first you need to familiarize yourself with the connectors on the back of the modem.
The first connector on the left is for connecting the power adapter. Then located on / off button of the device. Next is the button designed to reset the settings to factory settings. The blue port is for connecting the USB cable. The yellow connector is lAN port, light gray - WAN port.
If we connect the modem using a patch cord, one end of the cord needs to be inserted into the network interface card of the computer, and the other end into the LAN port of the router. The cable provided by the ISP, we must connect to the WAN port. Then we connect the modem to the power supply and press the power button.
Connecting using USB-wire passes through a similar scheme. The only difference is that you need to install drivers for operating system. You can download them on the official website of the company ZyXEL.
It is worth noting that the second connection method can provide bandwidth no more than 10 Mbps. Therefore, we recommend that you use the first method - connecting using a patch cord.
Internet setup on the ZyXEL P600 modem
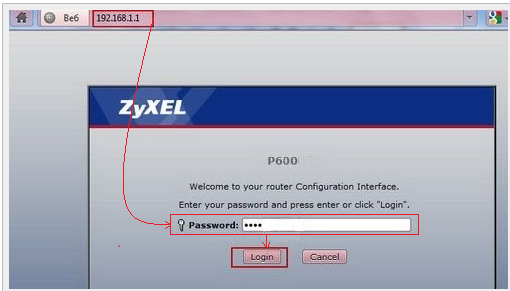
After connecting the modem to the computer, you can begin setting up an Internet connection. For this we will enter the working interface of the device. We launch any Internet browser and in the address bar specify the IP address of the modem (by default 192.168.1.1). Click on the "Enter" button and go to the login window in which you need to enter a password. The default password is “1234”, which we enter in the “Password” field. Then click on the button "Login" and go to the main configuration menu of the router.
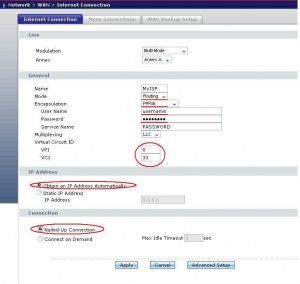
In the window that opens, find the section "Network" and select the item "WAN". It is in this tab, we will configure the connection to the Internet. Consider how the setting is made, for example, PPPoE connection. In the “General” block, find the “Encapsulation” field and select the “PPPoE” option. Then enter the user name in the “User Name” field and the password in the “Password” field. This data must be provided by the provider.

The remaining fields must be filled in according to the provider you use. Take the popular providers Rostelecom and Ukrtelecom as an example. If you are a Rostelecom client, you must enter the following field values:
- VPI - 0;
- VCI - 33;
- MTU - 1492.
Mark the options “Obtain IP Address Automatically” and “Nailed-Up Connection”. Then click on the “Apply” button to save the settings.

If your provider uses a connection type other than PPPoE, the Internet setup will have its own characteristics. In any case, check with the provider in advance all the necessary data.
Configuring wi-fi on the ZyXEL P600 modem
Not every ZyXEL P600 series modem is suitable for configuration. wireless connection. Older models do not support this way of connecting to the Internet. However, if you are the owner of a new version of this router, you can configure on it wi-fi network. Consider how to do this.
In the working interface of the router, we find the section “Network” and select the item “Wireless LAN”. Tick the option “Enable Wireless LAN”. Then we specify the name of the network, which will be displayed in the list of available wireless connections. We write the name in the field "Name (SSID)".
The next step is the choice of data encryption method. We recommend that you select the option “WPA2-PSK” in the “Security Mode” field, and “TKP” in the “Encryption” field. This will provide reliable protection during data transfer.
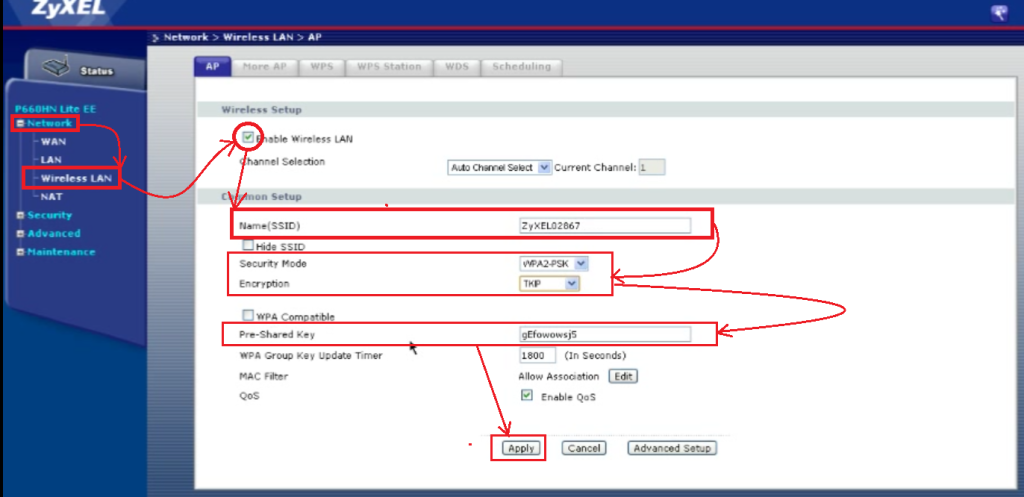
And finally, we specify the password that will protect wireless network from unauthorized access. The password must consist of at least 8 characters (letters and numbers). Enter it in the “Pre-Shared Key” field, and then click the “Apply” button to save the settings.
ZyXEL P600 series modem firmware
If you want to improve the quality of your modem, we recommend periodically updating its firmware. By updating the firmware, you can increase the data transfer rate or adjust correct work IP-TV. Consider how to change the firmware on the modem ZyXEL P600 series.
First of all, you need to download the latest firmware version. If you did not find the firmware for this model on the official website, download the firmware for the ZyXEL P666 EE modem. It is also suitable for the ZyXEL P600 series modem. Select the latest firmware version on the site, download the archive and unpack it. Then you need to select the section "Maintenance" and the sub-item "Tools" in the interface of the router. In the opened tab, click on the “Browse ...” button and in the search window specify the path to the firmware file that is stored in the memory of your computer. The desired file in the unpacked archive has the extension “.bin”. Select it and click the “Upload” button.
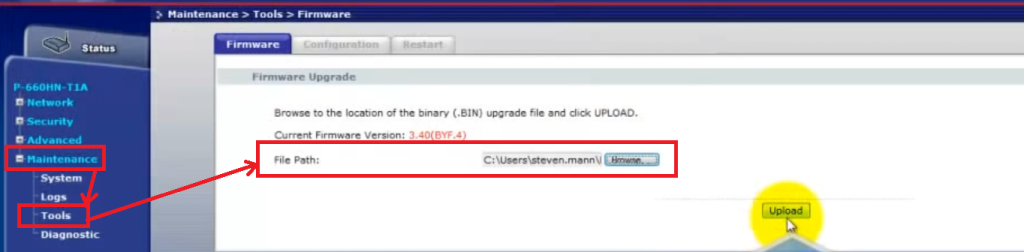
The process of updating the firmware will begin, which will take no more than two minutes. After this process is complete, you can start using a modem with an updated interface.
For clarity, the video: ZyXEL P600 series
Setting up Internet connection via DHCP
In order not to describe the whole process will present to your attention the video.
Server on your computer with zyxel p600, open ports
Do everything as in the video:
Note: Check if your antivirus programs are disabled. Is the Firewall disabled and your ports open onWindows .
Specify the number of the contract, who issued.
We check the balance of the account, if the balance is negative, then after checking for this instruction, we recommend replenishing.
To configure the modem in the "bridge" mode, use the web interface and the console.
1. To do this on network card The PC dials the ip-address from the 192.168.1.x subnet (for example, 192.168.1.2), the mask is 255.255.255.0. First of all, we set up via WEB, and then only through the console (but not vice versa!)
We register our DNS addresses!
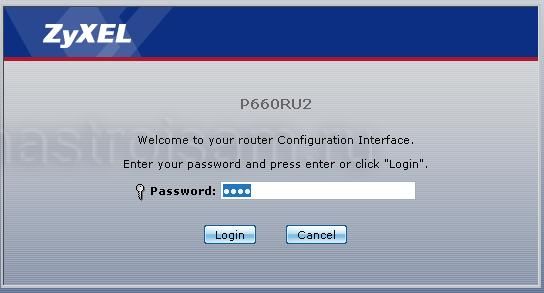
2. Enter the address in the browser address bar http://192.168.1.1/
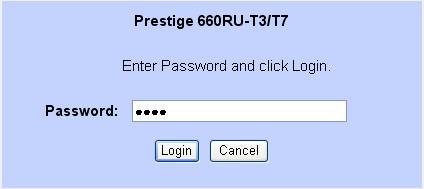
3. Type the password - 1234 and click "Login":
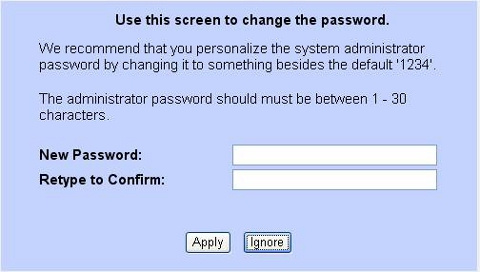
4. In the next window, click "Ignore":
5. Select “WAN”, then “WAN setup”:
6. In the “Mode” line, change “Routing” to “Bridge”:
7. Click "Apply" and close the browser.
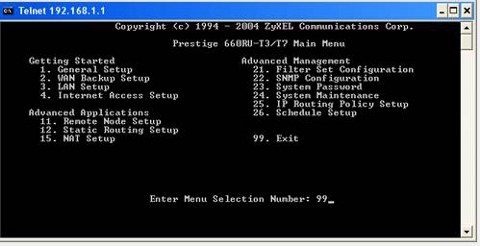
Now the modem configuration in the “bridge” mode needs to be done via the console, for this:
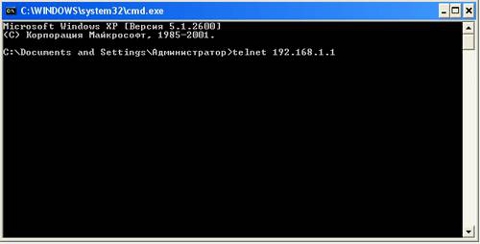
1. Click "Start", select "Run", type cmd command and click "OK".
2. In the terminal window, type: telnet 192.168.1.1, and press "Enter":
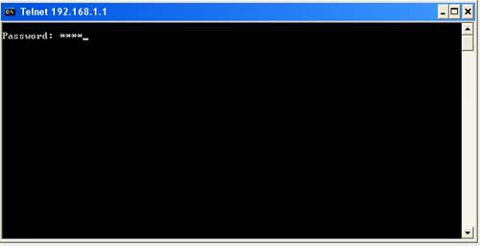
3. Enter the password - 1234 and press "Enter":
4. In the menu that opens, select the number 1 - “General Setup”:

5. Type in “System Name” any set of Latin letters.
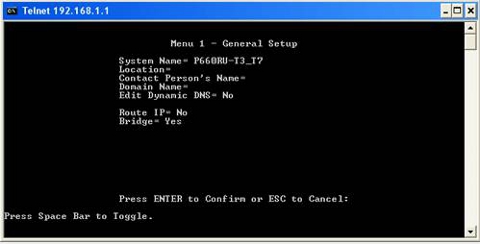
6. Press "Enter" to reach the point "Route IP = Yes", change it to "NO" with a space.
7. In the item “Bridge = No”, with space change to “Yes” and press “Enter” twice.
8. Type 99 and press "Enter":
Model settings P660RU2 EE identical to the models P660RT2 EE and P660HT2 EE.
Open the browser and in the address bar type: http://192.168.1.1 and press Enter.
If you just click Loginthen we will open the web interface in limited functionality mode
.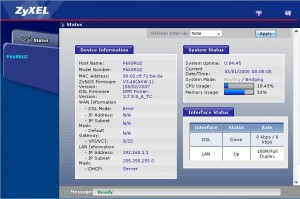
Here, only basic information is available to us: modem software version, network and ADSL channel settings, interface status, current modem CPU load, etc.
To log into the web interface in normal functionality mode - we need to enter a password 1234 and press Login.
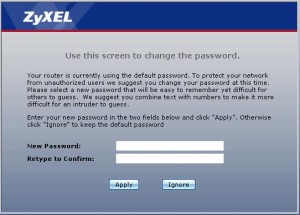
In the window that opens, you must enter a new one, different from 1234 password. This is done to prevent unauthorized access to the modem settings. Push Apply.

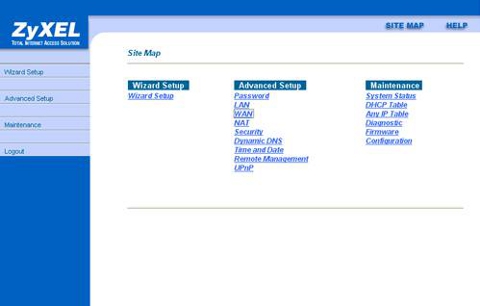
Here we select the item Go to Advanced Setuppush Apply.
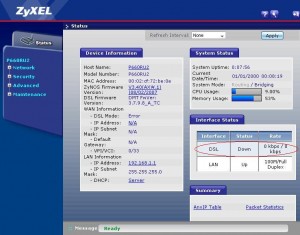
So, we are in the web interface. Before us is the settings menu (left) and the status window (in the center). If the telephone line is connected to the modem, then in the window Interfaces Status You can see the current ADSL connection speed.
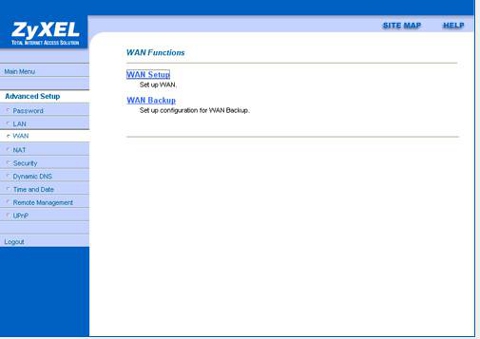
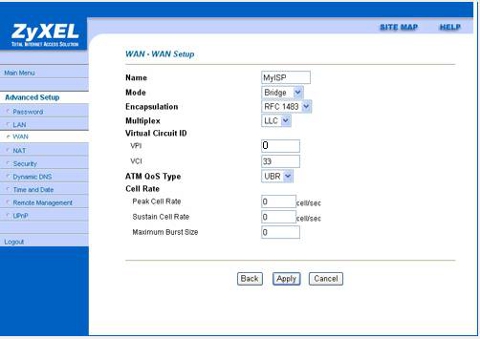
Configure the parameters of the ADSL channel. To do this, select the menu on the left Network -\u003e WAN.

The window that opens presents the main parameters of an ADSL connection. To configure the ADSL channel directly, enter the parameters VPI / VCIwhich we previously know in the technical support provider. For example, for the provider VolgaTelecom, the VPI / VCI parameters are 0/33. Multiplexing — LLC (VC is used very rarely). Also very important point is the choice of modulation ( Modulation).

In most cases, the best choice is Multi mode. If you need one specific modulation - then select the desired one from the list.
Another important parameter for this modem model is the choice of frequency standard - Annex A or Annex B. On standard lines used Annex A. If you have an ISDN line or is connected security alarm Something Annex B.
Now it is necessary to decide in what mode the modem will work. If we have one computer, then the easiest way is to set up a modem in Transparent bridge . In this case, we will establish a connection from a computer via a high-speed connection. To configure the modem in this mode in the drop-down list mode choose Bridge.
Push button Apply to apply the settings. Actually everything - you can work. It should be noted that Zyxel modems do not require additional actions to save the settings, i.e. When the modem is rebooted, the settings will be saved.
Now consider the option to configure the modem mode The router.
To do this in the drop-down list mode choose choose Routing, Encapsulation PPPoEin the fields Username and Password specify the username and password given to us by the provider. Configure the additional parameters as follows:
IP Address — Obtain an IP address automatically(usually users are assigned IP addresses dynamically).
Connection— Nailed-Up Connection.
Push button Apply to apply the settings.
At this setting you can finish. But sometimes it becomes necessary to configure a modem for a specific local network. To do this, select the menu item Network -\u003e LAN.

Now we change the IP address of the modem and the mask to those that we need. If we want to enable or disable the built-in DHCP server
- select the tab DHCP setup.
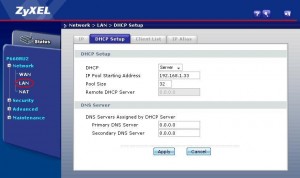
Here we select the mode of operation. DHCP(Server / Relay / None), the IP address of the beginning of the array of dynamic IP addresses ( IP pool starting address), the size of the dynamic address pool ( Pool size). Also here we can manually set addresses DNS servers. To apply the settings click Apply.
Some providers have a service. IP-TV. It usually goes on a separate virtual channel ( PVC). To set up additional channels, select Network -\u003e WAN -\u003e tab More Connections.
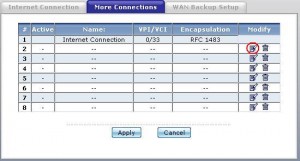
Here we select the edit icon on any empty connection. Next, set up by analogy in accordance with the parameters provided by the provider.
And finally, if you want for any reason to change the password to enter the modem. To do this, select the menu on the left Maintenance -\u003e System -\u003e General.
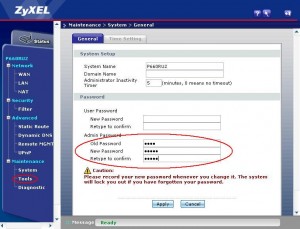
In field Old passwordenter the old password and enter the new password twice in the fields below.
Reboot the modem.
ZyXEL P600 is a good old series of DSL modems that work in homes and offices to this day. In this article we will talk about some of the features of setting up modems from ZyXEL.
When entering the web interface, only device statistics are displayed. There is no possibility to change the settings
Logging is a feature of ZyXEL authorization. The fact is that there are two types of access: user and administrative. Accordingly, there are two passwords. If, when requesting a password, you specify a user password, you will not see anything except the page Status with statistics. Users are perplexed: they are trying to find a link on the page to enter the advanced settings mode, but it is not there. In fact, to configure the device, you must click Logout , refresh the page and enter another password in the same field - the administrator password.
On the Internet, it is often advised to use ZyXEL's NetFriend utility utility. As if with it you can get full access to the settings of the modem. But this does not solve the problem if you do not know the administrator password.
I do not know the administrator password, how can I configure the ZyXEL modem?
The solution is only one: reset the modem settings and configure it again.
Step 1. Find your contract with the provider where your credentials for connecting the modem to the Internet are indicated. Contact the provider’s technical support (or go to the official website if the Internet is working) and find out how to set up a modem to work with your provider. Ultimately, you should have a list, for example:
Encapsulation = PPPoE VPI = 0 VCI = 33 Username = vasya328 password = 12345678
Step 2. Reset the modem settings. To do this, using a sharp object while the modem is on, press the button RESET and let it go until the indicator Power will not blink. It usually takes about 20 seconds. When indicator Power blink, release the button RESET, do not turn off the modem and just wait a couple of minutes. The modem will automatically reboot and reset the settings to the factory settings.
Step 3. Go to the modem web interface. Normally, the default IP address is set. 192.168.1.1 . Type in the address bar of your browser:
http://192.168.1.1
Enter the default administrative password:
After that, the system prompts you to change the password to a more complex one. If you are not worried about security and want to leave a password 1234 press the button Ignore. We recommend setting your password. To set a new password, enter your password twice and click Apply. After that, you will be taken to the advanced modem settings.
Step 4. Configure the Internet connection using the data found out in Step 1. Find the section Wan and fill in the fields Encapsulation, VPI, VCI, Username, Password. Then save the settings using the button Save Settings.