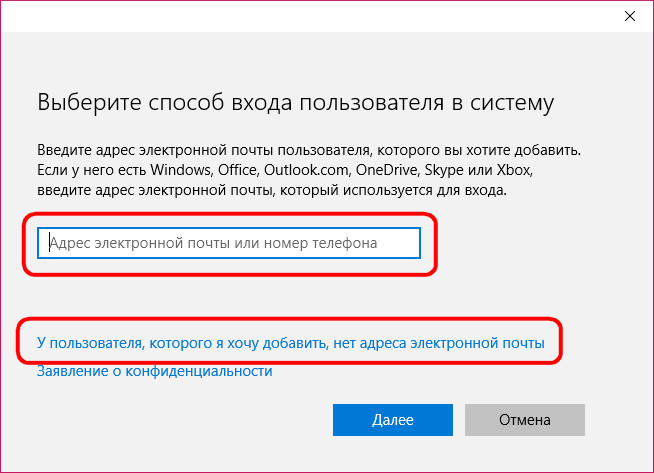
User Account Management. Name conflict resolution
Today our lesson and discuss user account management.
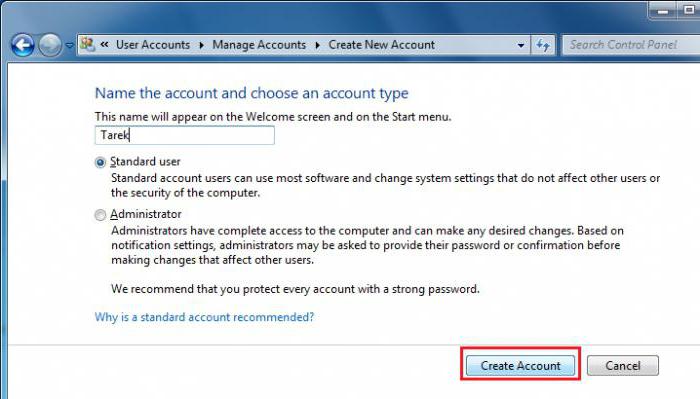
We have specified the name, now let's choose, for example, the type of the entry “Normal access” and click the “Create account” button. Now select from the list the newly created account and go to its settings.
In principle, the main thing we have already configured is the name of the account and its type. Now we can change something, but add something.
So, for example, the first item "Change Account Name" we will provide the opportunity to change the name accordingly.
We can simply rename the account.
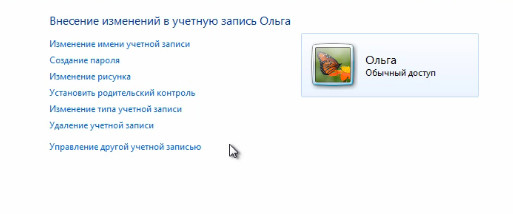
If you want to your account password has been setb, and you could go to the computer only by typing it. Thus, you can restrict access to some of your personal documents that are stored in your profile. Accordingly, you can create a password in this area. Here you enter the password, then enter the same password again for confirmation, and you can also enter a hint that will be displayed to you.
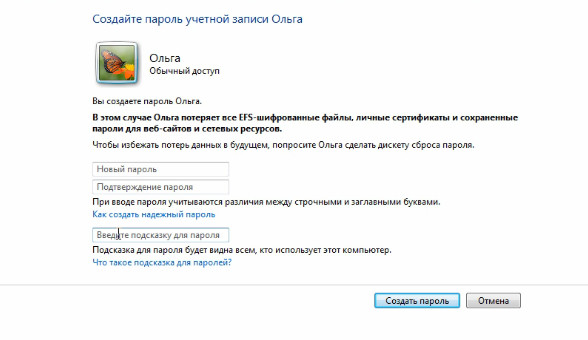
Let's set, for example, some simple password, confirm it, and enter the text hint “text hint to the password”. Click on the button "Create".
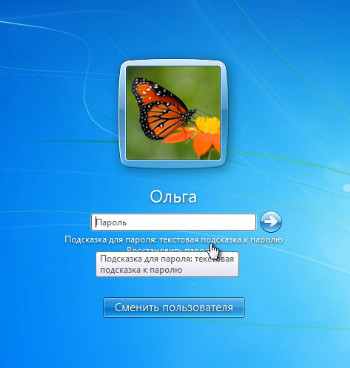
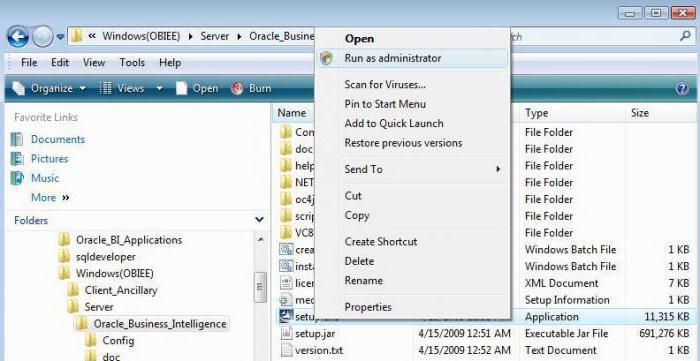
If I now, and near the Shut down button, click on the black triangle and select from the drop-down list "Change user"then I’ll see the welcome screen.
In order to get into the recording Olga, you need to click on this icon and I have a window where I need to enter a password.
Accordingly, in order to get into this entry, I need to enter a password. If I have forgotten the password or entered it incorrectly, then my hint, the text that I entered, is displayed here.
Let's go back to my user and consider what’s next.
After we have entered the password, we have the opportunity to delete it by simply clicking on this item.
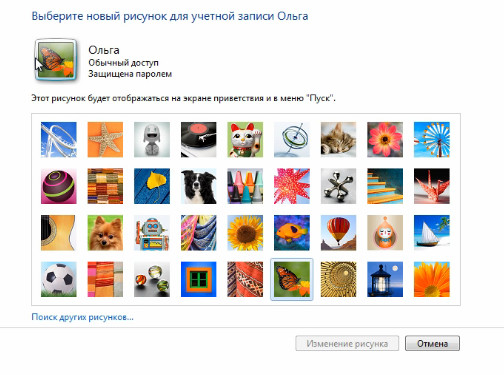
Drawing this here this here is the image that we have associated with our account. As we already know, this image is displayed not only on the welcome screen, but also in the Start menu. Therefore, we can choose this image from some standard ones that are presented to us here.
Let's choose, for example, this one here is a sunflower and click on Change Picture. Here, now he has applied.
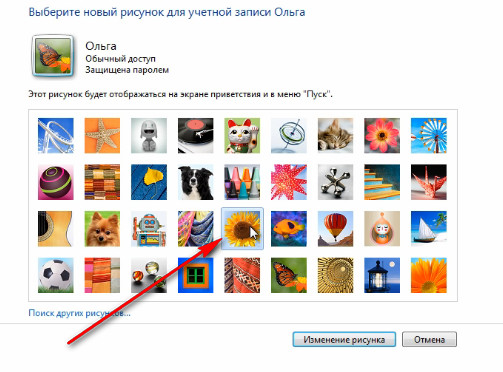
Or we can use the button. "Search for other pictures" and select an image on your computer, then this image will be displayed as this image of your account.
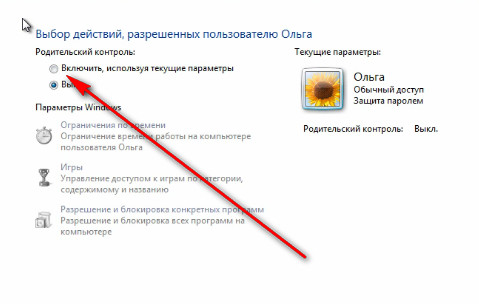
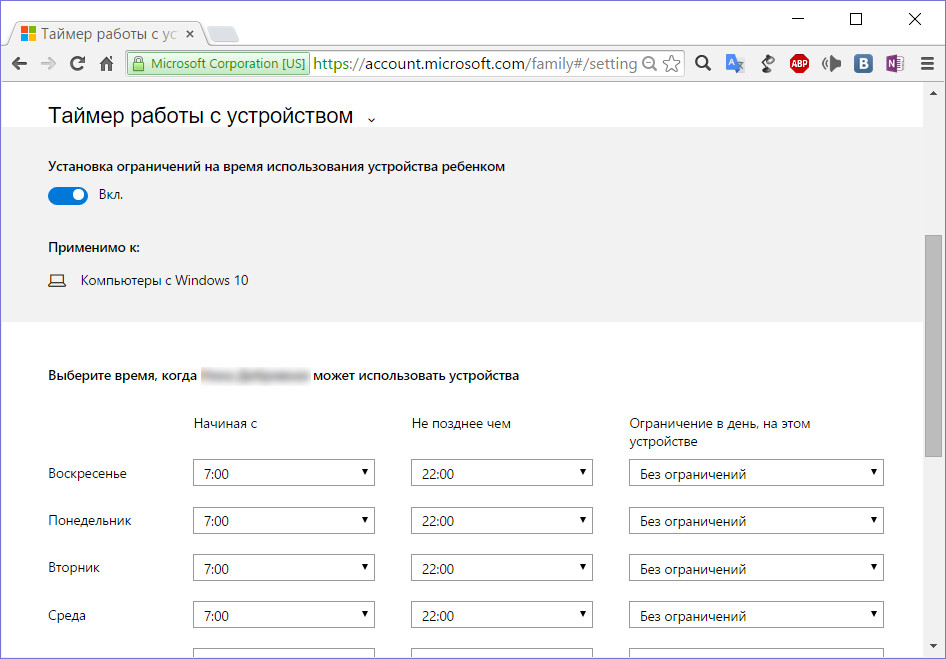
We also have an option “Set parental control”. What it is? If a child works at your computer, then you can create a separate account for it, and then adjust the parameters of parental control. To do this, we need to choose our account.
Parental control is disabled by default and here we can enable it.
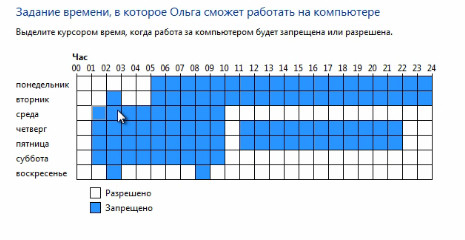
Here we can introduce time limits. That is, here we can specify the time intervals in which access to the computer will be allowed. All we need to do to do this is simply to indicate the hours in which access to the computer will be blocked.
Just block those watches that we consider necessary. Or we can block everything at all, and then just indicate the clock when access to the computer will be allowed. After that, respectively, you need to click OK.
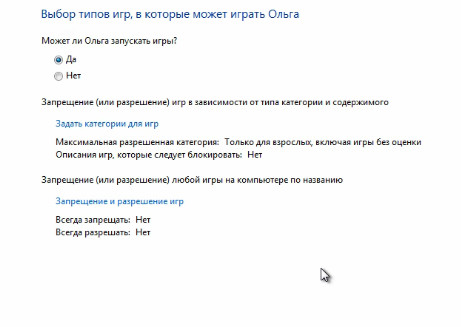
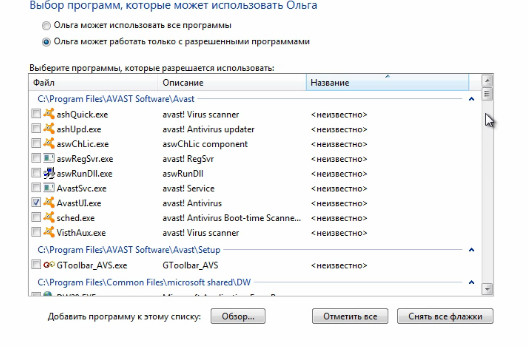
And the last thing that can be configured here is permission to work in some programs. Here we can choose those programs, a list of those programs that are there will be displayed here, and we can check the boxes next to those programs to which the user will have access.
And accordingly we can uncheck those programs for which access is undesirable. And accordingly, your child will not be able to run some program that you would not want him to run.
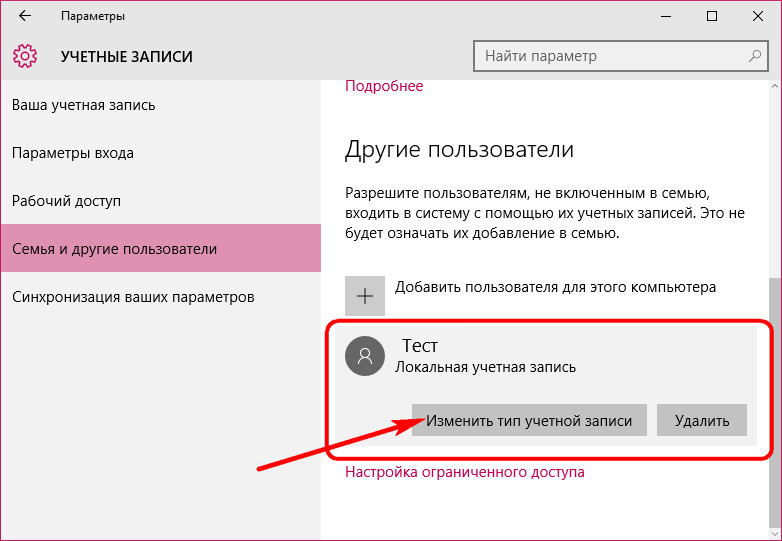
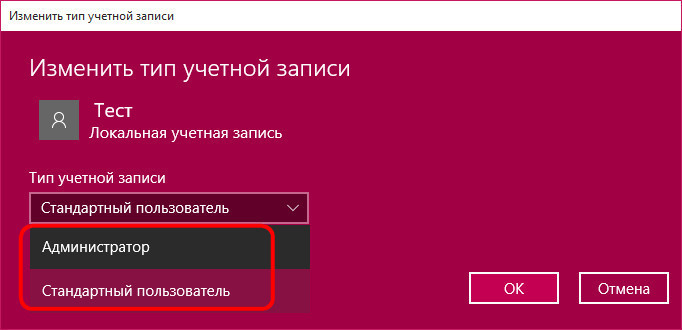
Let's go back to the general settings. If necessary, we can always change the type of account. That is, we will have this user or Administrator, or will have a regular account. This is done in paragraph "Change Account Type".

But in order to change the type from normal to Administrator, you must already be an administrator on this computer. That is, you must log on to the computer under an administrative account that already has rights. If you are under your account and your account has regular access type, you will not be able to make this change.
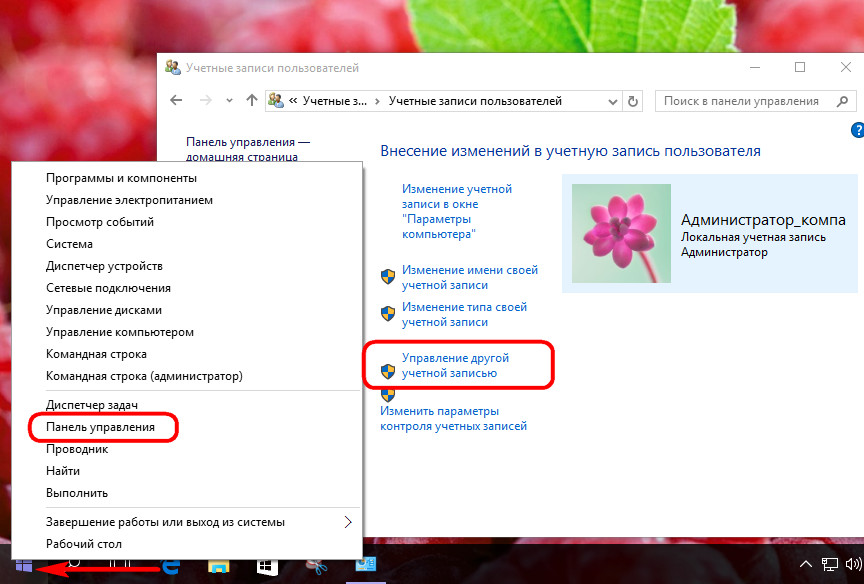
It is, in principle, relevant for “Account deletion“If you want to delete an account, then for this you need to have administrative rights on this computer.
In order to delete an account, you need to go to the “Account Management” item and, accordingly, you can select the necessary account and select the “Delete account” option. Here we will immediately be offered to delete either all of the files at once and completely, that is, the entire profile of this user, or “Save Files” and delete only in the Windows record. I will not do anything like that yet.
So we learned how to create accounts, I’m finishing this lesson.
Natalia Gerasimenko
Probably, today there is not a single person who would not come across a situation when several people work on the same computer, and each logs in with their login and password (the so-called user account in Windows). But far from all users know what a “accounting” is and how to change or control its basic parameters.
What is a user account?
The term denoting the account, comes from the usual translation of the English phrase User Account. In other words, a user account with a computer system with different levels of access to information, parameters, personal settings, programs used, etc.
No need to explain that we encounter accounts everywhere. Even a regular email address on a free mail server can be interpreted as a “user account”. The same applies, for example, to online games, users working on computer terminals connected to a local area network, programs like Skype, ICQ, etc. In general, if one expresses himself in simple language, this is the registration data of the user. But here all these types of "accounting" differ quite strongly. Now it will be considered exactly the user accounts of Windows 10, as well as 8, 7 and other versions of the OS. Basically, their essence for all "OSes" remains the same.
What are the benefits of a user account?
So first, let's see what the benefits of an account are. First of all, it should be noted that any user who does not have access rights to information at the administrative level can be completely confident in their own security - from the point of view that no other person equal to him in terms of access rights can view his personal files, history of work on the Internet, change personal data or do something else.
It turns out that the system simply hides all these files from prying eyes, but only if folders and documents are not assigned the status of a shared access, when absolutely all computer users who are, for example, in one local or virtual network, can use such files . From the point of view of confidentiality, this is very good, and only the administrator of a particular computer or the system administrator of the local network (sysadmin) has full access. Let's see what are its functions.
Administrator
As for the main (initially created) administrator account, this “account” can be described as granting a single person full access rights to information, changing the configuration of system parameters, installing or removing programs and applications, and managing other accounts.
In simple terms, the administrator is the most important user for whom there are no restrictions on working with a computer and the operating system, and who has exclusive privileges to perform certain actions. And it is the administrator who performs full control of user accounts with the possibility of granting rights or limiting the capabilities of any other user.
But the most interesting thing is that a computer system (if only one or several operating systems are installed) can have one or several administrators. Better - if one. And of course, in parallel, there may be users with practically the same rights, but such a hierarchy can be compared with, say, the army.
Suppose there are two officers in the rank of colonel. But one of them according to the post is the regiment commander, and the second is the chief of staff. The title is the access rights, the title is the user type. Probably, it is clear that within one unit (computer in our case) the regiment commander has the status of administrator, and the chief of staff (below) - the status of the user with some restrictions in rights.
Types of users
Now let's go directly to the users and groups themselves. As a rule, all types of user accounts in Windows are divided into three types: administrator, user with normal access (standard user account) and guest (“guest”).
As is already clear, the administrator has absolutely all the rights; ordinary users are allowed to simply work with a specific computer terminal. Guests are, roughly speaking, strangers who have minimal rights (only to log in to the system, but no more).
As for the groups, the administrator himself can create them completely arbitrarily, and in unlimited quantities. In fact, users who have certain rights and permissions can be grouped into different groups, or they can be grouped on some other basis, for example, they belong to a certain structure in the enterprise management (technical department, accounting, etc.).
User Account Control
As for control, the main functions are assigned to the administrator. The system in this case acts only as a means of enforcing the rights of users or maintaining a certain level of security.
It should be noted that the control of user accounts (Windows 7, for example) can be performed only when logging in to the system using the login and admin password. No other user has the right to make changes to the settings of the "account", the granting of rights to any actions or the removal of restrictions.
Here it is worth noting one important moment. Despite the fact that the system itself provides for control of user accounts, Windows 7 and other newer versions of the OS may grant temporary administrator rights to users (unless this contradicts the security and group policy settings). To do this, there is a special line in the context menu for starting programs. Such an approach allows users, for example, to install their own applications or use the same portable versions of programs that do not make critical changes to the registry or do not change security settings.
Access rights and restrictions imposed on accounts
With regard to restrictions on rights, they can be quite a lot. The fact is that the user account control of the 8th, 7th or 10th version of Windows provides for a sufficiently large range of what can be allowed or denied to the user with certain rights.
So, in most cases, the main restrictions for users below the admin level can be: imposing a ban on access to the registry and editing it, changing security system settings or group policy settings.
At the same time, as a result, there is also a ban on installing certain programs, using already installed applications or working with certain types of files and folders, reading removable media, etc. This is a reasonable step, since an inexperienced user can easily try to view files on an infected virus flash drive or install a suspicious program, and if the computer terminal is connected to a local network, the virus can easily migrate to other machines and harm so that absolutely all terminals will not work otosomed
That is why quite interesting is often used in the same “lokalka”. In the standard version, each terminal has its own “OS” (no matter what modification it is), which works independently of the central server.

In the second case, the computer does not have an operating system as such at all (sometimes it doesn’t even have a hard disk), and the network OS boots from a single remote server for all terminals. This type of boot can be seen in the BIOS settings (usually referred to as PXE Boot or Network Boot). The advantages of such a Windows start are obvious, because the user, no matter how he would like to, cannot change any parameters, even the simplest ones.
Create an account in Windows
Now for the time being we will leave alone control of user accounts and consider how to create an "account" of one type or another. As mentioned above, after a clean installation of the system, the user receives admin rights, and it is he who has the exclusive right to create, delete, or change any account present in the system.
To create a new record on the local computer, in the simplest case, go to the appropriate section “Control Panels”, then choose to create a new “account”, enter the name (“Peter”, “Vasya” is not important) and determine the type of record ( normal access or administrator), and then confirm your actions. After that, in the same section, you can create a login and password that will be used when logging into the system. You can also change the picture and other options available for this registration record. And, of course, the passwords and user accounts by the administrator can be changed even without the intervention of the users themselves. Actually, in some cases (restriction of rights, for example) their consent is not required. But most often it concerns local networks and system administrators, when the user is somehow guilty and has damaged the system.
Manage personal account settings
In terms of management, the user account of any level is controlled directly by the administrator. However, the user can change some system settings, say, the desktop wallpaper, resize windows, etc.
As for the rights to change more serious parameters, they can be provided by the administrator through the control menu in which the specified account is located. Another user can not change anything. Let's see what settings can be made in this case.
Changing the basic settings of accounts
First of all, the admin can configure permissions for system settings, programs, and some types of files. All of this is set either in the above section, or in the group policy client.
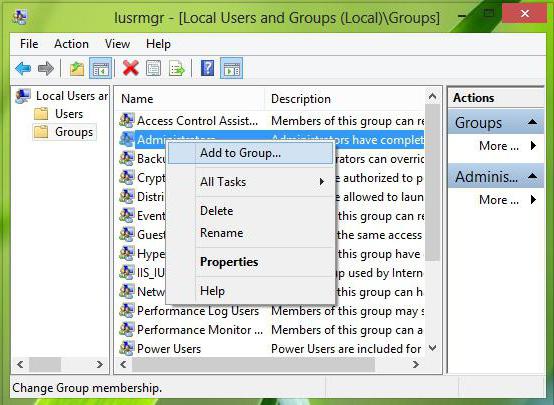
However, you can first use the local users and groups section to add a user. To do this, the lusrmgr.msc command is entered in the Run menu, and already in the computer management menu it is the user section, where the right-click menu is displayed with the option to add a new person. You can add it to a group either through the properties menu, where group membership is selected, and then the name of the working group and the search for names are entered, or through the group search itself, using the Advanced button in advance. It remains only to confirm the choice.
If we talk about the access rights to certain functions, it is best to use the control parameters in the “Control Panel” or in the system configuration (msconfig) with the choice of the service menu and the control settings, but more on that later. In the same, you can set the appropriate priorities (there are enough settings).
Deleting an account
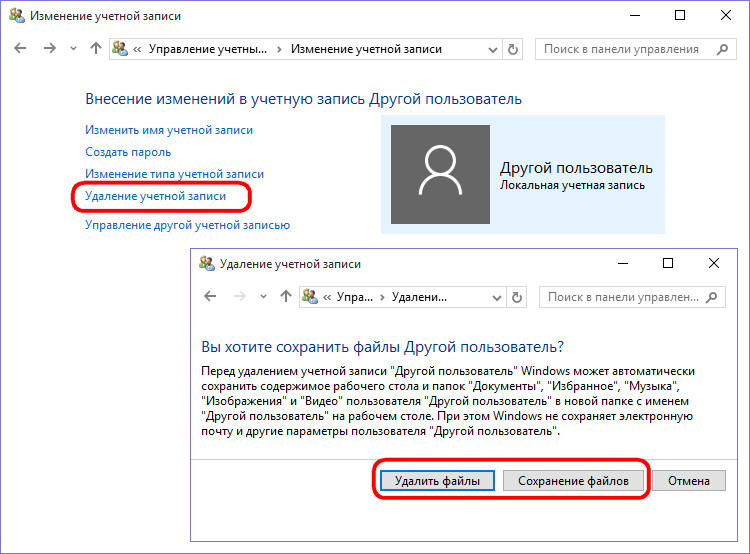
You can delete or disable any “account” from the same “Control Panel”, where in the control menu of another account you simply select the delete line (of course, when logging in as an administrator). That’s all.
Then the user, when attempting to log in to the system, can then receive a notification that the user account is disabled. It will not be possible to restore it after deletion, so on behalf of the administrator you will have to create a new one. However, when deleting a record, you can save custom files that will be available upon completion of the procedure.
Disabling User Account Control through the “Control Panel”
If we talk about how to disable the control of user accounts, the first thing to do is to use the “Control Panel”.
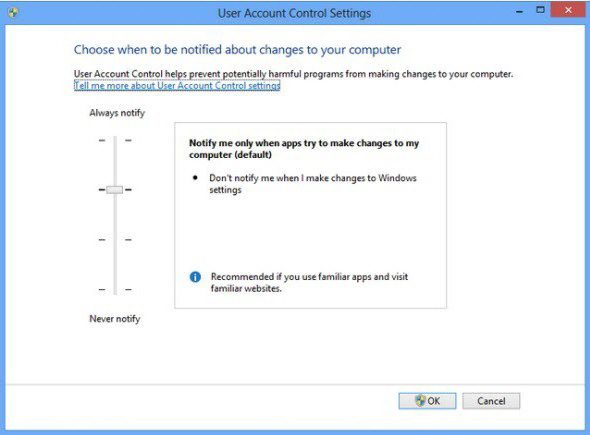
Here you need to select the options menu, and in the window where the vertical slider is located, simply move the latter to the lowest position corresponding to the “Never notify” parameter, which means only that the system will not issue any warnings regarding the configuration changes.
Disable User Account Control via the command line
As mentioned above, in the “Run” menu you can use the msconfig command with a transition to the “Service” section or the “Tools” section, where the setting is selected, which corresponds to the control of user accounts.

Select this line, then click the "Start" button, and then perform the actions indicated just above. However, access to disconnection can be simplified if the UserAccountControlSettings.exe string is immediately entered as a command. Then everything is the same.
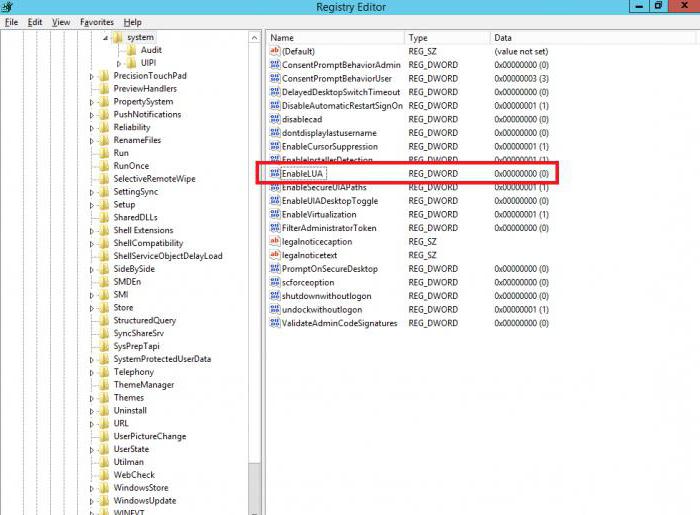
You can, of course, also use the EnableLUA parameter (change the value to “0”), which is located in the Policies \\ System branch of the main tree HKEY_LOCAL_MACHINE \\ Software and further, or with the help of the Windows command handler (in both cases the user account will remain unchanged , and control over it will be disabled). However, these methods will be somewhat difficult for an ordinary user.
Instead of an afterword
In short, everything related to what constitutes “accounting” and control of user accounts on the local computer. It did not cover topics related to similar actions of the local network administrator, but, in principle, one could say that all the basic procedures are almost the same, except that sometimes some changes and settings may affect the internetwork protocols. But this, as they say, is another question.
In the new Windows 10, Microsoft continued the tradition of delimiting the computer space by separate accounts for cases when the device is used by several people. We will not see any major changes compared to the predecessor of Windows 8.1 in the new system. Windows 10, like Windows 8.1, provides for work with local user accounts and with connected Microsoft accounts.
The latter is still preferred. As before, the Microsoft account is something of an access key to the synchronization of system settings, to the work of some Metro-functional, as well as other Microsoft web services. Changes in the functionality of the accounts are minor, but they are: unlike their predecessors, Windows 10 offers a more elaborate system of using one computer device by several users. Now the operating system rigidly divides them into their and strangers . For its Windows 10 provides for the creation of special accounts of family members, including children with customizable online parental control function.
Let us consider in detail the functionality of accounts in the Windows 10 system.
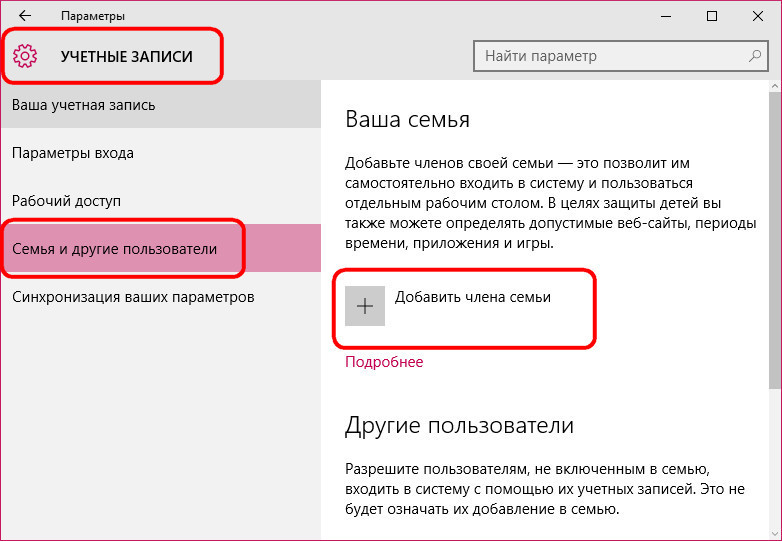
Regular tools for working with accounts
Tools for working with accounts in Windows 10, as in Windows 8.1, are scattered across two types of system settings - in the control panel and in Metro-application "Parameters" . In the control panel of Windows 10 there are functions of changing the name, password, type of accounts. Left and the possibility of their removal. But the prerogative of creation belongs purely Metro-functional system.
So, most of the functions for working with accounts are concentrated in Metro-The application is, respectively, a section.
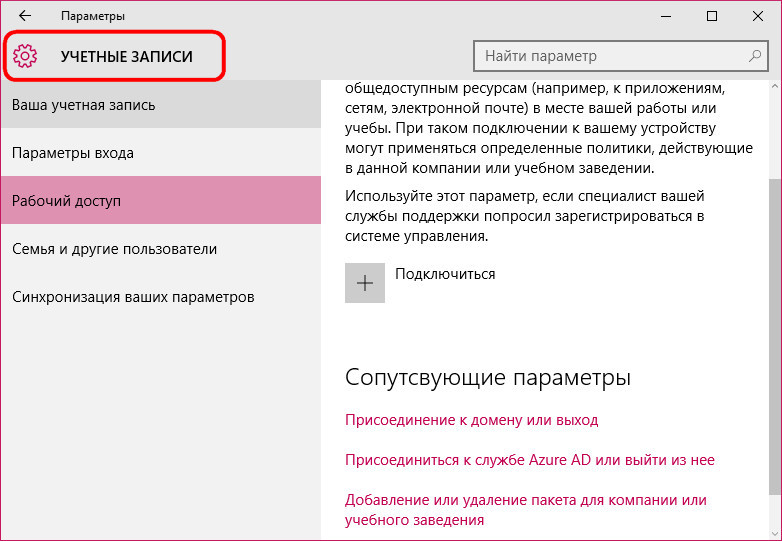
In the accounts section Metro- system settings you can connect and disconnect Microsoft accounts, create and delete new accounts, change passwords and PIN codes, set up synchronization parameters, connect to resources from your place of work or study, etc.
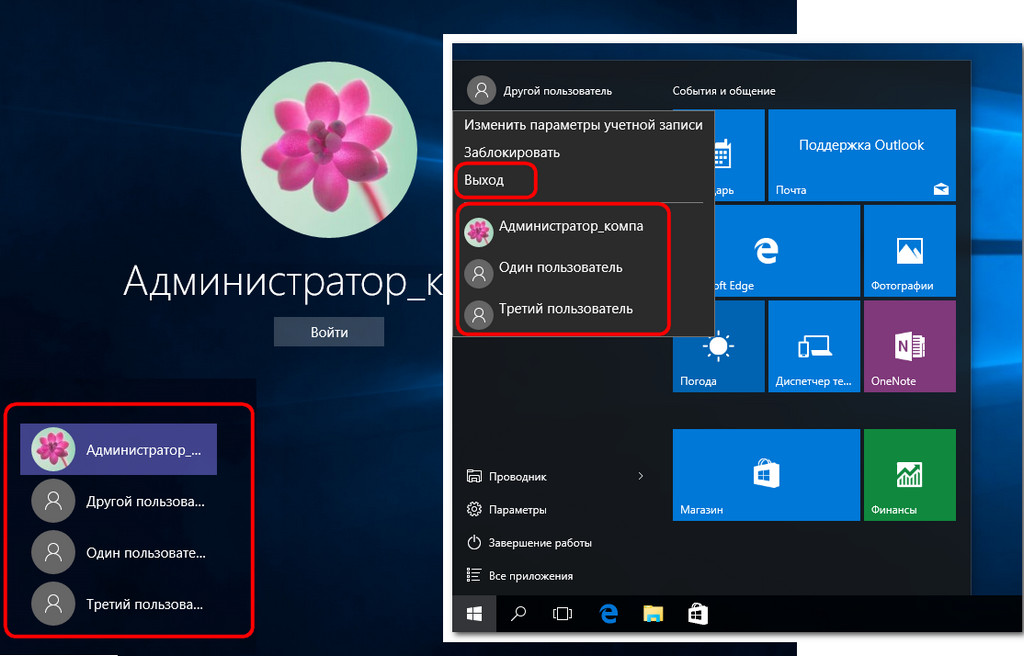
Switch between computer accounts in the menu "Start". The current user logs out of his account, and on the system lock screen, another user logs in instead. In another account is also possible to quickly go without fumbling with the lock screen, when another user is selected immediately in the menu "Start". In this case, the current user account is blocked, and no one will enter it without a password.
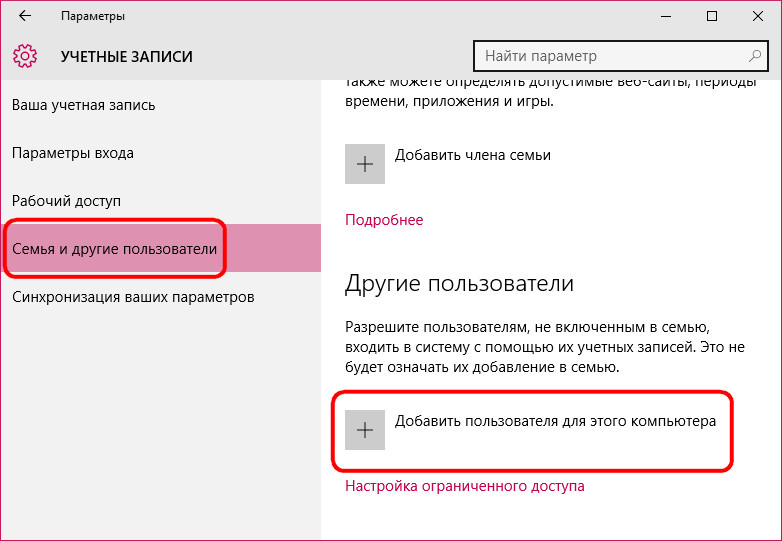
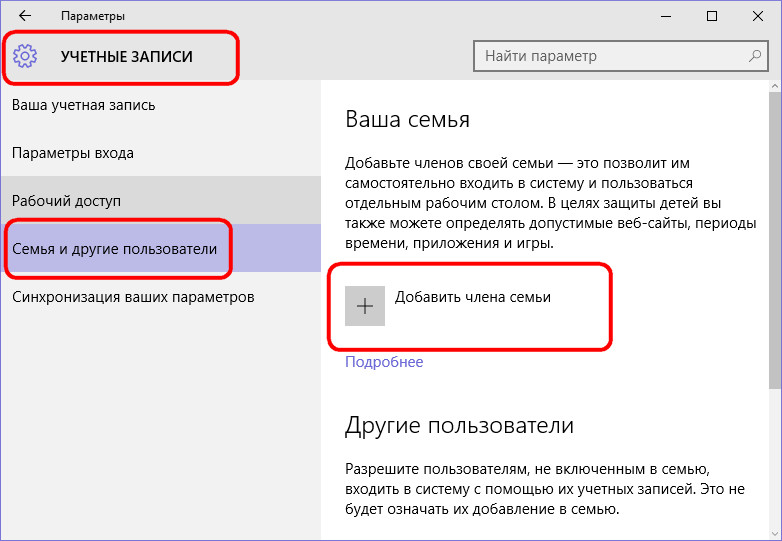
Adding a non-family user account
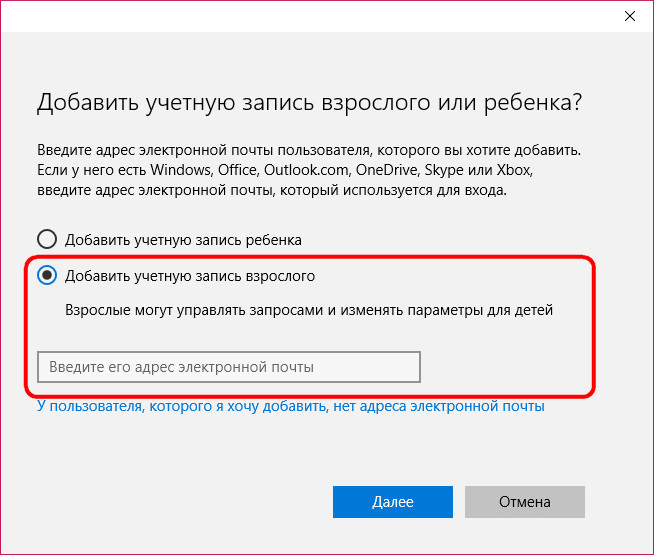
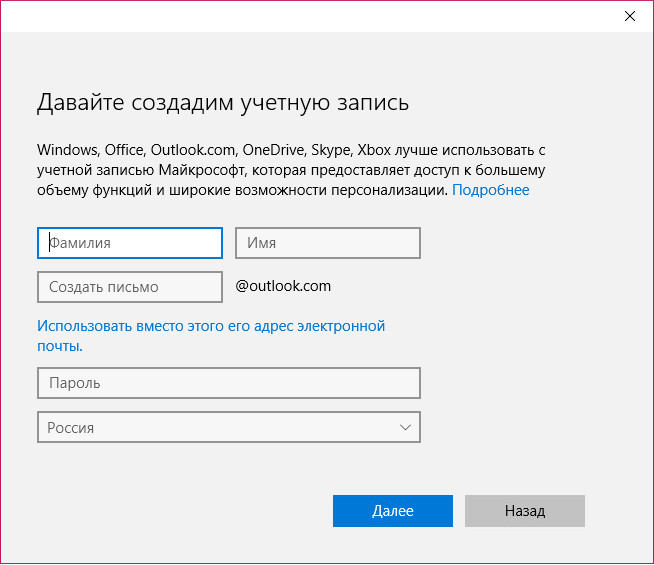
For users not from the family circle in Windows 10, you can create separate accounts, as it was in previous versions of the system. For this it is only necessary to possess admin rights. A connected Microsoft account is optional. In the application accounts go to the tab. In the window on the right, select the column and click the button to add new users.
The system will suggest first creating an account with a connection microsoft account. To do this, what is required is to enter the email address from this account. You can do without connecting your Microsoft account and create a regular local account by selecting the link below in this window. It is provided for those who have not yet managed to acquire a Microsoft account.
The window opened by this link will also focus primarily on the Microsoft account, offering to create it right there. And only at the very bottom we will see an inconspicuous option, providing for the addition of a local account.
Then a local account data entry window will appear. When creating the last to invent a password is not necessary. Unlike a Microsoft account, a regular local account can be used without passwords and PIN codes, without losing time to enter them during the operating system boot process.
After creating an account, it will appear in the column where you can change its type.
By default, Windows assigns all added accounts standard user type. In the list of account types to which you can change the standard user, we will see only the administrator.
The type of child account, as it was in Windows 8.1, in Windows 10 is configured within the family accounts.
Benefits of family accounts
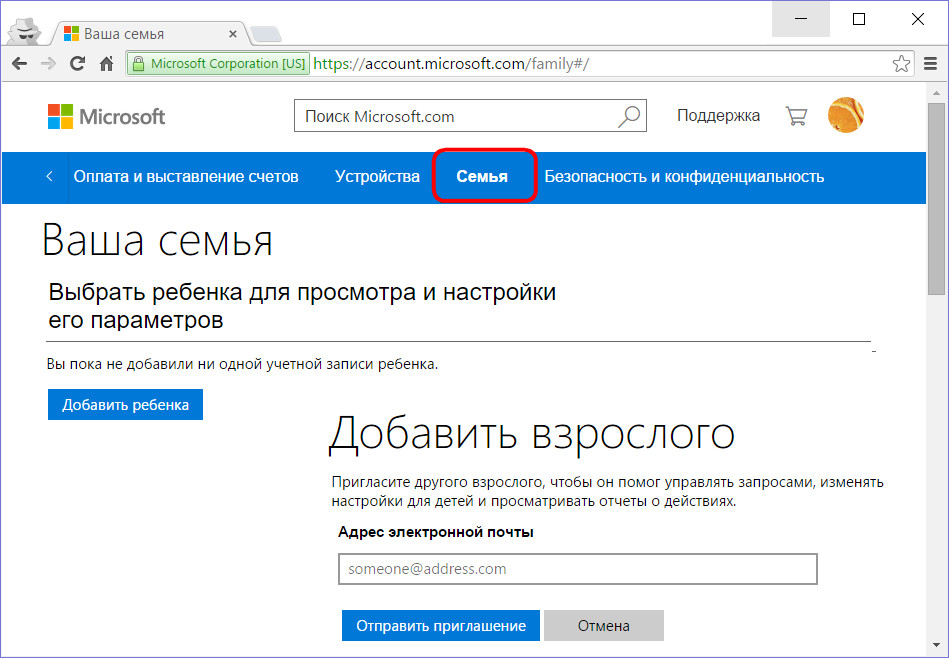
What is the advantage of family accounts? Accounts of family members connected to one computer device will later be available after synchronization on other devices running Windows 10. Family account settings are made on the Internet, in a special section of the Microsoft account -. Now the parent does not need to have physical access to a Windows 10-based computer in order to prohibit or allow the child to use certain features, as in previous versions of the operating system. To manipulate children, making changes to the parental control settings of their accounts, parents can now from anywhere in the world where there is Internet. Moreover, Microsoft has taken care of the equality of parents in the process of raising children. You can connect the same Microsoft account of another adult to a Microsoft account of one adult, and that one will also be able to make changes in the parental control settings of the child’s account on a Windows 10 device.
Family member account
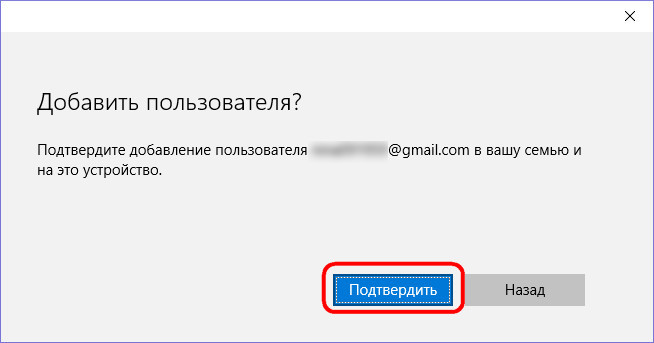
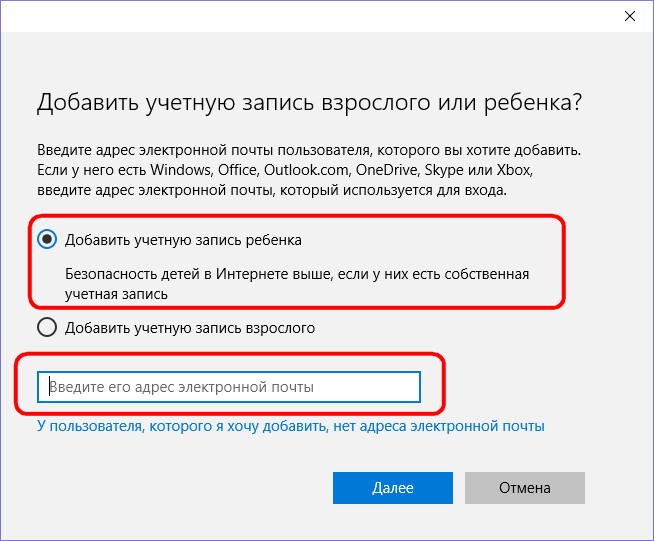
Since the associated family accounts are synchronized using a Microsoft administrator account, therefore, to create them, such an administrator must have a Microsoft account connected. In the tab, select the button to add a family member.
And if it does not appear, in this case the system will no longer offer an alternative with a local account. Microsoft account will have to create.
Confirm the addition of a new user from among family members.
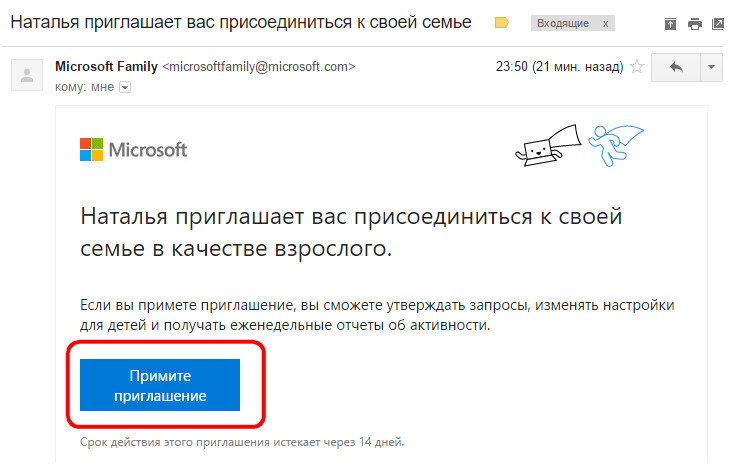
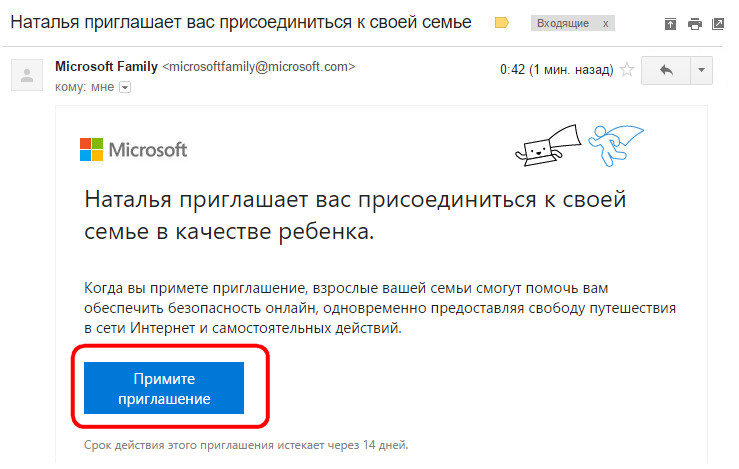
Then we will see the notification of the system that the newly added family member will be able to manage the parental control function in the children's accounts if he accepts the invitation sent to him by mail. Actually, now, all that remains for him to do is to check his mailbox and press the button for accepting an invitation.
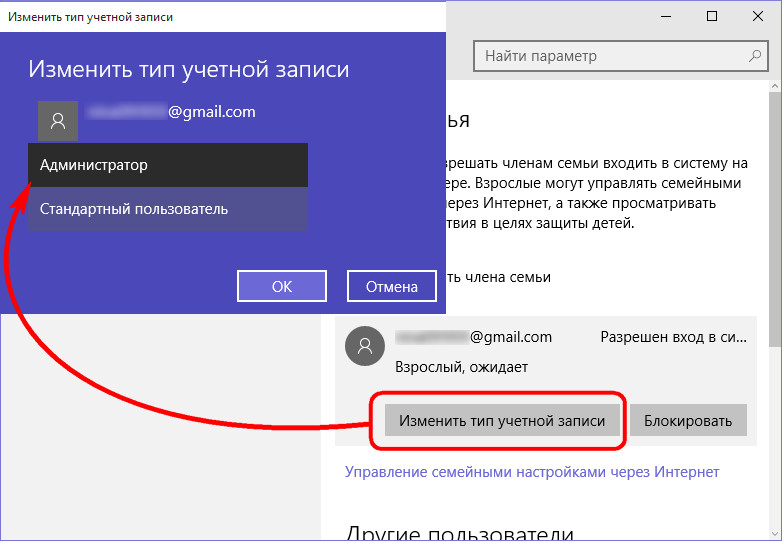
In all other respects, the accounts of family members are no different from the accounts of ordinary users. They are also available to change the type, and if necessary, any family member can be made the second administrator of the computer.
To add a child account, use the tab in the tab to add a new family member.
After adding a child account, you must confirm the function of the parental control. On the activation of this function itself the child must give consent in the lettersent to his email. It is illogical, but according to all the rules of democracy.
After the child has agreed to activate the parental control function in his account, we will see a new item in the tab that provides for managing family settings online.
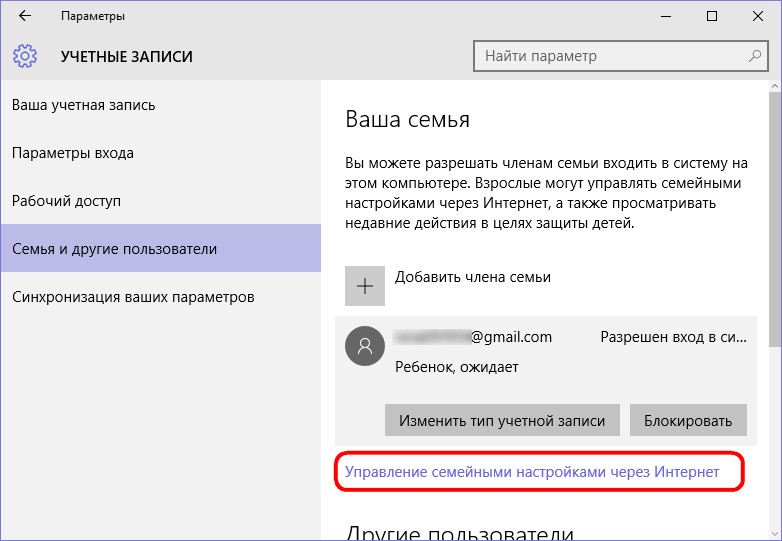
This is a direct link to the Microsoft account section, where you can configure parental control - prohibit visiting certain sites, the use of certain applications and games, limit the time for using a computer, and periodically monitor the child's activity on the Internet.
Limited access for individual accounts
The limited access mode from the predecessor Windows 8.1 to the new Windows 10 migrated with one minor change. The operating system still allows you to set for individual computer accounts (of course, except for the administrator account) special mode with limited access when only one is used Metro-applications. This setting in Windows 10 is available at the bottom of the tab.
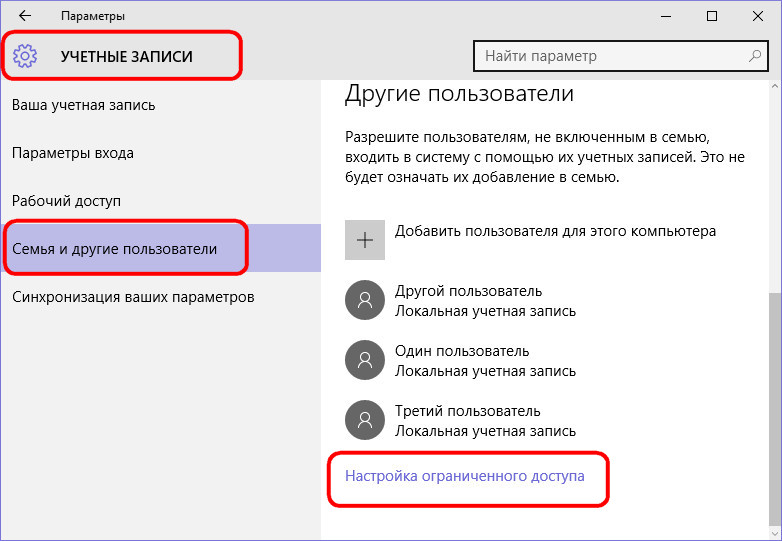
In the settings window that appears, you must select account and the only one available to her Metro-attachment.
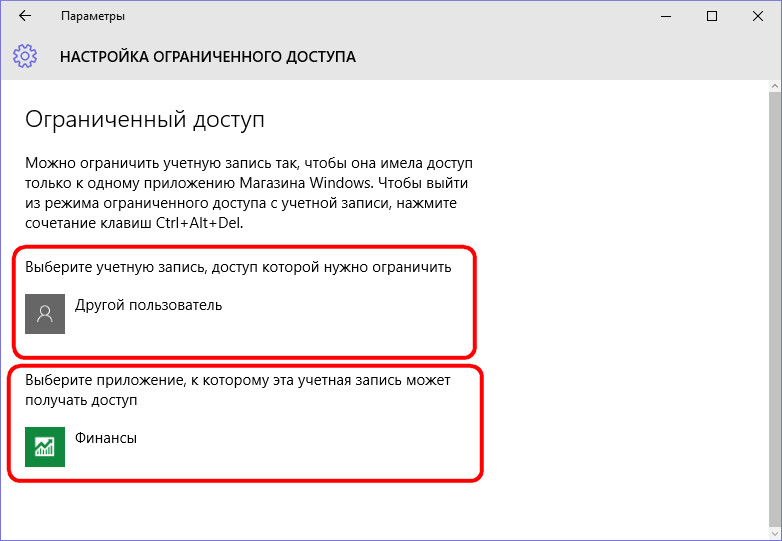
Restriction mode turns the entire account into a single application, deployed on the whole screen. No access to the menu "Start"nor to other system applications.

The exit from such an account with restrictions is provided with the help of hot keys. In Windows 8.1, you need to quickly press the Win key five times. In Windows 10, Microsoft decided to use the classic version of the hotkey combination - Ctrl + Alt + Del - to exit the account with restrictions.
Deleting accounts
Deleting unused accounts is done in Metro-application The delete button appears when you click on an account in the tab.
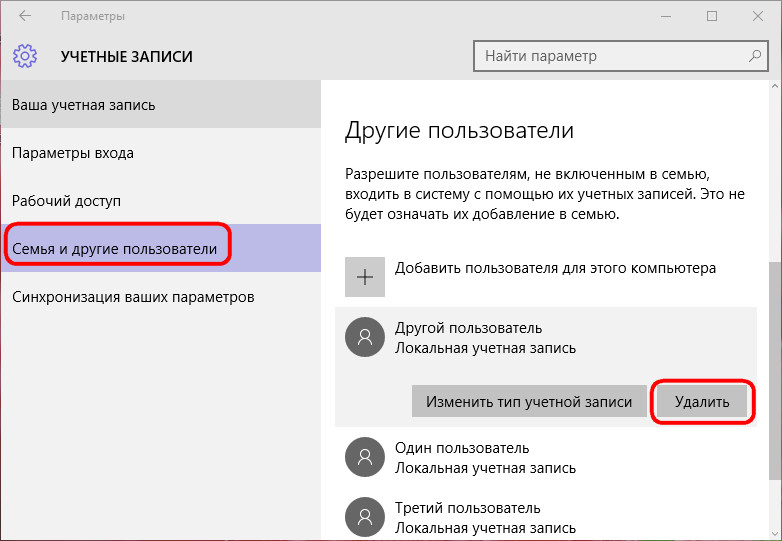
You can delete accounts in the system control panel. In the section click the option to manage another account.
Then select the one to be deleted. account and, in fact, we delete it - either with preservation of the user profile files, or without it.
A family member account is deleted in the Microsoft account section.
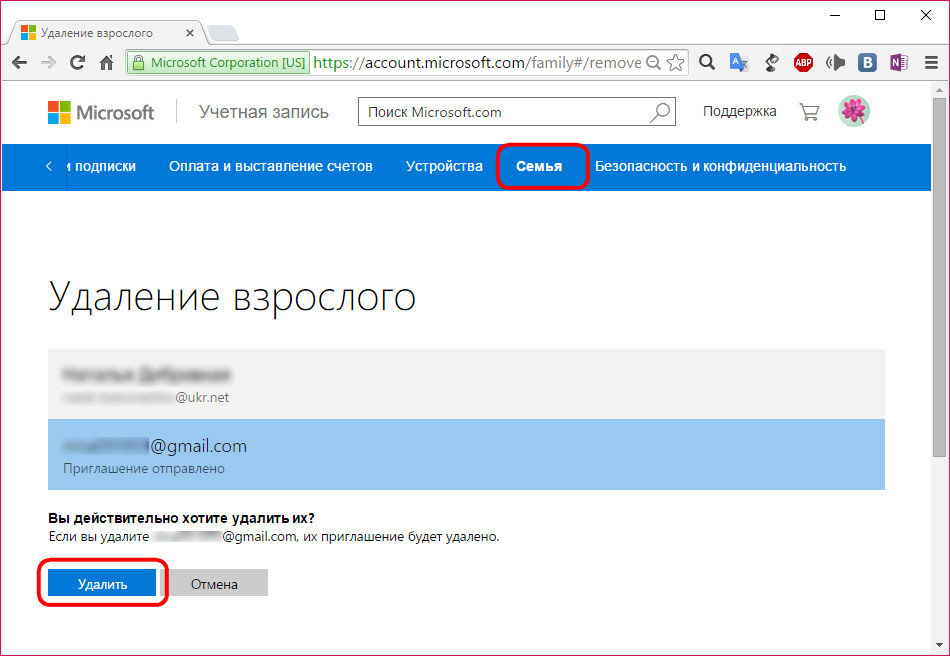
After that, the account on a specific computer device can be removed by the functionality of the control panel.
Family members can be temporarily banned from logging on to a specific device. Instead of the delete option, family members' accounts contain a button in the application blocking. After pressing it, you must confirm the entry ban.
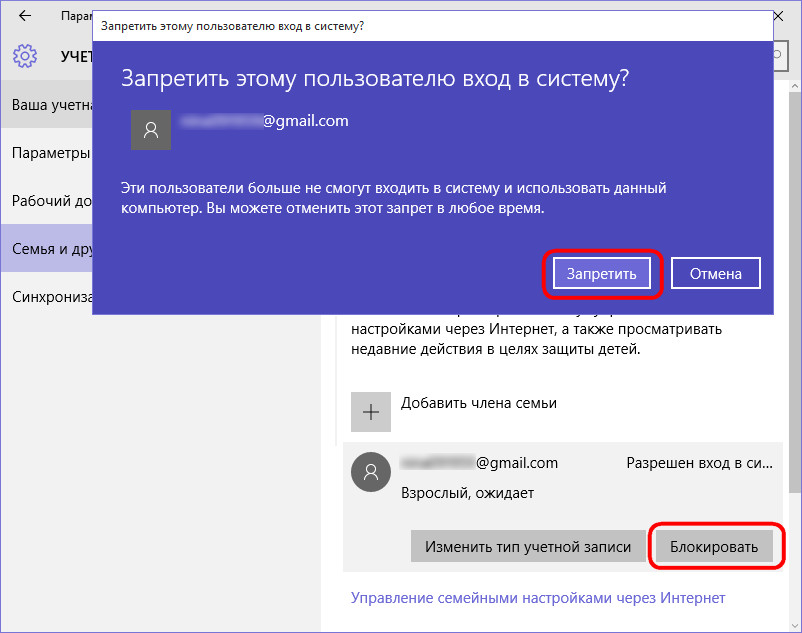
A ban on the entry of a family member can be canceled at any time.
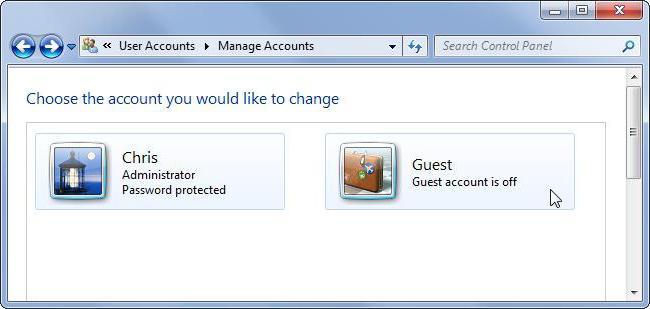
In one of my articles, I already wrote that you can add and change the properties of user accounts through the “Control Panel” - “User Accounts”. However, this method is more suitable for ordinary users. But the system administrator will be more convenient to manage accounts through the console "Computer Management" - "Local users and groups."
To get to the “Computer Management” console, right-click on the “My Computer” icon on the desktop and select “Management”. Next, expand the “Utilities” section and select “Local Users and Groups”.
The “” snap-in is designed to create new users and groups, manage accounts, assign tasks and reset user passwords. 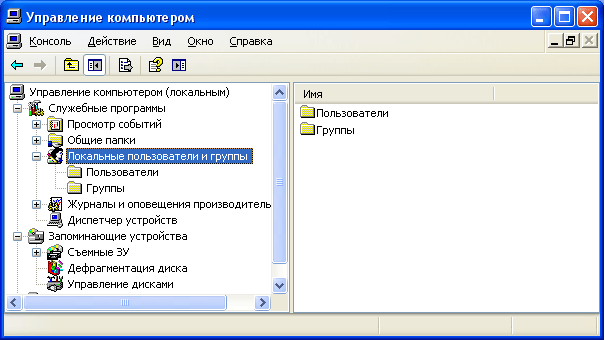 Local user
- This is an account that can be granted certain permissions and rights on your computer. The account always has its name and password (the password may be empty). You can also hear a different user account name - accountt
, and instead of “username” often say login
.
Local user
- This is an account that can be granted certain permissions and rights on your computer. The account always has its name and password (the password may be empty). You can also hear a different user account name - accountt
, and instead of “username” often say login
.
The “Local Users and Groups” snap-in node displays a list of user accounts: built-in accounts (for example, “Administrator” and “Guest”), as well as the accounts you have created for real PC users. 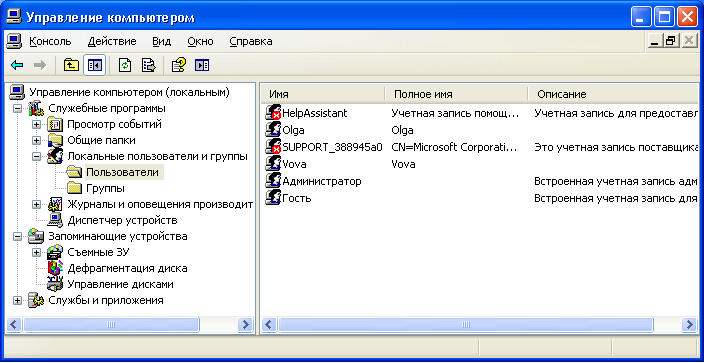 Built-in user accounts are created automatically when you install Windows and cannot be deleted. When creating a new user, you will need to give him a name and password (preferably), as well as determine which group the new user will belong to. Each user can belong to one or several groups.
The node displays both built-in groups and those created by the administrator (i.e., you). Built-in groups are created automatically when you install Windows. 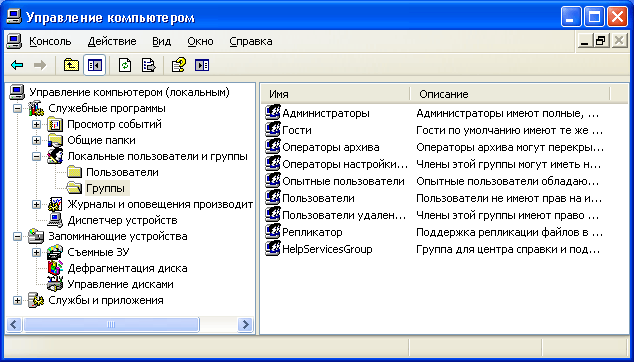 Belonging to a group grants the user certain rights to perform various actions on the computer. Group users Administrators
have unlimited rights. It is recommended that you use administrative access only to perform the following actions:
Belonging to a group grants the user certain rights to perform various actions on the computer. Group users Administrators
have unlimited rights. It is recommended that you use administrative access only to perform the following actions:
- installation of the operating system and its components (device drivers, system services, service packs);
- update and restore the operating system;
- installation of programs and applications;
- configure the most important parameters of the operating system (password policy, access control, etc.);
- management of security and audit logs;
- archiving and restoration of the system, etc.
You, as a system administrator, must have an account that belongs to the “Administrators” group. All other users of the computer must have accounts belonging to either the “Users” group or the “Experienced users” group.
Add users to a group Userand is the most secure, because the permissions granted to this group do not allow users to change the operating system settings or data of other users, install some software, but also do not allow running outdated applications. I myself have repeatedly encountered a situation where the old DOS programs did not work under the account of a member of the “Users” group.
Group Power Users Mainly supported for compatibility with previous versions of Windows, for non-certified and legacy applications. “Advanced Users” have more permissions than members of the “Users” group, and less than “Administrators”. The default permissions granted to this group allow members of the group to change certain computer settings. If support for non-Windows-certified applications is required, users should be members of the “Power Users” group.
Account a guest gives access to a computer to any user who does not have an account. To enhance the security of your computer, it is recommended that you disable the “Guest” account and configure existing users to access the shared resources of the PC.
Now let's see how account creation takes place through the “Computer Management” console - “Local Users and Groups”.
Account creation
When installing the original version of Windows XP (meaning not build from Zver or the like) it is proposed to create computer user accounts. You must create at least one account under which you will be able to log in when you first start. But, as a rule, in real life it is required to create several accounts for each user working at the computer, or for a group of users united by a common task and access permissions.
To add a new account, open the “Local users and groups” snap-in - select the “Users” folder - then right-click in an empty space with the right mouse button - select the “New user” option: 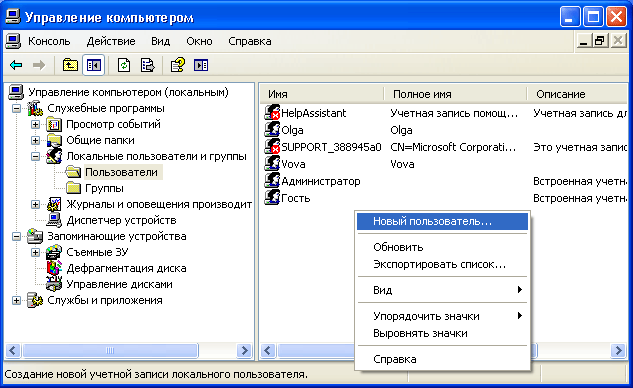 In the window that appears, specify the user name and description. Also set a password for the user (how to create a strong password for the account you can read).
Then configure additional parameters - check or uncheck the boxes next to the required items: 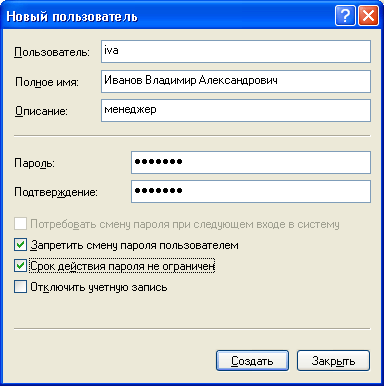 You can uncheck the box next to “Require password change on next login” and check the boxes “Prevent user from changing password” and “Password expiration is not limited”. In this case, the user will not be able to change the password of his account. This can only be done by you, working under an administrative account.
After clicking the “Create” button in the list of users a new account will appear. Double-click on it and in the window that opens go to the “Group Membership” tab. Here click “Add” - “Advanced” - “Search”. Then select the group to which the user should be included (the “Users” or “Power users” group is recommended) and click “OK” in all the displayed windows. After that, here in the “Group Membership” tab, remove from the list all groups except the one you just selected. Click “OK”: 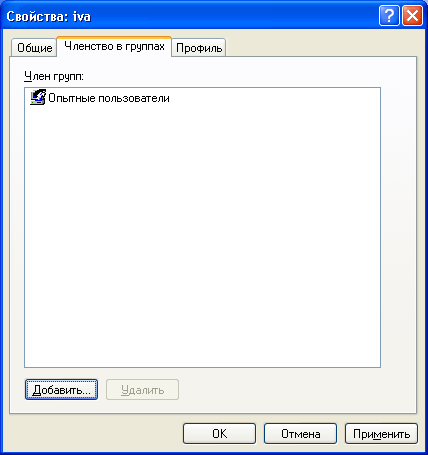 So you created a new account and included it in the group.
Now tell the user (in our case, Ivanov) the name of his account ( iva) and password so that he can log in. On all computers on the network, to whose resources Ivanov needs access, you will need to create the same account with the same parameters. If on any computer on the network there is no account for Ivanov and the “Guest” account is disabled, then Ivanov will not be able to view the shared network resources of this computer.
If the user account is no longer needed, you can delete it. But in order to avoid various kinds of problems, it is recommended to disable user accounts before deleting. To do this, right-click the account name - select “Properties” —in the account properties window, check the box next to “Disable account” and click “OK”. After making sure that this didn’t cause any problems (watch the network for several days), you can safely delete the account: right-click the account name and select “Delete” in the context menu. A deleted user account and all data associated with it cannot be recovered.
Access control
So, let's say, several users work at the same computer, and you have created your own account for each according to the rules described above. But suddenly there was a need to close access to some folders or files on a computer for certain users. This task is solved by assigning certain access rights to computer resources.
Access control is to provide users, groups and computers with certain rights to access objects (files, folders, programs, etc.) on the network and on the local machine.
User Access Control local computera done by changing the settings on the “tab Security”In the“ Properties ”window:
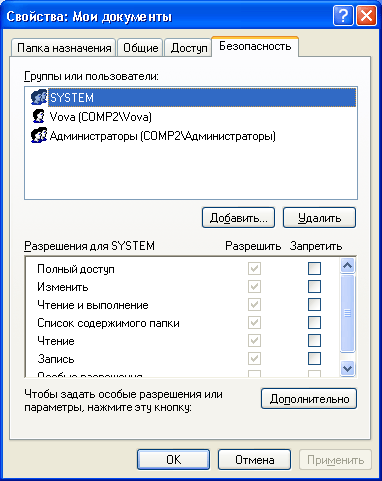
Security Settings for My Documents
“Tab” Access"Same window is used to control network access to shared objects (files, folders, and printers) on network computers.
In this article we will talk about access control. local users to objects local computer. This feature is only available in the NTFS file system. If the computer has an NTFS file system, but the “Security” tab is not displayed, go to “Start” - “Control Panel” - “Folder Options”. On the “View” tab in the “Advanced Settings” section, uncheck the “ Use simple file sharing (recommended)”And click“ OK ”:  The basic concept associated with access control is Permissions
.
The basic concept associated with access control is Permissions
.
Permissions determine the type of user or group access to an object or its properties. Permissions apply to files, folders, printers, registry objects. To set or change permissions for an object, right-click on its name and select “Properties” in the context menu. On the “Security” tab, you can change the permissions for a file or folder by checking or unchecking the boxes in the list of permissions.
For each user, you can set your permissions. First you need to select the user in the list, and then specify the permissions for this user. For example, one user can only be allowed to read the contents of a certain file (permission “ Reading"), Another - to make changes to the file (permission" Change"), And all other users in general to deny access to this file (uncheck all the boxes under" Allow"Or check all boxes" To ban”).
To view all valid permissions for files and folders on the local computer, select “Properties” - “Security” - “Advanced” - “Active permissions” - “Select” - “Advanced” - “Search”, highlight the name of the desired user and click “OK ". Items marked with checkboxes have permissions for this user: 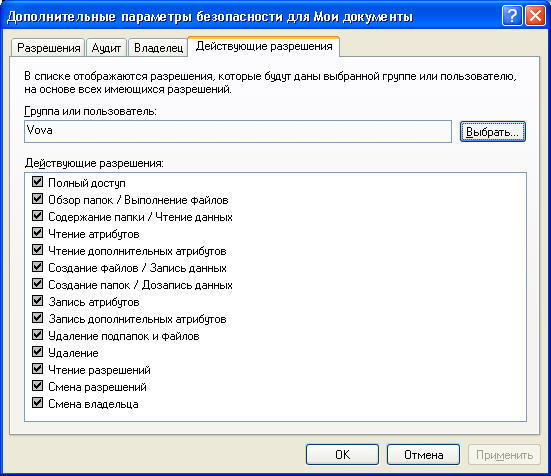 In the same window you can see the tabs “Permissions”, “Audit”, “Owner”. I will not dwell on them in detail in the framework of this article, since it already turns out too voluminous.
If there is no user in the list of users on the “Security” tab who needs to be assigned permissions, successively click the following buttons on the “Security” tab: To add” – “Additionally” – “Search". From the list, select the name of the user account to which you want to assign permissions and click “OK”. Instead of a separate user, you can select a group — permissions will be applied to all users included in this group. Well remember these buttons. You will do this procedure in all cases when you need to add a new user to the list of permissions, auditing, ownership, network access, etc.
Access control is applied not only to users local computer, but also to access shared files, folders, and printers over the network. About the differentiation of access rights for network users in relation to the folder I have already told in the article.
This documentation has been moved to the archive and is not supported.
User Account Management
Office 365
Applicable to:Office 365
Last modified section:2017-04-26
Microsoft Office 365: Supports the following methods of creating users, authenticating and managing them.
For information on tools that can help you perform administrative tasks, see Office 365 Account Management Tools. For information on how to perform day-to-day management tasks, see Frequent management tasks in Office 365.
Office 365: has two systems below that can be used for user credentials.
Work or school account (cloud ID). Users get Azure Active Directory cloud credentials to sign in to Office 365: and other Microsoft cloud services. These credentials are in no way associated with other credentials (corporate or for access to a computer) and constitute a default identity. We recommend using them to simplify deployment. For passwords for work or study accounts, use the Azure Active Directory password policy.
Federated Account (Federated Identity). Users in organizations with on-premises Active Directory who use single sign-on can log in to Office 365 services using their Active Directory credentials. Corporate Active Directory stores and manages password policies. For information about single sign-on, see Single Sign-On Strategy.
The type of identity affects user interaction and user account management settings, as well as hardware and software requirements and other aspects of the deployment.
When you create a new user, his email address and login are assigned to the default domain, as set in the Office 365 admin center: For more information, see Add users and domain to Office 365.
Office 365 Subscription Default: Domain Used<company name>.onmicrosoft.comcreated with an account. * You can not save the onmicrosoft.com domain, but add to Office 365 one or more personal domains, and then assign any of the verified domains to users to sign in. Each user domain assigned is an email address that will appear when sending and receiving email messages.
You can place in Office 365: up to 900 registered Internet domains, each of which is represented by a separate namespace.
For organizations using single sign-on, all users in the domain must use the same identification system: either a cloud or a federated identity. For example, there may be one group of users who only need a cloud identity, because they do not have access to local systems, and another group of users who use Office 365: and local systems. In this case, you'll have to add to Office 365: two domains, for example, contractors.contoso.com and staff.contoso.com, and configure single sign-on for only one of them. The entire domain can be converted from a cloud identity to a federated identity or from a federated identity to a cloud one.
For more information about domains in Office 365: see the service description.
* If you are using Office 365 :, provided by 21Vianet in China, the default domain looks like<название_компании>.onmsChina.cn. If you are using Office 365 Germany, the default domain looks like<название_компании>.onmicrosoft.de
With the exception of Internet sites for anonymous access created in SharePoint Online, when accessing Office 365 services: users must be authenticated.
Modern authentication Modern authentication provides logon to Office client applications across platforms based on the Active Directory Authentication Library (ADAL). This triggers logon capabilities such as multi-factor authentication (MFA), the use of third-party SAML-based identity providers with Office client applications, and authentication using smart cards and certificate-based authentication. In addition, there is no need to use the basic authentication protocol for Microsoft Outlook. For more information, including information about the availability of modern authentication for various Office applications, see the article Principles of Modern Authentication for Office 2013 and Office 2016 Client Applications and Using Modern Office 365 Authentication with Offices Clients.
Modern authentication is not enabled by default for Exchange Online. You can read the instructions on how to enable it in the article Enabling Modern Authentication in Exchange Onlinen.
Cloud Identity Authentication. Authenticating users with cloud identities is a traditional request and confirmation authentication. The web browser redirects to the Office 365 login service: where you enter your username and password for your work or school account. The login service authenticates the credentials, creates a service token that the web browser sends to the requested service, and logs in the user.
Authentication federated identity. Users with federated identities are authenticated using Active Directory Federation Services (AD FS) 2.0 or other security token services. The web browser is redirected to the Office 365 login service :, where you enter a corporate identifier in the form of a user principal name (UPN); eg, [email protected] The login service determines that you are part of a federated domain, and offers to redirect you to a local federation server for authentication. If you are logged on to a computer (joined to a domain), you are authenticated (using Kerberos or NTLMv2), and the local security token service creates a token that the web browser sends to the Office 365 login service :. Using this token, the login service creates a token that the web browser sends to the requested service, and then it is logged on. For a list of available security token services, see Single Sign On Strategy.
Office 365: uses forms-based authentication, and authentication traffic passing through the network is always encrypted using TLS / SSL using port 443. Authentication traffic uses a small amount of bandwidth for Office 365 services.
For full-featured clients, such as classic Microsoft Office applications, authentication can be performed in two ways.
If you have a cloud-based identity, then you are prompted for credentials that the customer service sends to the Office 365: Login Authentication Service (using WS-Trust).
If you have a federated identity, the client service first accesses the AD FS 2.0 server to authenticate the credentials (using Kerberos or NTLMv2) and receives a login token that is sent to the Office 365 single sign-on service (using WS-Federation and WS-Trust
Microsoft Online Services Login Assistant The Login Assistant, which is installed by the Office 365 Desktop Update Installer for Desktop, contains a client service that receives a service token from the Office 365 login service: and returns it to a full-featured client.
Basic / Proxy Authentication over SSL The Outlook client performs basic authentication over SSL in Exchange Online. Exchange Online sends an authentication request to the Office 365 Identity Platform: and then to the local Active Directory Federation Server Federation server (for single sign-on).
To ensure that Office 365 services are correctly detected and authenticated, administrators must apply components and updates on every workstation that uses full-featured clients (such as Microsoft Office 2010) and connects to Office 365 :. Office 365 Update Installer: Desktop is an automated tool for installing required updates on workstations. For more information, see Use installed installed classic Office applications with Office 365.
The login interface varies depending on the type of Office 365 identity you are using:
| Cloud ID | Federated ID | |
|---|---|---|
| Login to each session1 | Login to each session2 |
|
| Login to each session1 | Login to each session2 |
|
| Outlook 2010 or Office 2007 on Windows 7 | Login to each session1 | Login to each session2 |
| Outlook 2010 or Office Outlook 2007 in Windows Vista | Login to each session1 | Login to each session2 |
| Microsoft Exchange ActiveSync | Login to each session1 | Login to each session2 |
| POP, IMAP, Outlook for Mac | Login to each session1 | Login to each session2 |
| Web interfaces: Office 365 portal: / Outlook Web App / SharePoint Online / Office Online | Login to each browser session4 | Login to each session3 |
| Office 2010 or Office 2007 using SharePoint Online | Sign in to each SharePoint Online4 session | Sign in to each SharePoint Online3 session |
| Skype for Business Online | Login to each session1 | Without request |
| Outlook for Mac | Login to each session1 | Login to each session2 |
| 1 At the first request, you can save the password for future use. You will not receive the following request until you change the password. 2 You enter your corporate credentials. You can save the password, and then the next request will appear only after changing the password. 3 All applications require you to enter a username or click to login. If the computer is joined to a domain, then the password is not requested. If you select the option Remain in the system, the data entry request will not be displayed until you log out. 4 If you select Remain in the system, the data entry request will not be displayed until you log out. |
The way to delete accounts depends on whether directory synchronization is being used.
If you do not use directory synchronization, you can delete accounts on the Office 365 administration page: or by using Windows PowerShell.
If directory synchronization is used, then you must remove users from your local Active Directory, and not from Office 365 :.
Policies and procedures for managing passwords depend on the identification system.
Cloud Identity Password Management:
When using cloud identities, passwords are created automatically when you create an account.
For information on the cloud credential password security requirements, see the password policy article.
To increase security, users need to change their passwords when they first access Office 365 services: As a result, before accessing Office 365 services: users must log in to the Office 365 portal: where they will be prompted to change the password.
There are several means of resetting passwords for users with cloud identities:
Password reset by administrator If users lose or forget their passwords, administrators can reset user passwords in the Office 365 portal: or using Windows PowerShell. Users can change their passwords only if they know the current passwords.
Reset passwords using Windows PowerShell Service administrators can reset passwords using Windows PowerShell.
Managing Federated Identity Passwords:
With federated identities, password management is done in Active Directory. The local security token service negotiates authentication with the Office 365: Federation Gateway without transferring local Active Directory user passwords over the Internet to Office 365 :. Local password policies are used or, in the case of web clients, two-factor identification. Outlook Web App does not include a password change hyperlink. Users change passwords using standard local tools or using the login parameters of their desktops.
Office 365 license: Gives the user access to a set of Office 365 services: The administrator assigns a license to each user for the service, access to which he needs. For example, you can assign a user to Skype for Business Online, but not SharePoint Online.
In Office 365: Enterprise, the RBAC model is applied: permissions and capabilities are defined by management roles. A user who registers his organization with Office 365: automatically becomes a global or higher level administrator. There are five administrator roles: global administrator, billing administrator, password administrator, service administrator, and user management administrator. For more information about admin roles in Office 365: Enterprise, including how they are used in Exchange Online, SharePoint Online, and Skype for Business Online, see Assigning Administrator Roles. If you use the Office 365:, plan managed by 21Vianet in China, see the article. Want to chat with a customer service representative? Scroll to Select a plan and click the icon. chat on the red banner at the top.