How to take a screenshot on the iPhone and edit it: tips for users.
Users who use the Internet on their mobile device often need to save a page. With the help of a couple of clicks, you can “pick yourself up” a post from Instagram, an interesting photo, a useful guide. A beginner does not always know what it takes to make a screenshot easily and simply. You do not need to install any additional software. The built-in screenshot creator is located in the phone itself. After studying the instructions, you will perform this action in a couple of seconds.
Use the external shutter button or self-timer
There is a solution for this: simply press the volume buttons on the side of the device after you tap the screen at the focus point.
Use serial mode for sequential shots.
When a photographer is a fast moving subject, your shot often takes a minute before or after a moment than the scene that you really wanted to perpetuate. In a family photo, it can happen that you shoot right when one of your subjects turns away or closes their eyes.How to take a picture of the screen on the iPhone
We will understand how to make a print screen on an iPhone. This guide is suitable for owners of versions of Iphone 4, Iphone 5 / 5s, Iphone 6 / 6s. Follow this simple step-by-step instruction that fits all the latest Apple Iphone models. You should have no doubts, questions, how to take a screenshot on an iPhone:
In this situation it is easy to repeat the shot, but if this happens to you during a sporting event or in other situations, when you can hardly repeat the shot? This convenient mode is activated by holding the shutter button and allows you to take many pictures in sequence.
Physically zoom out, not via cell phone
After this sequence, you can click on a preview of the photo you just took and select your favorite pictures, discarding others. When you are too far from the object that you want to shoot and want to change the picture, naturally, use the built-in zoom function in the camera application. However, not everyone knows that this feature uses digital zoom, which does not hesitate to zoom in as it zooms.
- Turn on your mobile phone. To do this, locate the button on the right side of the top face, hold it for 3-4 seconds until you see the Apple logo.
- Leave what you photograph: picture, page, text - all you need.
- On any of the latest models of your “apple” phone, find the main round button on the front panel. This button is called “Home”.
- Remember where the toggle switch (right side on top), which we used when turning on the device.
- For a couple of seconds, hold down the “Home” button and at the same time with it the on / off button on the screen at the top right.
- When pressed correctly, you will hear a distinctive sound, similar to a click, and a white screen will appear.
- Where is your screen? Open the main screen, click the "Photos" icon. Next, select the section "Photo Camera" (for Iphone 6 / 6s, the folder is called "Recently Added"). In this folder, the saved printskrin should lie at the very bottom.
- Send a screen shot so that it appears inside a desktop computer or tablet, you get during synchronization.
The need to take a screenshot on the iPhone arises when the user wants to share with his friends a game achievement or part of the correspondence in a social network. Photographing the contents of the screen is easy, if the mechanical buttons of the gadget are in order, however, even if one of them is faulty, this is not an obstacle for experienced and experienced users. The article will tell about several methods how to make a screenshot on iPhone.
If you want to preserve the quality of the photo and have a chance, approach the topic physically. That way, you can adjust the image as best for you, and you can reduce or even eliminate the use of digital zoom, while maintaining the quality of your shot.
Using a third-party camera application
Is the base application getting too “tough” for your needs?
Locks the focus and manually adjusts the exposure.
Often, after selecting the object to focus on, the device suddenly recalculates the focus, losing the settings we have chosen. If you are looking for a solution to this problem, here it is! Just click on the focus point to lock the focus settings.Select the image that you would like to “scroll” and simultaneously press the “ Home"(Located in the center under the screen) and" Power "(located on the upper edge of the case). Then release them immediately.
You will hear a distinctive sound comparable to the shutter release on the camera. The screenshot will be saved in the standard Photo application - you can find it in the gallery last in the queue. Image format - png.
Using the slide up or down on the yellow square that appears when you skip the screen, you can adjust the exposure to your liking. Use the many available accessories. If you are so passionate about this subject that you want to experience new areas of photography, you may feel the need to expand your photo set.
If your goal is to expand your photographic abilities through the use of new personnel, you may be interested in additional lenses, with the help of convenient support, turn on your mobile phone, blocking the camera. Lenses: wide-angle, fisheye and macro.
Pay attention to such aspects:
- Do not hold the “Home” and “Power” buttons pressed, otherwise you risk a “hard” reset of the smartphone.
- By making a screen this way, you are photographing the whole the screen, not any part of it. If you need to "remove" part of the screen, it is better to use a special utility or a built-in photo editor.
The described method of creating screenshots is relevant for all models of the iPhone, except the very first, as well as for the iPad and iPod.
If you are looking for stability and convenience, you need to think about buying a convenient tripod. If you like a photo, you may not need to immediately purchase a reflex. With these tips, with the right apps and the right accessories, you can take high-quality photos with this small device.
Share it with anyone you want through your favorite social network using the left pane. The camera combines several photos together to give the best end result. Typically, an application takes a photo in the same position, at different exposures, underexposed, overexposed and medium, combining them together will give a more satisfactory result, improve the details in brighter and darker areas and solve the general sense of brightness Better than a hypothetical original picture.
How to make a screen if the button "does not work Power»?
You can make a screen on an iPhone without using mechanical keys - for this you need to use the function “ Assistive touch"(About which many users, alas, do not even guess). Act like this:
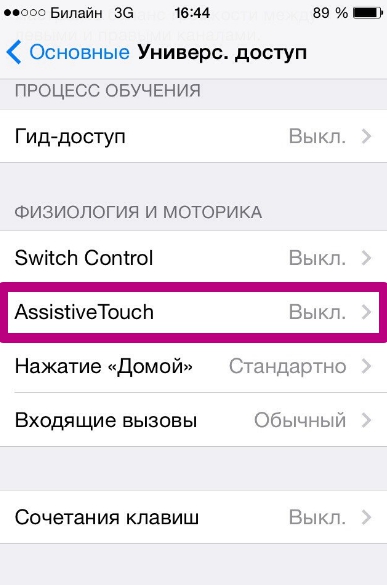
Step 1. On the device, take the path " Settings» — « Main» — « Universal access"And in the block" Physiology and motility"Find" Assistive touch».
Some of them focus exclusively on this method to try to get the best results in specific conditions, such as low-light situations, panoramic shots or portraits of the sun's rays, etc. Inside you can find many features, and you can now define it as a professional application in all respects.
This allows you to choose between 5 different styles. At this stage, the created images will be even brighter and more saturated. The application works fine and can give you very good results right from the start. Then complete them in post-production if necessary.
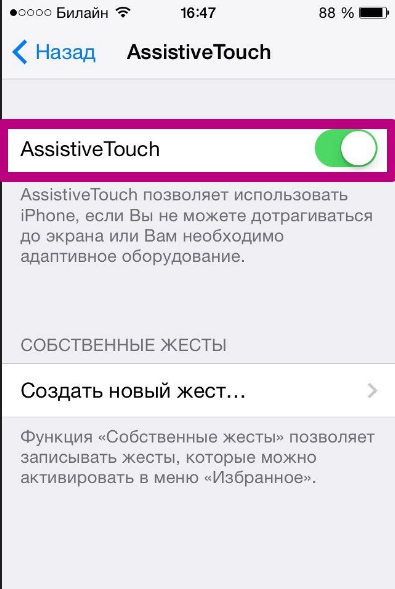
Step 2. Activate the switch opposite “ Assistive Touch », and you will see that a transparent round button has formed on the screen.
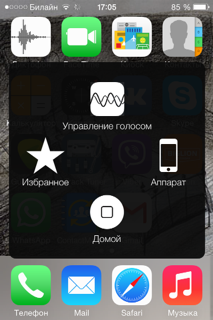
Step 3. Click on the transparent button - this menu will appear:
Other in-app packages are offered inside. As a guide, the application allows you to take 3 photos and then merge them together, and also allows you to choose whether you need to edit it immediately or if you want to do it later, having the opportunity to store our last 200 images so that they are available in case next edit. In addition, you can also see the histogram in real time and select whether to increase or decrease the exposure range of the photos taken.
This allows you to take pictures automatically or manually, and even import photos from your roll, which will then be combined together to create the final result. It also offers some further customization tools, as well as a number of other filters or styles to apply to the image to further change its appearance.
Step 4. Select " Apparatus", And in the next submenu -" Still"And you will be here:
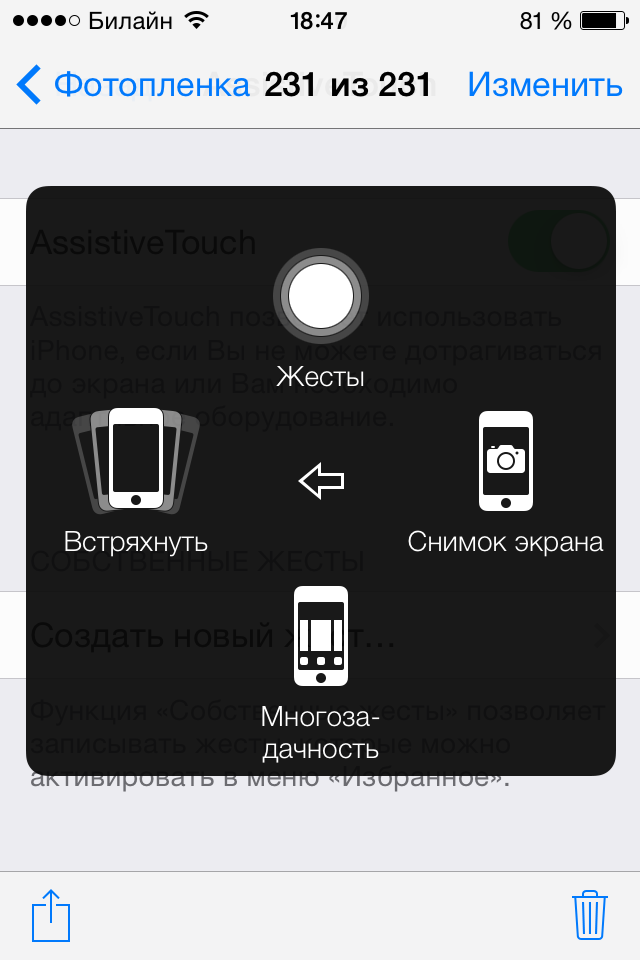
Step 4. Click " Screenshot", And the screen will be made. However, the program menu " Assistive touch»You will not see in this image.
What to do if you want to photograph only part of the screen?
In this situation, there is a solution: you can make a screen of the entire screen and then cut it using the built-in photo editor. This is done like this:
The same technology, if you have multiple images equal to different exposures, can be used for free in the online publisher. The application uses a simple ring to change the shadows and lights of the image and pushes it to the limit, and also allows you to orient the light effect differently and contains more series of filters and effects that can get a lot of results interesting and visual impact.
In some versions that contain the latest updates, you can also use the manual function. The application also offers the ability to import images from the gallery, and then align them later. There is currently no test feature to test it before purchasing. Or you just want to edit the images in a specific way.
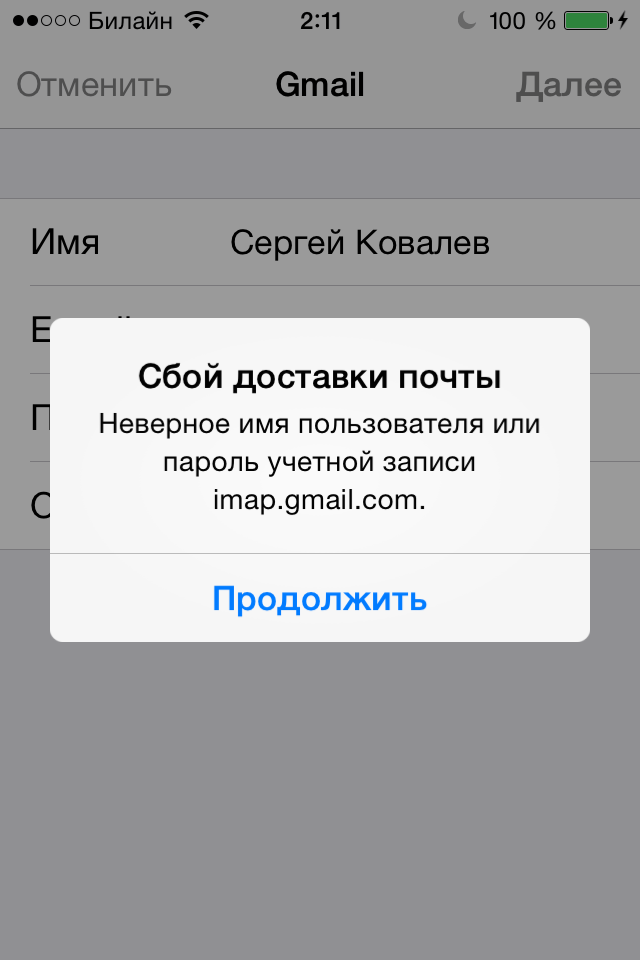
Step 1. Find the photo you want in the photo gallery. For example, this is suitable:
Step 2. Click " Change" in the upper right corner.
This will take you to the photo editor mode.
Step 3. In the photo editor mode, select the last tool in the bottom panel. Unfortunately, it will not be possible to illustrate this process - the iPhone does not “screen” the photo editor options.
Some of these applications have been the best for a long time, but they may be irrelevant. Others were able to upgrade to meet the needs of enthusiasts. But what are your favorites? The pharmacy market is constantly updated, have you found a new application that meets your needs?
Souls went through my hands, so I have something to say about everyone. Hope you are interested. And this is a great plus when you do not want to miss the moment, and, as we know, the ideal picture can be captured at any moment. Of course, the photo mode, which takes a standard photo, is loaded by default.
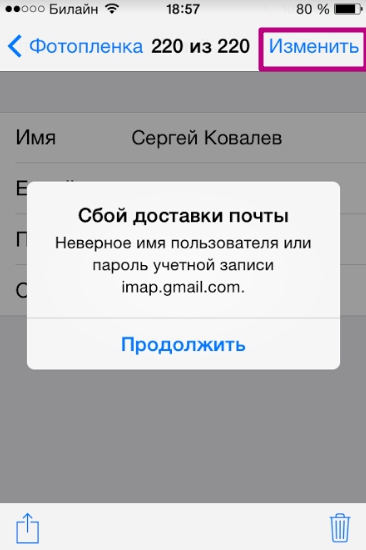
Step 4. Crop the picture and click " Save»- corrected image will appear in the gallery. From the original picture, in our example, we got this:

Conclusion
The presence of the function " Assistive touch"And the built-in photo editor - another confirmation of how attentive developers are to the problems of users. In situations where Android will not do without installing third-party software (for example, if you need to cut the image), iPhone will cope with integrated software solutions.
To change the mode, simply swipe left or right. Here are some methods we can use to make the perfect shot. This helps us to get a balanced picture, especially if you are familiar with terms such as the “golden section”. Even if you do not, the grid is useful if you want to get a beautiful picture.
If you have the time and resources, find your tripod! And do not confuse yourself with large tripods for professional cameras. These smartphones are pretty small trips, but they are quite functional. The good thing about these three legs is that they can stand in any corner because their legs are flexible.