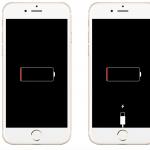
It does not connect to a mobile access point. Wi-Fi hotspot using smartphone
The "access point" function, present on smartphones and tablets with the Android operating system, allows you to distribute Wi-Fi to several mobile devices and PCs (personal computers). The importance of this option can be assessed if, for example, when going out of town, an urgent need to access the network from a laptop, but only a mobile phone is at hand. How to properly configure this feature Android?
Which smartphones and tablets with Android have a modem mode and can distribute Wi-Fi to a computer and other gadgets
To be able to distribute the Internet via Wi-Fi, you need a smartphone or tablet with Android (version 2.1 and higher) and an installed SIM card that has 3G / 4G mobile Internet. Device design shouldprovide a Wi-Fi module with support for one of the protocols: 802.11b or 802.11g.
Similar protocols are installed in almost all gadgets produced later in 2009, but for accurate information you should still refer to the technical specification of the device.
If there is mobile Internet support from the provider, but the phone does not connect to the network, you must first set it up. It implies the introduction of an APN-address through which the built-in modem will gain access to the World Wide Web. As a rule, the device requests this address when it is first launched. In case of problems with the configuration, it is recommended to make a request to the operator and clarify the reasons.
The function of distributing Wi-Fi can also be used by owners of CDMA smartphones. In such phones instead of SIM there is a firmware with the saved settings of the provider.
How to set up a Wifi access point on your phone and tablet with Android and turn it on
Configure the mobile access point as follows:
On some outdated smartphones running on Android 2.x, instead of the “Wi-Fi access point” item, there may be another - “Mobile Wi-Fi router” or “Wi-Fi hot spot”. This is the same thing, the principle of setting is similar.
Distribution of Wi-Fi from a mobile router refuses to turn on: possible errors and ways to fix them
If the network setup is done correctly, but there is still no access to the Internet, you need to check if the data transfer is disabled. For this function is responsible for the slider "Mobile networks" in the section "Wireless networks".
If the connection to the network was successful, but the quality of the Internet leaves much to be desired, then, most likely, the smartphone works in 2G mode. To switch to 3G-4G, go to “Settings” - “Mobile networks” and manually select the desired mode.
GSM is 2G (low access speed), WCDMA is 3G (speed is up to 56 Mbps), LTE is 4G. CDMA standard refers to 3G - the maximum access speed is 14.4 Mbit / s.
The user may encounter the fact that the menu item “Setting up a Wi-Fi access point” is blacked out (inactive). To gain access to this item, you need to switch the "Wi-Fi hotspot access point" slider to "On" mode.
It is not necessary to buy a 3G modem to make your laptop more mobile - the communicator can take on the role of an access point.
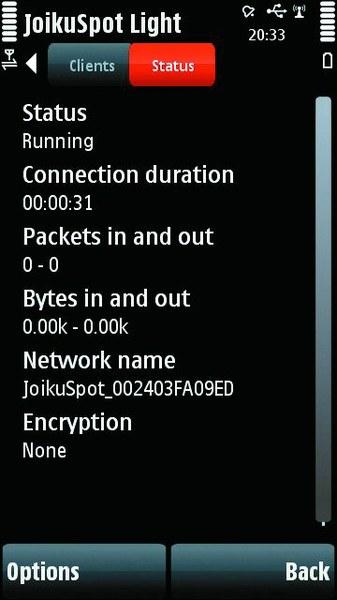 JoikuSpot at work on the Nokia 5800 (Wi-Fi-tethering) Today, the mobile Internet has ceased to be exotic, and smartphones and communicators that support high-speed 3G wireless connection (rarely WiMAX) are no longer an expensive rarity. In this regard, a reasonable question arises: if the phone can connect to the global network, then why not use it as a modem (access point)? As far as such a solution is possible in principle and what is needed for this, we will look at the examples of the main mobile platforms - Windows Mobile, Symbian S60, Android OS and iOS. Tethering as a technology
Connecting to the Internet through a mobile device with access to a wireless network is called tethering (tethering) (hereinafter referred to as simply “connecting”). In fact, we are talking about creating a network connection through which packets of traffic from the communicator pass. The smartphone itself thus becomes a DHCP server, distributing the Internet to other devices that receive a NAT connection.
However, technically this procedure is not as simple as it might seem. First, mobile operators often impede the use of such an opportunity on cellular devices, as there is a threat of network overload (not to mention the purely marketing nuances associated with the sale of USB modems and data plans). And manufacturers of mobile devices do not seek to apply this technology officially due to possible problems with power consumption and security of transmitted data.
Now the situation has begun to change gradually - in any case, on almost all mobile platforms in recent versions of the software, this possibility works out of the box, although in some cases a certain configuration is required. However, the latest mobile OS updates are not installed on all devices. For example, Android version 2.2, in which the regular mode of using the communicator as a modem for the first time officially appeared at the beginning of 2011, was installed on half of the devices. Therefore, to connect, you will need to install special software and a certain setup of the equipment. A network connection can be made using the main communication interfaces - USB, Bluetooth or Wi-Fi. The first and last are much more common due to the limited speed of the Bluetooth module.
The most stable is USB, because in the case of it the device is always physically connected to the computer and at the same time it is recharged through the port. Using Wi-Fi-connection looks more attractive due to the fact that several devices can be connected to the wireless network, and the communicator itself is able to be at a distance from the PC and is not connected to it by wires. However, we note that the access point, organized through the Wi-Fi capabilities of the phone, works exclusively in the ad-hoc mode, and not in the “infrastructure” mode, which ordinary Wi-Fi access points use. In addition, with high probability it will be possible to connect only computers, tablets and some mobile devices that support ad-hoc connections. Gaming consoles for the most part work only in the “point-to-point” mode, therefore, their control software will also have to be modified in order to provide access to the Network. Another disadvantage of Wi-Fi-tethering - the battery is discharged very quickly, since two wireless modules are working simultaneously. iOS: work out of the box
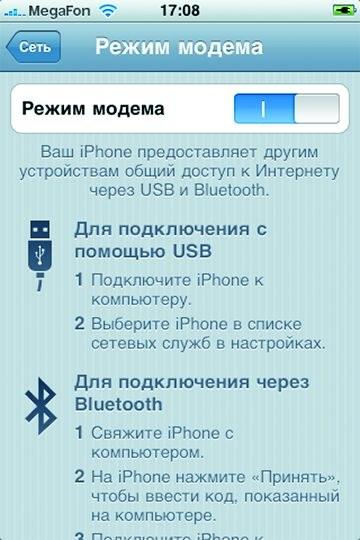
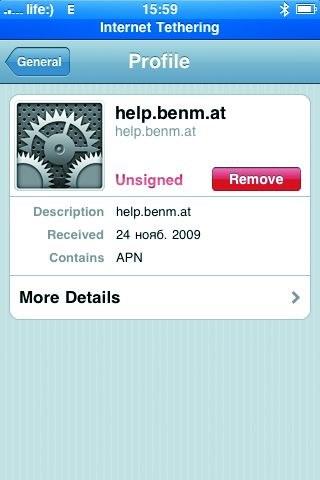
Modem mode has officially appeared in the iPhone firmware since version 3.0 (mid-2009). Previously, it was unavailable, and users had to install third-party software that required unlocking (jailbreaking) the system. Now in order for an iPhone with OS version 3.0 to be able to distribute traffic via USB or Bluetooth, you need to get the settings of the mobile Internet through iTunes. If you need to activate the distribution of wireless traffic without connecting an iOS device to iTunes, you will have to use special sites (for example, http://help.benm.at, www.iphone-notes.de/mobileconfig) or the built-in Safari browser with the online settings configurator . To do this, you will need to manually specify all the parameters of the access point, and then apply these files in the device. For iPhone 3GS and 4 with versions of the 4.0 system, the distribution of traffic via USB and Bluetooth, as well as Wi-Fi is currently standard. Android OS: new versions only
In the Google Android operating system, the wireless Internet distribution mode was officially unavailable until the summer of 2010, when Android OS 2.2 FroYo was released. Nevertheless, due to the openness of the platform and the more liberal attitude of Google to the idea of “rutting” these devices (obtaining superuser rights in the system), it was possible to use the laptop from the very beginning in version 1.5 to access the network from the laptop.
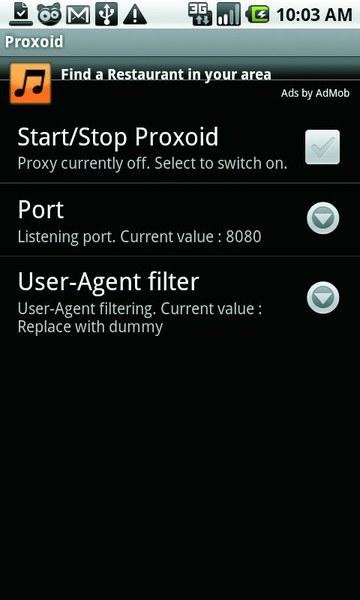
To do this, as already mentioned, it was necessary to install specialized firmware with an activated root-mode, which in most cases required quite complicated manipulations from the novice user (choosing a stable firmware from a large number of alternative options, updating the device bootloader, searching for an engineering firmware image for the desired model “Google phone”, preparing a memory card and PC for flashing, etc.). In the end, the device received the necessary option by installing the free Android utility Wi-Fi Tether (http://code.google.com/p/android-wifi-tether), but it worked only until the user installed the corporate update system. This issue was particularly relevant during the distribution of updates to Android OS 2.0 / 2.1. In version 2.2, the connection mode works for USB and Wi-Fi - the corresponding items should be noted in the settings menu. An alternative to the regular ability to distribute traffic is to install utilities that do not require the phone to be “rooted” - however, they may work somewhat slower than the original stack. These include the PDANet (www.junefabrics.com/android) and Tether (http://tether.com/android) applications, which cost about 900 rubles each. However, in the case of PDANet, non-US and Canadian users are provided with a fully functional free version (available on the Android Market with the Light prefix). Both programs work via USB, PDANet also allows you to organize a Bluetooth connection, but Wi-Fi connectivity is not available for both utilities. According to the developers, Tether organizes data transfer at speeds up to 7 Mbit / s, and PDANet - up to 35 Mbit / s. Symbian S60: Third Party Solutions
On Symbian-devices, working as a modem with the mobile Internet has been maintained throughout the entire history of this system and is still available: via USB and Bluetooth - using the standard method, and via Wi-Fi - using third-party software. In the first two cases, the user needs to have a synchronization program on the computer (mainly Nokia PC Suite, since Symbian smartphones from Nokia have always been the most popular). Together with it, the necessary drivers for emulating USB and Bluetooth modems are installed (in the case of the earliest versions of the synchronizer, they were distributed separately). After the smartphone is connected to the computer, the user needs to perform one of two actions - launch the appropriate One Touch Access tool in Nokia PC Suite or Ovi Suite to connect the phone to the Network (click on the icon with the radio station tower, then select the cellular operator and confirm the connection) or manually create a modem connection by entering the necessary settings (access point, modem initialization string, etc.).
Both methods can be considered relatively reliable - there is only a small chance of conflicts with existing network connections on the PC and the impossibility of the modem calling the number. Due to the design features of Nokia smartphones, until recently, when working via USB, device recharging was almost never supported. Wi-Fi-tethering appeared relatively recently, when not only top-end and corporate models, but also mass devices were equipped with appropriate wireless modules. For it, you need to install third-party software: JoikuSpot programs (www.joikushop.com) with the support of all S60 devices, including Symbian ^ 3, as well as Linux models of Nokia N900 and WalkingHotSpot (www.walkinghotspot.com) are popular.
The first utility has a lightweight version that provides only HTTP / HTTPS traffic transmission over an open unprotected network (that is, the smartphone itself becomes an access point to which you can connect without a password and whose traffic is not encrypted). FTP, POP3 and VPN are provided only in the paid Premium version, which costs about 400 rubles.
WalkingHotSpot is available in two versions - a trial, with a monthly period of validity (200 rubles), and a lifetime (750 rubles). The difference between these applications is that JoikuSpot is activated on a specific smartphone and tied to its IMEI (that is, the SIM card can be changed), and WalkingHotSpot - to an account on the developer’s website (does not depend on the number and can theoretically be used on different devices). The functionality of the programs, with the exception of some small nuances, is identical. JoikuSpot has a simpler connection interface, optimized for instant start and one-touch data transfer. Windows Mobile: a wide range of programs
In the mobile operating system from Microsoft, there is a Wireless Modem applet that allows you to turn your device into a DHCP server that automatically distributes IP addresses to connected devices, organizing a network to transfer Internet traffic. There are few configuration options, but this connection works quite reliably (failures can affect only the Bluetooth stack with the DUN profile - Dial-Up Networking). Distribution of traffic from the phone to the PC via Wi-Fi in a regular way is not provided. To do this, in some firmware device manufacturers install an application for organizing a mobile hotspot. Such packages exist, for example, for communicators from ASUS and Samsung.
With the same success, this feature can be activated using third-party software. For example, the WalkingHotSpot program described above also works with Windows Mobile based devices, but there is also an alternative solution - WMWifirouter (http://global.wmwifirouter.com/consumer) for 600 rubles. There is also a free (and therefore compatible with a limited number of communicators) Mobile Wi-Fi Router application (http://forum.xda-developers.com/showthread.php?t=538874) created by fans, which provides the simplest connection with WEP encryption. .
It is more convenient to browse browser pages and edit documents from a laptop than from a smartphone or tablet. Use the Android gadget as a wireless modem to set up and share Wi-Fi using an access point.
What is a Wi-Fi hotspot?
A Wi-Fi hotspot is a station that allows multiple devices to access a wireless network. In the role of the access point can act as a gadget with the Android operating system. Device Requirements:
- the presence of the module Wi-fi;
- availability of GSM / 3G module.
If your smartphone or tablet does not support GSM / 3G, but it works with OTG technology, that is, it detects connected flash drives, you can connect a USB modem to it and use it as a wireless access point.
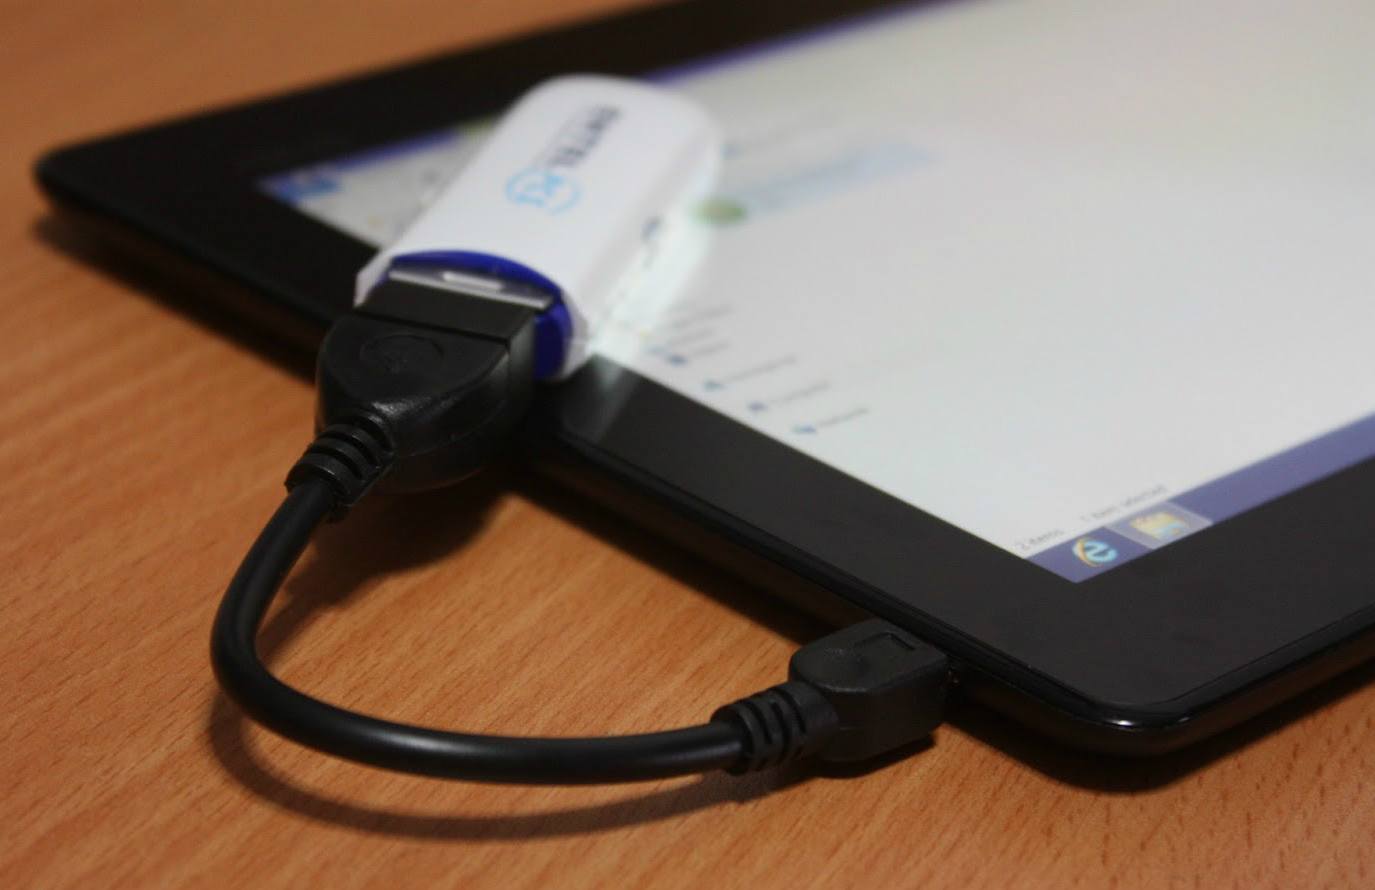 The modem communicates with the tablet via cable via OTG technology
Including the access point, remember: handing out Wi-fi, you spend mobile traffic. If the tariff is not unlimited, track your balance after working on the Internet. Also, the active access point increases battery consumption.
How to distribute the Internet from your phone, smartphone or tablet
There are two ways to distribute Wi-fi from a smartphone or tablet - using standard Android tools or using a third-party application. Please note - you can only distribute mobile traffic from the connectionGSM / 3G. Cannot configure access point usingWi-fi network connection.
Setting up an Android device as a router
Android system starting with version 2.3.x, allows you to broadcast Wi-fi to other devices. To configure the access point, make sure that the mobile Internet is turned on and go to the menu of the gadget. LG G3 setup example, Android 5.0 version:
- Open the menu item "Settings - Networks".
- Select "Shared modem and networks - Wi-fi hotspot".
- Click "Create Wi-fi hotspot"
- Set the name of the access point - so it will be displayed when searching from other devices.
- Choose network security level — WPA PSK for connecting computers on Windows XP SP2 or WPA2 PSK for connecting Windows XP SP3 and other systems.
- Set a password longer than 8 characters.
- Specify the maximum number of users that can connect to the access point at the same time.
- Go back and activate the access point by dragging the slider.
You can enable mobile Internet (data transfer) using the menu item "Settings - Wireless networks - Mobile data".
On Android earlier versions to configure the access point:
- Go to "Settings - Wireless Networks".
- Select "More" or "Next."
- Select "Modem and access point" or "Mobile AP".
- Next, make the settings according to the instructions above.
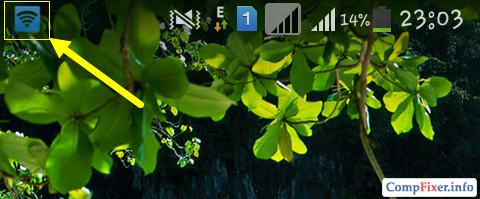
By activating the connection, you will see the corresponding icon in the notification bar at the top of the screen.
It is enough to configure the access point once, for subsequent connections it will be enough to activate the function in the network settings or by pulling out the notification curtain in the upper part of the screen and pressing the “Access Point” button.
Photo Gallery: setting the access point in the Android menu
Step 1. Open the settings Step 2: Select "Shared modem and networks" Step 3. Select the "Access Point ..." menu Step 4. Create a Wi-fi access point Step 5. Configure the access point settings Step 6. Turn on the access point When reconnecting no need to configure the access point
Application Usage
Use applications to distribute Wi-Fi access if your smartphone or tablet does not support standard settings. Famous programs: Osmino, mHotspot, MyPublicWiFi.
Configuring Wi-fi connections using the example of Osmino:
- Download the app from the Play Store and open it.
- Enter the network name, set a password and click "Distribute".
The smartphone or tablet will go into modem mode. To disable the access point, go to the application and click "Stop distribution."
Photo Gallery: how to enable Wi-Fi distributions in the Osmino app
Step 1. Download the application. Step 2. Specify the network settings and turn on the distribution. It appears when the program is first turned on.
Why the Internet does not turn on and does not work through the access point
Having connected the mobile Internet and activating the access point, the user may encounter difficulties. There are three reasons for the incorrect operation of the Wi-fi access point.
- connection blocking by an antivirus program;
- the impact of a downloaded application or virus on the network;
- oS error.
Antivirus, real-time smartphone protection, can block network connections. Go to the application, disable the firewall and activate the access point. If there is no connection, remove the antivirus program and try again.
Installed applications make changes to the operating system. Check your smartphone with antivirus and block malicious files. Use the Application Manager to find out which program has control over network connections and delete it. Then turn on the access point.
If the previous methods do not work, reset the gadget to factory settings. For this:
- Go to the "Options" menu.
- Select "General - Backup and reset."
- Click "Reset Settings".
By performing a reset, you will lose all data stored in the device’s memory.Pre-create a backup.
To block the distribution of traffic over Wi-Fi can mobile operator. If you configured the access point to Android according to the instructions and eliminated the errors described above, contact the contact center with a request to check the network settings and the presence of blocking.
The portable access point is the mode of operation of the smartphone, when the mobile Internet from a GSM or 3G operator is distributed via Wi-Fi. At the same time, the Wi-Fi module of the smartphone starts to work not as a client, as when the smartphone is connected to an access point, but as a router. We will show how to distribute the Internet from an android by setting up a mobile router mode using the example of a Samsung Galaxy smartphone.
How to configure the distribution of the Internet on Android
So, set up a mobile access point.
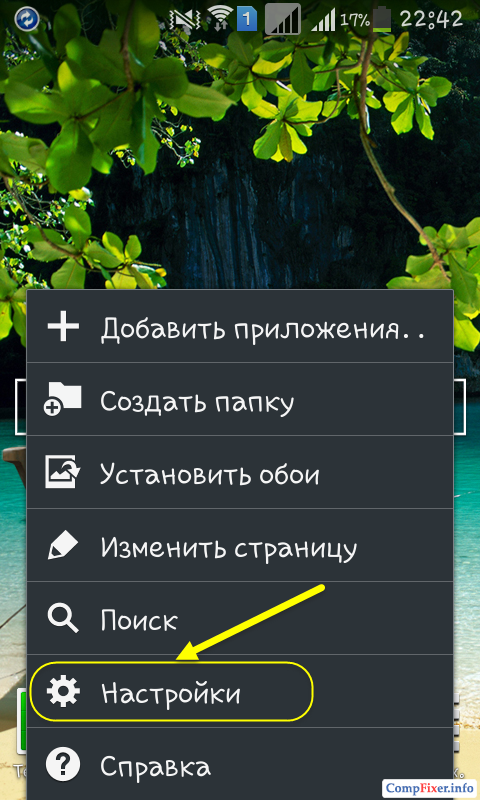
Press key Menu:
and select Settings:
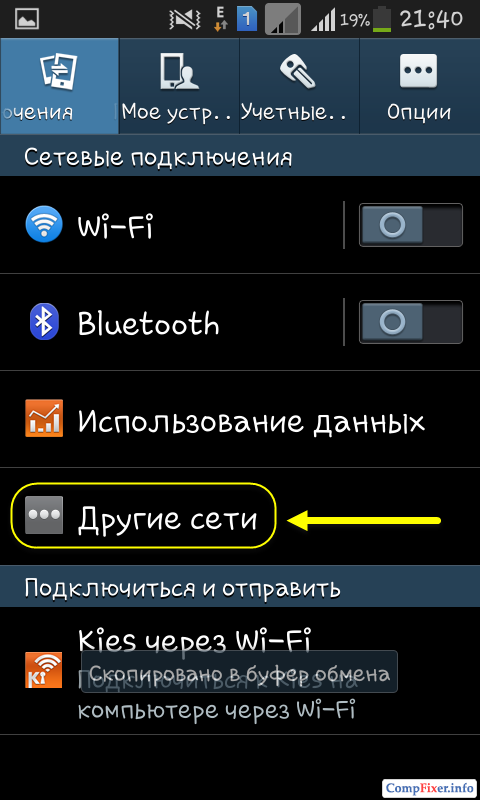
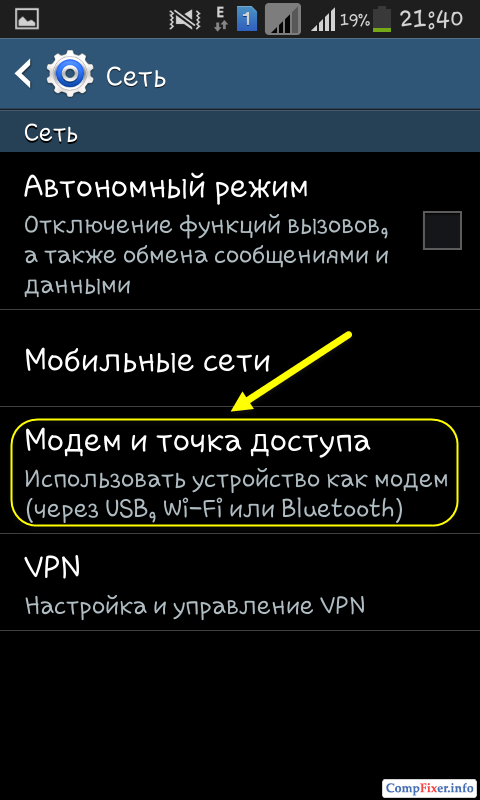
Press on Other networks:
Select Modem and access point:
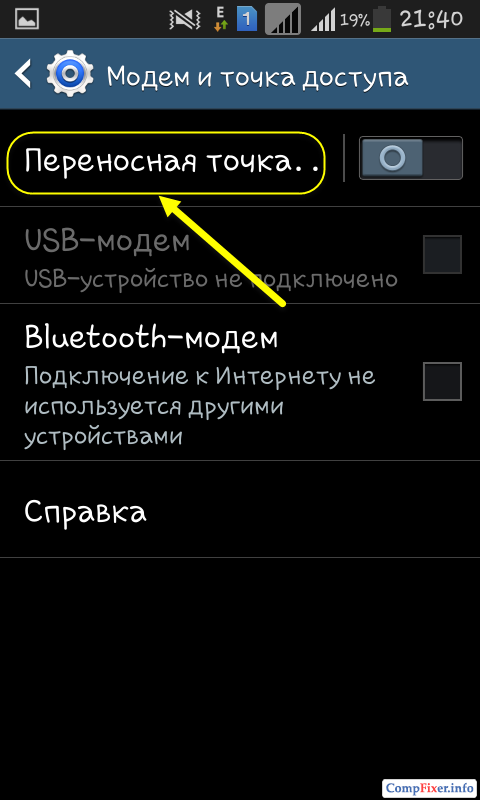
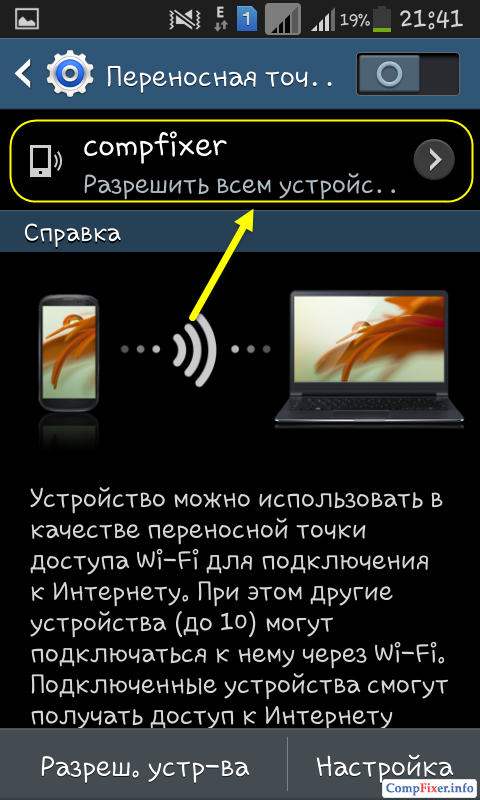
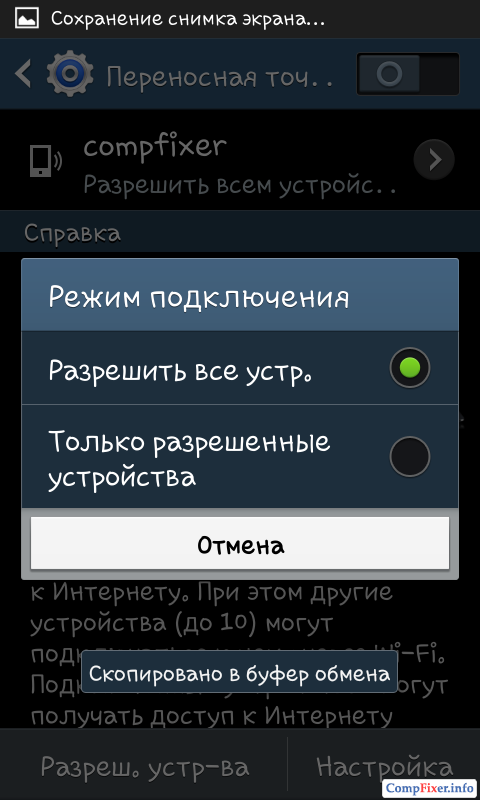
Select item Portable Wi-Fi Hotspot, moreover, press NOT on the selector, but on the very inscription :
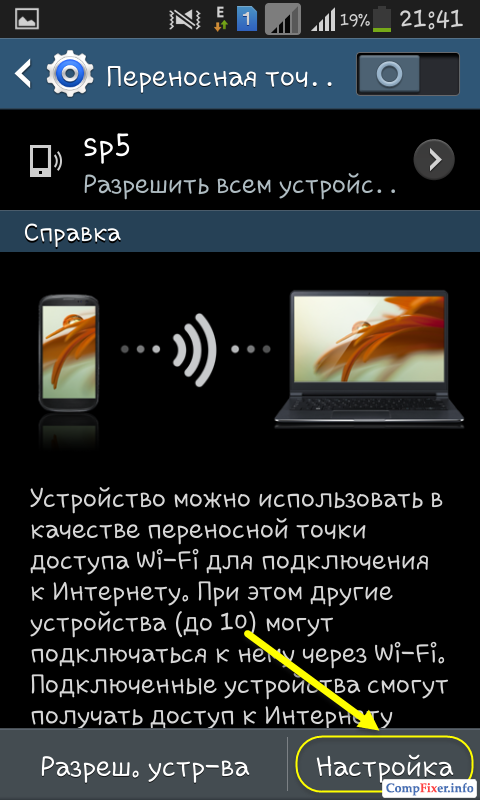
Press the button Customization:
1) Enter the name of the Wi-Fi network;
2) Enter the password (security key) of the wireless network;
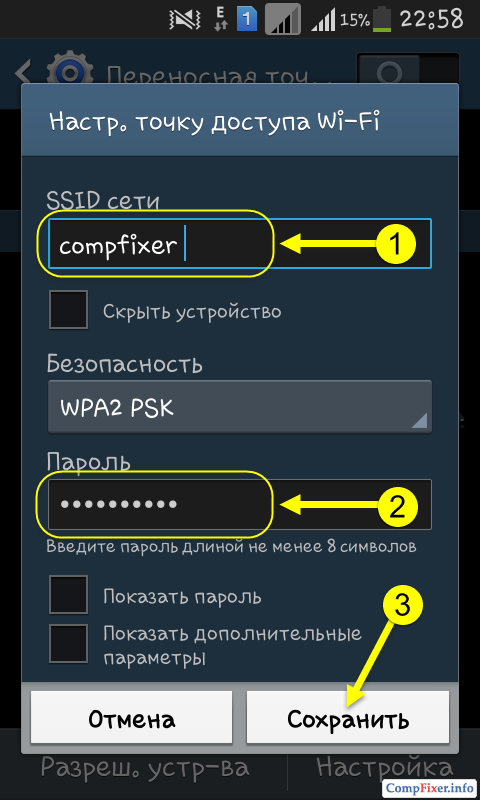
Now switch the selector. This will enable the access point:
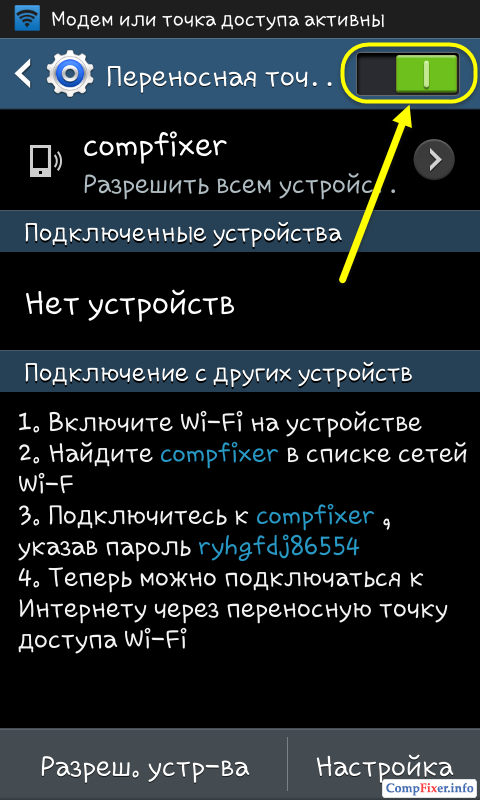
After that, you will see the "Enable portable Wi-Fi hotspot" alert.
During operation of the mobile access point, the corresponding icon is displayed in the upper left corner of the screen.
So, we learned how to distribute the Internet from android and now we need to connect to a mobile access point.
How to connect to Android AP from a laptop via Wi-Fi
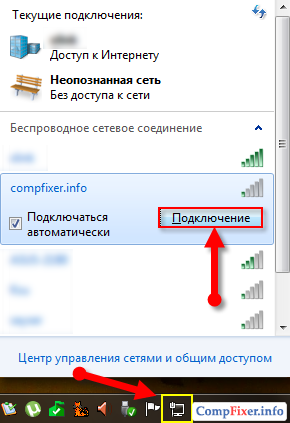
Once you have set up the distribution of the Internet via Wi-Fi on Android, you need to connect to the wireless network that your mobile device is broadcasting. On a laptop, this network will look exactly the same as other networks from routers.
Select a network. Click To plug.
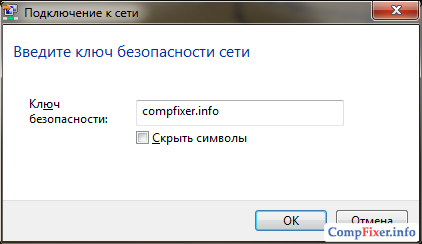
Enter the security key that you specified in the settings of the mobile point. Click OK:
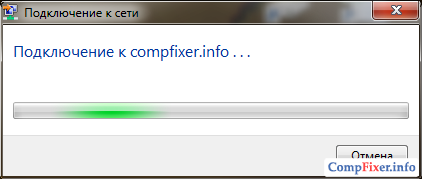
Wait for the laptop to connect to your wifi network:
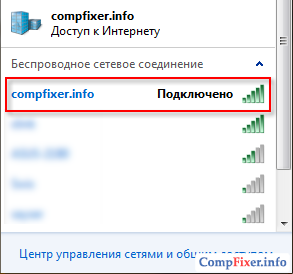
As a result, in front of the network name should appear Connected:
How to disable the distribution of the Internet
There are several ways to disable a portable access point:
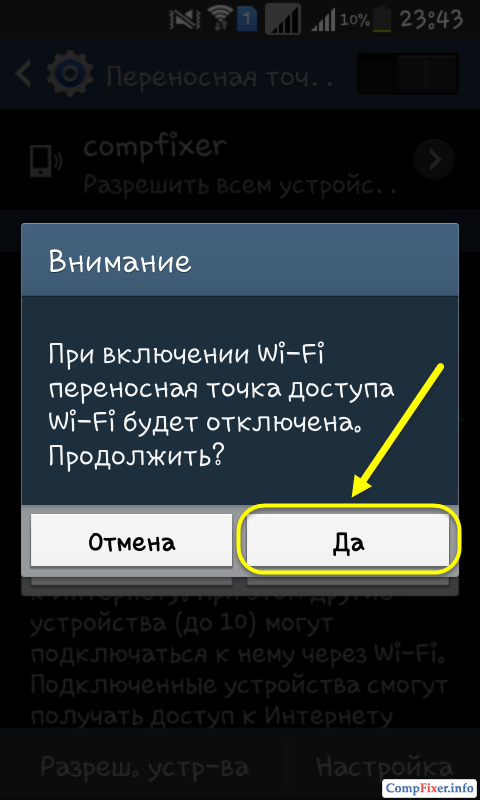
1 Just turn on Wi-Fi:
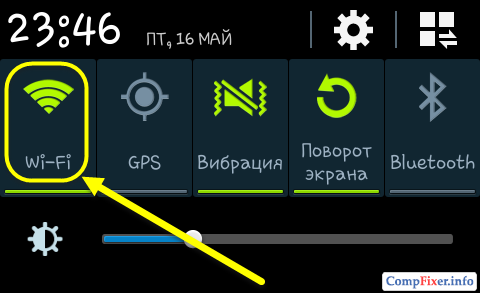
In this case, the system will display a message:
When you turn on Wi-Fi, the portable Wi-Fi access point will be disabled.
Click Yes:
2 Go to Settings -\u003e Other Networks -\u003e Modem and access point and turn off the portable access point:
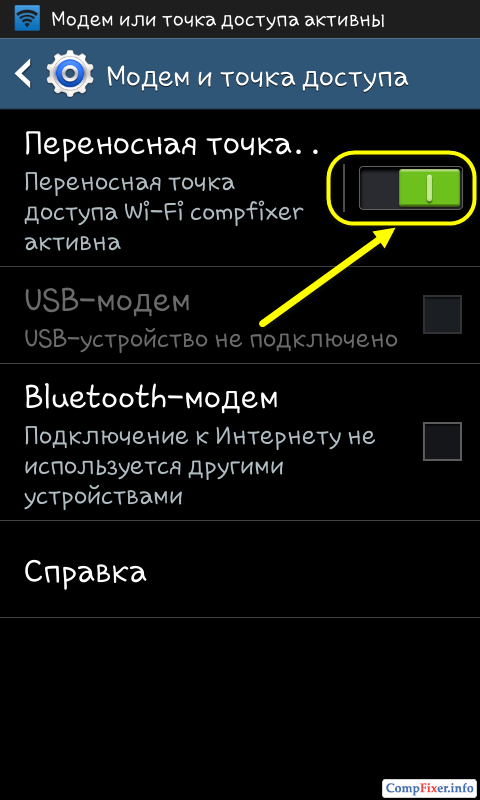
After that, Android will stop distributing the Internet by wi-fi.
The WiFi access point on Android is quite a demanded opportunity. The fact is that the phone or tablet uses the same wireless adapter that is installed on the laptop. The difference is only in the data transfer rate. This suggests that mobile devices with the Android platform can be used as an access point.
This is a very useful feature that allows, for example, on the road to distribute Internet via WiFi to a laptop for solving certain tasks. In addition, thanks to a mobile phone or tablet that works with the Android operating system, you can create a local network and combine several laptops for transferring data, sharing games, and so on.
How to distribute WiFi on Android
First of all, it is worth noting that there are many different versions of this platform. Moreover, many manufacturers modify its shell, making it original and not like the others. Therefore, the name of this function is subject to change. For example, on some mobile phones we will need to enable a portable access point or Mobile AP.
But, despite all the diversity, this feature is enabled in the wireless settings. How to do it? Everything is quite simple. First you need to open the menu. Next, enter the device settings. On newer versions of Android OS, go to the “Other networks” item.
If you are using an old smartphone, then open the “Wireless Networks” item. On some models in the settings you need to open the "More ..." item. Further, on all versions of Android you need to enter the category “Modem and access point”.
Now it remains only to tick the line "Access Point". As mentioned above, the name may be different depending on the version of the operating system. Therefore, on older versions of Android, turn on Mobile AP.
Now your mobile phone or tablet works as a portable WiFi access point on Android. In fact, it is a full-fledged local network to which you can connect a laptop or other WiFi devices.
How to share Wi-Fi with Android: Video
How to distribute internet over WiFi on Android
So, how to distribute WiFi on Android you already know. But what to do if we need to distribute the Internet. Of course, its speed is not the fastest, but in the case of 3G - this is quite enough even for watching online video.
To distribute the mobile Internet from a tablet or mobile phone, you first need to connect to it. To do this, call the drop-down menu. In the toolbar, where you usually turn on WiFi, Bluetooth, or other features, you need to find a button called Mobile Data. This feature may also be called “Packet data” or simply “Data”.