Flashing android via recovery. Flash, update and tune your smartphone without leaving Android
A few years ago, operations such as rooting, flashing and tuning an Android smartphone required quite deep knowledge, special tools compatible only with the desktop Windows, and a lot of patience. Today, everything has become much easier and all these actions can be performed using a special software for the smartphone, available directly in Google play.
Introduction
Normally installation alternative firmware on a pristine smartphone looks like this: first, you find the rutting information of your smartphone model on Google, then you get the necessary tools (Android SDK, adb, fastboot, scripts), connect the smartphone to your computer and try to follow the instructions as accurately as possible. If everything succeeds, you get root and, in some cases, in the appendage of the custom recovery console.
Next, install the firmware. To do this, you again plunge into the Internet and, after half an hour of walking through the forums and reading compatibility information, you find and download a zip-archive with firmware. Again, connect the smartphone to your computer and throw off the firmware on it. Then you turn off the smartphone, turn it on, hold down the volume down and power on buttons, and gain access to the recovery console. Five minutes after walking around the menu using the volume keys, you find your firmware on the memory card and give the command to install.
After the installation is complete, you restart the smartphone and pray that everything will work out. When the desktop appears on the screen, you exhale with relief and immediately remember that you forgot to download and install the Google applications and the kernel. Well, for this, you spend half an hour on the Internet, find the required zip files, dump them onto the memory card, then the recovery console, poke through the menu, wait with crossed fingers, and here it is, the desktop ... damn, you had to install another firmware ...
Familiar picture? If yes, then this article is for you. From it you will learn how to do the same thing in ten minutes by connecting your smartphone to your computer only once every two minutes.
What do you want and what will you get?
So, suppose you are holding a brand new smartphone. Your task is to install CyanogenMod (as an option - AOKP, ParanoidAndroid or the popular SuperVasyaAndroidModPlus) and the core franco.kernel. Both of them are distributed in zip-files that are flashed through the recovery console. However, the usual console will not accept them because of the digital signature curve (“not a manufacturer is a signature, goodbye”). Therefore, you need a custom recovery console that does not pay attention to digital signatures. This can be ClockworkMod or TWRP.
But! To install a custom recovery console, you need write access to internal memory smartphone, that is, you need root. And root in “non-Nexus” devices is always obtained using the hacking protection of Android. Total picture of the action looks like this: getting root -\u003e installation of the recovery console -\u003e CyanogenMod firmware -\u003e firmware google apps -\u003e kernel firmware -\u003e reboot -\u003e joy. Let's see how to do it all.
Root
First of all, we need root. I’ll say right away that this is the only task for the solution of which you have to connect your smartphone to your computer. There’s nothing you can do, the Android security system will not allow an Android application to do this. On the other hand, spitting is also not worth it, since everything is done very quickly and painlessly. The general algorithm of actions looks like this:
- We go on the phone in “Settings -\u003e About phone” and many times we poke into “Build number” until the message “Now you are a developer!” Appears, then go to “Settings -\u003e For Developers” and put a tick “ USB debugging ”(if Android version below 4.2 is installed, you can immediately go to the developer section).
- We connect the smartphone to the computer using a USB cable, select “Media Device” (MTP) or “Camera” (PTP) on the phone and wait for the drivers to be installed.
- Download the iRoot application and launch it.
- Click "Check connection ...".
- Click "Install ROOT" and do what the program writes.
According to Ukrainian developers, iRoot is valid for any smartphone under running Android 2.3-4.2.2, and not just Huawei devices, as you might think, by downloading and running the application. After completing the work and a few reboots, the SuperUser application should appear on the smartphone and, of course, root access, which will open the way for us to install recovery and firmware.
Installation Recovery
Installing a custom recovery console is meanwhile very simple. There are a lot of applications in the market for this, but I would recommend using Recovery-Tools, ROM Manager or TWRP Manager. The first one is intended solely for setting up a recovery and, in fact, consists of only two buttons: “Flash Clockworkmod Recovery” and “Flash TWRP Recovery". After pressing one of them, this or that recovery console will be installed. In principle, it does not matter which one to install, the difference is that TWRP is more convenient to control the finger, but we don’t care about this function either - we will not rummage through their settings, but rely on special software.

In theory, Recovery-Tools should determine the smartphone model itself and download the correct archive with the console, however this mechanism does not always work, and the database is incomplete. Therefore, as a backup option, you can use the ROM Manager, designed exclusively for installing ClockworkMod, but including a comprehensive database of devices. Again, all you need to do is click on the Recovery Setup -\u003e ClockworkMod Recovery button, confirm the phone model and wait for the installation to complete.
If this method did not work either, then you should pay attention to the model of your smartphone and see if it is Chinese. Needless to say, super cheap chinese phones can not flash this way. No one will bring them into the base, and all the more so will they engage in support. Therefore, in relation to the Chinese have to apply the old old-fashioned way of manual installation (and even then you are very lucky, if at all something will be ported).
Installing firmware
Now that the smartphone is equipped with a custom recovery console, it is ready to accept any firmware available for this model and swallow it without choking. We, of course, will not look for firmware on our own. We automate this process using the GooManager application. For those who do not know: from the very beginning of the distribution of custom firmware on the Web site has appeared. Initially, it housed a proprietary Google software (such as Gmail or a market), which the authors of custom firmware could not use due to licensing restrictions, but then it turned into an open repository of various firmware, and after some time the GooManager application appeared, allowing you to automatically install as firmware, and Google applications.
This application is remarkable in that it gives a choice of available firmware based on the model of the smartphone. As a result, we will not have to either look for the firmware on our own, nor be afraid for the fact that some of them may get crooked. In general, the algorithm for working with the application is as follows: “Launch -\u003e Browse Compatible ROMs -\u003e select firmware by name (for example, aokp or cm) -\u003e select version -\u003e Begin Download -\u003e Order & flash selected -\u003e Flash”. And that's it, the firmware will be downloaded and then installed automatically. The smartphone will reboot.
Installation, or, to be precise, installing Google applications is even easier: Download gapps packages -\u003e Yes -\u003e Order & flash selected. Although it is better, of course, to download Gapps in advance, and only then proceed to download and install the firmware. In this case, at the last step of installing the firmware (Order & flash selected) you will be able to select the gapps package, and it will be installed along with the firmware. Installation of several packages at once is possible only with TWRP Recovery; this function is blocked in ClockworkMod and works only in combination with the paid version of the ROM Manager utility.
I also note that by default GooManager does not make a wipe before installing the firmware, but he knows how. Therefore, each time a cardinal change of firmware, that is, the replacement of one with another, and not an update, in the last window (which appears after clicking “Order & flash selected”), check the box next to the option “Wipe data (factory reset)”. So you will escape possible problems with the download and operation of the new firmware.
Kernel installation
In addition to custom firmware, we can also install a custom kernel. We already talked about this in detail in one of the previous issues. If in a nutshell, the custom kernel can give more subtle control over the smartphone, increase its performance and save battery power, but everything is far from being as simple as with the firmware, and I would not recommend flashing the custom kernel and without limit to what comes with the firmware.
If the decision to install the kernel is made, then it's time to look into Google Play. For many popular custom kernels, special management and update utilities were developed at the time, with the help of which you can install the kernel as easily as mail client. Three well-known utilities from this list:
- franco.Kernel updater - “update” and configurator of one of the most famous cores for Nexus line devices (supported Samsung galaxy Nexus, LG Nexus 4, Asus Google Nexus 7 and Samsung Nexus 10). The free version can only install and update the kernel, but we don’t need more;
- Trinity Kernel Toolbox is a similar solution for the Trinity kernel that supports all the same Nexus devices, as well as the Samsung Galaxy Note II and Galaxy S III. In addition to the installation function, it also includes tools for managing all functions of the kernel and costs 114 rubles;
- GLaDOS Control is practically a copy of the previous application, but this time for, frankly, not the most popular GlaDOS kernel (Galaxy Nexus and Nexus 7). Includes a complete set for tuning and automatic update. It is worth 81 rubles.
All these applications allow you to install one of the three cores without any extra gestures. But if you don’t want to spend the money, or you chose a kernel for which there is simply no managing application, you can get out of the situation by downloading the kernel directly to the phone, and then flashing it using the same GooManager. This is done like this:
- Go to xda or w3bsit3-dns.com, find your device, choose the kernel (yes, you have to dig in numerous threads) and download it to your phone. Typically, the core weighs 5–10 MB, so it’s not long to wait and it will cost a penny (if there is no Wi-Fi).
- Install and run any file manager, go to the Download directory on the memory card, find the archive with the kernel and copy it to the goomanager directory, again in the root of the memory card.
- Run GooManager, click on the item Flash ROMs, put a tick in front of the archive with the kernel, click the button “Order & flash selected”, and on the next screen, without changing anything, press the button “Flash”.
Upgrading firmware, kernel and gapps
At this point, you should already have a custom recovery console, custom firmware, Google applications, and a custom kernel; full house, everything you need. However, we won’t be sitting on this for a long time, and soon new versions of firmware based on the new version of Android, even faster kernels and even more functional recovery consoles will be released. In short, you need to be updated. But how?
For updating also own tools are provided, but before passing to their review, I will explain several specific moments:
- Recovery Console can be updated anytime and as you like. It is in a separate section, therefore, even having ruined this section, you will not ruin Android. You can upgrade using all the same Recovery-Tools, ROM Manager and TWRP Manager.
- The kernel is also in a separate section, and it can be updated / changed whenever and how you like, the main thing is to consider compatibility with Android versions and types of firmware. The methods described above.
- The firmware is updated without any wipes, however, if a custom kernel was installed, it will have to be reinstalled. Reinstalling Google apps is not required.
- Switching to another firmware is done with a full wipe (factory reset) and subsequent installation of Google applications and the kernel. All data, except for files on the memory card, will be lost (this can be avoided by making a backup using Helium or Titanium Backup).
Now how to perform an update. Recovery and the kernel are updated using specialized software or, in the case of using a rare kernel, self-download and firmware manually, as shown in the previous section. You can update the firmware different ways. If the firmware was installed using GooManager, then when a new version appears in the goo.im repository, you will receive a notification, by clicking on which you can download and install the new version. You will not lose any data and applications, only the kernel will need to be reinstalled.
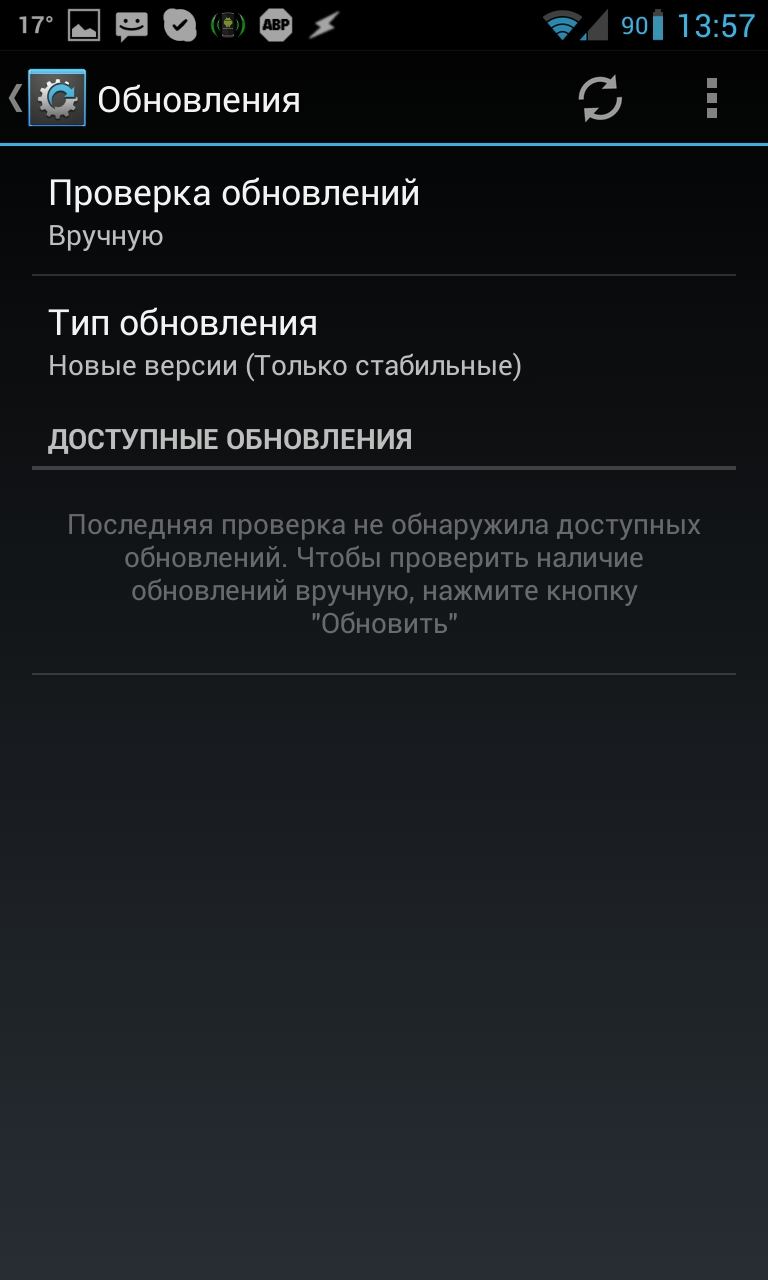
CyanogenMod has its own update mechanism, which also automatically warns you about the new version and offers to download and install it. By default, it only works with stable versions of the firmware, but it can be reconfigured, so that warnings will come after the release of nightly builds. To do this, go to "Settings -\u003e About phone -\u003e Update CyanogenMod". In the “Check for updates” option, select “Daily”, in the “Update type” option - “New versions (Including nightly builds)”.
The only problem with this method of updating is that each firmware will weigh about 200 MB - it is expensive if you make updates every day or several times a week. Therefore, I would recommend using the CyanDelta tool, which allows you to download only patches with modified firmware components instead of the entire archive. When using this tool, each update will weigh only 2-10 MB, so even a cellular network is suitable for pumping. It is very simple to use: after the first launch, the software will offer to download the entire firmware (patches will be applied to it in the future), after which it will hang in the background and notify you of updates.
Backup
To protect yourself from the possible installation curve of the firmware, you should regularly make a backup. To do this, there are two main types of tools: Helium and Titanium Backup applications for backup applications, and special function custom recovery consoles called Nandroid. The second one is different in that it makes a complete snapshot of all the components of a smartphone so that after any actions the smartphone can be returned to its previous state, including all settings, applications, contacts and messages.
Usually, Nandroid backup is performed manually directly from the custom recovery menu, however, we will use the Online Nandroid Backup application that creates backup copy system during its operation. The application is free and available on Google Play. After installation, it will install the backup script (this, by the way, will have to be done after each firmware update) and prompts you to perform initial settingwhich is reduced to the choice of the method of auto-generation of the name of the backup (the default is the current time), as well as the choice of the format of the backup. The usual Clockworkmod-format is universal and will be compatible with any custom recovery, however if ClockworkMod is installed on the smartphone, then in the Backup Mode option it is better to select CWM Incremental. In this case, each new backup will contain only differences from the previous one, due to which compatibility with TWRP will be lost, but it will be possible to preserve a solid chunk of free space on the memory card.
After all this is done, just click on the “Quick Backup” button and the application will start its work. You can use your smartphone at this time, so you should not postpone the backup for the evening or other time. At the end of the procedure, the software itself will display a message on the successful completion of the backup and will offer to view the backup in the Nandroid Manager application.
The latter, in turn, is a tool for managing existing backups, viewing their contents, restoring, and selectively restoring applications, settings, text messages, call logs, passwords from points wi-Fi access, desktop, and browser history and passwords. All recovery tools are located on the “Restore Data” tab, and any explanations for working with the application are not required here. Everything is Russified and understandable even to a child.
! (nandroid-manager1.jpg, nandroid-manager2.jpg)
! (online-nandroid1.jpg, online-nandroid2.jpg)
INFO
The AOKP firmware has a lot of hidden settings, which can be activated by installing the free application AOKP.co.
TWRP Manager allows you to perform almost all TWRP Recovery operations directly from Android: installing firmware, wipe, backup and restore, reboot in different modes.
findings
Today, the process of flashing and customizing a smartphone running Android is no longer the same furious quest it was in the days of the first android versions. As you can see, everything is done very simply, without reading long manuals and searching for compatible firmware. But even if something goes wrong, if you find yourself so unlucky that you will not only installed Android, but also the recovery console, the boot sector will still remain in place and you will be able to bring your smartphone back to life by connecting it to your computer and using the proprietary firmware tools from the manufacturer.
Read in this article how to flash Android through a computer. How to flash a smartphone, what is the firmware of a phone on Android, why it is needed - common questions for new users who have encountered problems on a device controlled by the “green man” for the first time.
As a rule, flashing comes to the rescue of users whose gadgets refuse to work or are unstable. With the widespread use of Android devices from China, which cannot boast of long-lasting support from the manufacturer, third-party firmware has become popular to upgrade to latest version OS So that you are not confused, let's order.
What is Android flashing, why is it needed?
The term “flashing” itself has been widely used to fill the market with smartphones running Android OS. The new system has opened up a lot of possibilities for the user, including openness, which allowed everyone to change Android at will.
You can reflash not only a smartphone, but also a normal one. mobile phone - they also work on the OS, albeit more simple.
What hides the term “flash Android”? Any modern smartphone, as we have already identified, works on the operating system (complex software toolswhich ensure the correct operation of the hardware), which is characterized by errors, glitches and other problems. OS, phone can also "fly off", as well as Windows on your computer. And in this case, the output is to reinstall the system or flashing it.
However, flashing not only errors can fix. Installing a new firmware introduces updates that ensure the stable operation of the smartphone, and often make the process of human and device interaction more understandable and enjoyable.
Firmware can be divided into two classes:
- Official (stock).Firmware produced by the manufacturer of the Android device. Since they are developed specifically for a specific model, the likelihood of errors during a flashing or in the process of work is minimized.
- Third-party (custom, unofficial). Firmware developed by simple users or small groups. The basis is Android (the OS is open, so everyone can work with its program code), into which improvements are subsequently made. Third-party firmware does not guarantee perfect performance on your device, it may contain various errors, unnoticed by the developer.
Unofficial firmware, as a rule, is developed for those who have not acquired localization of the system into other languages or do not receive updates. Particularly interesting developers are attracted to inexpensive devices with good hardware, which are popular among users.
How to flash a smartphone on Android?

There are some pretty simple ways.
- Ota-update. In fact, this is not a firmware. You simply update the version of the OS with the standard means of the device. The process is very simple, besides, we have already talked about it in detail,. The only thing worth noting is that not every smartphone gets updates “over the air”, and model owners from little-known companies may never see them at all.
- Re-Flashing with a Smartphone. Using only a smartphone and a couple of applications, you can easily install new firmwaredownloaded from an official or unofficial resource. The method is quite simple, but you should first get acquainted with what we have already written about.
- FlashingAndroid through the computer.A way to flash Android, which we will talk about today. He, let's say at once, is somewhat more complicated than those presented above. But he offers much more opportunities.
Before you reflash
We will not hurry. To begin with, you should be cautioned against possible undesirable consequences and some nuances that may arise when Android is reflashed via a computer.
Data backup
The very first thing you should do is back up your important data. Sure to!During the flashing process, absolutely all files from the device’s memory will be deleted. Therefore, in advance, save the necessary information to a personal computer or to the cloud storage in order to restore everything quickly.
Backup copy of the installed firmware
It will not be superfluous to make a backup of the system itself, so that in case of problems during a flashing, there is something to recover from. To create a backup copy of the OS, the simplest means is about which we have already written.
High-quality wire, fully charged battery
Quite often cause errors in the process android flashing A low-quality USB cable, bought for a few cents, comes out through the computer. Often, a smartphone is not detected by the PC at all due to a bad wire. Therefore, we recommend to buy in the store a quality cable, but more expensive.
Be sure to charge up to 100% of the battery of your smartphone. The firmware can last for a long time, and the power from the USB port is not constant.
Possible problems
Remember! Re-flashing you do at your own peril and risk. Although this process is not so complicated, it is often accompanied by errors that can lead to the inoperability of certain functions of the smartphone or to scrape (complete failure). Although most of the problems can be corrected, some do not respond to treatment, even in service centers.
Be careful when flashing. It will be very useful to get acquainted in advance with the forums in which users share what can specifically destroy your device. Feel free to clarify the nuances that you do not understand.
The market is simply filled with a variety of Android-based devices, so it’s difficult to predict what errors may occur in your particular case. The reasons may be incorrect user actions, "clumsy" third-party firmware, problems with cable, drivers and other things.
After reflashing your device, you lose the manufacturer's warranty.
If you are not confident in your abilities, then it is better to contact the service center. Specialists with a guarantee pereprobyut your device, and you do not have to read the article further.
How to flash an Android device through a computer

So, readers who were afraid of possible problems were eliminated, and we are moving from theory to practice.
USB debugging mode and the necessary drivers
To begin with, we will take a smartphone or another Android device in our hands to activate the “USB debugging” mode. This is done so that the computer could make changes for a USB-connected device. So, the instruction:
- first of all, we will get developer rights so that we can access a special menu in the settings;
To gain access to the developer menu, you must make multiple clicks on the item "OS version". It is located in the “About phone” section (the very last item in the device settings).
- after rights are obtained, go to the “Developer menu”, which will appear in the settings;
- here we find the item “Debug USB”, make the switch opposite it active.
Smartphone can be put aside. Go to the drivers, which are useful for flashing Android through a computer.
The drivers for each device are different. You can download them on the official website of the manufacturer or on one of the forums.
To install the driver:
- connect the device to the computer;
- go to the "Device Manager" (use the search or find the section in the "Control Panel";
- find the item with the name of your device (a smartphone or tablet may not be determined by the system, in this case, a line appears with an unknown device, next to which is a yellow triangle);
- right click call context menu for this device;
- select “Update driver” from the list;
- click on the item "Search for drivers on this computer";
- then click "Select a driver from the list of already installed";
- clicking the "Install from disk" button, specify the path to the downloaded drivers;
- restart your PC and smartphone for the changes to take effect.
Often, just a smartphone driver is not enough. For a number of devices, additional USB port drivers have to be installed so that the PC can detect them. In addition, numerous devices require the installation of the ADB tool.
Android Debug Bridge (Android Debug Bridge) - a console application that is used to control android devices through a personal computer.
Returning to the fact that there are countless devices on Android, for individual devices you have to download a whole bunch of special software. The list of software can be found on the official websites of manufacturers or on thematic forums devoted to flashing specifically your gadget.
Software for flashing Android via computer

We approach the choice of software, which we will use directly to install the firmware on a smartphone or tablet. For these purposes, a whole bunch of programs are presented, but all of them can be divided into two broad groups:
- Software for flashing certain models.Branded programs produced by companies exclusively for their devices. Almost every major manufacturer offers a free version for download. Programs for flashing certain models provide a quick and error-free installation of new firmware, in addition, they have additional tools that will allow you to make a backup of the system and roll back in case of critical errors. Like software The following companies are represented: Samsung (Odin); Lenovo (Flash Tool); HTC (Fastboot); LG (KDZ Updater); Sony (Flashboot); Nexus (Fastboot).
- Universal software for firmware. Programs that can be used for flashing any Android devices. They are also a lot, but the possibilities are about the same. The most popular were the QFIL and SP Flash Tool: the first for flashing devices with Qualcomm Snapdragon processors, the second - Mediatek.
Unlocking Bootloader
Many smartphones, so that the user could not freely make changes to the system, are presented with a locked bootloader. Bootloader is a special program that is responsible for access to the kernel. From what we conclude that while it is blocked, we will not be able to flash anything.
Bootloader unlocking is performed using special software, which is provided by the manufacturer with the necessary instructions. As a rule, it all comes down to installing a special program (for example, HTC - Bootloader Unlock), activating the debugging mode via USB on the smartphone (described above how to do this) and pressing just one button - “Unlock”.
Choose firmware
When all the drivers are installed, the bootloader is unlocked and the program for flashing Android through a computer is downloaded, you can proceed to the choice of firmware. Everything here depends on your device: there may be darkness or no firmware at all. There are several types of firmware:
- Official.Presented by the manufacturer without any changes.
- Unofficial based on the official. Firmware that has been improved by third-party developers, but changes have been made to a minimum (language support added, bugs fixed, and so on).
- Informal. There are also reworked firmware, which are simply crammed with a variety of possibilities. They are developed on the basis of Android, ready to offer a bunch of new features, but often contain errors. The most famous of them: CyanogenMod, Lineage OS, OxygenOS and others.
You can download the firmware on the official sites, forums and other resources. and that, we have already written.
Android flashing through computer using SP Flash Tool as an example
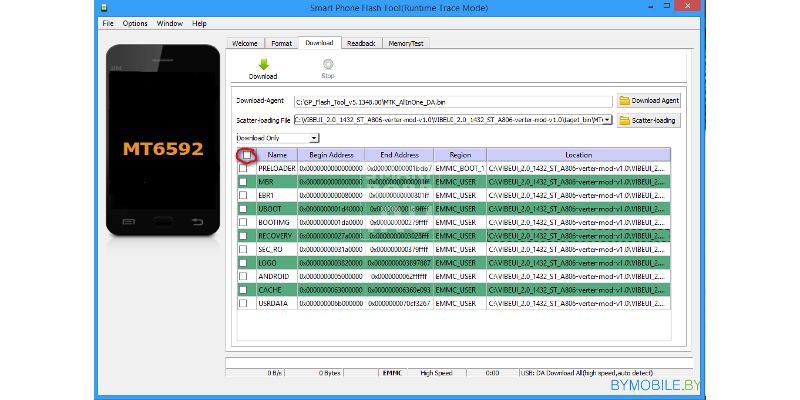
As we have already noted, the principle of operation of all programs for flashing is approximately the same. We will talk more about the firmware through.
Once again, we remind you that the SP Flash Tool is a tool for flashing only devices with processors from the Mediatek company. You can find out which chip your smartphone has on the official website of the manufacturer or using special applications (AIDA64 and similar).
So, we are not connecting the smartphone yetWe work only with the program on the PC:
- unpack the firmware if it is in the archive (it is better to do this in the root of drive C);
- run the program SP Flash Tool (recommended as administrator);
- specify the path to the scatter file by clicking on the “Scatter Loading” button, which is located in the right part of the window (the file is located in the folder with the firmware, the name ends like this - emmc.txt);
- necessarily uncheck the Preloader item (if your device runs on an MT6575 or MT6577 processor, then also remove the check mark from the dsp_bl point);
- select Download Only from the list;
- press the Download button, next to which is a blue or green arrow icon (depending on the version of the program);
- only now we connect the Android device to the computer without using any adapters - only one wire;
The device must be turned off.
- the program will start searching for a smartphone (if it does not find, remove and insert the battery; if the device has a non-removable battery, disconnect and reconnect the cable);
- after determining the device, the process of flashing will begin, which may take a long time;
Do not disconnect the device from the computer!
- waiting for the appearance of the window with a green circle;
- only now we disconnect the device from the computer and try to turn it on.
The process of the first launch can take quite a long time (about 10 minutes), just wait.
Approximately the same scheme is the firmware devices by other programs. However, do not neglect the instructions for use. Study them thoroughly, only then proceed to the firmware.
Conclusion
Firmware Android devices through a personal computer - the task is quite complicated, with a lot of nuances, but doable even by beginners. The main thing in this business is not to lose sight of every moment, so that afterwards you will not look on the Web how to reanimate a brick Do not rush, carefully study the instructions specifically for your smartphone, the benefit of them fully on the Internet, and understand the sequence of actions. Well, we can only wish you good luck with a flashing!
Phone firmware is software that is installed on a microchip during production. Sometimes there is a need to reflash a smartphone. That is, update the operating system of the device. Why do you need it? Re-flashing is necessary if various operating system crashes occur while working with the smartphone. Or if you need to russify the device. In any case, information on how to flash the Android phone through a computer certainly will not be superfluous.
Before proceeding directly to flashing the smartphone, it is necessary to carry out preparatory measures. This event should be treated very responsibly. Otherwise, there may be serious problems with the gadget. So, before you upgrade Android, you need:
- Charge the smartphone. If the gadget turns off during the flashing, it will lead to undesirable consequences (loss of system filesdata). Therefore, make sure that your device is charged to the maximum. Or rather, connect the device to a power source during OS reinstallation. Then the device just will not turn off.
- Update the current version of the OS specifically for your device. To do this, use the information stored in the “Settings” menu in the “About phone” section. There you can view the current firmware, device build number, number of cores, etc.
- Download new firmware. Using the information received, find a new firmware on the Internet and download it. Remember that the OS must comply with all the characteristics of your device.
Flash device through PC
If you want to self-flash a smartphone using a computer, then first you need to download the corresponding software to your PC. The program must be selected depending on the brand of your phone. For example, if you are a Samsung smartphone owner, then in this case, download and install the utility called Odin on your PC. Here is a detailed list of utilities for specific manufacturers:
- Lenovo - Flash Tool;
- Sony - Flashboot;
- LG - KDZ Updater HTC;
We will use the software called Fastboot. It is suitable for people who use devices from the company Nexus or HTC.
Instructions for flashing
We find the Fastboot program on the Internet and download it to your computer. The downloaded files are unpacked in the root of the system disk C. As a result, the path to the file should look like C: \\ Android. The downloaded utility is two folders. In the directory called Tools are the utilities that are needed to update the system. In the Driver folder, as the name implies, are the drivers. 
The next step is to connect the firmware to the PC via a USB cable. After the computer connects to the device, the automatic installation of the drivers will begin. However, sometimes the gadget can not independently find firewood. In this case, go to the manufacturer’s official website and download the latest version of the OS from there. Do not forget that the downloaded version of Android must meet all the characteristics of your phone. Having downloaded the appropriate OS, drop it into Tools as an archive with a .zip type.
Before flashing Android via PC, you need to unlock the so-called bootloader on your mobile device. To do this, open command line. To do this, press the hot R + Win combination, after which the standard Run utility will open. In the line we drive in cmd, and then press Enter. The window for the Windows team has opened. 
Enter in the terminal cd C: \\ Android \\ Tools, and then click on Enter. You will be moved to the Tools section. You need to enable the fastboot devices command. After that, the console will display the code of your mobile device. This suggests that the utility has determined the device and you can proceed directly to the flashing operating system. If the line appeared waiting for device, it means that the smartphone is not found. To get the device code, you need to install drivers. 
To update the Android OS on your gadget, you need to use the fastboot update command. Enter the fastboot update ***. Zip into the console and click on the Enter button. Instead of *** you should set the file name with ready firmware. The system update process begins, which takes a certain amount of time. After the firmware is reinstalled, you need to restart the mobile phone.
Recovery through firmware
There is another way to flash an Android phone without a computer. The essence of the method is to use custom or standard Recovery. So, in order to update Android, look for the firmware on the Internet that matches the characteristics of your mobile phone. After that, download the OS and transfer it to the root file system gadget. If you want to use custom Recovery, then install TWPR or CWM on your smartphone (you can download applications for free via Play market).
After that, you need to restart the device and enter the recovery mode. Recovery Mod on different smartphones is activated in different ways. It all depends on the manufacturer. As a rule, the recovery is activated by simultaneously pressing the Power keys (on / off button of the smartphone) + Volume Down (volume down key). After you go to the Recovery menu, you need to open the partition that is designed to install the firmware. In standard recovery, this item is called “apply update from external storage”. As for custom Recovery, in TWRP you should choose “Install ZIP, and in CWM -“ apply update from sdcard ”. Navigation through the recovery is performed by the Volume Down and Volume Up keys. 
After you click on the desired item, you must specify the path to the firmware that you previously downloaded to your device. The process of updating the operating system begins. After you finish the flashing, you need to restart the mobile device and reset the characteristics to the factory settings. To do this, go to the "Settings" section on your smartphone and find the item "Reset settings" there.
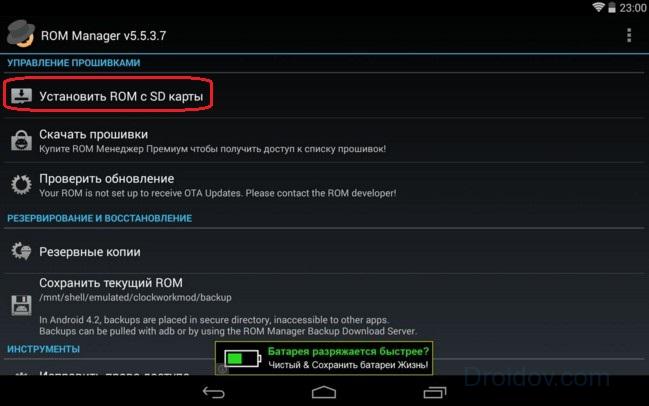
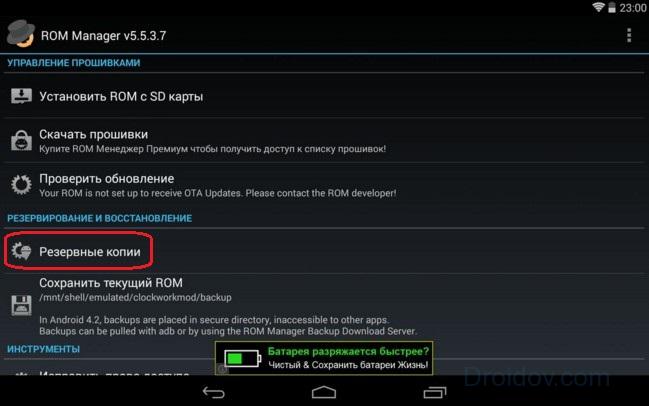
Flashing through ROM Manager
You can install the firmware at home through a program called ROM Manager. The utility, unlike the same CWM and TWRP, has a simple interface that facilitates the process of updating the firmware. In addition, the program has a couple of interesting properties. For example, you can make a backup of the system and return the OS to its original state if the firmware process failed. So, in order to flash the Android phone itself through the ROM Manager, you need to have root rights. You can get root through special applications like Unlock Root, Vroot, etc. In addition, it is necessary that the smartphone has onboard a custom recovery (the same CWM or TWPR).
If you have all of the above, then in this case, download and install the ROM Manager application from the Play Market or the Internet. Then we search for a suitable firmware and also download it. Then run the ROM Manager and follow the instructions below:
How to restore the system through the ROM Manager
If you have any problems after upgrading the OS, you can roll back the changes, returning old version firmware. This is done as follows (provided that you made a backup beforehand):
If you have any questions about the firmware of your phone or something does not work - leave your comments. Also, one of the methods is shown in the video below using the example of Lenovo:
In contact with