How to set up speakers on a computer - simple ways. Sound output to different devices
Primary setup sound on a personal computer or laptop begins with installing drivers for a sound card. Of course, the latest modern operating systems, such as Windows 7, are themselves able to determine the sound device model, regardless of whether it is embedded or separate, and install the necessary auxiliary software. Of course, this option is not suitable for owners of sound cards that came out recently.
If the OS does not install the driver in automatic mode, then do not despair. We need to start from the very beginning, namely, to understand exactly which sound card is installed on your personal computer. They exist of three types: 2.1, 5.1, 7.1. At the very beginning, when installing special drivers with the help of tooltips, you can easily determine this. And, depending on the type of sound card, you can begin setting up the sound on your computer, knowing what kind of sound you should get as a result.

How to set up speakers on your computer: step by step instructions
First you need to turn off the computer, completely de-energizing it. Then connect the speakers to the connectors corresponding to the colors with the cords (as a rule, it is green). Also, Line Out can be written on the connector.
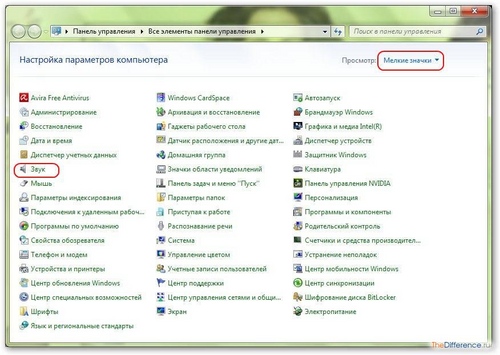
After you connect the cords, you need to turn on the computer. Then, regardless of whether you have Windows 7 or Windows XP installed, you select “Start” - “Control Panel” - “Sound”.
In the "Sound" menu you need to find the tab "Setting up speakers". There you can choose the correct location of the speakers (left, right), and also confirm that their appearance corresponds to the sound card type. All these parameters are also easily configured using video tutorials:
Speakers do not work on the computer - what to do?
If there is no sound on your personal computer, it is quite sad. Here, tips on how to set up speakers on a computer will not help you. You need to thoroughly understand the nature of the fault.
First you need to eliminate the possibility of damage to the equipment itself - headphones, speakers. To do this, you can connect them to another sound source. Then you should pay attention to the software (as it is better to entrust hardware faults to a specialist). In the "Control Panel" you need to select "Administration" and find there windows service Audio. It should be in the “Running” state. If everything is in order, but there is no sound, it is worth contacting a specialist. Setting up the sound on a computer is a fairly simple and intuitive procedure. However, if you are not sure about your knowledge, then you may need to seek help from a more experienced comrade who will help you set up the speakers.
New release operating systems It also brings unpleasant innovations: someone doesn’t like the new design and the lack of familiar buttons; others find it difficult to find new ways of interacting with the system and setting it up. Let's start working with Windows 7. How to set up sound and make it quality - you will learn about it from this article.
Sound tuning in Windows 7 is carried out through the control panel and allows you to customize the microphone, speakers, sound effects. The way to adjust the sound is different from the settings in Windows XP. Some changes have been added to the control panel that may seem unusual for users of other operating systems. But, in fact, nothing complicated in setting up the sound in Windows 7 is not.
Go to the control panel. In order to access the sound settings, you must select the section “Equipment and Sound” -\u003e “Sound” - it is quite logical, in general. We will open the settings window, the interaction with which we will study.
The audio settings window is divided into several tabs: playback, recording, sounds and communication. Let's get acquainted with them in more detail.
Sound Playback Settings
Tab "Playback" shows us a list of devices that can play sound. Devices currently in use are marked with a green check and disabled ones with a red arrow pointing down. Here, devices are not only physically connected to a computer, but also those that can be connected in principle — that is, sound adapters for which drivers are installed. Select the active device and click the "Configure" button. Here we can configure the playback device.
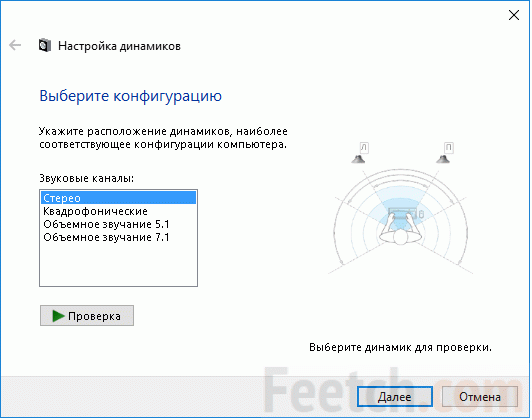
First, we configure the speakers depending on the number of audio channels. If you are using headphones or regular speakers, then our choice is Stereo. If you have a more advanced audio system connected, then you can choose “Quadrophonic” or “5.1 Surround Sound” or it, but in the “7.1” variant. When you click the "Next" button, we can specify the location of the speakers, which of them are broadband and other useful things.
If on the "Playback" tab click the "Properties" button, we will see a window with advanced settings audio devices. Here we can turn the device on or off; change its icon and specify the sound format, adjust the sound playback effects.
Sound recording
Back to the window general settings Windows 7. How to set up sound recording? This is also easy. The “Record” tab shows similar settings, but now for recording devices. If you select a microphone and click the “Configure” button, the speech recognition window will open. Unfortunately, Windows will inform us that speech recognition is not supported for Russian. The "Properties" button can bring us more benefits, when you click on it, a window with tabs opens. sound tuning in Windows 7 is not the most difficult task, is it? The “General” tab in the properties of the microphone displays a brief information about the device. The Listen tab allows you to connect a player or other devices to listen to music; on the “Levels” tab, we can change the volume and microphone gain, while the “Levels” page contains the settings for bit depth and bitrate. The "Improvements" tab gives us the opportunity to enable various sound effects.
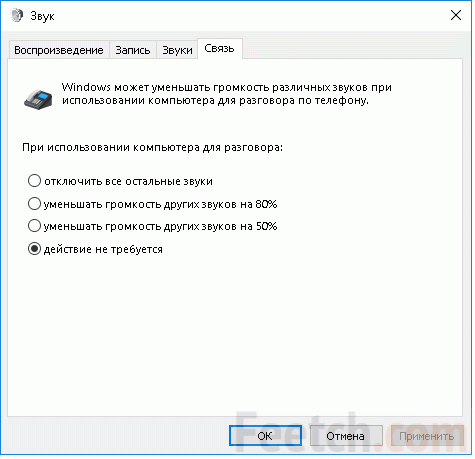
Other tabs of general sound settings in Windows 7 are also useful. On the “Sounds” tab, we can change the sound scheme used, and the “Communication” tab allows us to reduce the volume of sounds during conversations — conveniently and clearly! We hope that this article has helped you familiarize yourself with Windows 7. How to set up sound? It's simple, because now you yourself can share the experience!
No matter for what purpose a personal computer is purchased, it will always be used as a multimedia center for watching videos and listening to music. Even the “weakest” computer can easily cope with this task, so before you start using your computer as a multimedia center, you need to figure out how to adjust the sound on your computer. It is assumed that readers have already checked the volume level and installed (and downloaded from the Internet) all the necessary codecs (K-Lite Codec Pack). Without these two steps, everyone may have trouble playing.
Quick setup
Regardless of what does not work, we proceed to the lower right corner of the desktop. In the tray we find the speaker icon, if necessary, click on the arrow.
Adjust the volume if necessary. We click right click and then choose the item depending on the nature of the fault:
- For sound, a playback device.
- For voice - recording devices.
Playback devices
Entering the sound window, first of all, right-click and put the daws:
- Show disabled devices.
- Show disconnected devices.
The difference between them is that the first ones are programmatically disabled, for example, through the task manager, and the second ones are not available at all, could be deleted or even not used initially.

Standard analog output
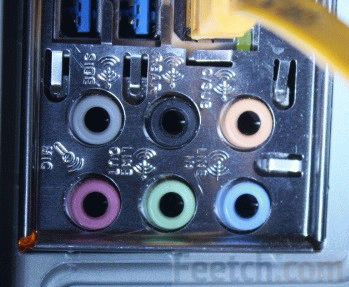
On the screen a typical set of devices. The speakers are the outputs located on the rear panel. system unit. To verify this, double-click on the icon.

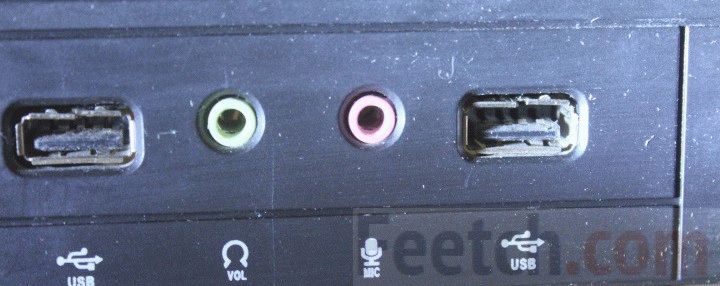
Right here is the decoding by color. Due to the fact that the translation into Russian curve, a beginner may not understand what is being said:
- Green - left / right column. In the surround sound1 system, these are front speakers.
- On the orange port channels go center and subwoofer.
- Gray - rear (rear, side) speakers, left and right.
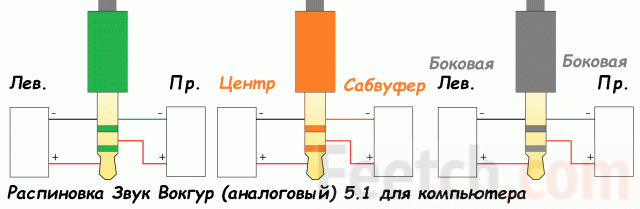
On HiFi systems, sound around 5.1 usually has polar outputs - two for each speaker. Therefore, you need to find an adapter for the computer. As for the usual stereo, there jack is already unsoldered, it remains only to attach it to the green input. Pinout adapter 5.1 in our case is as follows.
Knowing the layout, do not be afraid of further options (because the list is extensive). Let us examine what each setting means.
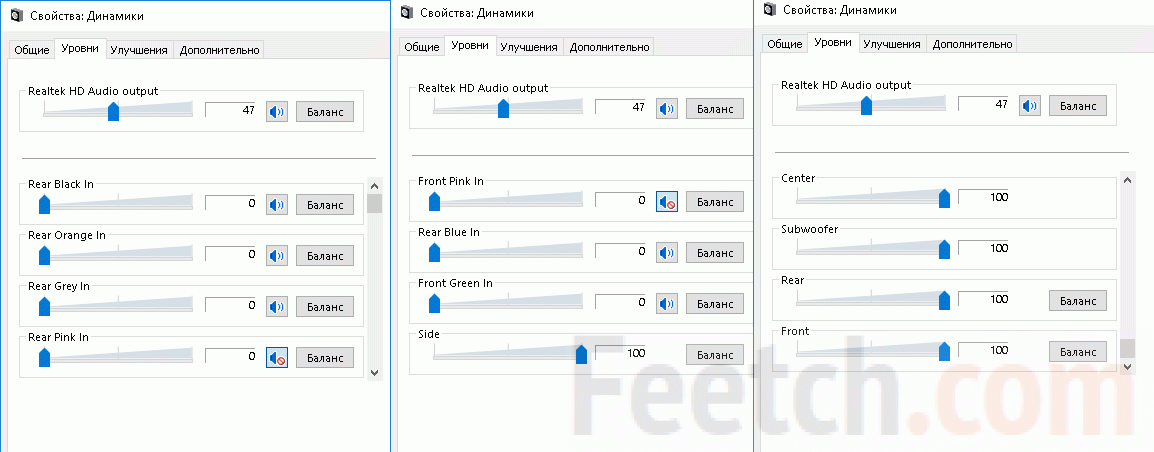
In the upper part it is proposed to change the settings of the entire sound at once. At the moment, the level is 47%. By clicking on the speaker icon, you can instantly turn off all the speakers, next is the balance. But there are 12 more settings! They should not scare us:
It remains to add that changing the level of the orange connector simultaneously adjusts the subwoofer and the central speaker, the gray one - both side. Embarrassment can only lead inscriptions in - inputs. In fact, some of the connectors are outputs for sound. We did not say anything about blue. This is a linear analog input, like a (pink) microphone. The Improvements tab is proposed for review below.
Headset on the front panel of the system unit
The second in the list of Realtek HD Audio 2nd output is the audio connector of the front panel. A red arrow means that it is not connected. What was mentioned above. This option means that the motherboard has a free F_AUDIO connector, where you can get a headset. A typical view is shown in the picture.
![]()
If you look closely, you can see - the second left lower pin. This is the key by which the layout of the connector is determined. Electrical interface is shown in the screenshot.
![]()
Pinout will help to connect here almost any headset. It should be noted that two different physical interfaces can go to F_AUDIO:
- AC`97.
- HD audio.
The table is given for the second case, because the first one is becoming obsolete. But in the specification for the motherboard you need to clarify with which signals this connector is supplied. In addition, you can separately meet the internal uSB ports under the headset, but usually no one uses them, but instead use those that are located on the case of the system unit. In the photo is a typical combined module for the front panel of the system unit of USB and audio jack. The two connectors differ from each other in key position.

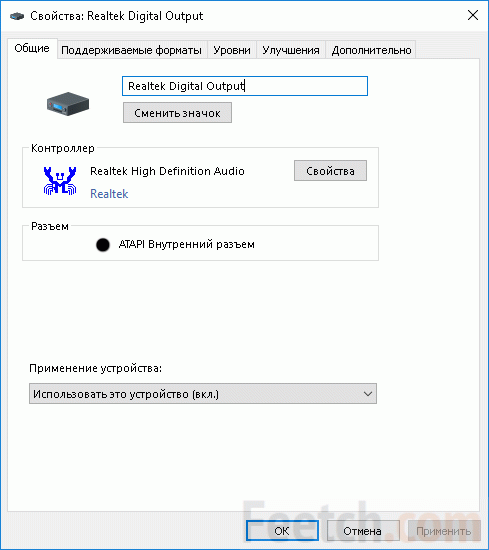
S / P-DIF digital audio output
The last component in the playback device menu is working properly, but the description says something about the mysterious ATAPI internal port. You will not find anywhere else on the Internet deciphering these words. In fact, this is just an S / P-DIF connector that is not on the rear panel. The connector on the motherboard is empty. Why S / P-DIF may be needed when setting up the sound?
The interface was introduced in the 80s (XX century) by Sony and Philips after the release of the first digital CD players. To play music, one had to perform double analog-to-digit conversion (reverse and direct), which reduced quality. The S / P-DIF transmits, at maximum performance, an amazing sampling rate up to 768 kHz. Bus bitrate typically ranges from 2 to 3.1 MHz, depending on this parameter:
- 2 MHz for a sampling rate of 32 kHz (satellite receivers).
- 2.8 MHz for a sample rate of 44.1 kHz (CD players).
- 3.1 MHz for a sampling rate of 48 GHz (digital tape recorders).
To evaluate the potential benefits of this connector, note the tab supported interfaces.
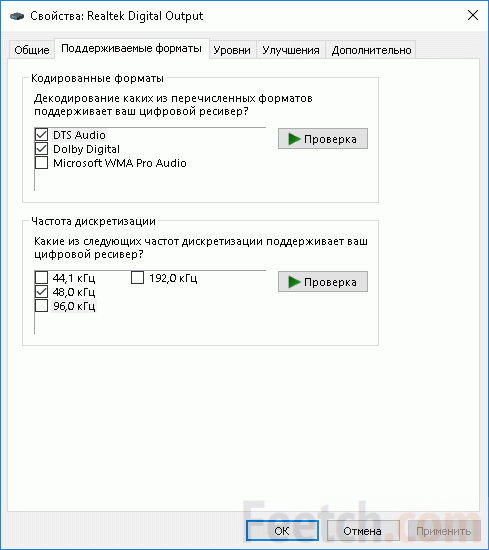
- DTS audio. Used to play HD quality videos and Blu-ray discs. Supports a system of columns 5.1 and 7.1, depending on the software implementation. Suitable for connecting home theaters.
- Dolby Digital - in the usual form the same interface 5.1. The difference from DTS in the capabilities of the connected equipment (players, home theaters, etc.).
- Microsoft WMA Pro Audio. Used by some players, for example, online at nbcolympics.com/video.
All three varieties provide high-resolution digital audio for sophisticated speakers. Since they are transmitted via the same channel, the process is completely transparent to the user. In some cases, you will need codecs or drivers. S / P-DIF is a 3-in-1 hybrid output port for maximum compatibility with external equipment.
How to use S / P-DIF
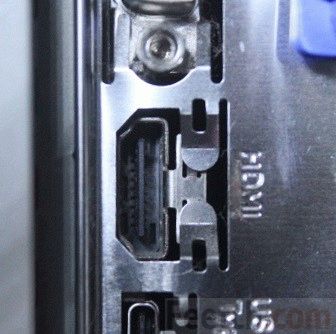
From the configuration of the motherboard, it is clear that the manufacturer (Gigabyte) is not very concerned about the digital output S / P-DIF. Instead, there is a high-performance HDMI port on the back. This is a hybrid interface for transferring audio and video information on one line. The only problem is that the cable is not cheap, complete with the equipment is extremely rare and not supported by all devices. HDMI speakers are extremely difficult to find, however, the same can be said about S / P-DIF (for example, Polk Audio Woodbourne).
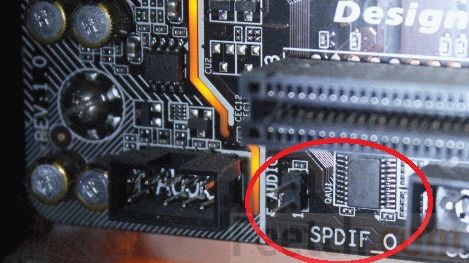
The photo shows that the connector is represented by only two pins. According to rumors, the Gigabyte uses the ALC883 transmitter here, which can be directly wired to the optical or coaxial 75 Ohm input of any equipment. To do this, you need the appropriate cable. One of the pins is a schematic ground, and the other is a digital audio output. For docking suitable pin connector from the system fan (cooler). Ports could be found on e-bay (ebay.com/sch/-/175673/i.html?_nkw=spdif). True, they are not cheap. If there is an opportunity, you need to ask for connectors in the nearest PC repair shop, sometimes they agree to sell components at a reasonable price.
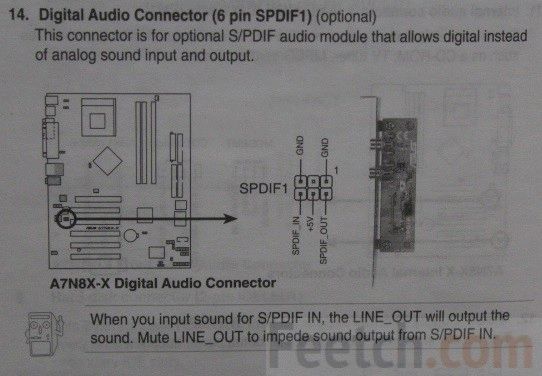
Some, even old, motherboards (Asus A7N8X-X) have an S / P-DIF connector with an input. This allows you to record sound here and perform some other operations. In this case, the pins may not be 2, but more, for example, 6. Their functions are listed in the user manual (see photo).
HDMI
Analog sound will never be the best. Therefore, if it is not possible to use S / P-DIF, then you need to buy an HDMI cable. This digital interface is usually available on modern motherboards. You need to look at its version in the user manual. Starting from 2.0, the interface supports the transmission of as many as 32 independent channels. Of course, HDMI is compatible with the DTS and Dolby Digital mentioned above in connection with S / P-DIF. HDMI is aimed at movie lovers, and not at music lovers, because it allows you to simultaneously transmit high-definition video.
To use the interface, you need to buy a cord, and an input connector is found on the home theater. From the above it should be clear what is required acoustic system 5.1 or 7.1 (including +2) to enjoy all the benefits. Otherwise, there is no need to use such complex equipment.
Recorders
This topic is actually disclosed. An analog microphone is usually inserted into the pink jack next to the headphones, and a USB headset sometimes requires driver installation. The author had to see one village system administrator (population about 2500 people), who said that complex headphones do not require a driver. The fact is that in the villages they do not sell really high-quality equipment, and not everyone knows about it.
Complicated USB-headset is defined in the device manager, as a composite device. And it does not work, although sometimes (we did not see it personally) you can hear something in the headphones. This is not suitable for Skype and communication, and still it is recommended to install a driver. Because inside the tricked out headphones, you can often have your own controller.
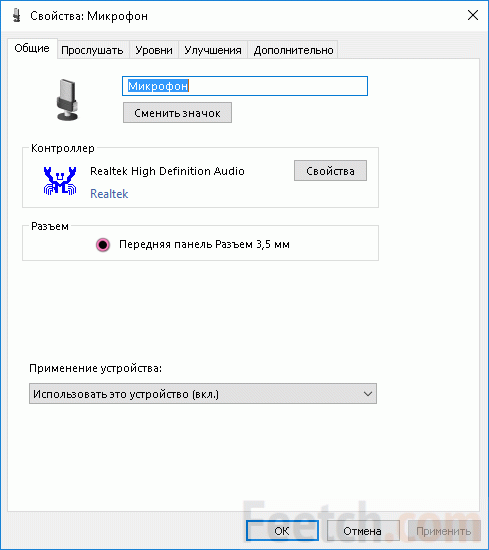
The main problem for users is the one that zero gain is registered in the microphone settings. Therefore, you say, but you can not hear. This is corrected in a couple of minutes. In the beginning it was told how to enter playback devices, and now you need to choose recording devices. Put the daws in context menuas above and change the gain. I would like to draw attention to the fact that manufacturers have errors. For example, our microphone supposedly stands on the front panel, which is not true. He is plugged into the jack next to the speakers.
Functioning is carried out with a flick of a finger in the receiving area. When this indicator on the right side of the window is partially painted green. If this does not happen, then the sound does not come, and third-party programs for communication are not to blame. Double click on the working microphone and go to the Levels tab. Here all scales must be set to maximum. Most programs adjust the volume of the headset themselves, and you don’t need to worry about it. If the indicator now turns green when clicked, then everything is fine. Otherwise, check the drivers, switches on the microphone, because the device does not work correctly.
In addition to the microphone, there is a stereo mixer in the window. This device is a system, you will not find it on the motherboard. It is responsible for mixing channels. And if you want to perform a full capture of the sound, and not just the microphone, then you should select the stereo mixer as the default device. Other programs (Audacity) allow you to make changes to the raid. Linear input refers to the blue jack (see above).
Skype
Now it is not necessary to install Skype, because an online version has appeared (web.skype.com/ru/). To do this, put the plugin on the browser.

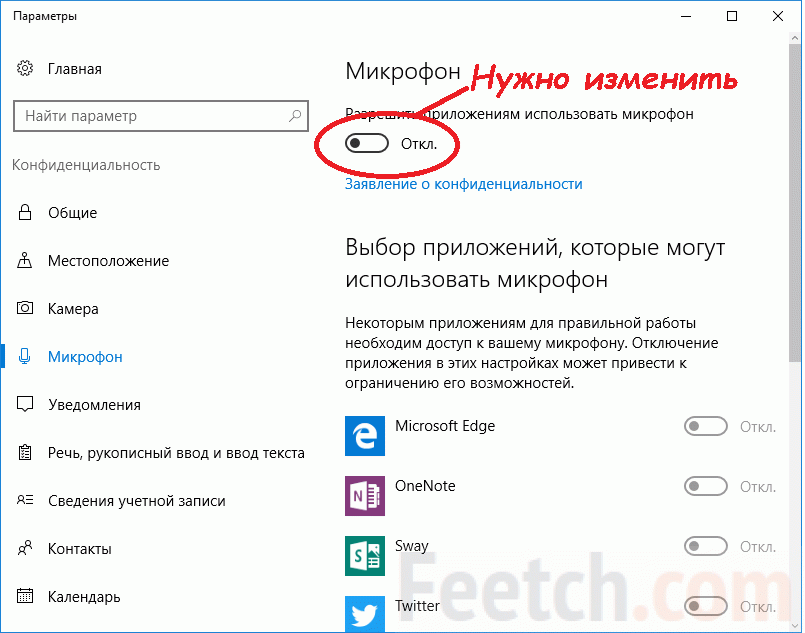
After that, you will need to give permission to the firewall, and you can begin to communicate. The downside is that there is no check call option. But if everything is set up according to our instructions, then there should be no particular problems. To test the microphone, use any audio capture program, including the built-in Windows Record vote. AT new windows 10 at wrong settings microphone warning will be displayed, which is an additional guarantee and at the same time - a signal to perform the test.

This means that applications are not allowed to use the microphone. Then here, in the sound recordings, you need to go into the parameters and give permission. Otherwise, the microphone will not work.
In the installed Skype application, the internal settings simultaneously change the microphone's system gain. This should be remembered and checked periodically manually in accordance with the scheme described above.
How to play sound on a PC
First you need to figure out how the computer plays the sound. In analog interfaces, the digital binary signal is converted from music or video files to continuous. The first in the chain of converters are software or codecs that unpack an audio file and allow audio data to be read by the media player. After processing, the data from the central software core is transferred to the sound card, where the binary conversion takes place. digital signal to analog sound and its pre-amplification. Further information enters the sound reproducing device, headphones or speakers.
There are different formats, and each has its own specificity, which does not allow the scope of the review to talk about. Therefore, it is usually considered sufficient to download from the Internet and install the K-Lite Codec Pack. This package comes with its own very good player.
Sound tuning on a computer in the Windows operating environment is done using standard tools system, and using third-party utilities (which it is better not to use). Below we will consider the sound settings using standard tools that are on any computer. To do this, go to the "Start" menu, then "Toolbar" and select the icon that says "Sound". Settings that can be made using this standard utility are as follows:
All the above actions will be possible only if the drivers for the interaction of the sound card and motherboard. These drivers usually go on disk with the card, or on the Realtek website (rarely on the other). To check whether the drivers are installed correctly, you need to do the following.
In the "Start" menu, move the cursor to "My Computer" and open the properties menu with the right mouse button. Go to properties, then click on the line that says "Advanced system settings" (for Windows 7 and above, for Windows XP, this step is not required) and in the window that opens, go to the "Hardware" tab. After that, click the button "Device Manager" and you can see all the devices installed in the system. Next, expand the “Sound, video and gaming devices” node in the tree and make sure that the devices function correctly (there is no yellow icon with exclamation point). If there are any problems, you should reinstall the drivers.
Sometimes there are such situations that we turn on our computer, but there is no sound. The same situation may occur after reinstalling the operating system. What to do in this situation, as carried out computer audio setupLet's try to understand this issue.
First you need to make sure that your speakers or headphones are connected not only to the PC itself, but also (in the case of speakers) to the mains. If everything is in order here, then we transfer our gaze to the lower left corner of the monitor on the "speaker volume control", it looks like this:
Often there are situations that the volume slider just stands at zero. If everything is fine here, then proceed to check the drivers. For each operating system, this check is carried out in different ways.
Sound settings on Windows XP
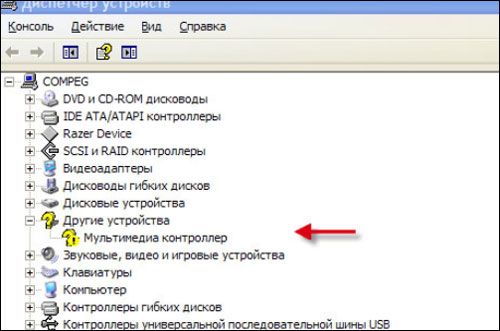
Sound setting on windows computer XP is as follows, first press the "Start" =\u003e "Run" or "Run" button, after which a window will appear, in the line of which you need to enter: "devmgmt.msc" and press the "Ok" button. Now you will see the Device Manager. In general, it should be said that if there is a yellow exclamation point or a question mark on any device, this indicates that the device is not working correctly or does not work at all. So, in our case, if you have an exclamation mark in the Device Manager, Multimedia Controller, as in the picture below, you have a problem with the drivers.
To do this, you need to find your box from the motherboard, which should contain a driver disk for the motherboard. Using this disk, we install drivers for your audio controller.
But bad luck, you do not have such a disk, and what to do in this situation? The solution to this problem is to search for drivers on the Internet. Some will say right away that this is hard and that a huge number of drivers will need to be shoveled, but this is not the case with our advice. So, open the device manager =\u003e on the "Multimedia controller", which is highlighted by an exclamation mark, click RMB =\u003e Properties. A dialog box appears in front of us in which you will need to go to the Details tab, and from the list that appears, select the equipment ID, then you should have the following
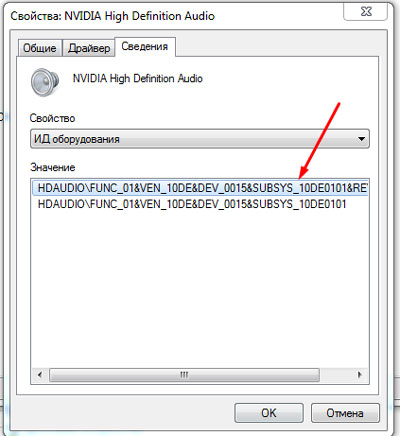
Each top line will be different, as each audio equipment is different. Click the PCM on this top line, copy, go to the site devid.info.
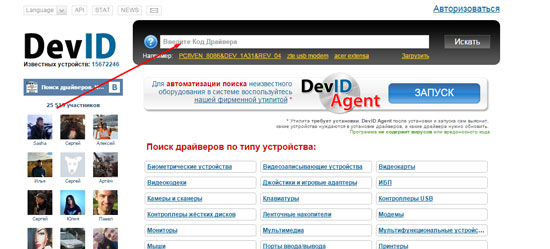
In the line indicated in the picture we insert our code and click "Search". Congratulations, you found your audio driver. Download under your operating system, install and everything should work.
Windows 7 and Windows 8
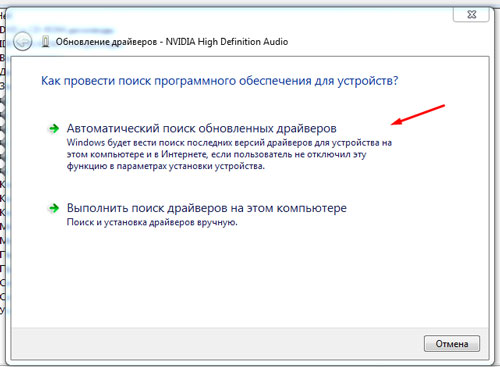
Sound setup on a Windows 7 computer is performed by the same method, only to go to the device manager you can use the following method, on the "My Computer" icon, click RMB, "Properties", a window appears

And in the right part go to the "Device Manager". Sound tuning on a Windows 8 and 7 computer is more simplified. Again, we are looking for our audio device with an exclamation mark, click on it RMB =\u003e Update drivers ... =\u003e Automatic search for updated drivers.
With this approach, the operating system itself will search the global network for drivers for your audio device and you do not need any program to adjust the sound on your computer. But again, there is a problem when there is no driver disk from the motherboard and access to the global network. Here is the only way out, again, copy the equipment code of your audio device, insert the flash card into the PC, create a text document on it, open it, insert the equipment code, save the document, and go with a flash drive to a friend, relative, friend, in general , to anyone who has access to the global network. And with the help of this code we are looking for drivers for your audio device, as described above. Download the driver on a flash card and install it on your PC.
We hope that this article has helped you in solving your problem.
Typical problems with Windows are mainly due to the fact that the hardware was not properly configured in the computer. For example, speakers or speakers may not work. There is no sound for various reasons on the computer, so first you need to put off the panic and try to restore normal work on your own.
We check equipment
There is no way to listen to something? Immerse yourself in the deep reasons for the lack of sound and try to configure the sound card. We must be sure that everything is working properly on the computer. For this you need:
- Open the Start menu and select the Windows Control Panel there.
- After clicking on the category System and Security.
- Then in the special section System click on the Device Manager.
- If a password is requested windows adminthen you need to enter it.
- After that, double-click on Sound, gaming and video devices.
Now you should see if there is a sound card in the list that opens. If it is not there, you should read the instructions from the manufacturer how to configure it. It is also useful to look at the Other devices tab, the sound card may be there. A laptop is usually easier to configure in this regard, since there is no sound card. Instead, there is a special sound processor.
The sound in Windows may not work if there are problems indicated by a yellow question mark in front of the sound card:
- Right-click on the sound card and select Properties.
- After you need to go to the General tab and check the Device Status.
Usually in such cases, the sound in Windows can be restored simply by installing new drivers on the computer. If you do not have time to poke around for a long time to find and install the necessary driver, you can try a good program called Driver Genius.
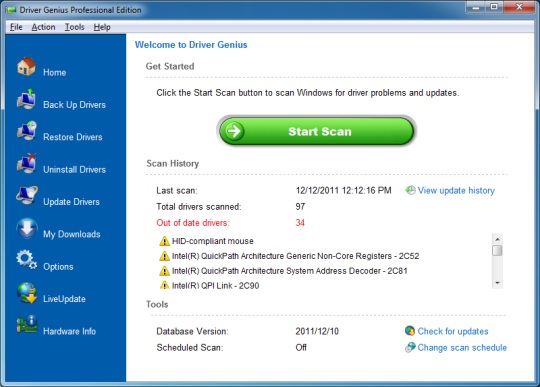
After this program When it is running, it finds all the necessary drivers on the network (including for sound) and can install or restore them on its own in Windows.
Connection check
If there are speakers, but there is no signal from them, then you need to check whether they are properly connected. Practically on all computers, the sound works from three connectors that are connected to the sound card. Here it is important to understand that the speakers must be connected to a linear audio output.

And what if there is no certainty which connector is responsible for what? In this case, it is worth going through all the options on the computer, alternately connecting to each slot. The same goes for headphones. It is interesting to know that in almost every computer after connecting the headphones, the sound is turned off automatically.
Power check
The speakers may simply not be plugged in, so there is no sound physical reasons (no current). Naturally, you need to connect the speakers to the network, and the speakers will begin to play the soundtrack. The same applies to the controls through which the speakers increase and decrease the volume. Often on laptops, the sound control is turned off in the negative, so that the small speakers are simply not audible.
It is necessary to open the volume through the following path:
- Click the Start menu;
- Then select the Control Panel;
- Click Hardware and Sound;
- Next item Sound;
- At the end Adjust the volume.
- Then the volume slider needs to be raised up.
It is important to monitor whether the sound is completely muted in the mixer. Also, some models of laptops have external wheels in order to regulate the sound fed to the speakers. Need to check this wheel.

Checking programs
And what if after all these manipulations, it was not possible to adjust? It's okay, you just need to check the volume in programs installed on Windows. Perhaps he just does not play there. Each program has its own controls so that it does not need to switch to install windows, and quickly turn it down or turn up the volume. So it is better to check the settings everywhere and everywhere (speakers, headphones, installation) to eliminate all the reasons for the lack of sound on the computer and then restore normal operation.
Various operating system errors are directly dependent on users. It is enough to download a malicious program that is attached to free files on the network, and the problem will begin to malfunction. However, if you keep records of all softwarewhich is installed and removed, it is possible to keep the system under control. So the columns will sound, and the picture will be displayed correctly, and the programs will function correctly.
(Visited 22 486 times, 25 visits today)