Samsung galaxy s2 i9100 factory firmware. Firmware for Samsung Galaxy S2. F. Installing GAPPS
The international version of Samsung Galaxy S2 has not received updates from the manufacturer for a long time, but we were able to find the official firmware of Android 4.1.2 ZSLSE. The firmware is not tied to any operator, that is, it works on an international smartphone model and has Chinese language packs. In order to use this update, you need to have an unlocked Galaxy S2 and follow the step-by-step instructions carefully.
Please, make sure that you are careful when using Odin, and carefully read the entire manual before continuing. All these warning signs can make you uneasy, but the fact is that One can be a lifesaver.
Drivers and utilities
Before we begin with a step-by-step guide, make sure that you have ready-made and ready-made tools to get you started. To use this method, you will need four things. However, downloading firmware from an untested source can be a death sentence, especially if it has been changed for malicious intentions.
Before you already download the necessary materials, you need to check your smartphone - you need ClockworkMod installed.
Now note the changes made in the firmware: you will get an updated interface TouchWiz, as well as Project Butter, improved screen lock, S-Cloud, Direct Call, Smart Stay and Pop-up Play. If you really have an international Galaxy S2, you will also get 50GB in DropBox, several desktops and improved Google Now, as well as a new notification bar.
Step 8: Complete the firmware process
Use the link below and enter your phone model number to find all the latest firmware files and download it to your computer. This means that the installation is complete. The device must reboot automatically, and now it should work on a newly-flashed firmware.
Read the instructions carefully before touching the phone. It's a good idea to print them out and closely monitor them. However, if you experience any errors or your phone is stuck on a certain boot screen, here's what you can do. And as always, we end up with an invitation: let's not be a stranger and be part of the conversation, where we help each other, discuss the latest and best, and do our best from our technologies.
This firmware is designed ONLY for the international version of the Samsung Galaxy S2 GT-I9100!
To install the update, precharge the batteries to at least 85%, and turn on the item in the "USB Debugging" settings. Check it in the settings in the menu for developers.
Do not forget that installing the official update will remove the previously obtained root-rights and you will have to try to get the superuser rights again.
Note. Be sure to back up your data first! Your settings and user data will be lost by following these steps! The first reboot will take some time, so do not worry. They will not work, and you will receive a message.
Installing Custom Recovery
Contact the manufacturer for assistance. 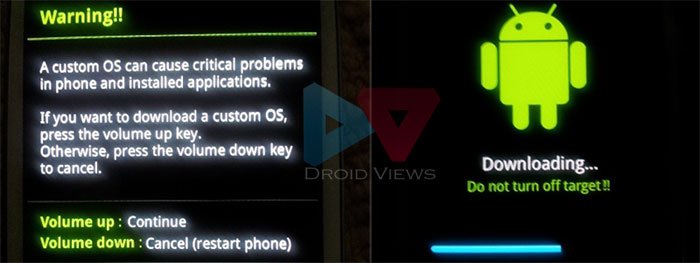
Act at your own peril and risk. To be comfortable, first of all it's important to create a backup of the data on your smartphone so that you can restore everything in case of problems. Below you will find links for download. After downloading these 2 files and continuing extraction in the appropriate folders.
Do not forget that you act only at your own risk and risk, since we are not responsible for all your actions. If there is an unforeseen situation, then all the blame lies solely on you.

The instruction is provided ONLY for informational purposes only.
Turn off your cell phone. . That's all, you get a warning! with a yellow triangle, do not worry that you are doing well. Here are some screenshots during the ice cream sandwich update that will help you. Manage it at your own peril and risk, paying close attention to every step. Do not attempt this procedure on another model.
Check before continuing! At the end of the flashing, which will continue for several minutes, our device will restart automatically. At this point, our device will reboot and, after a short wait, the configuration screen will look the same as the first purchase.
Installation instructions for the Android 4.1.2 update on the Galaxy S2 GT-I9100 (ZSLSE):
- Step 1.Download the Android 4.1.2 ZSLSE firmware for Galaxy S2 to your computer (the file is available for download at the end of the manual).
- Step 2.Download the Odin v1.85 program, which is required to install the update.
- Step 3.Turn off the phone and restart it in boot mode by pressing and holding the volume buttons and the Home button. Press the power button / Power until the Android robot icon and the triangle appear. Press the POWER button again to enter the boot mode.
- Step 4.Run ODIN on the computer and connect the phone to it while it is running in boot mode.
- Step 5.While your Galaxy S2 is connected to the computer, you will see that ID: COM is displayed in yellow with the corresponding COM port number - this process can take several minutes!
- Step 6.Select the files that you want to install - you can find them among the extracted from the archive, which you downloaded in the first step.
Check the PDA item and select the file with the extension .tar or.md5.
Check the Phone checkbox and select the MODEM file. If you do not see this file among the unzipped files, skip this step.
Check the box on the CSC item and select the CSC file. Once again, if this file is missing, skip this step.
Check the PIT item and select the file with the .pit extension. You can skip this item if you did not receive a similar file from the archive - Step 7.Enable the "auto-reboot" and "F reset time" items in the ODIN program. If in the sixth paragraph you marked for installation a file with the extension .pit, then you should also check the "re-partition" checkbox.
- Step 8.Press the START button in ODIN and the installation will automatically continue. The process may take several minutes.
- Step 9.Once the installation is complete, your Galaxy S2 will reboot itself. Once you see the main screen, unplug the Galaxy S2 from your computer and you can check the installed Android Jelly Bean update.
Files to install Android 4.1.2 Jelly Bean on the Samsung Galaxy S2 GT-I9100:
Before you continue
The details of the sign are as follows. You will need to do this later, if you want, reinstall the root. The device must have at least 80% of the battery charge. Disable or remove any antivirus installed on your phone. Step 4: Open "One" as an administrator.
B. Install the kernel
Step 9: Click the "Start" button in "Odin" to begin the installation process. Step 10: After the installation is completed, the device restarts. You can disconnect the device from the computer.
After checking the list of functions mentioned below, we will check the prerequisites and procedure that will help you update the device.
To everyone who does not know how to flash your Samsung Galaxy S2 to the new version of Android 4.4, is dedicated. Follow the step-by-step instructions, which I'm sure should not cause you difficulties. If you still have problems with the firmware - write in the comments.
Fundamental rules
- Charge smartphone should be equal to at least half.
- Concentrate and do everything as written.
- Do not take the phone while Samsung firmware.
Download Files and Firmware 4.4
- Create a folder on the disk, in the name of which there are only English letters and numbers (for example, C: i9100)
- Download and transfer all files to a folder created earlier
- (version 6.0.2.9)
- (for version 4.4)
- (for mobile devices)
- (version 5.07.0)
- (version 6.0.4.5)
- (choose from the folder with the version android)
Preparing for the Galaxy S2 firmware
- Disable all unnecessary on the PC
- If enabled, then turn it off through the Task Manager or completely delete it.
- Anti-Virus, if there is one, is also turned off.
Installing programs
- Unarchive Odin3_v3.09
- Installing SAMSUNG USB Driver for Mobile Phones
Downloading files to Samsung
- The firmware itself CyanogenMod 11
- PhilZ-cwm6-XWLSW-XEU-5.07.0-signed
- KitKat Compatible CWM version 6.0.4.5
- Archive (gapps-xxx-signed.zip)
Installing Custom Recovery
We transfer the phone to the Download Mode.
Preparing for installation
In the recovery mode, select the appropriate options to clear and erase the data in the phone. Now, after updating the firmware, select "Back" and select "restart the system now". After the update is applied, and as soon as you see the main screen of your device, you can disconnect the device from the computer.
- After downloading, connect your phone to the computer.
- Turn off the device so that it can be entered into recovery mode.
- Please note that it may take 3-4 minutes to update.
- Turn off the device
- We press simultaneously on 3 buttons: "Unlock", "Volume down", "Home"
- We see a warning - press "Volume up"
Installing Recovery
- Run Odin3 v3.09 (the file itself should be in a folder with the same name).
- We click on "PDA" and look for the file-archive recovery, which we saved in the folder.
- We connect devices through the factory USB-cable, the first field (ID: COM) will be highlighted in blue.
- Click on the "Start" button.
- At the end of all downloads, click on "Reset" (the phone will reboot).
- At the moment when the Galaxy phone reloads we pull the cord out of the PC.
Installing Android 4.4 Firmware
A. We load the recovery mode
- Turn off the device
- We press simultaneously on 3 buttons: "Unlock", "Volume up", "Home"

A. We load the recovery mode
This firmware does not bring any new basic functions, except for the usual updates. The usual reservations apply, and you should know that messing around with operating systems on the device can sometimes be problematic, cause unexpected problems, and in extreme cases your smartphone will become nothing more than a beautiful door, so be careful and be careful, if at all.
So be very careful. Step 3: In Scandinavian mythology, One was one of the main gods and the ultimate ruler of Asgard, recently known for the famous Hollywood blockbuster Thor. Step 6: Now that we have the necessary files needed for the process, it's time to throw them together to perform the magic. One will enjoy this and readily prepare the file for the installation that should follow. A rather terrible warning sign will appear on the screen, giving you the opportunity to retreat now if you so desire.
B. Install the kernel
- Click "Unarchive archive to SD-card" / "Install zip from sdcard" and look for our archive named "PhilZ-cwm6-XWLSW-XEU-5.07.0-signed"
- Reboot Recovery: "Advanced"\u003e "" Reboot recovery "
C. Download the recovery mode
D. We make wipes
- We create "wipes" as well as below
- First, go to Wipe / Data / Factory reset
- At the second stage we go to Advanced, choose the item "Wipe dalvik cache"
- At the 3rd stage of our instruction, click on the "Wipe cache partion"
- And we finish the firmware of the smartphone with a few buttons: Mounts & storage\u003e Format / System
E. Install KitKat
- Unzip KitKat Compatible as well as you did the previous time
- Restart Recovery.
F. Installing GAPPS
- Go to Recovery mode (as described in step A).
- Just as we installed KitKat's kernel and firmware (Items B and D), install the GAPPS-archive with the name (gapps-xxx-signed.zip)
- Restart Recover: "Advanced"\u003e "Reboot recovery"
If you did everything correctly, after rebooting, the device will boot already with the new version of Android. Downloading will take longer than usual. Be patient.
If you decide to continue, press the "up" button to close the warning and activate the device boot mode. You can also register. Following the guide below, it does not matter which version you install, technically it does not matter which version. I remind you that all the changes made to this guide are at your own peril and risk.
D. We make wipes
The battery must be fully charged. Then start the phone in download mode :. - turn off the phone - press and hold the volume key on the home switch - the phone starts in a special mode - the volume key confirms the choice - the phone is already started in the boot mode.
I remind you, if you have any questions: describe it in detail in the comments, and we will find a solution!
Firmware for Samsung Galaxy S2 By DimkaVarlamov average rating 3.5 / 5 - 109 user ratings