Connect to microsoft exchange via http protocol. Correct setup of Microsoft Exchange server
I. Basic authentication ( basic) and authentication Kerberos not supported The ability to send a username and password automatically in this mode of verification is not provided.
Ii. You must save passwords in your user profile.
I. To change the client authentication mechanism Outlook and establish checks NTLMfollow these steps depending on the version mail client.
To do the following:
1. Run Microsoft Office Outlook 2003.
2. In the menu "Service" select item .
3. Select item "View or change existing accounts" and click "Further".
4. On the tab "Outlook processes mail for these accounts in the following order." select "Microsoft Exchange Server", and press "Change".
5. On page "Exchange Server Settings"press the button "Other Settings".
6. Click the tab "Connection".
7. In case the box is checked "Connection to Exchange mailbox by protocolHTTP " press the button .
8. In section select NTLM Authentication from the list .
9. Click the button. "OK".
10. Select the tab "Security"
11. Choose from the list "Secure Login" option "Password check NTLM"
12. Click the button. "OK".
13. Press the button again. "OK" Outlook
14. Click the button "Further", and then "Done".
15. Restart the program.
To do the following:
1. Run Microsoft Office Outlook 2007.
2. In the menu "Service" select item "Account Settings".
3. On page "Accounts email"
select "Microsoft Exchange", and press "Change".
4. On page "Exchange Server Settings" press the button "Other Settings".
5. Click the tab "Connection".
6. If checked "Connecting to Microsoft Exchange via HTTP" press the button "Exchange Proxy Settings".
7. In the section "Authentication Settings for Proxy"select NTLM Authentication from the list "Authentication method when connecting to an Exchange proxy server".
8. Click the button. "OK".
9. Select tab "Security"
10. Choose from the list "Secure Login" option "Password check NTLM"
11. Click the button "OK".
12. Press the button again. "OK" in response to the offer to restart Outlook for the changes to take effect.
13. Click the button "Further", and then "Done".
14. Restart the program.
Ii. To add or change passwords in a user profile, you must perform the following steps:
1. Click "Start" - Run, in the line specify the following command: control keymgr.dll
2. Click "Add"
3. In the field "Server" (or "Internet address") specify * .exch.hc.ru
4. In the fields "Username" and "Password" Specify the details of the mailbox.
Outlook 2010 is one of the most popular email applications in the world. This is due to the high stability of the work, as well as the fact that the manufacturer of this client is a brand with a world name - Microsoft. But despite this, and this program errors occur in the work. Let's find out what caused the error “There is no connection to Microsoft Exchange” in Microsoft Outlook 2010 and how to fix it.
The most common cause of this error is entering incorrect credentials. In this case, you need to carefully double-check the input data. If necessary, contact the network administrator to clarify them.
Incorrect account setup
One of the most common causes of this error is wrong setting user account in Microsoft Outlook. In this case, you need to delete the old account, and create a new one.
To create a new account in Exchange, you need to close Microsoft Outlook. After that, go to the "Start" menu of your computer, and go to the Control Panel.
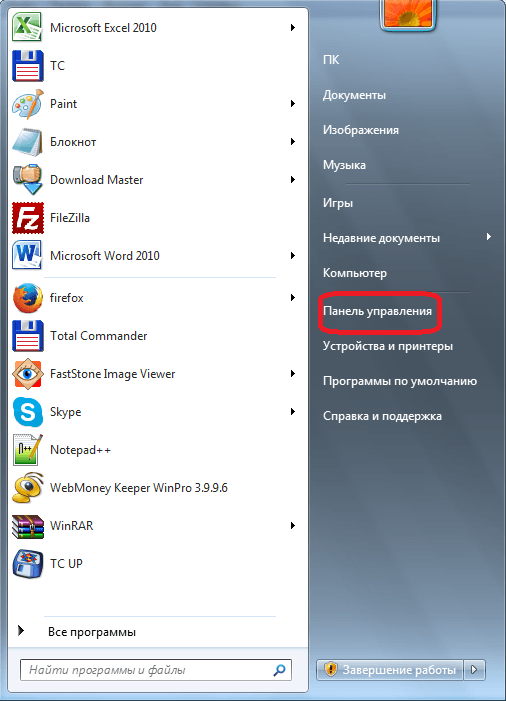
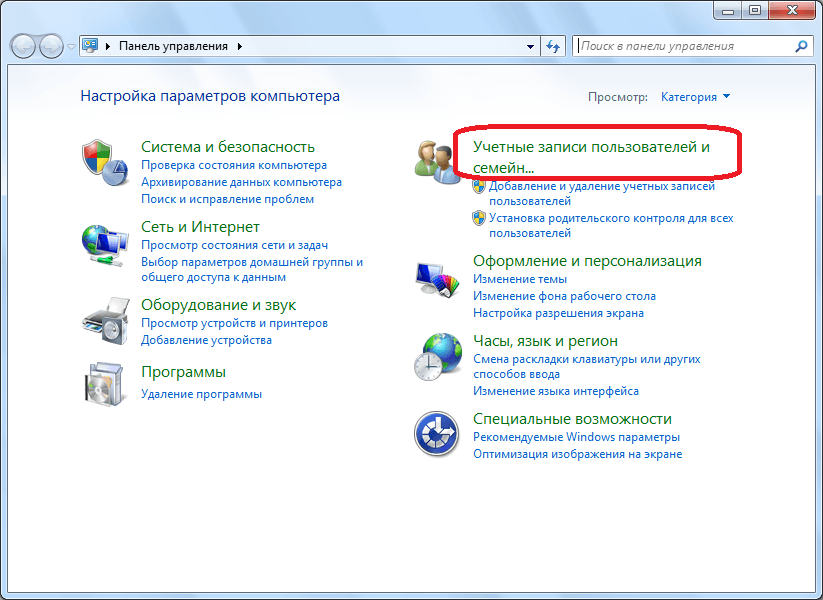
Then, click on the item "Mail".

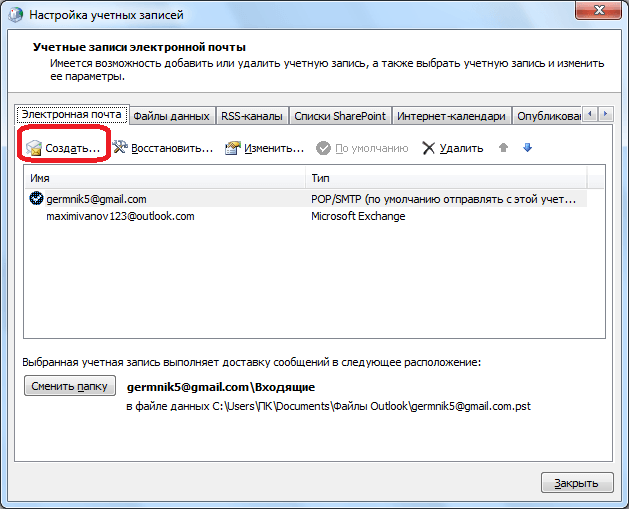
In the opened window, click on the button "Accounts".

A window with account settings opens. Click on the button "Create".
In the window that opens, by default, the service selection switch should be set to “Email Account”. If it is not, then put it in this position. Click on the "Next" button.

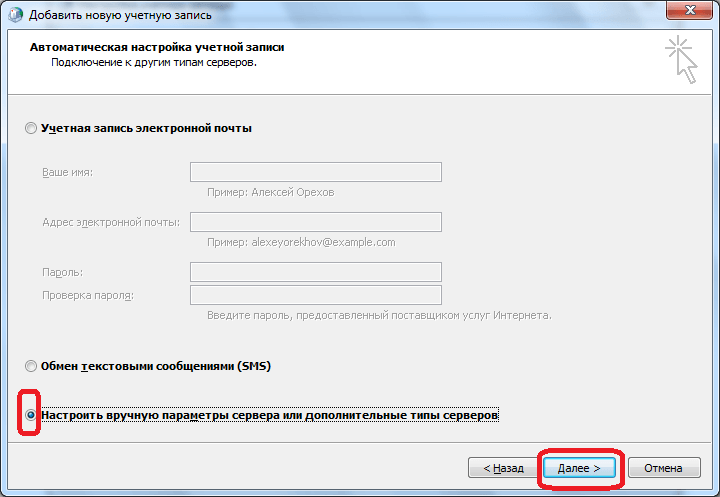
The add account window opens. Rearranging the switch to the position “Manually configure server parameters or additional server types”. Click on the button "Next".
In the next step, we switch the button to the “Microsoft Exchange Server or Compatible Service” position. Click on the "Next" button.

In the window that opens, in the "Server" field, enter the server name by the pattern: exchange2010. (Domain) .ru. A tick next to the inscription "Use caching mode" should be left only when you are logging in from a laptop, or being not in the main office. In other cases, it must be removed. In the "Username" column, enter the login to log in to Exchange. After that, click on the "Other Settings" button.
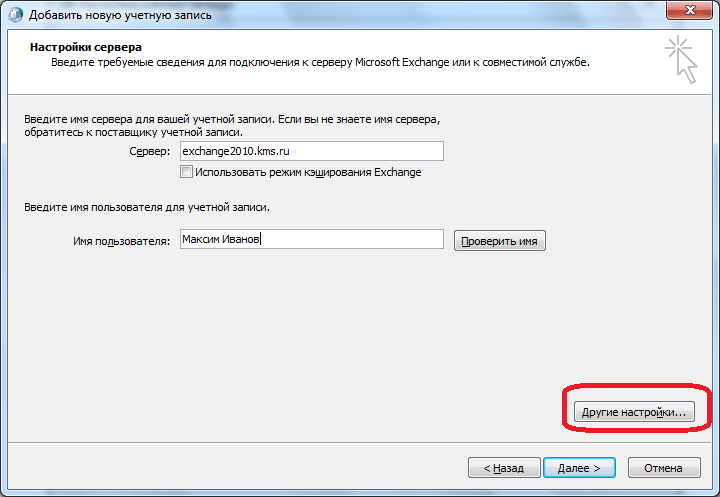
In the “General” tab, where you will immediately move, you can leave the account names by default (as in Exchange), or you can replace them with any convenient one for you. After that, go to the tab "Connection".

In the Mobile Outlook settings box, we tick the box next to the “Connect to Microsoft Exchange via HTTP” entry. After that, the button "Exchange Proxy Settings" is activated. Click on it.

In the field "Address URL" enter the same address that you entered earlier when specifying the name of the server. The verification method should be specified by default as NTLM authentication. If this is not the case, then replace it with the desired option. Click on the "OK" button.

Returning to the "Connection" tab, click on the "OK" button.

In the account creation window, click on the "Next" button.

If you did everything right, then account created by Click on the "Finish" button.

Now you can open Microsoft Outlook, and go to the created Microsoft Exchange account.
Legacy Microsoft Exchange Version
Another reason why the “No connection to Microsoft Exchange” error may occur is an outdated version of Exchange. In this case, the user can only, having communicated with the network administrator, offer him to switch to more modern software.
As you can see, the causes of the described error can be completely different: from the banal incorrect input of credentials to incorrect mail settings. Therefore, each problem has its own individual solution.
AT local network (LAN) Outlook 2010 and Outlook 2007 communicate with the Microsoft Exchange Server using Remote Procedure Call (RPC) using the TCP / IP protocol. On the corporate network, this method provides fast and efficient access.
However, when you are outside the organization’s firewall, such as at home or on a trip, access to the Exchange server typically requires a connection to the organization’s network through a virtual private network (VPN). A virtual private network provides you with a connection inside the corporate network and inside its firewall. It also provides access to more network resources than is necessary to work only with e-mail.
For remote connections, Outlook has the Mobile Outlook feature - an alternative to connecting via a virtual private network - which allows you to work with Outlook as in an organization without using special hardware and connections (smart cards and security tokens). Outlook can connect to the Exchange server via the Internet using remote procedure call and HTTP protocol. The Mobile Outlook tool allows you to access your Exchange account via the Internet when working outside the organization's firewall.
To use Outlook Anywhere, the following requirements must be met.
Your account is hosted on Microsoft Exchange Server 2016, Exchange Server 2013, Exchange Server 2010, Exchange Server 2007, or Exchange Server 2003.
In the case of Exchange Server 2003, 2007, and 2010, the Exchange administrator must allow HTTP connections on the server. Additional information about configuring this feature for Exchange administrators can be found in the Microsoft Office Resource Kit and in the Microsoft Exchange documentation.
For Exchange Server 2013 and 2016, Outlook Anywhere is enabled by default, since all Outlook connections are made through it. After deployment, all you need to do to successfully use Outlook Anywhere is to install a valid SSL certificate on the Client Access server. For mail servers Your organization only requires a self-signed default SSL certificate.
For more information, see Outlook Anywhere.
Enable Outlook Anywhere in Outlook
For Outlook 2007 and 2010, the Exchange server administrator can automatically configure all copies of Outlook in an organization or provide a special script executable file that launches Outlook Anywhere. Outlook Anywhere can also be configured manually if met system requirements and the correct URL and security information provided by the Exchange server administrator is known.
Outlook 2013 and Outlook 2016 no longer support manually configured Exchange profiles. To enable Outlook Anywhere, Outlook 2013 and Outlook 2016 administrators need to configure Autodiscover. For more information, see the articles.
Connecting Microsoft Exchange Server to the Internet is quick and easy. Microsoft Exchange Server 4.0 supports SMTP using the Internet Mail Connector, while Microsoft Exchange Server 5.0 has native support for SMTP, POP3, HTTP, and NNTP. This article describes the minimum steps that must be taken in order to configure support for these protocols.
TCP / IP configuration
Make sure that the Microsoft Exchange Server that you want to connect to the Internet is fully functional. Exchange clients with mailboxes on this server should be able to send messages to each other. Also check if the server has TCP / IP installed.
If your organization does not yet have Internet access, contact your Internet service provider. Order a permanent Internet connection, while requiring the provider to take over your domain name service - DNS. If a persistent connection seems unprofitable, a session connection can be used. After the provider assigns you an address, you may need to change the IP addresses on your local network.
Make sure that the connection with the provider is established, and check whether there is an Internet connection by requesting any server known to you, for example, the Microsoft server at 131.107.1.240. If successful, the following will appear on the screen:
C: \\ users \\ default\u003e ping 131.107.1.240
Pinging 131.107.1.240 with 32 bytes of data:
Reply from 131.107.1.240: bytes = 32 time = 341ms TTL = 115
Reply from 131.107.1.240: bytes = 32 time = 280ms TTL = 115
Reply from 131.107.1.240: bytes = 32 time = 281ms TTL = 115
Reply from 131.107.1.240: bytes = 32 time = 280ms TTL = 115
If a message like Destination Host Unreachable or Request Timed Out appears on the screen, you will need to troubleshoot the TCP / IP configuration. Check the protocol setup, router configuration, or RAS service configuration. If your provider was initially involved in configuring the router, call their technical support service. If the host’s ping test was successful by IP address, now try to check if the server will respond to the name, for example, dns1.microsoft.com. If successful, you will see the following on the screen:
C: \\ users \\ default\u003e ping dns1.microsoft.com
Pinging dns1.microsoft.com with 32 bytes of data:
Reply from 131.107.1.240: bytes = 32 time = 300ms TTL = 115
Reply from 131.107.1.240: bytes = 32 time = 281ms TTL = 115
Reply from 131.107.1.240: bytes = 32 time = 280ms TTL = 115
Reply from 131.107.1.240: bytes = 32 time = 881ms TTL = 115
If a message like "Bad IP address" appears, then before you can continue to work, you need to finally troubleshoot the TCP / IP configuration.
After ensuring that TCP / IP is installed correctly, you can proceed with setting up Microsoft Exchange Server to send outgoing messages. Find out the IP address and TCP / IP name of the Microsoft Exchange Server host. Suppose the name of your mail server is mail.company.ru, with the address 206.247.73.110. Try to request this server by IP address. If you fail to do this, it means that you have incorrectly determined the IP address of the server - check the TCP / IP properties in the network properties window.
Query your Microsoft Exchange Server by name. This is very important - all Internet protocols require that client machines and other servers on the Internet can find your system by name. If this does not work out, contact those who are in charge of your DNS service and ask to add an entry in the DNS to the Address ("A") line for your server (mail.company.ru).
You must instruct other mail servers on the Internet to forward messages addressed to you to your Microsoft Exchange Server. Let's say you want to receive mail at [email protected] To do this, the DNS administrator must assign the Mail Exchanger ("MX") attribute to your domain (company.ru), if this has not already been done.
Check the MX status record with NSLOOKUP, a utility that is available in Windows NT 4.0. At the command prompt, run NSLOOKUP and give the command "set type = MX". Now enter the email domain name of your company, such as "company.ru". If successful, you will see on the screen the host name of your Microsoft Exchange Server, mail.company.ru. For example:
C:\u003e NSLOOKUP
Default server: sec1.dns.psi.net
Address: 39.8.92.2
\u003e set type = mx
\u003e company.com
Server: sec1.dns.psi.net
Address: 38.9.92.2
Non-authoritative answer:
Company.com MX preference = 10, mail exchanger = mail.company.com
By default, the server should output the name and IP address of the DNS server that is specified in your TCP / IP configuration (see points 5 and 6 above). Depending on whether the DNS server you are pointing at is the primary DNS server for your company, you will receive an answer with the status “authoritative” or “non-authoritative” - this is unprincipled. If, in response, you receive a message stating that the MX service for your company (company.ru) is provided by your Microsoft Exchange Server (mail.company.ru), then everything is fine. If a line appears on the screen that is not similar to the one above, it means that you cannot receive incoming messages, and the DNS administrator should fix this problem. If everything works, then TCP / IP is installed correctly, and its settings will allow you to receive incoming messages in Microsoft Exchange Server.
Installation, configuration and testing of Internet Mail Service (SMTP)
In Microsoft Exchange Server 5.0, SMTP protocol support is installed by default when the server is installed, and for the first time you configure the protocol using the installation wizard for Internet Mail Service (Figure 1), which is started by the menu command File | New Other. If you have Microsoft Exchange Server 4.0 installed, you must run the program microsoft install Exchange Server and select "Internet Mail Connector". In either case, the Internet Mail Connector (in Microsoft Exchange Server 4.0) or the Internet Mail Service (in Microsoft Exchange Server 5.0) are installed as an object in the Connections container for this site.
If you are using Microsoft Exchange Server 5.0 and are running the wizard for the Internet Mail Service to configure this service, answer all questions in the manner suggested by default. This will give you a minimal working configuration of the Internet Mail Service. When you are done, the wizard will configure SMTP support and start Internet Mail in Microsoft Exchange Server.
Internet Mail Setup Wizards
If you are connecting to the Internet by dialing, then in the Microsoft Exchange server selection window, select the Allow Internet mail through a dial up connection check box. Next you will have to specify the RAS phone number for your provider.
If you are using Microsoft Exchange Server 4.0, you need to install at least Service Pack 2 or a newer version. Run the installer and select the Internet Mail Connector. After the installation process is complete, download the Microsoft Exchange Server Administrator and load the Internet Mail Connector object in the Connections container for your site. Here you need to do just two things. Firstly, in the General window, specify who is the connector administrator — select the administrator or any user from the general address list. Then in the Address Space window, click the New Internet button and then the OK button to close the next dialog box. In the Addresses window, you will see that SMTP is set to 1. To close this window, click OK in the DNS information window and close the Administrator program. Configure Internet Mail services to start automatically and start it (Control Panel, Services).
If you connect to the provider by dialing, open the Dial-up connection tab in the properties of the Internet Mail Connector and start the process of dialing and sending mail. In the Available Connections column, select the RAS phone number of your ISP. You can set the provider to automatically dial the number every few hours or at a certain point in time. When IMC uses RAS to dial the ISP, it will establish a connection with the SMTP host and wait for the mail to load. This usually happens right after the SMTP host recognizes the presence of the Exchange server, but sometimes it can take up to 15 minutes. If you want mail loading to start immediately, you need to set the appropriate command in the Retrieving Mail options. The exact format of this command depends on your provider. As a rule, you can use a command like Finger or Rsh.
Finger command syntax:
Finger [email protected]_smtp_host,
Your_domain is the name of your domain (for example, company.ru), isp_smtp_host is the name of the SMTP host of your provider (for example, mx4.smtp.psi.net).
Rsh command syntax:
Rsh -Iisp_domain -l logon "/ user / lib / sendmail -q -Ryour_domain",
Isp_domain is the name of your provider’s domain (for example, psi.net), logon is the login alias that has the authority to create a set of settings on the provider’s server, and the rest is the command generated by the remote set of settings. A good source of documentation for this and other teams. Check with your provider which command syntax you should use during the installation.
Now you need to check the configuration of Microsoft Exchange Server. The easiest way is to send someone on the Internet a letter from one of the users and ask to answer it. However, this method does not provide any information in case of failure. The most effective way is to first test using Telnet. Start the Telnet program, enter the File | New command and enter the host name of your Exchange server (for example, mail.company.ru), and specify 25 as the TCP / IP port. Click Connect and you should connect to the Microsoft Exchange Server and see At the top of the telnet window of the screen is a line similar to the following:
220 mail.company.com Microsoft Exchange Internet Mail Service 5.0.1457.7 ready
The answer, starting with 220, means that the server supports any SMTP service (in this case it is Microsoft Exchange Server Internet Mail) and is waiting for receiving mail. If you have not received such a response, check the configuration of Internet Mail again and if it is running.
POP3 protocol setup
Microsoft Exchange Server 5.0 supports POP3 protocol. This means that you can use any POP3 client program to read mail from a server, such as Microsoft Internet Mail, Windows Messaging, or Microsoft Outlook 97 with Internet Mail installed. To configure the server accordingly, complete the following steps:
Start the Microsoft Exchange Server Administrator, open the Protocols container for your site, and double-click the POP3 protocol object. Check the Enable protocol box (fig. 2). Go to the Authentication tab and make sure that all four options are checked. Close the POP3 properties window.
POP3 protocol setup
Now open the Internet Mail Service window and select the Routing tab. In order for users who have access to mail through the POP3 protocol to send messages to Internet users, Must be set Reroute Incoming SMTP Mail, and in the routing window as the address for incoming mail
To check how POP3 support works, of course, you need to use a POP3 client. You can conduct testing manually - use Telnet, enter the name of your Microsoft Exchange Server and specify the TCP / IP port - 110. A line will appear approximately like the following:
OK Microsoft Exchange POP3 server version 5.0.1457.10 ready
If you see this on your screen, it means that Microsoft Exchange Server is ready to receive information on port 110 and is waiting for the POP3 command to download mail. Note that POP3 clients use SMTP to send messages, so the Routing tab for POP3 mail is part of the Internet Mail Service object. To end a Telnet session, type Quit.
HTTP support
Microsoft Exchange Server 5.0 has built-in support for the HTTP protocol and allows users of Web browsers to read and send mail. This is especially useful if you need to read your mail from a computer on which you can not install the client program for e-mail. For HTTP support, you must install Internet Information Server 3.0 (IIS) and Active Server Pages.
On the computer where IIS is installed, run the User Manager. In the window and grant the Everyone group rights to local access (Log On Locally).
Start the Microsoft Exchange Server Administrator, open the Protocols container for your site and double-click the HTTP protocol. Check the Enable protocol box. It enables users to mailboxes which are stored on the server, read or send mail via the HTTP protocol using a standard web browser, such as Microsoft Internet Explorer 3.0 or later.
Connect to a personal email account
To check if HTTP support works, launch your Web browser and enter the name of your Microsoft Exchange Server in the address bar, followed by "/ exchange". The Microsoft Exchange Server logo should appear on the left side of the screen, and the registration window should appear on the right (Fig. 3). If this does not happen, it means that the HTTP protocol is installed incorrectly. If you see the registration window, enter your email username (for example, Administrator) and click where "click here" is displayed. A dialog box should now appear asking you to verify your identity. Enter your domain name and user name in the Username field (for example, MyDomain \\ Administrator), and your password in the Password field. After that, a form will appear on the screen with which you can read or send mail.
NNTP configuration
In Microsoft Exchange Server 5.0, NNTP support is installed by default during server installation. This allows users from any NNTP client program to browse public folders, and also, using NNTP, publish or read newsgroup articles from USENET news servers.
To access this or that shared folders (Public Folders) via NNTP, start the Microsoft Exchange Server Administrator program, open the NNTP protocol window in the Protocols container for your site. Select the Enable protocol and Enable client access check boxes (Figure 4) and click OK. If you want to have anonymous access to shared folders, go to the Anonymous tab and select Allow Anonymous Access.
NTTP configuration
To read the newsgroup article from the USENET server on the Internet, start the newsgroup wizard with the File | New Other command. At the very beginning, it is a good idea to carry out an elementary reading of a publication from a well-known source, for example, from a common Microsoft news server (msnews.microsoft.com). When you are finished, NNTP support will be configured and the wizard will activate Internet News Service of Microsoft Exchange Server. If after you click "Download the active file from my provider now" the connection is interrupted, then there may be a problem with the router. If so temporarily select "I will configure my newsfeed later." Later, you can install the protocol support, go to the publication object on msnews.microsoft.com in the Connections container and download the active file.
To test NNTP client access, you can use any NNTP client program. To test manually, you can still use Telnet, using TCP / IP 119.
To test newsgroup support, download the publish object from the msnews.microsoft.com server in the Connections container for your site and click the Inbound tab. For a few seconds there will appear the inscription "Setting up the Active File", after which you will see a list of newsgroups that are available on the Microsoft news server. You can select and load several of them, and then click OK. In about 30 minutes, you will see various newsgroups and messages in the public folders of the Microsoft Exchange Server.
Recently, about a month ago, I’ll not say for sure) the following problem appeared. When I try to configure Outlook to connect to Exchange, the first error is:
"There is no connection to Microsoft Exchange. To complete the operation, you need a permanent or temporary connection of Outlook to the server."
The error occurs in any case, the server name is written in the form of a short name, full or in the form of an IP address.
The client’s network address is issued via DHCP, and DNS server addresses and default routes are taken from there. Everything works, the name of both the server and the machine is resolved in both directions, the packets between the server and the client go normally, even the balls open (on the server there are none, go to administrative), it seems like everything is the way to go. But - in any. And under any user domain. The server and client logs are empty.
Began to experiment. As it turned out, reinstalling Outlook (with cleaning the registry and the like) does not help. Reset does not help network settings. Resetting TCP does not help. Moreover, reinstalling Windows does not help.
The problem was observed only on some machines, because for the time being they scored (due to reductions in free machines abound), but the problem periodically manifested itself, it was clear that this did not start just like that, so I decided to get to the bottom of the reason.
Further experiments have shown that the connection error exists only for new profiles. Those who already have Outlook configured on the same machine are working fine.
The problem exists for all (two) mail servers. Stuck in different switches.
And in the end, a pattern was found by beating his head against the wall - if the last octet of the IP address is even for the machine, an error occurs. If odd, there is no problem. This actually explained that reinstalling Windows did not give anything - on DHCP server for this MAC address was a reservation, and the machine consistently received the same IP address.
The network is built on HP and Cisco, customers go through completely different distances through a different number of switches (there is no normal SCS, everything is inherited from the past), the problem is also observed on the terminal server which is plugged into one switch with the mail one.
Maybe everything is simple. But I have so far only a surprised laugh. Who knows?
PS I don’t like to write such long, lengthy posts, but it’s still Friday)