How to set up a specific channel on the TV. How to set up the TV for test pictures
Bright colors, clear image and eye-catching level of illumination can be obtained on the TV screen only if Samsung TV is set up correctly. Are you one of the connoisseurs of beauty? Then this article is for you. It will be no less useful to ordinary users, who, having brought a brand-new TV home, annoyed to find that the picture does not meet expectations.
The answer to the question of the need to tweak a new TV is quite simple: sometimes manufacturers (and this applies not only to South Koreans) produce devices with some enhanced characteristics — deeper colors with green or red colors saturated with low frequencies. It is believed that since their models will look brighter and more preferable on the store shelf, next to the products of competitors. But what looks good in a huge trading floor is not always suitable for an ordinary apartment. Therefore, sometimes TVs have to reconfigure.
How to set up a Samsung TV: image
The only way to customize a Samsung TV for better picture quality is hardware calibration. This is the name of the procedure when optimal, standard images are fed to the input of the tele-box and at the same time measurements are taken from the screen. Then the characteristics of the image are trying to fit this ideal. But since calibration is quite troublesome and requires a certain level of knowledge, we will limit ourselves to simpler means. To customize your SAMSUNG TV, you will definitely need a remote control. remote control (Remote control). By pressing the Menu button on it, we will see the Service menu, through which we will make all the settings.
If this menu is in English, then first of all you need to change the language. To do this, use the arrow-cursors to find the Setup (Setup), press Enter and go to Language (Language), where we select the Russian language. After this, the tuning process turns into pleasure - we look, we press, we choose. Having found the Image item through the Menu, we set the Contrast, Clarity, Brightness, and Color levels in it using the cursors.
At the same time, most experts advise to disable features that give some of the settings at the discretion of the TV. First of all, it is a light sensor, dynamic backlight, power saving mode, dynamic contrast function, dynamic image mode. Experience shows that TV often chooses not the most optimal picture option.
How to set up a Samsung TV: sound
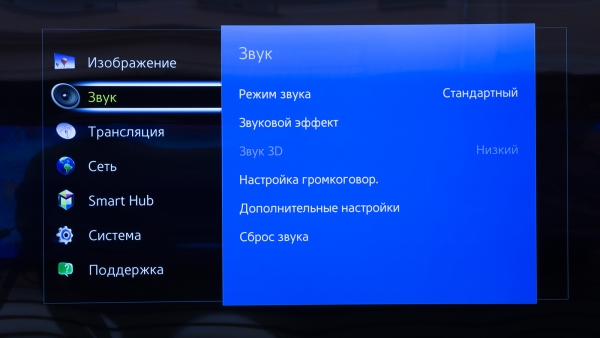
Continuing the story about how to easily set up a Samsung TV, go to the sound settings. It is also carried out through the Menu and Settings, Sound. Here you need to choose a sound system from the proposed. Usually this is Dolby, equalizer, surround sound function. They differ in sound quality, since all these devices are provided for use in different operating conditions.
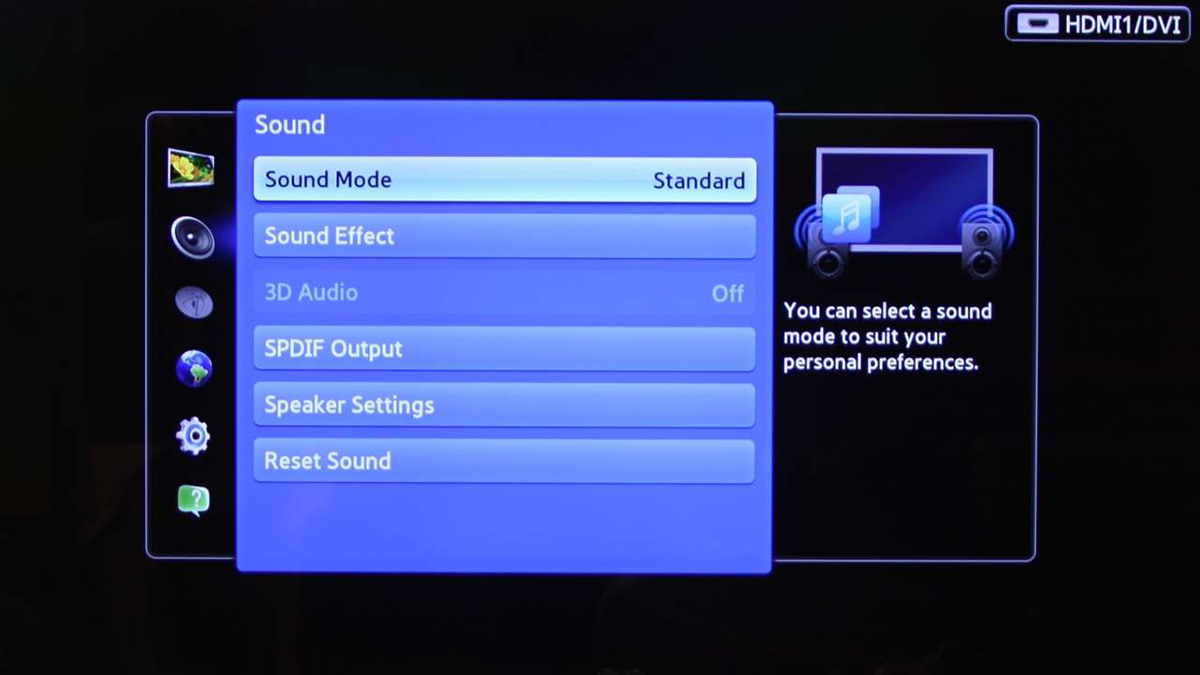
And they are designed for the fact that, for example, in a large hall you need a stronger and more surround sound than in a normal living room. But if the same apparatus is used, for example, for playing games and watching TV shows, then it is possible to set up various sound systems in it. This is available through the menu item Sound and Sound Settings. Here, for each user, you can create your own profile, as well as switch between profiles.
How to set up a Samsung TV: channels
Learning how to quickly set up a Samsung TV, go to the channel settings. Here, too, we will not look for difficult paths, and artlessly select in the Menu Settings and Channel Search / Setup. If the TV device asks for a PIN code, then enter 0000, 1111 or 1234. After that, we can safely switch to Auto Tuning, specifying the signal source Cable, Channel Type - Digital, as the search mode - Network. After that, click Search, and when it is completed - OK.
The device will find all the channels that are available in the cable network. To sort them, in the Channel menu item, select the Channel Manager sub-item. With its help we delete, move, group the channels. In case there is a SMART TV function in the smart Samsung, you need to find the button on the remote Smart hub, click it and go to the Channel icon. And in it choose Edit to sort the channels.
Conclusion
In this article, we looked at how to debug a picture and sound on Samsung personally, without the help of guest artists. For this you need only a remote control and own ingenuity. And you need to start the whole procedure by installing the Russian language in the menu and setting the desired parameters. In general, the procedure is simple and accessible even to a novice user.
You will need
- - remote control (RC);
- - Samsung TV;
- - indoor or central antenna;
- - when connected to digital television Requires a digital set-top box.
Instruction
Search (tuning) of channels is also carried out using the “Service menu”. Press Menu on the remote control, then select "Settings", where you will be presented with a list of settings, select "Search / Tune Channels".
Here it will be possible digital or analog channel search, depending on the connection of your TV. Next, you will need to choose how to set up and search for channels: manually or automatically, select, respectively, “Manual” or “Auto Tuning”.
With automatic tuning, the channel search will be conducted without your participation. The programs will be automatically assigned numbers, which you can change in the future. Channels that you watch more often than others, you can assign the first numbers on the remote control.
Image adjustment is done in the same way as the previous settings. Menu button on the remote control, then the item "Image". Here you can choose the optimal image by changing the parameters “Contrast”, “Sharpness”, “Brightness”, “Color” with the help of arrows-cursors by changing the values of the scale of the necessary parameter up or down.
Sound parameters are also subject to adjustment. On the remote menu, "Settings", "Sound". In this option, select the quality and sound system of the proposed. Depending on the model, Samsung TVs have different sets and sound quality. In modern models there is a function of surround sound, Dolby, EQ.
Cell phones are very convenient to use. You are constantly in touch. You can call yourself anytime, wherever you are. But sometimes the standard ringtones from different models of the same manufacturer, for example, Samsung, are annoying.
Instruction
The bell rings, you grab the phone. And he calls the neighbor, who sits next to you in the bus. But this problem is easily solved by setting your own ringtone settings on your Samsung phone. To do this, go to the phone menu and select the "My Files" folder. Then, scrolling through it, open the Sounds tab and go to the Downloaded Sounds folder. This folder contains the melodies available for your phone model. Listen to each melody and select the one you like.
Check the box and go to "Options". Then click the Set As command. The phone program will prompt you to install this. melody like a call like melody contact or like melody signal. Select the setting "Call". When you receive a call you will play the selected melody by default.
You can also set as a call melodywhich you downloaded to your phone. To do this, go to the Music folder through the menu. From the list of downloaded melodies, select the one you want to set as a ringtone. Then open the options, go to the "Set As" command, select "Call". Save the settings. Now the melody of your phone will be different from others. In the settings, you can also set the volume of the melody, and check how exactly one or another melody will sound during an incoming call.
For each number you can set individual melodies by selecting the command “Set as melody contact. Then, with the ringing bell, you will know who is calling you. In the same way you can install melody on the alarm clock of your phone. Only you need to make settings in the “Alarm” folder in the device menu. It is also worth noting that melodies from flash drives are installed in a similar way, you just need to go to the directories that are contained on the memory card.
Quite often you can see how people argue on the subject: which brand of phone is better. Each gives his arguments in favor of a company, but it is not possible to reach a common opinion.

Choose a phone
Buying a phone is not an easy task. The market is full of brands, each of which is represented by a dozen models. All of them have their advantages and disadvantages, each has its own fans. Someone likes multifunctional devices that are practically pocket computers, someone just needs a phone that allows you to make calls and send SMS messages. For example, the consumer chooses between Samsung and Nokia. Here it is necessary to understand.
Nokia has long been synonymous with quality, reliability and durability. In 2011, its share accounted for more than 30% of the global market. Nokia phones have always been distinguished by their simplicity and "indestructibility." Recall at least Nokia 3310. It was this model that survived the blows and falls and earned the authority of the company. It has become one of the most popular in the history of Nokia. Then began a series of ups and downs.
In particular, the emergence of such a model as the Lumia returned a lost interest in Nokia. Lumia phones - are modern and multifunctional devices working on Windows phone, with powerful processor, Wi-Fi and other "chips". Users who need not too expensive and at the same time productive devices, should look at this series. In this case, Nokia phones are perfect for those who need “strong middling”.
Or Samsung?
If until 2011 in the market mobile phones firmly in the lead Nokia, then in 2012, Samsung took the place. Since all components of the company produces itself, their phones may be more functional. And if they are inferior to Nokia in the "indestructibility", then in manufacturability, as well as the ratio of price and quality can give them a significant form. In addition, all samsung phones Traditionally powerful batteries. Today, Samsung products are ranked second in the world in the market. mobile technology and has a huge range of models.
Sources:
- how to change language in samsung
Many Samsung TV owners are not always able to quickly and easily understand the features of setting up a new device, especially when it comes to Samsung, which is worth buying to all fans modern technology. Do not think that setting up the Samsung TV is capable of delivering a lot of problems - in fact, this process takes not so much time, especially if you know exactly what needs to be done in each particular case. In any case, you need to use the instructions or in advance to find all the necessary information, which this article will be devoted to.
The well-known company Samsung is deservedly considered one of the leading brands in the market of household appliances. Televisions of this company are considered among the best, as confirmed by numerous users. The manufacturer seeks to expand the available range of models of devices and every year produces a certain number of new options, equipped with a full set of all the necessary options. Each series has its own settings, and sometimes it’s not so easy to understand them. A modern LCD TV set, for example, model 5500, with improved functionality, is equipped with additional options and is able to be configured fairly easily.
In fact, setting the LCD TV from this brand rarely causes problems to users. You can set up such a TV as quickly as possible even if you lose the instruction: all menu interface options are extremely clear and precise at an intuitive level for everyone. For this, the remote control and the available connection to the standard antenna itself will suffice. To the question of how to properly configure the Samsung TV, could not put you in a dead end, you should remember that all options are available in the Service menu, which can be accessed by pressing the Menu button on the remote control.
Any owner of a new TV wants to find out in his new TV. This can be done through the Menu, where the default language is English, which you can change if you wish. Features of the Samsung TV allow you to do it without much effort.

It is better to change the language in advance, as the Russian-language interface will help you quickly get used to the functionality of the new TV.
How to set up channels
The correct way of setting should begin with the channels, by setting which, you can proceed to the next steps. After installing a more familiar language to the Russian-speaking user, setting up a list of channels will seem like a very simple task for everyone:
- need to go to the menu;
- select item settings;
- then click the Search and configure channels button;
- choose manual mode or automatic tuning.

If you select the second option, all channels on the TV will be tuned automatically. The user will only need to monitor the process, while Samsung will independently search for all available channels and assign them names.
After the search is completed, you can rename certain channels using the standard menu. When the device finishes scanning all available ranges, the first channel found will turn on automatically. Then the user can view the entire list using the appropriate buttons on the remote control. If a is used external device , it needs to be adjusted independently, especially when it comes to a satellite receiver. To do this, you need to select a special source of information intended for TV by clicking on the Sourse button. More about settings digital channels for tv samsung can learn from.
Image adjustment
When it comes to how to set up a Samsung TV, you should pay attention to the image. This can be done the most in a simple way using the remote control. Often the picture on the screen may seem too dark or light - in order to get the desired color, you need to go to the color settings. You will need to open the Service menu using the button above and select image sectionthen go to the menu with the appropriate options.
- With the help of Contrast you can set the parameters of the ratio between the brightest and darkest image.
- Sharpness helps to adjust the sharpness of the image.
- The Brightness command allows you to brighten a picture or darken it noticeably.
- An option called Color helps to make colors richer or lighter, as well as switch to black and white mode.

Properly configured color mode is very important, because it depends on the perception of the image.
There is also an additional and very convenient option that allows you to reset the image completely if you cannot correct it after changing several settings modes.
Adjusting the sound
Easily customizable and properly installed sound also has no less noticeable value than the image. To do this, you also need to go to the Service menu, in the Settings section and select the Sound item. It is in this section you can choose the quality and method of transmission of sound.
It is also worth noting that many modern models are equipped with additional options, for example, an equalizer, a function Dolby and surround mode. Acoustic system Each Samsung TV has individual features that you should pay attention to, because the sound quality and overall impression of it will depend on their proper settings. You also need to know from Samsung - it will depend on access to all the provided multimedia features, in particular,.
Sergey Plotnikov,
April 12, 2015 08:00
Modern TVs have a fairly high-quality factory image calibration. However, this fact does not mean that a user who wants to get a good and realistic picture on the screen does not need to take any gestures. In addition, in any more or less advanced "box" there is a large number of presets and options prepared. This material will be told the basic principles for adjusting the brightness, clarity, proportion and color of modern TVs. Simple steps that, nevertheless, allow you to achieve the best picture on the screen "family pet."
Definition
We will not postpone the matter indefinitely. I propose to start setting up the TV with the installation of the highest possible detailed image. Restrictions on the clarity of the TV impose several factors: different signal sources and different principles of shooting video content. Unfortunately, even modern TVs can apply to the image of the so-called "overscan", which appeared back in the days of the reign of CRT technology. Namely, the device screen cuts off 3% of the image at the edges. As you know, the best clarity can be obtained in the "point-to-point" mode, when the content is displayed on the screen in a 1: 1 ratio. Therefore, if the TV cuts off the edges of the image, then its detailing is lost.
To adjust the clarity of the TV you will need a test video that you can download on. Below is a screenshot of this pattern.
In fact, the user is required to adjust the image so that a smooth white frame is visible along the perimeter. This means that "overscan" off the TV. Unfortunately, there is no single principle. In some TVs, the proportion must be set manually. In other "overscan" is disabled using a specially selected mode. In the third, an automatic selection of the aspect ratio is performed.
Next, you need to find the “Sharpness”, Sharpness or “Sharpness” parameter in the image settings. In 99 cases out of a hundred, this function is implemented as a slider. By default, the clarity is set to position 0 when the gradation is “from -50 to +50”, but more often in the position “50 out of 100”. It is worth considering that some technologies of additional signal processing, which one or another TV possesses, can affect image clarity. Therefore, before the add-in they must be disabled. We look at the slanting lines from the test video and analyze:
- If the contours of the lines are clear and you do not observe any artifacts, then everything is fine with clarity.
- If the outlines, and the whole image are blurry, the clarity is below the optimal level.
- If the outlines have an unnatural underscore, artifacts are present, and false lines are added, then clarity should be reduced.
Brightness
Historically, there are two brightness settings on LCD TVs. Under one of them imply adjustment of the black level in the signal. He is called simply "brightness." About here the screen brightness is called “backlight”, “backlight brightness” or Backlight. Unfortunately, for many inexperienced users, this confusion can be misleading. The brightness parameter affects both the image and the user's health. And if viewing the “box” after some time causes discomfort, then it is urgently necessary to change this parameter.
Low backlight reduces eye strain.
As I said before, the brightness of the screen itself is set in the “Backlight” menu, Backlight or “Backlight brightness”. Here everything is individual. In the afternoon, the brightness can be set higher, and in the evening, on the contrary, lower.
To adjust the brightness you need. The video shows 25 pages. Stage number 16 is the reference black. This color is based on the creation of films and TV shows. And all that remains behind this level no longer matters. Adjust the brightness of the TV based on the following positions:
- The 16th line merges with black, and the gradation of the signal is visible exactly up to the 17th band. So with brightness everything is in order, nothing needs to be changed.
- The signal gradation is visible either after the 16th stage, or earlier than the 17th stage. In this case, you need to adjust the brightness to get it, as in the first paragraph.
There are still situations where the gradation of the signal is not visible at all or, conversely, can be traced at all levels. In this case, the problem is most likely on the source side.
As is the case with clarity, the black level may be affected by additional technologies that the television supports. These include automatic contrast control and dynamic backlight. It’s better to disable them before setting them up.
Chromaticity
The color of the image has a large number of parameters. Fortunately, they are optimized. So, for household video sources, the ITU-R Recommendation BT.709 standard has been adopted. It guarantees that the user will receive natural and natural colors, as well as real color reproduction.
Any modern TV has several image modes at once. For example, a test sample boasts the following presets: Autoview, Dynamic, Standard, Night Hollywood, Day Hollywood, Hollywood Pro, Games and PC. Very often, TVs have the mode "Bright", "Film" and "Cinema". You can choose any of the presets you like, but not all of them provide the user with an acceptable image quality. From my own experience, I can say that the best options have modes associated with movies. Vendors in stores use the “Bright” pattern for hacking. However, as practice shows, at home to watch TV with this mode is unrealistic.
For a start, what is the "right setting". If you have been at the electronics store at least once, then you probably noticed that all the exhibited TVs are shown differently. What is the reason? Which one is better? Let's see.
I think you will agree that the TV should not only show some kind of picture, but also introduce as little distortion as possible into the original content. The content itself is always created with an eye on the standards and recommendations of the industry, and the main goal of any TV is to convey to you exactly the image that you wanted to show. Everything is important here: the skin tone of the actor, and the color of the sky at sunset, and what details of the image should be visible and which parts are hidden. There are international standards that describe what should be the image on the screen of your TV. All of you, for sure, met the abbreviations PAL, NTSC, or HDTV, these are the properties of the video signal and various image parameters that are hidden behind these letters. With the advent of HDTV in our lives, most of the standards are immediately outdated, and, in fact, the most relevant now is the REC709 standard, which is used in high-definition television (HD) and Blu-ray video.
The general parameters of the correct image are:
- color temperature 6500K (D65)
- linear gamma, recommended value 2.22, for darkened rooms 2.4
- recommended brightness ~ 120 cd / m2
- color gamut for REC709 (similar to sRGB coverage).
Unfortunately, modern TV manufacturers customize their products frankly bad, because they are not interested in their displays matching the existing color standards, but in increasing sales of these same displays. In an effort to sell more TVs, manufacturers are constantly trying to present more "bright blue" and "live red" colors than their competitors. They specifically enhance the brightness of some colors, so that the products look more seductive on the shelves compared to their counterparts from other companies. On counters with outwardly identical products, the buyer will choose the brightest TV set, or one whose colors appear deeper. If manufacturers paid enough attention correct setting their products, then all the TVs displayed on the counter would show a very similar image.
The only right way to get the right image on the TV screen is hardware calibration. It lies in the fact that the reference images are fed to the TV input, and measurements are taken from the screen. Next, adjust the TV settings until the image parameters are as close as possible to what is required by the standard. But this setting is quite laborious, requires knowledge, and above all equipment.
Is it possible to make the image on the screen of your TV more true, without resorting to hardware setup? I will give a few tips based on my experience in setting up various TVs.
Which image mode to choose (standard / dynamic / movie)?
On the absolute majority of TVs, the Cinema / Cinema mode is the most correct. Do not use the Dynamic mode for viewing: because of a non-linear gamma, the image in it is always wrong, but because of the very high brightness, this mode strains your eyes, especially if you watch TV in dimmed lighting or in the dark.
Which color temperature mode to choose (cold / standard / warm)?
On the absolute majority of TVs, the Warm mode is the closest to the standard color temperature (6500K). With the choice of Warm1 / Warm2 (on Samsung TVs), determine for yourself which one is better. This is usually Warm2, but there may be exceptions.
What settings are recommended to turn off to get the best picture?
It is necessary to turn off all settings that adjust the brightness / contrast at the discretion of the TV. That is, you should turn off “dynamic contrast”, “power saving mode”, “light sensor”, “dynamic backlight” and not use “Dynamic” image mode.
How to set the correct parameter "contrast"?
In fact, this parameter is incorrectly called “contrast”, since the contrast is the ratio of the maximum brightness of the white field (white level) to the black level (level of the minimum luminosity of the panel). So, the “contrast” parameter in the TV menu changes exactly the white level, that is, the level of maximum brightness of the image.
For plasma:
- make the setting of the “contrast” parameter better in the dark;
- set the “contrast” parameter to a value close to the maximum (90-95);
- decrease the “contrast” parameter until the picture with the white level (100IRE) ceases to “cut eyes”.
Have plasma samsung tv There is a “cell light” parameter (cell light), which has a big effect on the overall brightness of the image. You can immediately set it to a value close to the maximum (18-20), and then follow the recommendations.
LCD TVs are arranged a little differently - they have a “backlight brightness” parameter (sometimes called “backlight contrast”), which has the greatest value for the overall image brightness.
For LCD / LED:
- make the setting better in the dark;
- put the parameter "contrast" close to the maximum value (90-95);
- display an image with a white level window (100IRE) (links at the end of the article);
- set the parameter “backlight brightness” to the maximum or a deliberately higher value than necessary;
- reduce the “brightness of the backlight” parameter until the picture with the white level (100IRE) stops “to cut the eyes”.
I do not recommend using the maximum values of the “contrast” parameter, because some TVs have non-linearity of color temperature when setting the maximum value.
An unnecessarily bright image (and the “contrast” / “brightness of the backlight” is responsible for the real brightness on the TV) strains your eyesight and leads to eye fatigue, keep this in mind when adjusting these parameters.
How to set the correct parameter "brightness"?
The brightness parameter determines the black level. To install it in the correct position, you can use a special image «Pluge pattern». In this image, the leftmost vertical bar corresponds to black. To set the “brightness” parameter to the desired position, first increase it until you see all the bands clearly, and then decrease the “brightness” parameter until the leftmost vertical bar merges with the background. In addition, you can use special adjustment discs, for example AVSHD (link at the end of the article), where in the section “Basic Settings” you will find the necessary images to adjust the basic settings of the TV.
What is "clarity"? How to install it correctly?
"Sharpness" (sharpness) - this is exactly the clarity of the image. This parameter is needed so that you receive an equally sharp image from different viewing distances. To adjust this parameter you can use the special image “Sharpness pattern”. Technique settings "clarity" is as follows:
- sit at a viewing distance from the TV;
- display “Sharpness pattern” on the TV screen;
- increase the “clarity” parameter to a maximum, or to a value at which artifacts of excessive “clarity” will be clearly visible: light halos around objects and thickening of thin lines;
- reduce the “clarity” parameter until image artifacts disappear, such as light halos around objects and thickening of thin lines. 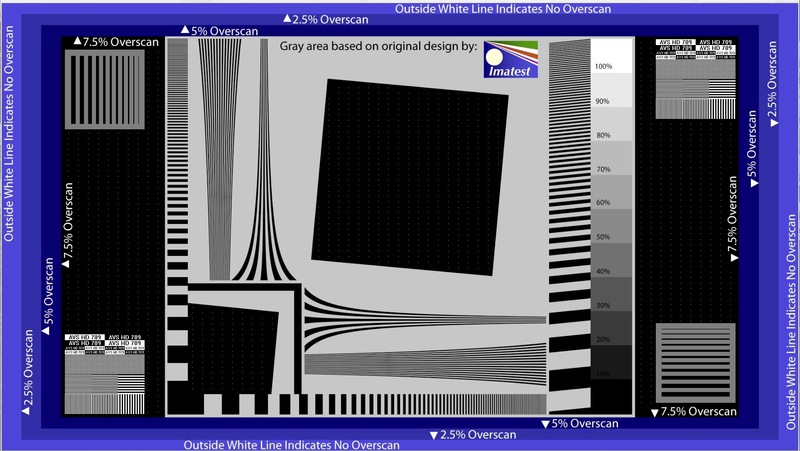
How to set the color / saturation parameter correctly?
It is difficult to set this parameter correctly without measurements. My recommendations are to display high-quality photos of nature with a multitude of shades of green on the TV screen (since the eye is most sensitive to it, and it is he who on many TVs is overexposed) and adjust the color / saturation parameter until the image looks as realistic as possible . Additionally, you need to check the settings on high-quality photos of people, skin tones should be natural. 
My TV has white balance settings and a color management system (CMS), how do I set them up correctly?
Only with hardware calibration. Adjusting these parameters "by eye" is useless.
Thank you for your time. Constructive criticism is welcome.