Installing Mac OS X on the PC with a USB flash drive. Installing Mac OS from a USB flash drive. How do I boot to Mac from an external USB storage device?
Many users have already successfully transferred from OS X Lion and OS X Mountain Lion to a new operating system using the Mac App Store. However, there are makovods who prefer to do clean installation OS. In this case, the OS goes to the formatted partition hard drive, from which all data has been deleted. Or even a new drive is used.
Disk partitioning schemes
When you execute a new disk partition to change its schema, all data will be deleted. 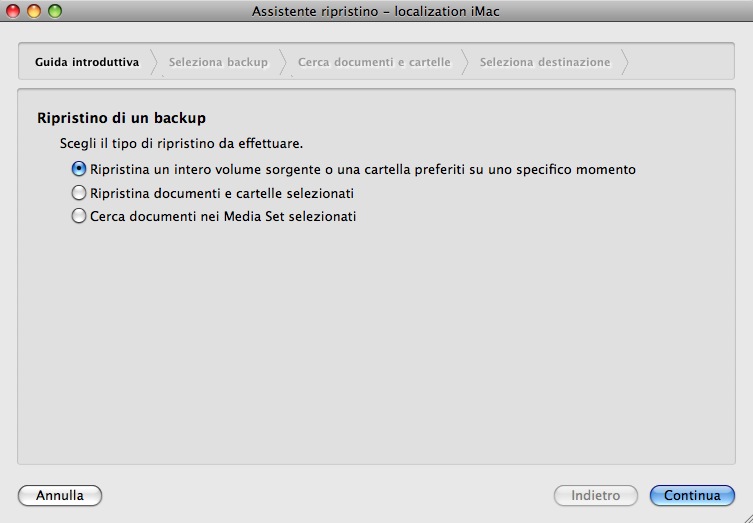
Review the list of backups until you find backup copywhich reflects the point of time to which you want to restore. The Select a backup panel appears. . Do the following: The Recovery Options panel displays a summary of the sources and copies of the recipients.
Performing Dynamic Recovery
Start and restore from a copy. In most cases, copy operations are performed on separate external hard disks.
It is believed that this method is the most reliable and promising in terms of future stability of the OS. Applications and modes installed in the environment and under the control of OS X Mavericks will work with maximum stability. If you chose this method of installing a new operating system, we recommend that you pre-run backup all important information.
Recover copy, then dynamic restore
Use the left and right arrow keys on the keyboard to select the volume you want to use, in this case, the external drive containing the backup copy of the copy. After the startup process is completed, you can use the computer that is started from the backup drive. See "Using the Copy Helper" in the chapter. To perform this type of recovery, follow the steps described earlier in this chapter, first in the "Start and Restore from a Copy" section, and then in the "Performing Dynamic Recovery" section.
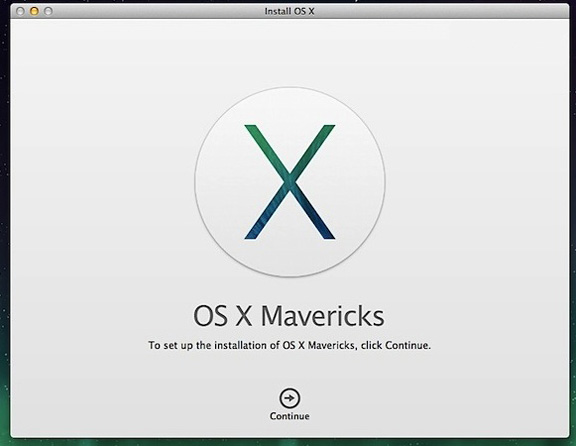
Clean installation OS X Mavericks:
Step 1: from the Mac App Store, but do not install the OS.
Step 2: Using the manual, create a bootable USB flash drive with OS X Mavericks.
Step 3: After you prepare the boot drive, restart the Mac, option key (ALT).
Step 4: When starting the machine, select "Installer Mac OS X" from the boot menu.
In this case, two options are available. Use "Restore selected documents and folders" to select recovery items. In the "Using the Recovery Wizard to view and restore files and folders" in the chapter. Scroll through the list of backups to find a backup that corresponds to the exact time you want to restore. The Select Destination screen appears. When you are ready to restore, click "Start". The helper starts automatically and finishes the registry and system recovery. When finished, the computer is ready for use.
- Reboot this volume.
- The "Select backup" panel appears.
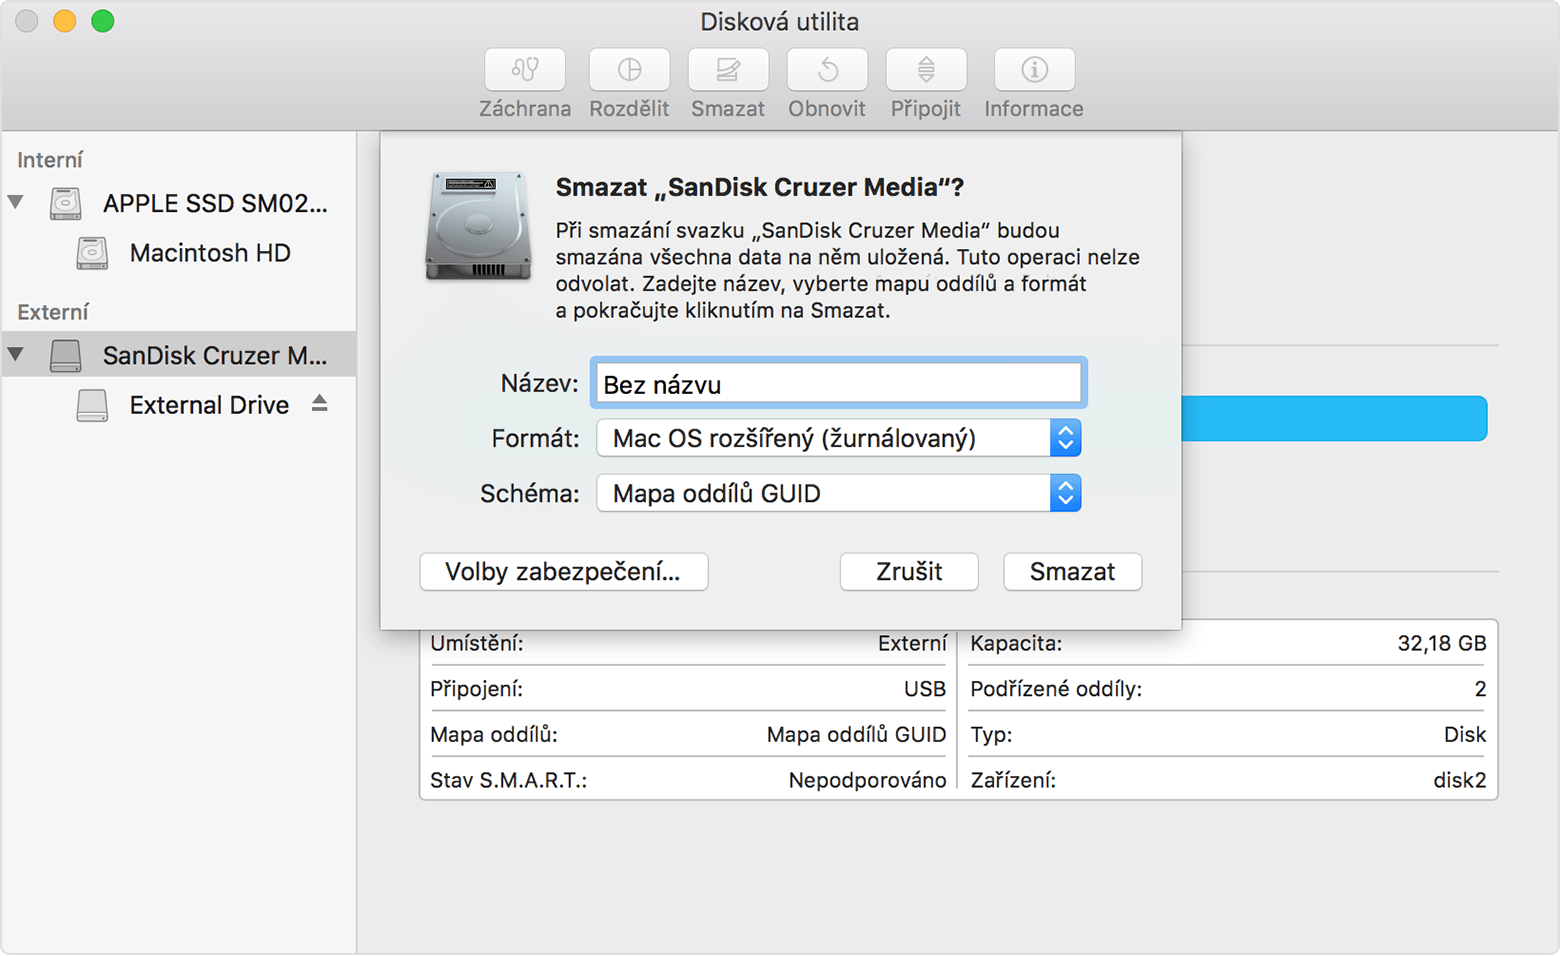
Step 5: Open Disk Utility and specify hDD, which you want to format. Click the Erase tab. From the Format drop-down menu, select Mac OS Extended (logged) and write the desired disk name.
Step 6: Click the Erase button to start formatting the drive.
Check your system requirements
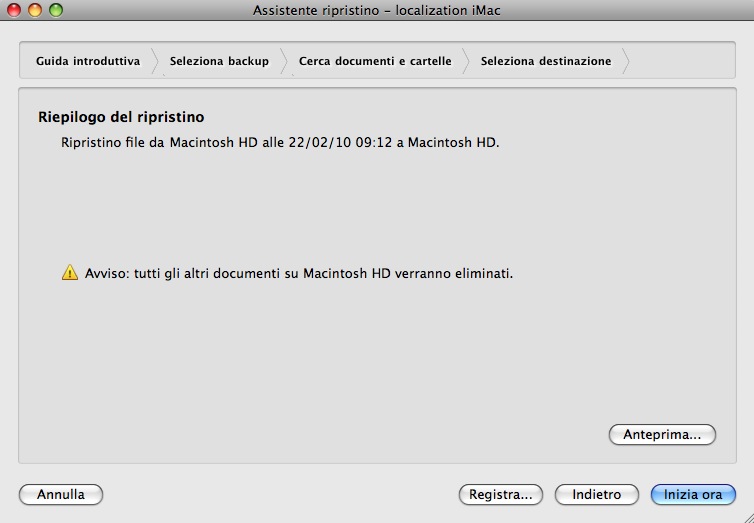
The following procedure involves completely replacing the contents of the client computer's hard drive with a previous backup containing all the files. Scroll through the list of backups to find a backup that corresponds to the exact time you want to restore. Start now Restart the client computer. In all other cases, the correct partition is automatically selected and formatted. There are three ways to create a key.
The first method. The first method is the most difficult. In truth, nothing is particularly difficult, but you must carefully recruit a long team from the Terminal, a tool that can be intimidated by the less experienced, as it is intended for system administrators and people familiar with the command line. Here's how to do it.
Step 7: After the operation is completed, close the Disk Utility and select "Install Mac OS X" from the top menu.
Step 8: Specify the drive and run the OS X Mavericks installation.
After a clean installation of OS X Mavericks, you can transfer applications and other important files from a Time Machine backup or use the OS from scratch.
Copy operations are terminated when "Copy completed" appears in the terminal window, followed by a user invitation. Please note that this may take a few minutes. At this point, you can close the terminal window and extract the key created in this way.
Method 2, traditional. You can copy it to the Applications folder, but it's not necessary. Keep in mind that the selected disc will be completely deleted, so pay special attention to what you are doing. You can specify "Sierra", but any name is ok. Obviously, it's useful to specify a name that allows you to identify the key when necessary.
The usual way to install the "apple" OS has long been an update through the Mac App Store, especially since OS X began to be distributed free of charge. Nevertheless, there are scenarios that might require a "grandfather's way". We will describe one of these cases in this article.
Recently, the author had the following situation: "vintage" MacBook Unibody, a retro-review of which, required cleaning the body and changing the thermal paste. Performing these operations with his own hand was no time, but the experience of data loss during the repair of your humble servant was already available. This time on the disk there was nothing particularly important, however, the desire to restore from this did not increase, and at hand was not external storage with a fairly large free partition for Time Machine. The solution asked for itself: take the old hard drive that came with the laptop and install a fresh copy of the operating system on it, so that the service center employees can check the device's performance. How can this be done?
You must wait for the file to be copied. This may take a few minutes. So try to be patient and do not worry if the operation seems to take so long. Here's how it works. If you want, you can copy it to the Applications folder, but it's not necessary. This needs to be said earlier with the help of other procedures: patiently wait for the copy and create phase, which can take several minutes. Go to the tab: Sections, go to the tab "List: the section tab" and select: 1 section.
- Launch the application.
- Then go to the button: Initialization.
- Let's go to Good, and then: Apply.
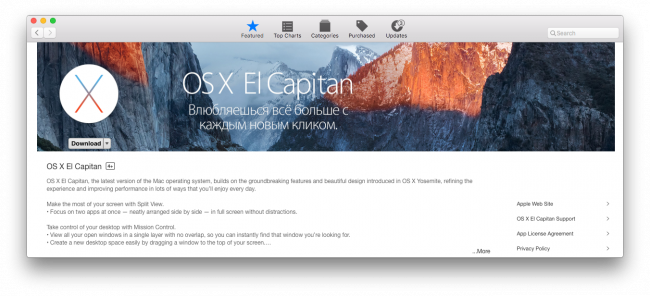
So, first, we'll need an OS X installation file. The easiest way is to download it from the Mac App Store, by searching or, if you have already updated the OS, the "Purchases" section.
Removing and formatting the flash drive
Do this, or if you have already set the most important data safe. Once you delete everything, you can not get deleted data. 
And format. . After downloading, the installation wizard runs itself, and you are in the new system in half an hour. Of course, you will not leave your files, and you will even start running all the windows that you ran in the old version.
Most of you have probably already moved a new system. But if you do not, or if you have problems with the new version, you will definitely get a clean install. But how to make a clean installation? And only in today's tutorial we will show you how to do it. First we will download the system from this link.
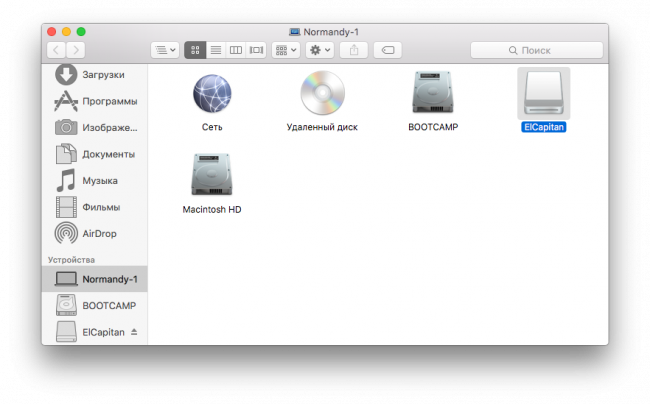
The next step, which can be done at boot time, is the preparation of the drive. For installation, I used a removable flash disk with a capacity of 32 GB, formatted in file system Mac OS Extended (Journaled) and named very simply: ElCapitan. Of course, smaller carriers are also suitable (the minimum required volume is 8 GB).
The second way
The second way is to make the user more comfortable, because there is no need to work with the terminal. You will be informed of the progress in the notification in the upper right corner, and after it is completed, a table will open, from where you can contribute or close it.
Whether you use the first or second method, the procedure remains the same. This completely erases it, so you need to have important data, the backup copies of which are stored on the external drive. Another option is to partition the disk here and install a new system on the second partition. This leaves you data and when new system will be deployed, you can drag it from one partition to another.
But now the fun begins. Go to the "Terminal" program, which is located by default in the "Utilities" folder, and enter the following command, where the name of the media should be taken into account (do not forget that the system will ask for an administrator password that will not be displayed when typing).
sudo / Applications / Install \\ OS \\ X \\ El \\ Capitan.app/Contents/Resources/createinstallmedia -volume / Volumes / ElCapitan -applicationpath / Applications / Install \\ OS \\ X \\ El \\ Capitan.app -nointeraction
After formatting or partitioning the disk utility, close the disk, and then continue with the installation that will help you. Setting for each motherboard is different, so let me say a few things that need to be customized. After inserting, press ⌘ space and enter "disk utility" and start it.
Click Split and select 1 partition. We will sum up what we clicked and give "Continue and install." We will return as the default language to Czech. For information only. Czech is somewhere in the middle of the menu. In the following steps, we must remove and format the target disk on which the system will be installed. Therefore, as soon as we continue to choose the language, select "Tools" and " Disk Utility"In the top panel.

After confirmation, the media will be cleaned and the boot disk from the previously downloaded file (of course, the file itself must be in the "" folder). When the process is completed, the word "Done" appears in the "Terminal" window. Do not forget that the speed of the procedure depends on the characteristics of your drive.
When the operation is completed, we close the utility on the disk. We will jump a bit further, in accordance with the license agreement, which we confirm and go into the window where the installer asks us where to install the system, and we select the disk that we deleted. After installation, the system will reboot.
Check system requirements
We will again confirm the license terms and create your account. We choose the time zone where you can enter "Prague" in the field. But the most important thing is waiting for us. Go to the "Post-installation processes" section. In other cases, the correct partition is selected and formatted automatically. Useful information can also be found in these resources.
Make sure that the memory device is properly formatted
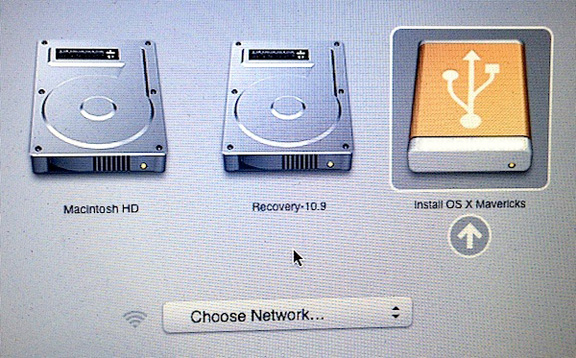
Select the startup disk to start the computer.
Using the Configuration Boot Disk
Internet risks are inherently related.The last action - loading from the received disk - is done by holding the key while turning on the computer. Next, you will be prompted to select a boot volume, where we specify our drive and click, after which the usual installation of the system starts. Of course, if you already have OS X on your Mac, you can start the installer with a simple mouse click. If necessary, it is recommended that you create a backup using Time Machine.
This advanced procedure is designed primarily for system administrators and other users command line. If it automatically opens after the download, close it. . Here is the syntax of the command. We decided to dedicate this topic to the whole article to help you solve this problem. Even less experienced users can do this.
What about the whole process that you need?
You can use this procedure not only for public beta versions, but also for future versions. Before installation, make sure that your portable media is completely empty - there is no data that you want to find. Go to the "Content" folder and then "Resources."
We hope that this advice will save you from long searches on the Web. Successful installation!
Editorial site is not responsible for the safety of user data during the installation or re-installation of the software.
Used materials osxdaily