Which one to choose a monitor for macbook air. Designate yourself the design criteria. It definitely matters. Advanced desktop.
Laptops today for many replaced stationary PCs. With them, you can be as mobile as possible and work anytime and anywhere. Especially when it comes to Macbook Air, which has become a legend, thanks to its "air dimensions" and performance.
How to connect an additional monitor to your MacBook.
The picture literally "cuts off his legs." The cost of a dozen thousand gold for such equipment exceeded the financial capabilities of most computerized citizens of the country on the Vistula River. But now the situation has changed. This is the price that remains in the passion of modern technology. However, before you go your way to the store, it is important to understand that achieving an amazing resolution "in your own backyard" requires several additional conditions.
However, it is only available in the latest equipment. Please note: the information provided is based on the manufacturer's tests. We do not guarantee compatibility in the user environment. External devices can be easily connected using an adapter or adapter cable.
Convenience and mobility are fine, but there are many situations when you need to display information on a classic monitor or several.
For example:
- for a more comfortable viewing of movies and cartoons;
- at presentations and conferences;
- for the simultaneous solution of several problems. For example, tracking information in several tables at once.
Now that it's clear why you need to connect the monitor to the MacBook, it remains to figure out how to do it correctly.
You can use two monitors to display an extended table. You need a video cable. You may need an adapter. In the Video slots section. Make sure that the wires are properly connected, otherwise you will not see the image on the screen. Then click the "Monitor Detection" button.
Show advanced table
You can deploy monitors in any configuration to create an extended table. For example, you can place monitors next to each other to create one large long table.
Displaying a cloned image
Cloning an image shows the entire table on each connected monitor.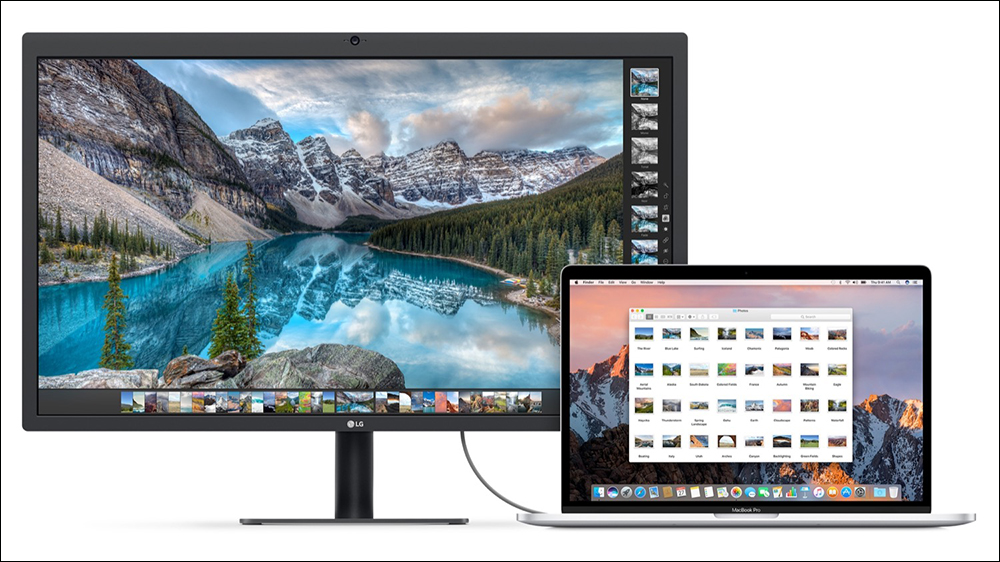
What you need to connect
An adapter is required to connect the monitor. Which one depends on which model of your MacBook. In the latest line of devices have a port Thunderbolt, older Mini DisplayPort, and quite "ancient" Mini-DVI. In a number of models, one can also find an HDMI connector. The second thing to check before selecting the correct adapter or cable is the connector on the monitor to which the connection will be made.
Display on some screens of a cloned screen, and on the other - an extended table
- Set the same resolution on both monitors.
- Click Deployment and select the Clone check box.
Its only drawback, and at the same time its biggest is its screen resolution. The technology is characterized by incredible sharpness and screen resolution, unprecedented in laptops. The notebook is characterized by its weight and dimensions, is also intended for users of the professional segment, which does not prevent its use by "ordinary bakers". An amazing screen, a laptop designed for computer graphics, movie editing, photo processing, as well as for ordinary users, such as people who work with text, works with text editors, is a pleasure in itself.
What is the difference between an adapter and an adapter?
The cable adapter has an extremely simple function, it connects two different configurations of the connector, transmitting signals from one contact to another in a certain scheme. The adapter acts on the signal itself, changing it in the right way.
As a result, you may need:
Adapters:
In this model, we also do not have the opportunity to integrate components, we must first decide which components we want to equip with our model. Although in this case we increase the battery life. If you do not need to "buy" to buy, you should wait for the very fact of having the latest processor. Do not believe the rumors that the graphics card is too slow for such a resolution.
Designed for all types of work, both for the home and for professionals. In model 21. 5 we can not replace the components themselves, so we have to make changes when ordering or choose the right model from the store of this shelf. Model 27 is more powerful, fast and powerful, has a screen with a higher resolution than the younger brother.
- Mini DisplayPort - VGA;
- Mini DisplayPort - DVI.
- Apple HDMI - HDMI;
- Belkin Mini DisplayPort - HDMI.
This set will be enough to connect the MacBook Air to most monitors. Undoubted convenience is that any of them can be bought on the Apple website. If you want to save money, you can buy cheaper analogs in regular online stores, but their quality can be noticeably lower. A common mistake is buying an adapter for DisplayPort, while you need a Mini DisplayPort - watch it closely.
Matrixes burn out. The new ones have even less rear space, but other cooling. I wonder how in 4 years the matrices will behave. Then there was a problem. Many people took this message completely indifferently, others maliciously claimed that this is a good decision, because competition makes the best monitors. Built on a 12-inch picture tube, it offers a 5-diagonal work area. This allowed to work in 24 lines, each of which could contain up to 80 characters.
Technical parameters did not differ much from its predecessor. The user is also given more options for adjusting the image. It was assumed that the monitor, although it is a separate part of the computer, should be so closely associated with the design that it should optically be a single unit or visually necessary in addition to the computer. Let's add a taste that is extremely valuable today. He created and, in my opinion, still creates, perfectly built with the computer to which it was intended.

The MacBook Air, released before 2011, did not support audio over HDMI, so this feature should be provided in the adapter or adapter. If we are talking about connecting the latest displays of Apple Cinema or Thunderbolt, then we will not have to buy anything else, since they already have built-in cables with the necessary connectors, plus it will be possible to recharge the laptop from the monitor via MagSafe.
A few more monitors will let me skip. The image grew, colors appeared, and the monitors matched the computers for which they were intended. The monitors not only had mechanical rotary controls for image adjustment, but they could be adjusted to their settings from the control panels.
This monitor was also an indicator of how reasonable it is to connect an external device - the monitor - to the computer. As its name suggests, this allowed simultaneously displaying two pages of folded text in A4 format. Undoubtedly, it was a specialized monitor, and special treatment was required. To achieve optimal working conditions, it was necessary to warm up for about 20 minutes.

Modes of operation
It's not enough simply to connect the monitor to your MacBook Air laptop, you need to select the correct mode of operation for it.
There are only three options:
- video replay of monitors;
- extended desktop;
- closed cover mode (system unit).
This mode is most in demand. Its essence is extremely simple. The monitor completely duplicates the image from the MacBook display. This is the same option that is needed for presentations and working with the projector. The limitation is that the resolution of the connected screen can not be greater than that of the MacBook.
This monitor was unusual because it was vertical. Relax in your stylistic assumptions. Monitors to the joy of users have definitely grown, and the base model has a diagonal of 16 inches, while the more advanced screen is 21.
New monitors were already set up from the operating system that recognized the monitor connected to the computer itself and was able to select the optimal computer resolution for the monitor connected to it. When the user changed the monitor, he had to change the cycle.
Over time, there are pins with suitable switching pins and even with automatic guides. Integration was a sad price, when we did not make a decision on it. These functions, although ultimately well-developed, have never been recognized in the eyes of users and have been used by the way. Ray Rilli led a team of designers. Use the monitor body as a small volume compartment to pull the back of the monitor.
Is there not enough screen space for the laptop to accommodate all the necessary tabs? The problem can be very easily solved if you expand it by connecting an external monitor. With the activated desktop mode, you can work on two monitors at the same time. In this case, the settings are set to the main screen on which the menu bar will be located.
Many of the problems were to lay out many of the buttons so that they were easily accessible to the user, and at the same time they would not work with the monitor malfunction. It was also important to isolate the built-in microphone from the speakers inside the monitor. In order for the microphone to finally reach the top of the monitor, it was not disturbed by the operation of the loudspeaker, special baffles and speakers developed for this project by Dave Lundgren and Oxford Villa were used.
The disadvantage of this solution was a large number of cables connecting the computer with the monitor. The next few models are different monitors designed for home and professional users without taking a big step forward. It was a program that, based on a monitor model connected to a computer, chose a previously defined color calibration.
Note. For OS X Mavericks and later, the menu bar will be displayed on both screens.
Now the additional monitor will be the continuation of the main monitor and you can simply drag the objects between them with the mouse. In any of the options for selecting the main monitor for entering information, you can use the trackpad or laptop keyboard.
This monitor not only changes the size of the inside of the cathode tube - from 14 to 17 inches. Each change in the size of the monitor caused the work to be re-initiated.
- A basket with speakers and buttons A panel with a front panel with a microphone.
- Housing for the camera, electronics and ventilation system and low-noise systems.
Advanced Mode Configuration
Sequencing:
- connect an additional monitor;
- select the system settings in the menu;
- go to the "Monitors" section;
- select the "Location" tab.
- the item "Enable video replay of monitors" should be turned off (the checkbox is absent).
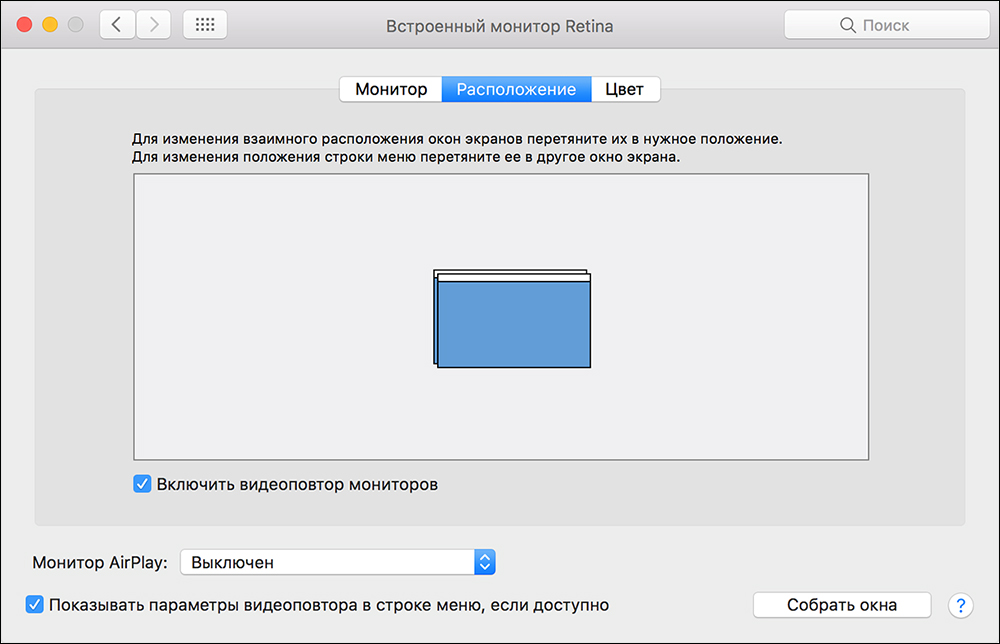
How to set display locations
In order to work on two screens was as comfortable as possible, you need to adjust their relative position, so that the windows between them move or vertically, or horizontally to one side. It is not difficult to do this. On the "location" tab, you can see the schematic arrangement in the form of blue rectangles, and their size will be proportional to the resolution. Dragging the rectangles with the mouse, you can set the desired location.
Thus, it was decided to use universal combinations of these three elements, so that subsequent changes do not cause all the interference in the elements, but only in the cathode-ray tube. Thanks to the telescopic support it was possible to adjust its height, as well as the horizontal deflection angle of the display.
The display also had the ability to adjust the vertical angles. Their appearance was very different from the appearance of most monitors available at that time. Unfortunately, it was a dark side, because these monitors had rather slightly adjustable corners. Why two, so how can there be one?
System unit
On a stationary workstation in the office or at home, you can use the MacBook Air as the system drive of a regular PC. To activate the mode, it is enough to put the MacBook into sleep mode and close its cover.
Since access to the keyboard, obviously, will not, then, in addition to an additional monitor, you will have to purchase a mouse and an external keyboard. It is recommended to connect the charger so that the battery does not discharge at the most inopportune moment. OS X in the default settings does not support the output from sleep on commands from devices via Bluetooth. Therefore, you need to activate this option in advance.
It is then the function of turning on the monitor automatically turns on the computer or vice versa. Plastic and transparent oblivion, there is aluminum. On the right edge of the monitor is a very bad panel, which provides the ability to brighten or reduce the monitor and its switch. A nice touch is that the buttons on the monitor are touch buttons. These parameters make this monitor ideal for today, as well as for purely entertainment tasks.
However, changes in new monitors are not just a visual modification. Graphics found that at this price you can buy more specialized monitors, while for home or office users the price was too high. And let me return to the key issue with which this record began. Initially, it was the integration of the appearance with which it later joined the integration with the computer system software, and finally the hardware integration that enriched the monitor in a number of very useful ports, integration at a really high level.

Can I connect a TV
Yes. In order to quickly connect a modern high-definition TV or Apple TV, add a status menu and assign the device to be connected as the primary device. The selection menu will appear when connected, for this, in the settings, check the "Show video replay parameters in the menu bar, if available". After that, you can watch your favorite movies and any video from the MacBook on the big screen.
Today we can say that she did not leave. Curiosity. The early macs of the "refrigerator" are often enough for simple graphics, if not for a small monitor.
However, changes in new monitors are not just a visual modification. Graphics found that at this price you can buy more specialized monitors, while for home or office users the price was too high. And let me return to the key issue with which this record began. Initially, it was the integration of the appearance with which it later joined the integration with the computer system software, and finally the hardware integration that enriched the monitor in a number of very useful ports, integration at a really high level.
How to connect 2 monitors to a Macbook Air
If one additional monitor is not enough for you and you need to connect two to the MacBook, then there will not be any problems with new models that have a Thunderbolt and an HDMI port. In some MacBooks, Air immediately 2 Thunderbolt, so theoretically you can connect to it not 2, but immediately 3 additional monitors, although the performance will fall much, which will be very noticeable when you start different videos on each. For older models, you will have to come up with "collective farm" solutions, and if you can connect two monitors, then in the video replay mode, not the desktop extension.
What they say in Apple
There are several official documents relating to connecting external monitors to the latest models of the MakBook Pro line. They are talking about connecting to the USB Type-C connector of monitors with a resolution of 4K and 5K. So, the 15-inch MacBook Pro can work with two additional 5K monitors or at once with four with a resolution of 4K. But for 13-inch models, the number is 2 times smaller. And also in the company confirmed support for the Dell UP2715K monitor with a resolution of 5K and a diagonal of 27 inches.
Conclusion
Many users do not even suspect how convenient it is to work on multiple monitors at once, since they have never tried it. Meanwhile, the effectiveness of work, when on one monitor the primary, active tasks are deduced, and on the other, all the secondary ones - chats, monitoring, etc., are several times higher. Especially if you use programs such as Mission Control that make managing applications on different screens even more convenient.
Learn how to connect an additional monitor to the MacBook Air, using our tips, and enjoy the result. If you have any questions or technical problems, write about it in the comments and we will help to solve them.
Today's note will be devoted to the owners of "apple" leptopov - that is, the owners of MacBook, MacBook Air or MacBook Pro. Perhaps this information will be relevant for earlier models, such as iBook G3 and G4, as well as PowerBook G3 and G4, but, frankly, did not check. Surely you already noticed on the butt of your favorite video output: in the early models it was VGA, then it was replaced by DVI or Mini DVI, then he was replaced Mini DisplayPort and in the newest models it is a universal high-speed port Thunderbolt. Many know that through these ports you can connect an external monitor or LCD-panel, and many have already successfully used it. But not many are aware of all the additional conveniences that can be gleaned from such a pair. In this note, questions will be asked that once puzzled me, and brief answers were given to them.
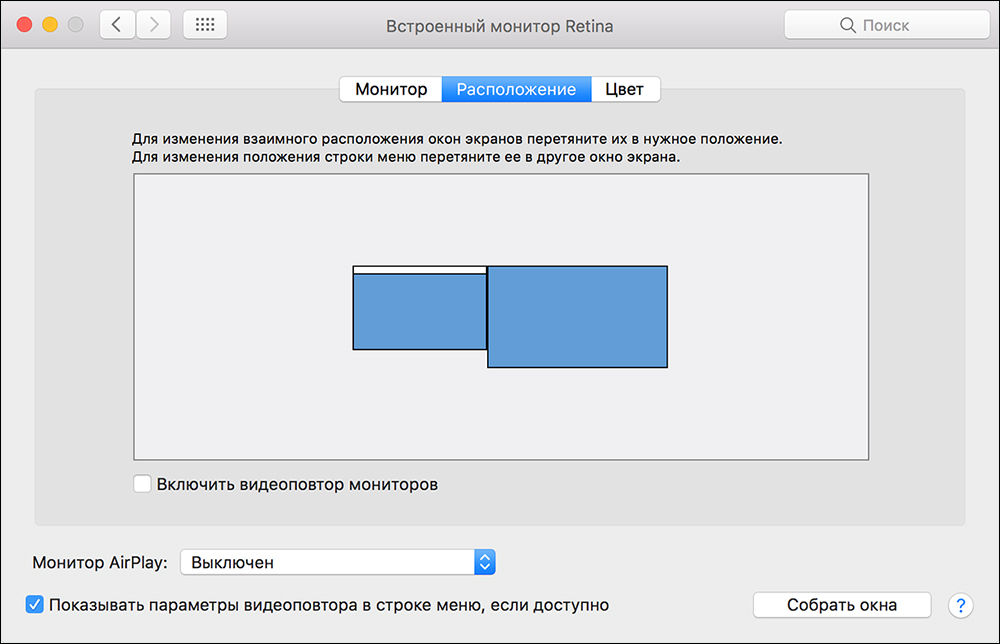
How to change the location of an external monitor connected to a MacBook, MacBook Air or MacBook Pro relative to the main one in Mac OS X?
By default, the connected external monitor becomes the "continuation" of the desktop on the right side: pull the cursor to the very edge and it continues its movement on the external monitor. Everything is cool if the laptop is to the left of the monitor. In this case, everything is intuitive and convenient. But what if the location is non-standard? We go in System settings > Monitors > Location:, "Grab" an external monitor (I have it surrounded by a red frame) and "pull" it into a convenient place.
If you place one monitor higher or lower than the other, the menu bar will be on the top monitor, and the Dock on the bottom monitor is for one large space. To see how it will look live click on the image with the settings. 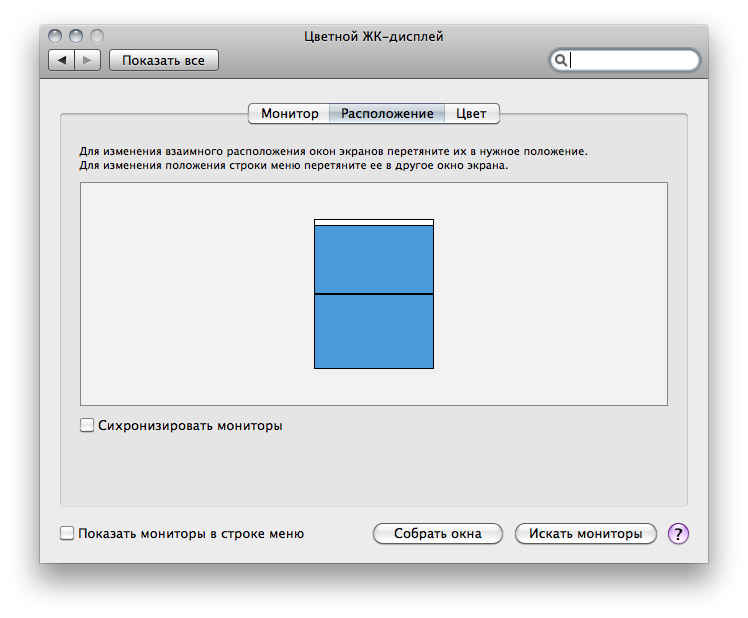
How to make an external monitor in Mac OS X basic?
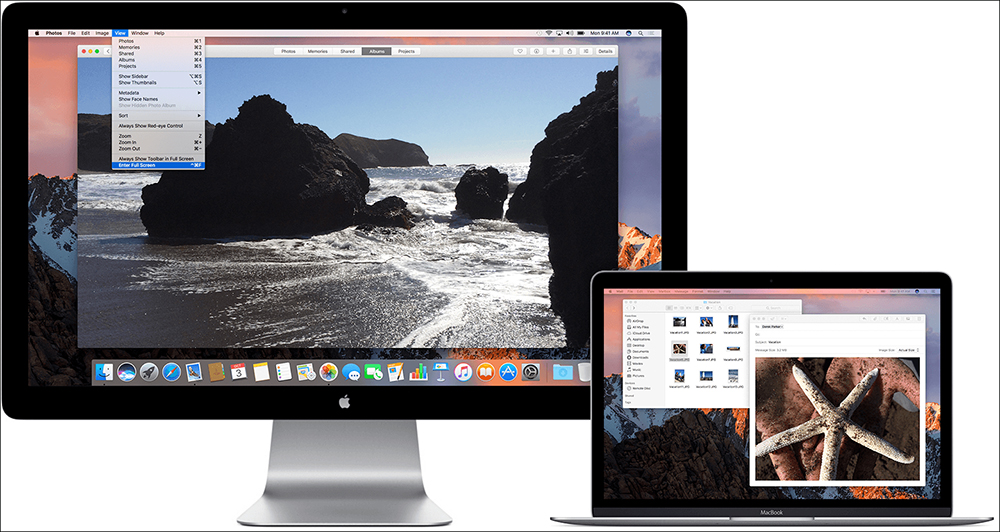
An additional monitor is convenient to use if the display resolution of the laptop = the resolution of the external monitor being connected. But usually connect a monitor, whose resolution is much greater than the resolution of the built-in leptop matrix. Because of this, in fact, external monitors and use. I have a practice of such use: 15 "MacBook Pro with 23" external monitor. In such a bundle, it's not very convenient to use: the constant dragging of working windows from the laptop to an external monitor (and the windows of running programs open by default on the monitor of the laptop) are particularly tiring, moreover, during work, when "switching" from an external monitor to " laptop "once-through-time stuck with the mouse cursor in one of the corners (marked green in the screenshot). All this after a while begins to irritate. And then there was another solution - the appointment of an external monitor main. In order to assign an external monitor, we take a white strip - this is a schematic menu bar, and drag it to an external monitor.
 In this mode it is very convenient to work: on a smaller screen we move informative windows that do not need to be accessed often, for example, the Twitter client window, Jabber contacts, Skype or ICQ, and on the big screen we work in Photoshop, surf the Internet or make up another website .
There is one more way, but this is more to people who have suffered a bad luck in the form of damage to the matrix on the laptop. The external monitor can be used simply as the main monitor, and the MacBook, MacBook Air or MacBook Pro will act as a system unit. To do this, you need an external keyboard, mouse or Magic Trackpad (no difference in USB or Bluetooth). Add to the laptop an external keyboard, mouse or trackpad and, if necessary, make their initial setting. Close the lid of the laptop and wait until it goes into sleep mode (the white indicator should slowly "pulsate"). After the laptop "sleeps" with a keyboard, mouse or trackpad "wake up" it. When the system "wakes up" the built-in monitor will be disconnected, and the external one will be perceived by the system as the primary and the only one. To avoid overheating, the cover can be opened slightly.
How can I synchronize an image on a laptop and an external monitor (projector) in Mac OS X?
There are situations when it is necessary to display the same image on the external monitor or LCD panel as on the laptop. The simplest example is a presentation or lesson, during which you need to demonstrate the actions performed in the system or program. In this case, we connect an external monitor, an LCD panel or a projector to the laptop, which is also perceived as a monitor, we go in System settings > Monitors > Location: and at the bottom activate the checkbox Synchronize monitors.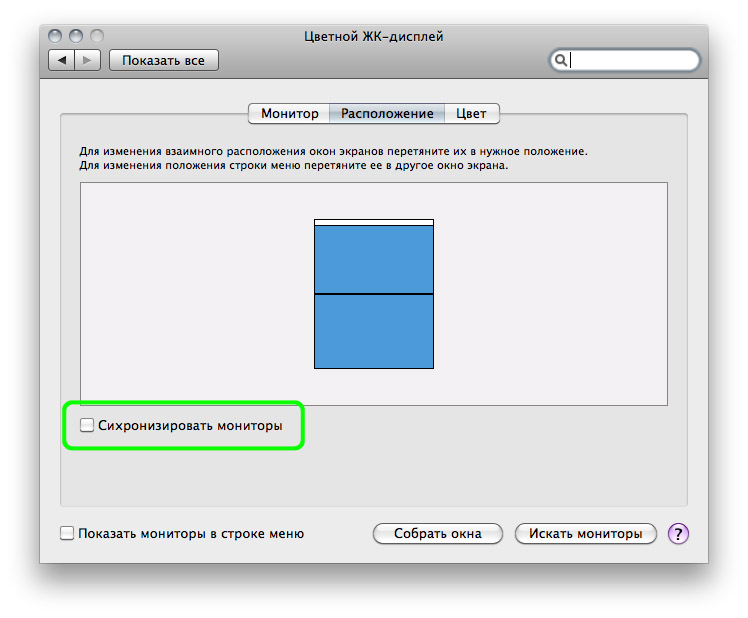 When using the "Synchronization" mode, one thing should be considered: when synchronizing, the image on a large monitor or plasma can be blurred because the relatively small resolution of the built-in display simply "stretches" to a large screen.