Can I make a hard drive a hard drive. How to make a flash drive a local disk.
I have long wanted to write this article, I think it will be very interesting to you. I received such a question from a friend how to make a hard drive out of a USB flash drive. So, we will disassemble two options: changing the flash drive on 64-bit Windows and 86-bit.
If you decide to use programs like Acronis Disk Director or others to view the flash drive, then you will not see it, because there is a so-called descriptor Removable Media Bit (RMB), which is in any USB flash drive and makes Windows detect such drives as removable, and not as a local drive. In order to fix this, we just need to delete this descriptor.
Why did I say that there will be two options? Because on systems of different digits this operation will be carried out in different ways. To do this will be quite simple, so let's start.
How to make a flash drive a hard disk on Windows x86?
To do this work, we need to download a special driver Hitachi Microdrive. You can download from here.
Now we know the code of the device instance. In this case, we need to go to the device manager, go to the tab disk devices. Search for your flash drive and right-click on it. In the window that opens, go to the tab "Intelligence", and choose a drop-down list "Device instance path". In field "Value" select the entire line and copy.
Let's move on to the driver. Unzip it to start anywhere, and then use any notepad to open the file. Find there an item and in the very last line, starting with the word USBSTOR replace everything with what we copied in the device manager. Here's how it works out:

At the end of the line, after REV_ХХХ, you need to remove a small tail:

After all done save the file.
Now once again go to the device manager and again open the properties of our flash drive. Let's go to the tab "Driver" and there we press the button «Refresh».

In Windows 7
Then we need to choose "Search for drivers on this computer" and choose exactly the file cfadisk.inf, which we have changed.
In Windows XP
In this OS we choose "Installation from a specified location", later "Do not search" and "Installation from disk". Again, select the cfadisk.inf file as the driver.
After that, your flash drive should be defined by the system, like a hard drive.
| INTERESTING: |
How to make a USB flash drive on Windows x64?
So, in this case, we are downloading this archive.
Now go to Device Manager, open the properties of our flash drive and go to the tab "Intelligence". There, from the drop-down list you need to select "Equipment ID". In the "Value" field you will need to copy all the lines except USBSTOR \\ GenDisk and GenDisk.

The file F2Dx1.inf, which we downloaded, is opened with a regular notepad. In general, it is desirable to use Notepad ++. After opening the file, we find the item in which we delete the first 5 lines, and then just replace them with what was copied. The main thing is that each line starts with the phrase: % attach_drv% = f2d_install.

Next, we must go back to the properties of the flash drive and in the driver tab click on the button «Refresh». Here we do everything the same as in the first version, just as a driver we select the file F2Dx1.inf.
In addition, I want to say that the flash drive will be determined by the hard drive only on the system in which you performed this operation, because, we just changed the driver in a Windows environment. If you insert a USB flash drive into another computer, then it will be detected as a flash drive. That's all.
http: //site/wp-content/uploads/2016/05/drive.jpghttp: //site/wp-content/uploads/2016/05/drive-150x150.jpg 2016-05-02T12: 18: 50 + 00: 00 EvilSin225Windows how to make a flash drive a hard drive, make a hard drive from a USB flash drive, a flash drive as a hard driveMany users could pay attention that any programmer coming to repair problems associated with the system, has with him. This trick is very useful, because with any problem with the system or hard drive, the user can always restore access to the computer and understand what the problem with the computer is. In this case, not everyone wants to have a system in a computer, where it's easier to carry a small system disk with additional files. Therefore, any person should know how to make a hard disk from a flash drive.
But how to turn a USB flash drive into a hard drive? It would seem that such a process should be difficult and resource-intensive, but in reality everything is simple enough, while the amount and "age" of the flash drive does not matter. The main condition for a flash drive is for it to work properly. Also for this role not only USB flash drive, but also SD-card, the process of changing properties is identical.
It is worthwhile to know that multi-partitioning should not be applied to such external media, since many operating systems support only the first partition in disks that are not HDD-type. HDD - a non-removable media that is installed in the computer. You can remove them, but it takes a lot of time and effort, so people use cards and external drives to facilitate the entire process of transferring information or the operating system right along.
First, you need to make sure that Windows identifies the USB stick as a non-removable device. In this case, any flash-card has the inverse parameter, then you need to start the changes. Some absolutely do not think about the safety of their equipment, so they just modify the flash drive. But this method is dangerous because many flash drives simply can not change under the chosen parameter, because of what they will break and they will have to be carried to the service center. It is much easier and safer to replace the response from the device with the required result. A special driver is installed for this purpose. Flash drive instead of a hard disk on Windows 7 will work as well as with any other operating system.
Before the flash drive is made a hard drive, the device must be connected to the computer, and then determine the type of flash drive.
First option
Open the Media Management Manager. You can find it using the "Run" button, here "diskmgmt.msc" is entered and "Enter" is pressed. Now you can see what type of drive has a removable or non-removable storage.
![]()
The second option
You can also see the type of device by opening the Volumes tab in the properties of the flash drive.
The third option
You can also type the diskpart command.

So, now the user knows whether the flash drive is a removable or non-removable device in this case.
Second step
If the device is defined as "non-removable", then it can already be used as a hard disk. Otherwise, before using a USB flash drive instead of a hard disk, its type needs to be changed to "fixed". For this purpose, a special filter driver is used, which will easily change the incoming information, changing it to the required one. One of the most common and simple filters is the Hitachi Microdrive driver. Thus, the user does not intrude into the microclimate of the flash drive, while simply deceiving his system, giving her a false answer.
After the carrier becomes ineffective, the computer will consider it a full-fledged hard disk, which can be divided into sections, each of them will function simultaneously. The main thing at this point is to download a program that matches the bit depth to your operating system.
The third stage
After the user was able to deceive the computer, it is possible to identify the device code. You can find the code in the "Details", "Device Instance Path" tab.
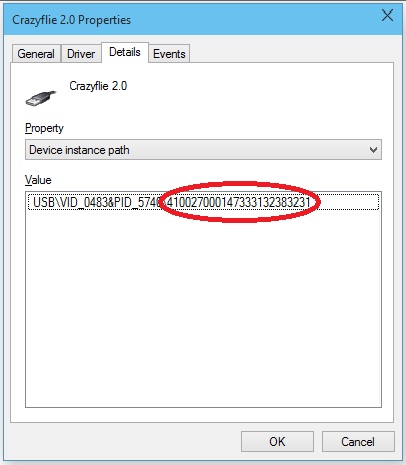
As a result, it is necessary to copy the information, with it further will perform some manipulation in the program Hitachi Microdrive. When copying, you need to remove all the information after the second "\\".
On a 64 bit system
Now we need to find the cfadisk file in the Hitachi Microdrive folder, where we find the cfadisk_device and cfadisk_device.NTamd64 sections.
In sections instead of the information after "\\" we insert the code of our device.
On a 32 bit system
The process is similar, only in the file for the 32-bit version you need to find the "cfadisk_device" section.
Here it is necessary to replace "DISK & VEN_ & PROD_USB_DISK_2.0 & REV_P" with the device code.
If you want to set your own name for the device, you need to replace "Microdrive_devdesc" with the desired name, say "USB_hard".
Fourth stage
The last step is to replace the drivers. On 64-bit operating systems, before this action, you must disable the digital signature verification driver so that it does not update itself due to third-party intervention.
You need to open the "Drivers" tab =\u003e "Update Drivers". Next is the folder with the Hitachi Microdrive driver. This driver is selected, it remains to skip the message about the lack of a digital signature, then restart the computer, and see the result of the work. The drive has become immobile.
The driver is deleted by clicking the "Update drivers" button.
That's how easy it is to make a hard disk from a flash drive. This procedure can be carried out by any person, if you follow the instructions, while the computer can not be damaged at all, just like the storage system. If you use a high-quality, high-capacity external drive with good performance, then it does not even matter if you can use a flash drive instead of a hard disk. In this case, it will cope with the task no worse than hard drives.
In this article, we show how to make USB flash drive or SD card was detected in the system as a regular local hard drive. You, probably, ask, and what for it is necessary? The fact is that Windows by default defines all flash drives and memory cards as removable drives, which can not be divided into several sections by Wndows standards. And even if the flash drive is divided into two or more partitions with the help of third-party utilities (in the same Linux), only the first one will be available in the Windows family. Those. Windows supports normal work with multi-partitions only for HDD disks, which in the system are defined as local (ie, non-removable).
Information. Windows recognizes USB flash drives as removable devices due to the presence on each device of a special bit descriptor RMB (removable media bit). If, when polling a connected device through the StorageDeviceProperty function, the system determines that RMB = 1, it concludes that the connected device is a removable drive. Thus, in order to convert the USB-fluke to the hard disk from the system's point of view, it is enough to modify this descriptor. This can be done directly (which is rather risky because of differences in hardware implementations of specific devices, and it is not always possible), or indirectly, by replacing the response of the USB device with a special driver that allows you to filter out information in the device response.
Connect to any available port of the computer USB flash drive, then open the disk management manager ( diskmgmt.msc) and make sure that its type is defined in the system as Removable.
You can also see the type of the device on the Volumes tab in the properties of the disk (as we see here Type: Removable). 
Or with the diskpart command:
List volume
![]()
Filter driver for flash drives Hitachi Microdrive
In order for a USB flash drive or SD card to be recognized as a hard disk in the system, we need a special filter driver that allows us to modify the data transmitted through the system stack of the device's current driver. We will use the filter driver for USB flash drives from Hitachi ( driver Hitachi Microdrive), which at the level of the OS driver allows you to change the type of device flash drive from removable to fixed (USB-ZIP -\u003e USB-HDD). By using this driver, you can hide from the system that the connected device is removable. As a result, the system will assume that it is working with a regular hard disk that can be broken down into partitions that are simultaneously available in the system.
Archives with the Hitachi Microdrive driver:
- 32 bit systems - (3.0 KB)
- version of Hitachi Microdrive for 64 bit systems - (3,8 KB)
It is necessary to download the driver version for your system according to its capacity. Both archives have the same structure and consist of two files:
- cfadisk.inf- installation file, with the driver settings
- cfadisk.sys - Hitachi driver file
The next step is to identify the device code of our flash drive. To do this, in the properties of the drive on the tab Detailsin the parameter Device Instance Path select and copy ( Ctrl + C) instance code of the device. 
In our example, this will be:
USBSTOR \\ Disk & Ven_Linux & Prod_File-CD_Gadget & Rev_0000 \\ 0123456789ABCDEF & 0
Suppose we plan to install the driver on 64 bit system. Using any test editor, open the file for editing cfadisk.inf. We are interested in the sections cfadisk_device and cfadisk_device.NTamd64.
% Microdrive_devdesc% = cfadisk_install, IDE \\ DiskTS64GCF400 ______________________________ 20101008% Microdrive_devdesc% = cfadisk_install, IDE \\ DiskTS64GCF400 ______________________________ 20101008
We change the value of DiskTS64GCF400______________________________20101008 to the code of our device.
Important! In the device instance code, you must discard the part after the second "\\" (in our example, flip 0123456789ABCDEF & 0).
We get:
% Microdrive_devdesc% = cfadisk_install, IDE \\ USBSTOR \\ Disk & Ven_Linux & Prod_File-CD_Gadget & Rev_0000% Microdrive_devdesc% = cfadisk_install, IDE \\ USBSTOR \\ Disk & Ven_Linux & Prod_File-CD_Gadget & Rev_0000
Save the file.
If the driver is installed on a 32-bit system, you need to download the advisory archive, unpack it and open the cfadisk.inf file for editing. Find the section :
% Microdrive_devdesc% = cfadisk_install, USBSTOR \\ Disk & Ven_LEXAR & Prod_JD_LIGHTNING_II & Rev_1100% Microdrive_devdesc% = cfadisk_install, USBSTOR \\ Disk & Ven_JetFlash & Prod_TS1GJF110 & Rev_0.00% Microdrive_devdesc% = cfadisk_install, USBSTOR \\ DISK & VEN_ & PROD_USB_DISK_2.0 & REV_P
Then we change the data in the last line, specifying the code of the instance of our flash drive, i.e. in our example, we get:
% Microdrive_devdesc% = cfadisk_install, USBSTOR \\ Disk & Ven_LEXAR & Prod_JD_LIGHTNING_II & Rev_1100% Microdrive_devdesc% = cfadisk_install, USBSTOR \\ Disk & Ven_JetFlash & Prod_TS1GJF110 & Rev_0.00% Microdrive_devdesc% = cfadisk_install, USBSTOR \\ Disk & Ven_Linux & Prod_File-CD_Gadget & Rev_0000
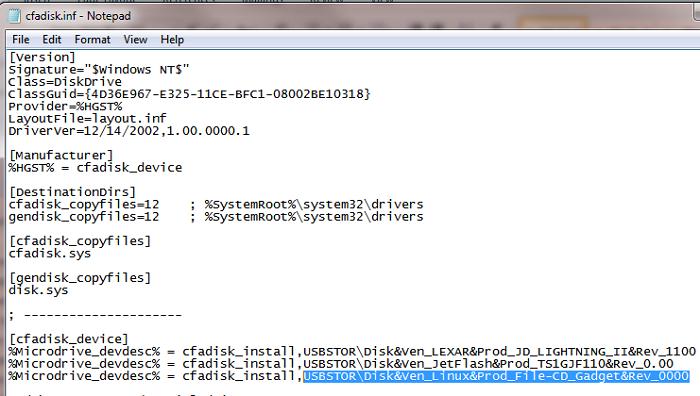
Tip. If you want the USB flash drive in the device manager to be displayed with a specific name, you need to edit the value of the Microdrive_devdesc variable, for example:
Microdrive_devdesc = "Transcend 64GB DIY SSD"
Installing the Hitachi Microdrive driver instead of the native USB drive driver
It remains to replace the driver used by USB flash drive.
Important! If the USB driver of Hitachi Microdrive is installed on a 64-bit system, there is no digital signature for this driver, either.
Open the Drivers tab and click the button. Update Drivers. 
We will point the folder to the directory in which the downloaded archive with the Hitachi driver is unpacked: 
Let's choose a new driver. 
Ignore a warning about the missing digital signature driver. 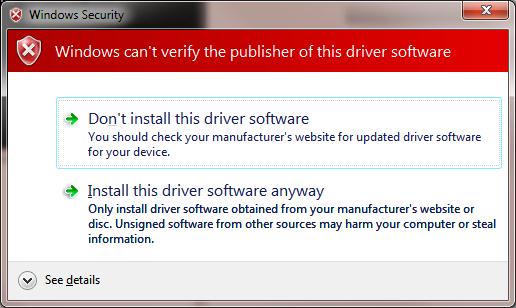
It remains to reboot the computer and, having opened the disk manager, make sure that our USB flash drive was defined as a regular hard disk ( Type: Basic), and the driver is a Hitachi driver.

Opening the explorer, you can also make sure that the icon of the flash drive has changed, it began to appear as a hard disk of a normal disk. 
Now with this flash drive you can work as with a normal HDD: create partitions, specify an active partition, create dynamic disks, install software that does not work with flash drives, etc.
Important. On other Windows computers without this driver, the second device partition will not be available.
To remove the Hitachi Microdrive driver, open the properties of the disk and click the Update Driver button on the driver tab - the system will install the native driver.

Have you purchased a new, fast solid state drive (SSD), and the old one is idle? Give it a new task and use it as an external data drive. To do this, you only need a case with a SATA controller; it is available for both 2.5-inch and 3.5-inch models. For the latter, a power supply unit is required, while compact drives have enough power supply via the USB port.
Labor intensity: average, costs: 600 rubles.
2 Mini-NAS on the router
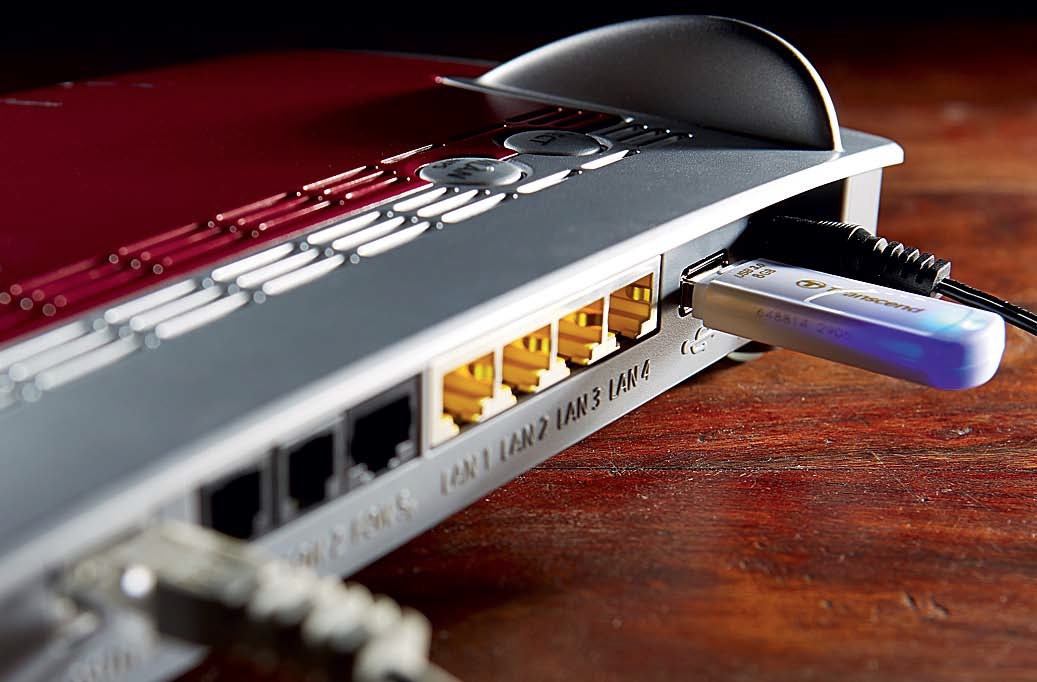
Does the entire home network need access to the same data? To do this, you do not need expensive and bulky networked storage (NAS) - this task can be performed by USB-drive, if it is connected to your router. Newer devices are equipped with the appropriate port.
First, you need to format the USB drive from under Windows OS in the NTFS file system and then just connect it to the router. In this case, the latter should have a USB port and it should support the corresponding functionality. Now, by typing address 192.168.1.1 (or similar) in the address bar of the browser, you will enter the user interface of the router.
Click the "USB Settings | Sharing a storage device "(for TP-Link routers, for other devices, the name of the menu items may differ) and make sure that the disk started.
To access data in the home network, it will be sufficient to type the address of the form "\\\\ 192.168.1.1 \\ Volume1" in Windows Explorer. Permanent connection is achieved by right-clicking on the folder to which you plan to allow access, and by selecting "Connect network drive".
Labor intensity: small, costs: no
3 Flash drive instead of password
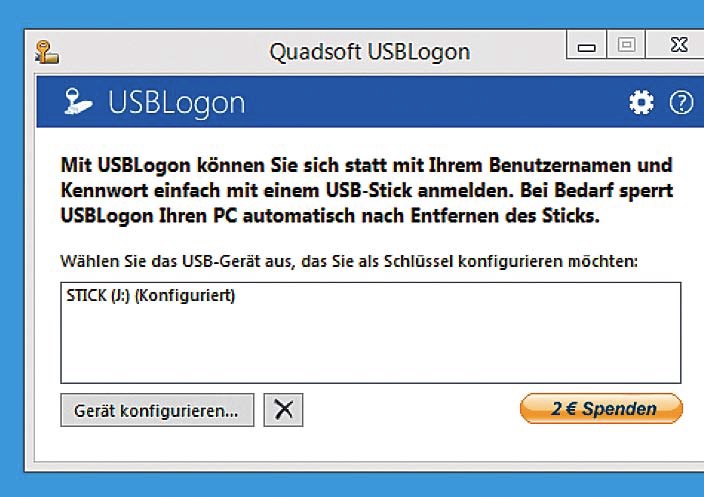
For a small USB flash drive, there is also practical use. For example, when you log on to Windows, you can unlock your computer without entering a password. To do this, you need a Rohos Logon Key tool (1450 rubles), Predator (650 rubles) or a free USBLogon ( If the computer no longer works as it should, the boot USB flash drive comes to the rescue. The Sardu tool (http://www.sarducd.it/) installs up to 20 different antivirus programs on the drive, and also provides various versions of Linux and other first aid software. > Preparation: In the left sidebar, the selected software is listed by category. Mark the necessary programs with check marks. We recommend selecting several antiviruses and a Linux version (for example, Ubuntu). > Creating a flash drive: On the right sidebar, click on the symbol with the USB drive. You can start creating a bootable flash drive. > Application in an emergency: to use the boot drive in the event of an "accident" you need to change the boot sequence from the drives in the BIOS Setup. A photo: manufacturer companies, racum / Flickr.com In this case, you must set the boot priority from USB to HDD. Then select the necessary program from the list. Do not forget to undo the changes in the BIOS after "repairing" the computer.
*** Guys, everyone is here! About flash USB = HDD and SD card = HDD + install on them System (XP, W7x64, Server, etc.) I'll try to help. ESTRST - I just wanted to say the main thing, but it turns out a lot of important and detailed information and you can not see the end and the edge! How can it be ???, with the author of the article \\ the site can somehow be contacted and put together the necessary links and recommendations throughout this kitchen (and it is not very simple, although if you do not rush, errors will be minimal.) Maybe the author will read and with me somehow get in touch?
*** I read this site in awe (!!!), so much sensible here writes a heady person!
Sorry I do not know (or until I found out what his name is), save him and bow to the ground!
—————————————-
*** But I still say something:
I after the awesome zamorochek everything is put and everything works on flash-SD cards. It is divided everywhere into 2 sections C and D. On the C system, on the D data.
*** Important moment-1: set Extended Write Filter
from Microsift (EWF) both for systems 32x, and for W7x64. With W7x64 EWF to find it was necessary to sweat a week - but everything can be found in the Internet (and at the very Microsofte). It's funny, but for W7x64 for EWF you need only 2 files of less than 150 kb (!), These 2 files are in the package Embedded Standart7 x64, but to find it, x64 oh how not easy - small for some reason somewhere it was hidden to download. Again, a kind person, these 2-a file laid out in the Internet + detailed instructions from him how to use them. Do not despair if this is on EN, I translated + I also looked in the Internet, I did it. Do not be afraid of operations through DiskPart - in fact, everything is not as difficult as it might seem in the first reading.
*** Important point-2: Installed Primo RamDisk (Ultimate Edition is v5.5, not v5.6) because the driver for x64 systems is in version 5.5 (for some reason, from distribution in known places then the second driver for x64 disappeared, but I managed to download it). And such a joke: although this file is registered as 'x64', it also works on x32 systems. The file that is registered as x32, native, in a month or two will not work, flies. All the guys write about this in the comments in Primo RamDisk. And I also flew off - rescued the second x64 file that I had, but I guess to use it for x32 systems the dude helped out of the comments, that's modchin - thanks to him!
*** What are the important points №1 and №2:
= # 1 = EWF so that nothing is written on the flush or card on the C drive, everything will work in RAM, and if necessary, your command will be written to disk-C. The resource of a flash card is saved. The speed is noticeably increasing, because in spite of the disc-torsion to which we are accustomed, there will be a disk-virtual in memory. And there the speed of the oh-th-go!
= # 2 = Primo RamDisk in order to make additional RAM disks (the same in memory) where I
transferred everything from the C: paging file (Pagefile), Temporary Internet files, Cookies.
On a separate RAM-disk put the program-Portable, such as Opera, Chrome. RerOrganizer, TuneUp Utilities, Aida64, etc. By storing this RAM disk with data when the computer is turned off, it is saved to the Image file, and when loaded from the Image file it is read and loaded. The time spent on this is not much, almost not noticeable on a modern computer (I have a Dell-XPS i7 laptop on board + 16gb of memory, balshe does not know how to, bang!)
—————————————-
A lot of months on this issue, I've been scouring in the Internet - everything was making pieces, as you can see, which I wish you all.
—————————————-
*** In brief about the driver-Hitachi I'll say this:
= 1 = With the SD card do everything the same as with a USB flash drive to be like an HDD. Putting the System on a flash or a card is not a simple matter (!). Immediately get ready for patience, the OS is set very slowly, the clock lasts for hours. Then installing the right drivers will also take many hours.
Systems need to be taken only sharpened for USB-HDD, there are such assemblies from the masters: AlexUSB, Lopatkin, Xalex-Zhuk, guys from the project 'Kolhoz', etc. Googlite in the Internet, you will find.
The Hitachi driver for W7x64 is (!!!) + works fine. Found it, like, from the comments on
Flashboot.ru about Hitachi driver. Looked there all the sections that can help in the search for the driver x64, and that's all the same naryl - dude said about him and gave me a reference (oh, thanks to him!)
Tip: The last time I did so. Installed the system (I'm talking only about the OS for USB-HDD) on SSD, and then through the image of Acronis-a rolled into a flash. Do not forget, you need to watch the USB flash drive - read it in the Internet, everything is written about it (but do not fuss, and you will succeed in everything). Of course, you can not do without shoals, immediately warn you, do not despair.
= 2 = After installing the SD card, insert the SD card into an optional external card reader (preferably USB3, it is more expensive than USB2 for a little bit, but it works more quickly and correctly to the USB3 reader, I do not go into details about what is "right" on the word, and connected to USB2 and USB 3. Beautifully-from the Transcend TS-RDF5K USB3 as a flash drive in the form, from the side slots for 2 types of cards: one is large, the other is small.This time in this case (!) 2- and the slot DOES NOT WORK .Worth ~ 240 r in Moscow in XCom-Shop).
—————————————-
*** All the guys - I was sweating ... I never wrote so much, but then I read your troubles-failures and I got stuck all this. I know all these shoals and through them I had to break through. So I want to help you somehow - I also helped people, even master whales assembled me personally on forums!
If I do not forget - I will dive to this site, see how the people and the author reacted, I can learn and I will be able to upload many files and instructions for downloading myself (I do not know how to do it, damn it - but who can ask how this is done).
*** I hug = good luck !!!


