As in Photoshop, cut the image to fit. How to crop a photo in Photoshop cs5.
Instructions
Reduce the "canvas size" as one of the options for cropping the edges of the image. The meaning of this method is to narrow the frame of the image - everything that remains outside the frame will be cut off when the picture is later saved to a file. First, in the open document, create a duplicate of the main layer by pressing the CTRL + J key combination. The duplicate will be needed if Photoshop does not allow changing the main (background) layer, and you will need to adjust the position of the picture relative to the narrowed canvas frame.
Open the menu "Image" and select the "Canvas size" line. This action corresponds to pressing the ALT + CTRL + C keyboard shortcut. This command opens a window in which you need to set new width and height values of the picture.
Change the numbers in the fields "Width" and "Height" and press the "OK" button. The editor will warn you that the new dimensions are smaller than the previous ones - click "Continue", and the visible area of the image will be reduced in accordance with the sizes you specify.
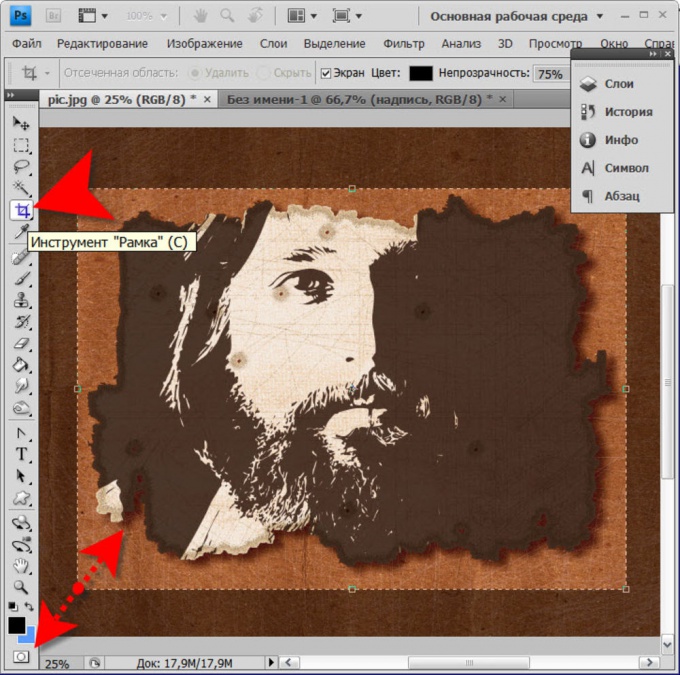
Another way to crop the unwanted in the picture is to use the "Frame" tool. To enable it, press the C key or click the corresponding icon on the toolbar.
Hover the cursor to the upper left corner of the area of the image that should remain after the cropping. Press the left mouse button and, without releasing it, move the cursor to the bottom right of this area. So you select a rectangle, on each side of which there will be three nodes.
Drag the node points to adjust the cropping borders more precisely, and when done, press the Enter key and the editor will remove everything that remains outside the selected border.
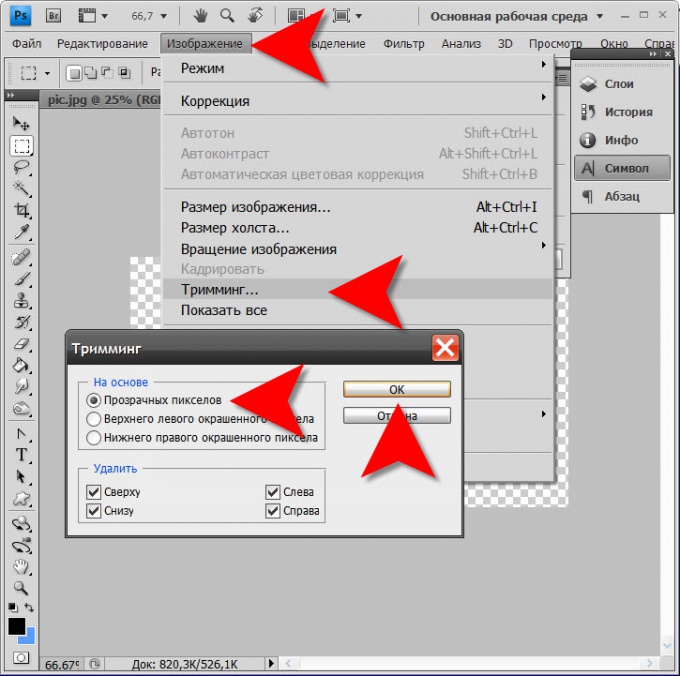
The third way is to use the function "Trimming". This method is useful when you need to crop transparent fields around an image or text layer. The "Trimming" command is placed in the menu in the "Image" section and opens a separate window. You should make sure that in front of the item "Transparent pixels" in this box is checked, and click "OK".
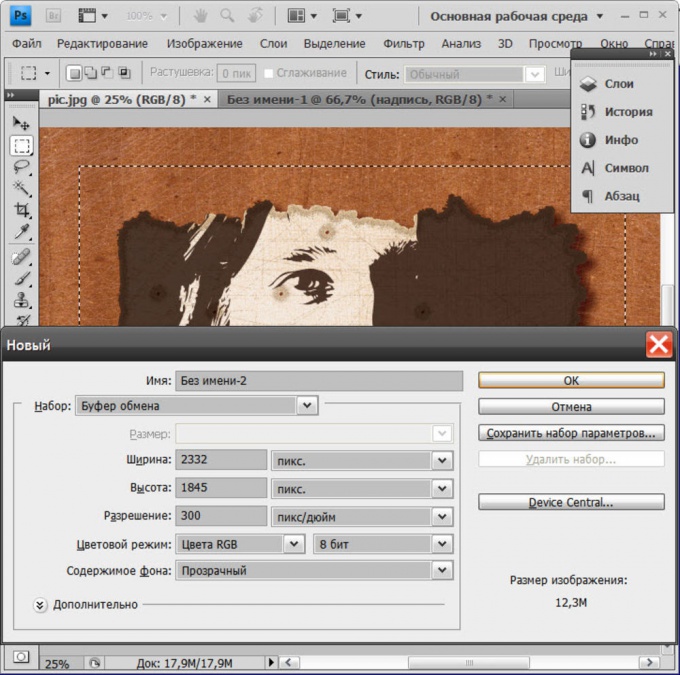
The fourth method involves using the "Rectangular Area" tool. To enable it, just press the M key or click the corresponding icon in the toolbar. With this tool, select the area of the image that you want to keep and copy it into the main memory by pressing CTRL + C.
Create a new document by pressing CTRL + N. The dimensions of this document will be exactly the same as the copied area of the image, Photoshop will do it automatically. Therefore, when you insert the contents of RAM into the created document (CTRL + V), this will be a copy of the original image, but with cropped the edgesmi.
To issue a poster, a picture, a photo or embroidery in a beautiful frame by oneself is quite simple. For this it is absolutely not necessary to go to the baguette shop.

You will need
- double-sided scotch, small nails, cardboard, pencil, sharp writing-office knife
Instructions
Recently, the popularity of decorating interiors with paintings or posters has gained momentum again. Almost every owner of the living space wants to hang up his favorite photos or embroidery, created with his own hand, in a prominent place. But the prices for decorating these decor elements in the baguette workshops are quite high, so not everyone can afford them.
Not everyone knows that it's not at all difficult to create a picture, poster, photo or even embroidery in a finished frame on your own. In any framing workshop, for sure there are ready-made frames, and most often they are not made from expensive wooden baguettes, but from plastic, which looks very much like a tree. Such frames are much cheaper, and they can be sold both with glass and back, and separately. If you have a ready-made frame, you can order glass to it additionally, and cut the backboard yourself from cardboard.
In order to decorate a picture or a photo in a frame, you will need a double-sided scotch, small carnations, cardboard, a pencil and a sharp clerical knife. If you make out a poster or a photo, first you need to crop the image along the outline, leaving small fields (they will be hidden by the frame). For thin baguette, the edges are usually 1 cm. They are necessary for the image to be completely seen after the design.
Next, by the size of the poster or photo, cut out the cardboard. Take double-sided scotch, cut it into slices and paste it on the cardboard surface, then gently begin to paste the poster to the cardboard, while carefully smoothing it. Otherwise, the general appearance of the product will disfigure the air bubbles.
After that, put the cardboard in the frame and fasten it with the help of small studs (in the event that the frame does not have special petals).
The hardest part is to decorate the frame with embroidery, as the fabric will have to be pulled on cardboard. Before making the finished fabric, be sure to wash and pat. Embroidery is made in the same way as a poster or photo, only it does not need to be cut to the size of the frame. The material will need to be firmly "planted" on the cardboard, wrap the edges, slightly pulling them, and fasten them on the other side.
Related Videos
Today we will talk about how to crop a photo in Photoshop cs5 with the "Frame" tool. Do not confuse! It is to crop the image, rather than cut the part and not reduce the size with a zoom. This was mentioned in other articles.
We have a picture on which we are interested only in one area, for example - with a dog. We want to remove the rest. And for us it does not matter that the size of the photo will decrease. Let's pay attention that now the size is 1600х1200рх.
If the cropping needs to be done strictly on some specific boundaries, we set or set the values. If you just grab any arbitrary area, you can not do this.
Use the tool Frame on the toolbar. Activate it by clicking on the icon, or with the C key on the keyboard.
Crop without dimension reference
Let's say that you want to crop the photo arbitrarily and it does not matter what format it will be.
We clamp the mouse in the upper left corner of the selected area and, without letting go, we draw it diagonally. In the lower right corner we release the mouse. In the default settings, the designated part of the photo remains visible, and the rest of the field is obscured.

Moving the cursor to the visible part, it can be moved, choosing the best position. When the result is satisfied, press Enter on the keyboard, or double-click inside the selected area, or click the checkbox in the options panel. A round icon next to the check mark or pressing the Esc key resets the selection.
To make the photo cropped to the desired size, set the values in Photoshop or align the borders along the guides.
To set the values, we'll take care of the settings.
Tool settings
When the tool is active, but the selection is not done yet, the parameters panel looks like this:
Width and height
To determine the cropping area arbitrarily, the "Width" and "Height" windows are left empty. When we know the required ratio of parameters, we enter the corresponding values there. That is, if you specify a width of 20, and a height of 10, then the rectangle will stretch in the same proportion - the width is 2 times the height.
Clicking on the arrows between them swaps the numbers.
When a value is set, you can select the scale graduation (cm, inches, mm, etc.). The figures will be translated in relation to the new units of measurement and they can simply be replaced with the required ones.
 Initially, the units of measurement are set the same as in the graduation scale of the lines. How to change them by default is told in the.
Expansion
Let's not talk about the concepts of expansion - it's a separate topic.
The "Expansion" window can be left blank. In this case, when pruning, the extension images, with which we work. For the image that will be placed on the site, a value of 72 pixels / inch is sufficient. If it is prepared for printed products, you need to know the requirements of the printing house. More often it is 300 pixels / inch.
Saving Parameters
If you often have to install the same dimensions, it is better to save them for convenience. To do this, we enter them into the boxes, then open the toolbox of the Frame tool by clicking on the arrow next to it (1). A window will open, in which we press the arrow in the circle (2). A new window opens, in which we select "New set of parameters for the tool" (3). The next drop-down box already contains the name of the parameter, which you can change at your discretion. Click OK.
 The parameter appears in the set.
 Now, when you need to set such figures, just select this parameter in the set and its values will fit into the boxes.
The "Image" button inserts the full size of the open file into the windows, and "Delete", respectively, deletes all entries in the size and extension windows.
Other settings
When the cropping area is already defined, the options panel looks like this:
"Delete" and "Hide"
The "Delete" and "Hide" buttons work only when there are other layers besides the fixed background layer, or if the background layer is not fixed, that is, the lock is removed.

To crop a photo in Photoshop, select the Delete value.
Set the Hide value when you do not want to remove the outer area, but make it invisible.
In this case, the "Perspective" option is inactive.
Frame Overlay Type
 Function "Rule 1/3" divides the designated area into 3 parts horizontally and vertically. This separation helps to correctly arrange the details for correct visual perception of the picture.
- "Grid" has the same purpose as "Rule 1/3", but with a smaller scale of divisions.
- When the "No" parameter is active, the divisions are not reflected.
Screen Color
If you check "Screen" - the outer area will not be obscured. When the screen is not selected, you can define the color of the darkness next to it and its opacity at your discretion.
Resize, rotate, perspective
Zoom in and check the border binding to the guides. Usually they do not require an adjustment. But if you need corrections or changes in size, we move the cursor to the border, and when it takes the form of a straight double-sided arrow, we pinch it and drag it in the desired direction. This edge is displaced.
To stretch or narrow all sides at once, we move the cursor to one of the corners and pull it.
When the arrow becomes curved, the frame can be rotated. When the Shift key is held down, the rotation is performed in steps of 6 steps from strictly horizontal to strictly vertical position.
The center of rotation is indicated inside the frame. It can be moved to any point by simply dragging it with the mouse or with the Alt key held down, click the place where you want to set the rotation center. Around this point, the image will rotate.
If you tick the "Perspective" function, you can adjust the perspective by stretching or tapering the corners of the frame with the mouse.
Once again, let's repeat how to crop an image: by pressing the Enter key, or by double clicking inside the designated area, or by clicking the checkmark in the options panel.
On how to crop a photo in Photoshop using the selection tools and the "Crop" function, read in.
More useful information about the frame Crop the version of CS6, see the video:
Let's talk about the wonderful product of Adobe, which offers multifunctional tools for working with images. It is clear that the speech in this article will be about the photoshop, as it is called among the people. Photoshop - this is the program that is useful as an ordinary user to realize their creative potential, and for people working in the field of professional photography or graphics. So:
How to crop a photo in Photoshop?
We with you, dear reader, will consider three variants of cropping photos that will give an equally good effect. First, try to figure out the Crop Tool. Then try to crop the photo in order to create an acceptable size for its printing. Well, the third option will allow you to crop the photo, keeping the necessary proportions.
- The first option is to go! This option is useful for those who want to crop the photo and do not care what size it will be in the end. Open the photo in Photoshop and from the listed options in the left column select the Crop Tool. Use it to select the area of the image that you want to keep. Now press the Enter key on the keyboard. That's all. Now our picture is cut off, so to speak, "by eye." Now you need to save the resulting image with the command File - Save As (File - Save As).
- Let's proceed to option number two, which is possible thanks to Photoshop CS5: how to crop a photo. As we have already said, this method will create a document that can be safely printed later. Let's take the standard photo size, for example, 10x15 for an example. It is necessary to know the original size of the photo. To do this, go to the menu Image - Image Size (Image - Image Size). In this case, we will be interested in the Dociment Size item. You need to set the required units of measure. In our case, these are centimeters. We see the initial values of our image, which must be adjusted to the standard. To do this, go back to the Crop Tools tool and in its options panel set the values to 10 centimeters and 15 centimeters for the height (Hight) and width (Width) respectively. Now, as in the first version of a simple operation, select the desired image area with the Crop Tool. The settings you entered earlier will not let you bring down the desired 10x15 format again. And of course, after the performed actions, you should save the work done using the File - Save As menu.
- And finally we will offer you the third option of how to crop a photo in Photoshop. This method can be used if you do not want to customize the image to a common format, but want to preserve the aspect ratio of the image. To implement the method, do the following. Select the entire area of the photo using the keyboard shortcut Ctrl + A. You can also do this using the Select-All menu. After that, in the same menu, select the option Transform Selection (Transform selected area). And with the help of this tool, while holding down the Shift key, you need to adjust the frame to the kind that you want to see in the end. Then go to the Image menu and select the Crop function. The image is now ready. It remains to remove the selection using the menu Select - Deselect (Selection - Deselect). You can also use Ctrl + D.
Here, in fact, and all the possible ways of how you can crop a photo. Photoshop is a very convenient graphical editor for both home use and for real professionals.
In this article, we'll look at how you can easily crop a photo to the size you want. We will deal with changing the size of the snapshot. Consider how to get photos of standard size: 5 by 7, 8 by 10 or 11 by 14 without distortion and that everything seemed to be elongated and thin or flattened and thick.
Here is an example of a problem. I get many photos from my Canon Digital Rebel XT, which has a resolution of 8 megapixels. Here is the photo I made with it last winter:
Original photo
Now, let's assume that I want to print photos in 8 to 10 format. Because the photo was taken from an 8-megapixel camera, taking a picture of 8 by 10 with professional-grade quality should not be a problem. Let's look at the length and width of this image in pixels so that we can calculate what its overall size is.
I open the " Image size"By selecting it from the" Picture". If we look at the section " Dimensions in pixels"At the top of the window, we will see that my photo as I moved it from the camera has a width of 3456 pixels and a height of 2304 pixels:

Photoshop dialog box "Image size" with the size of the photo in pixels
The size in pixels can give us information about how many pixels our image is made of, but this has nothing to do with the size of the image when printing. To view or resize a photo on print, we need to refer to the " Document size».
Currently, these length and width of the document say that at a resolution of 240 pixels per inch, which is a standard resolution for professional print quality, my photo will be printed in the format of 14.4 by 9.6 inches. This, of course, is a decent size photo, but most likely I will not be able to find a paper size that would match these sizes.
Let's see what happens if I use the " Image size"I will try to change the size of printing photos to 8 by 10. Typically, this is the format we use when printing. Since my photo has a landscape orientation ( those. width greater than height), I really want to get a photo of 10 by 8.
Therefore, I change the width value in the " Document size"By 10 inches. I want to be sure that when you change the size, the proportions of the image will not be distorted. Therefore, I choose the option " Keep proportions"At the bottom of the dialog box. So I changed the width to 10 inches:

Change the print size of the image in the "Document Size" section
After I changed the width of my photos by 10 inches, since the option " Keep proportions"Was enabled, we can see in the figure that Photoshop itself changed the height of my photos to ... 6,667 inches? It is not right. We need a format of 10 by 8, not 10 at 6.667. Hmm ... I think I just need to change the height by 8 inches:

Change the height of the image in the "Manual Document Size" section
Well done. I changed the height of the photo by 8 inches, and now in the " Document size"I see that my photo has a format ... 12 by 8 ?! Hey what's going on? All I want to do is change the print size to 10 by 8. But if I change the width value, then the height does not fit me, and if I change the height, the width is not the same! How can I resize a photo by 10 to 8?
Answer: No way. At least through the window " Image size". The original photo dimensions will not allow you to change it by 10 to 8 without distorting the image. So what do we do? It's simple! We forget about the dialog box " Image size».
Instead, we trim the photo as large as we need! For this we use the Photoshop tool " »!
Step 1: Select the "Crop" tool
The first thing to do is to choose " "In the toolbar or press the letter C on the keyboard:
Select the tool "Crop"
Step 2: Enter the exact print sizes that you need in the options panel
If you look at the options bar at the top of the screen, when the " ", You will see the option" Width and Height". Here you can enter the exact width and height values that you need.
And also units of measurement ( inches, centimeters, pixels, etc.). Since I want to crop my image in a 10 to 8 format, I enter 10 in the width field, and then " in", which means" the inches"After that I enter 8 in the height field, and then again" in":
Enter the exact width and height values in the options panel
Step 3: Drag the crop box
After you have entered the exact dimensions, just click inside the image and set the cropping frame. The area of the photo will remain inside the frame, and everything else that is now a little darkened will be cropped. You will notice, as when stretching the borders of the frame, the sides change proportionally, because we have set the exact parameters.
The only thing we can do is adjust the overall border size with the same aspect ratio. To do this, pull at one of the corners of the frame. You can also move the crop box within the image. To do this, move the cursor inside the frame ( it will take the form of a black arrow), and then click and hold the mouse button, drag the frame:

Move the cropping frame using the "Crop" tool
Step 4: Press Enter / Return to crop the image
When you set the desired size and position of the crop frame, just press Enter ( Win ) / Return ( Mac ) to crop the image: