How to cut off excess photoshop. How to crop a photo in Photoshop?
Very often people who have never dealt with a program are interested in the question: how to crop a photo in Photoshop? So in this short lesson for beginners, I'll talk about how to crop a photo in Photoshop.
Let's start the lesson
Run the program.
Open our photo with the keyboard shortcut Ctrl + O, or go to the File - Open menu. I found on the Internet a photo of a funny cat and will work with him :)
To do this, click the magnifying glass icon several times. The program focuses on large photos, so we need to move it up and down with the sidebar. We click the left mouse button and do not release, we drag the area of interest to us, making a choice. When you release the left button, you can resize it using eight square grips on the edges of the selected area.
When the selection already has the right size, it's time to trim. To do this, select "Crop" in the "Edit" menu. The program was left alone. It remains to save the file to disk. Click the "Save" icon, and enter a file name in a new window. Save the file to disk by clicking the "Save" button.
Depending on the desired result, there are several ways to crop a photo.
1 Method. Free crop.
Suitable when we just need to get rid of unnecessary empty background to align the composition, or remove other unnecessary elements in the photo (for example, other people), while the final image size does not excite us.
However, the binding can be changed after embedding by clicking the "Paste" button, visible in the properties panel. You can also resize the image using the Selection tool. Then use the same tool to move the shape of the frame so that it is exactly on the photo. If the photo overlaps the shape of the frame, go to the Layers palette and place the photo under the mushroom.
Just drag the image under the Path. As you can see, during this operation the shape of the fungus lost its edge and became a container for photography. The mushroom also lost its white fill, because the filling of the frame was done when the trimming mask was replaced with a photograph.
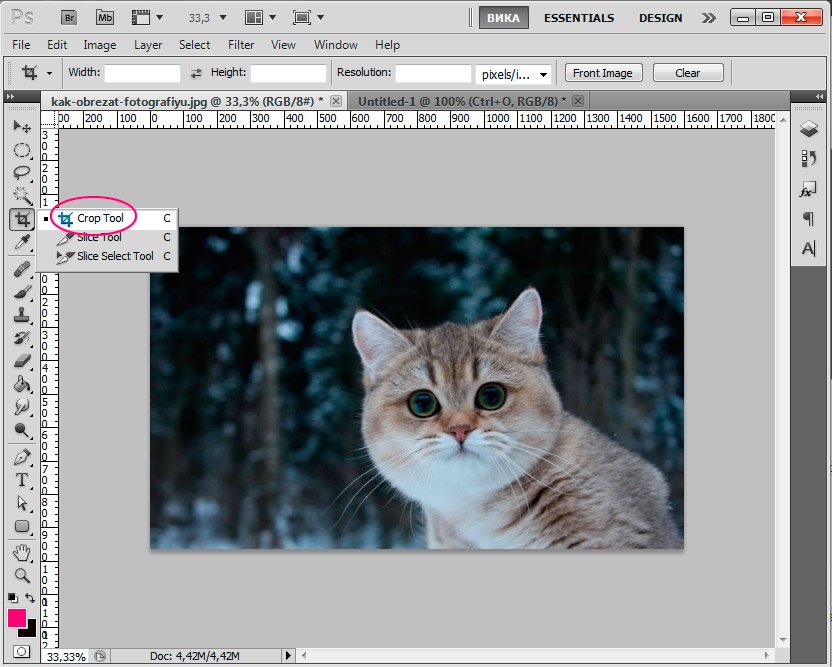
On the toolbar, which is on the left, select the tool "Crop Tool" (C):
The cursor will then turn into a two-sided frame.
Select the area in the photo that you want to keep, the parts of the image that will be cropped will become darker.
Finally, one more information: how to extract components from the clipping group? So - how to break a clipping mask on the image and shape of the mushroom? The problem may be that the fungus lost its original edge and filled it up when creating a prism mask, and after hacking the mask no longer restores either the edge or the fill - it is completely invisible in the image area.
This is the easiest way to select this invisible form by checking the check box next to its name in the Layers palette. You can easily apply a new fill color to the selected object and format it with the edge. Have you ever thought about how professional photographers can create these circles against the backdrop of their images?
After you have formed the frame, you can adjust it, change its size and position, moving the square markers to the sides and using the mouse to move the frame.
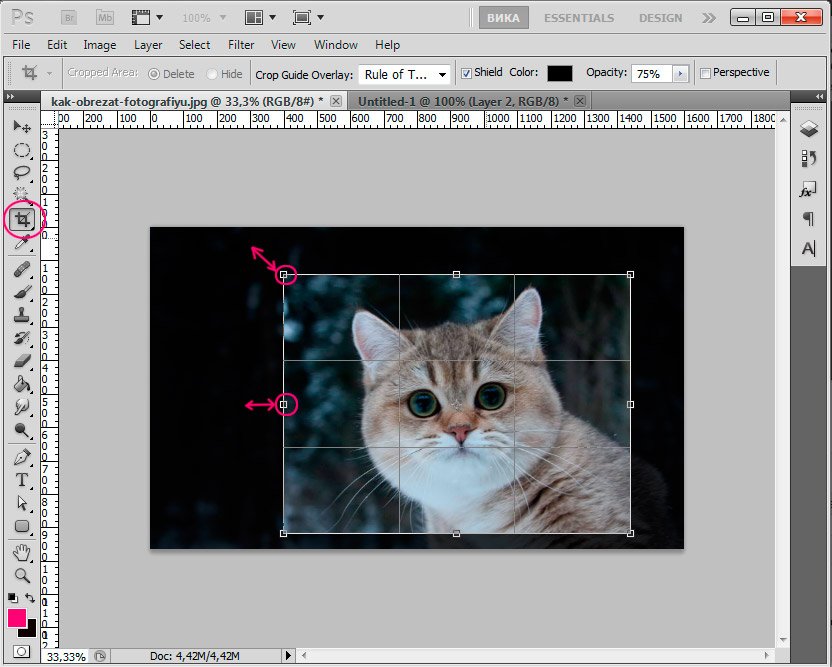
When you are finished adjusting the frame, press Enter to cut off excess edges, or double-click with the left mouse button.
# 3 Determine which part of the image you want to focus on
For bokeh, as far as possible, we recommend one with a dark background and several light sources, as shown below. Then duplicate the layer so you can clearly see the differences between the original photo and other versions. In addition, layer work always helps you, because instead of taking things from the very beginning, you can only change the layer, and later you can make other changes to the image. In the photos in this article, the girl holding the lantern is the main subject, so she will remain focused.
With this method of cropping, the original photo format will change arbitrarily.
If you just use the photo on the Internet, it does not matter, however, if you need a specific image format, for example, to print a photo, you need to use a different method of cropping the photo.
2 Method. Framing with the specified parameters.
The method is similar to the previous one, but here we use additional parameters that allow us to use the "Crop Tool" tool.
At the background copy level, use the Quick Select tool to select and crop the object that you want. You will want to select only the topic to avoid the fragments that will remain outside the side, and the changes that you make later.
Before you can add a blur effect, you must first clear the selection. Now the selected background should be semi-washed. Now you are going to adjust the look and level of the blur so that you can get the desired bokeh. Open the hidden bokeh, changing the "Range of Light" until you reach the correct exposure. Stir the blur level by dragging the cursor to the left. . Watch the exposure level of the image. If the image is overexposed, the side will not be as visible and will look unnatural.
So, select the "Crop Tool" on the toolbar, or call it with the hot "C" key, draw attention to the top toolbar for this tool.
We have the following fields: Width, Height, Resolution.
You can set the desired parameters of the final image to crop the photo according to your requirements. In this case, the program will observe the aspect ratio of the image when cropping, and will not allow you to go beyond the assigned settings.
# 5 Compare the current image with the original image
Before saving a new image, take a look at the original. Click the "eye" to the right of the duplicating layer. If you are not satisfied with the result, go back to step 4 until you are satisfied. If you are satisfied with the result, delete the original layer and save the new photo.
Do you notice how the blur effect looks more interesting and fabulous than the original? Try this tutorial and practice as much as possible so that you can create impressive and professional images. If image processing is not your strong point, find a tutorial on how to get the bokeh straight from the camera, following some tricks or tricks.
Be sure to specify the units of measure for your width and length. If I need a size of 15x10cm, I specify 150 mm x 100mm.
Permit for printing is better to put 300, for internet use enough 72.
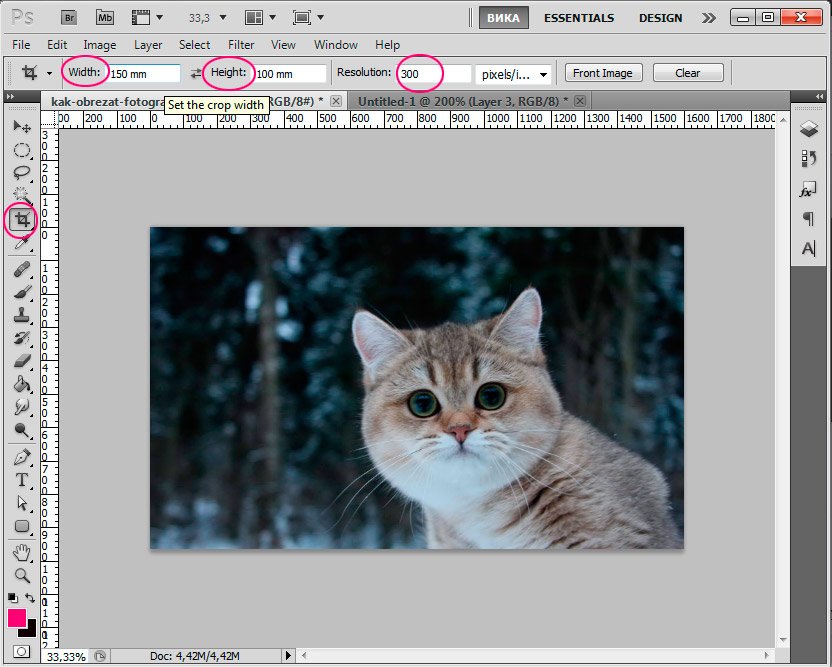
After you set the desired width and length of the image, you can set the frame and crop the photo, all proportions and parameters will be taken into account.
Open aperture, correct exposure, ideal sensitivity. The idea is to select the edges and corners of the photo and give them a drawing drawing with a pencil. Well, first we will need to duplicate the photo layer to have a copy that we are working on, later we will have to return to the original version. This will make a copy on top of the main layer.
Ok, now you will have a black and white image. Now you have made a choice from the white areas. We will have to copy these areas to a new layer. Then hide the layer number. We will have to paint the newly created black layer. It's time to duplicate the main layer and place it above all layers.
Thus, the image size will change as in the first case, however you can control this change.
And the last way to crop photos.
3 Method. Removing items while saving document parameters (width and height).
Let's say I need to remove the cat from the photo, leaving the background with the forest and without changing the format of the photo, i.e. The width and height should remain the same.
Create a mask on this layer by clicking the button shown in the picture. Delete the background of the duplicated photo using the "Background eraser" tool on the toolbar. At this stage we will take care of the color of our eyes. We will apply the same method, make a choice for the eyes, copy this area to a new layer and apply the curve filter to this layer with the following settings.
You will notice that the eye color is too harsh. We do the same for the lips. Make a selection of the blouse and apply the settings. We put a little shade on the powder. Select black and set the opacity to 44%. It automatically organizes and merges several images into rows and columns.
First, go to the layers panel "Layers" and unlock the original layer by clicking on it twice and clicking "Ok". In this case, the lock icon should disappear from the layer.
Take the Rectangular Marquee Tool (M). Right-click to bring up a small tool menu.

A window will open in which you select the files that should be included in the panorama or the entire directory. It is recommended that two neighboring photos have at least 20% identical parts. In some situations, the program can not automatically adjust some photos. From here, we can drag them to the area to which they belong, and the program will correctly position them. After placing the photos, we can use various tools to improve the combination of images.
We have: image rotation, scaling, merge setting, and in the right column we can choose a combination of ordinary or perspective photos. The combined use of these tools is required, especially if the photographs have been incorrectly executed, and the overlays look distorted.
Now, on the contrary - we select what we want to remove from the photo. I single out the cat.
 Click Delete to delete the selection.
Since now we have a hole in the picture, we have to fill it up with something. We will fill it with the same background as the rest of the photo.
Rapid export of materials and countertops
If we decided to combine photos in perspective, we can choose a cylindrical perspective. Then you can fix small flaws that appear in the final image, crop the irregular edges and save your creation. To get the perfect combination of photos, this must be done with the help of special techniques, which will be presented in the next article. Select individual materials from one or more workspaces, or select all worksheets, and click once to export them in many sizes, resolutions, and formats for on-screen workflows, web pages, and icons.
Without removing the selection, press the key combination Shift + F5.
In the appeared window should be the value: "Content-Aware" (Given the content).

Click "OK" and wait until the program fills in empty areas similar to already existing fragments of the image.
Increase, pan and scroll 10 times faster
Controls are automatically hidden, because the forms are scaled to a small size, and polygons retain their living characteristics after uneven scaling.
The increase is 10 times stronger
Automatic file recovery. Repeat the application and the file will be restored. All text, all images and graphics are live and fully editable. Use the basic tools for drawing and editing with the pen and touch, including the floral you can Scale, move and draw.Here's what happened:

To deselect, press Ctrl + D.

In the window that appears, we set the name of the image, select the JPEG format, the place where we will save the picture, click "Save".
Draw exquisite curves and straight lines, quickly and visually. Click the Curves tool once to place the dots and see how the line is dynamically curved or double-click to create corner points for straight lines. Edit with the same tool - you do not need to worry about fixing points and pens.
Automatic Type Surface Size
Easily connect lines that intersect, overlap or have free ends and simultaneously cut unwanted segments, without affecting the traces of the original lines. Forget text fields with insufficient space.
Inspiration for colors and shapes from anywhere
The trajectory that you are planning before putting the next point. When you draw, an elastic line appears from the last anchoring point to the tip of the pen.
In this lesson we talked about how to crop a photo in Photoshop. I hope the lesson will be useful for someone from beginners.
In today's lesson we will consider one of the options how to crop a photo in Photoshop. There are a lot of options for cropping a picture in Photoshop, I want to offer you one that is possible thanks to Photoshop CS5. This method allows you to create a document that can be safely printed in the future. You specify in advance the size of the document you want to make.
Improvement of control points
Look where the next curve passes when designing the next point and save time for cleaning the trajectories. Tweaking the curves is now easier. New anchor points allow you to pull from unequal positions or in different directions as you draw to control the fluidity of each element. You can even change the corner point to smooth it without destroying the shape.
Updating pixels, dots or meshes
When the mount is activated, the anchor points are perfectly aligned with the pixel, grid or point of your choice. But not the point of processing. They are now eliminated from the mount, so you can maintain the accuracy of the curvature and get fine control during editing.
Let's start studying the lesson.
Step 1.
Open the original image in Photoshop
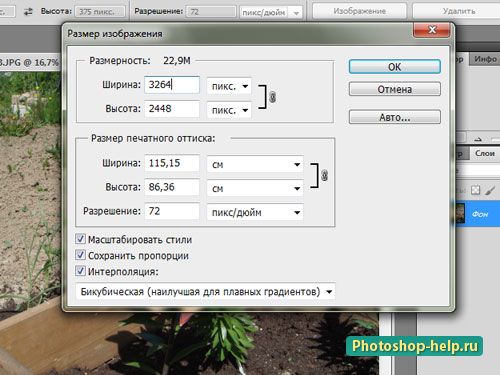
First, we check the size of the image from which we want to cut a piece. Go to the tab Image - Image size
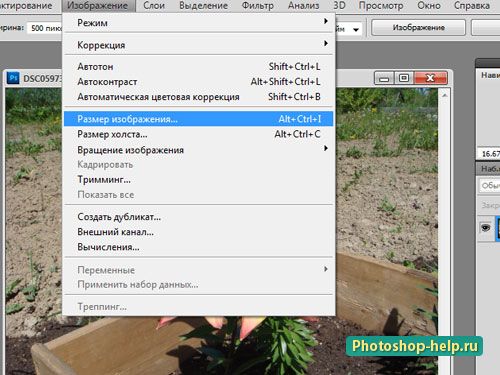
In the window we look and try to remember at least the width (note that the tick "keep the proportion is worth it). We see that The size printed impression big enough.
Better control of contours
Close the outlines in a precise and predictable manner. When you complete a drawing, you are better off when you connect the start and end points. Move the closing point or select the pause of the direction lines to adjust the closing curve exactly as you like.
Segments of the remodeling circuit
Draw the curves with more precision, using options for expanding and closing outlines and drawing straight lines. Use presets to create cursor outlines with fewer dots or more accurate executions of real bands. Drag the contour segments into the desired shape.
Step 2.
We will cut the photo in Photoshop to get the standard photo size 10 * 15 cm. To do this, first take the tool Frame, expose the values in width and height in centimeters (sign directly in the text), we set the resolution to the standard.

And select the frame flowers. The dimensions will be met, you do not have to worry about it. If you do not hit the right place at once, then you can move the frame. After setting the frame, press the key Enter.

Step 3.
The picture immediately becomes very small. To see more carefully what happened, go to the tab View - Real size. You can simply enlarge the view.