Firmware file for zyxel keenetic. Update the firmware Zyxel.
Zyxel Keenetic Start - an excellent router for the house. The model is positioned as the "younger brother" of the more powerful previous brand routers, but it contains a maximum of functions for normal use. Unlike other devices, the router is distinguished by a pleasant low price, which did not affect the excellent quality inherent in all models of this brand.
The router is low price, but not inferior in quality to expensive models
Let's take a closer look at the review of the functions of the Zyxel Keenetic Start router, learn how it is configured and flashed.
Externally, the router is little different from the standard routers - unobtrusive design, black body and an external antenna. Its maximum speed is about 150 Mbps, which is quite enough for one user and a group that can be created within the local network. It provides the functions of IPTV, the creation of another access point for guest use.
For protection there are all relevant protocols and a firewall, which will make it possible to secure your connection. In addition, the router is as easy to set up as possible, so you can install it yourself to use the Internet.
Setting up the equipment
To install and configure, connect Zyxel Keenetic Start to your computer, then do the following:
- Log in to the router settings: enter 192.168.1.1 in the browser's address bar, then you will immediately see the explorer for configuration.
- Choose a quick setting.

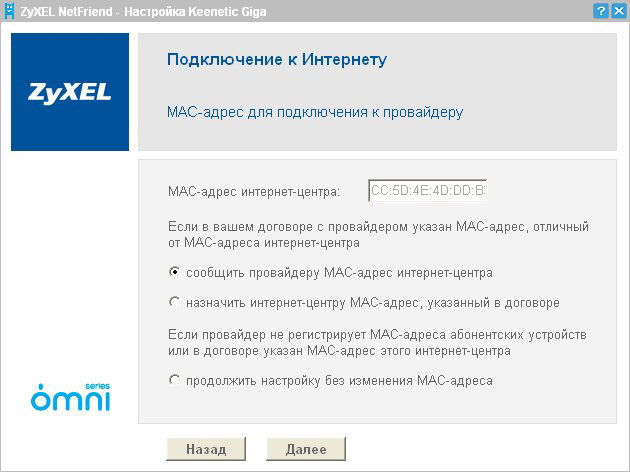
- You will see a window for selecting the MAC address. If the provider does not register it, then indicate this option. If your service provider registers addresses, previously the Internet has already been used on this PC, then select the next suitable option. In the event that both options are not suitable, you need to call the support service and say that the provider registered the address of the kinetics start equipment - you will see it on the bottom of the case.
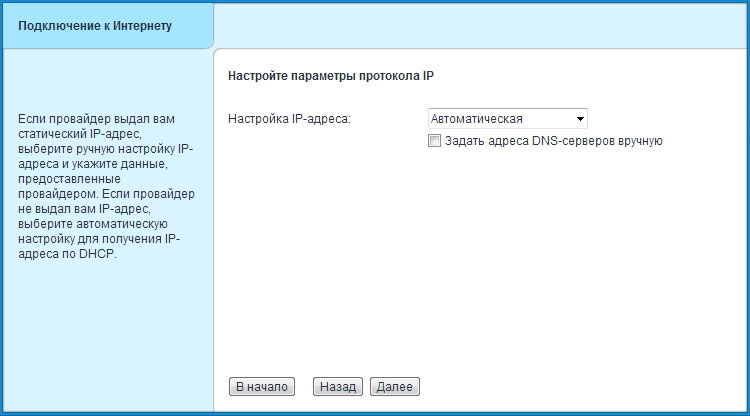
- Next, specify the type of connection by IP - mainly the Internet comes with an automatic address determination.

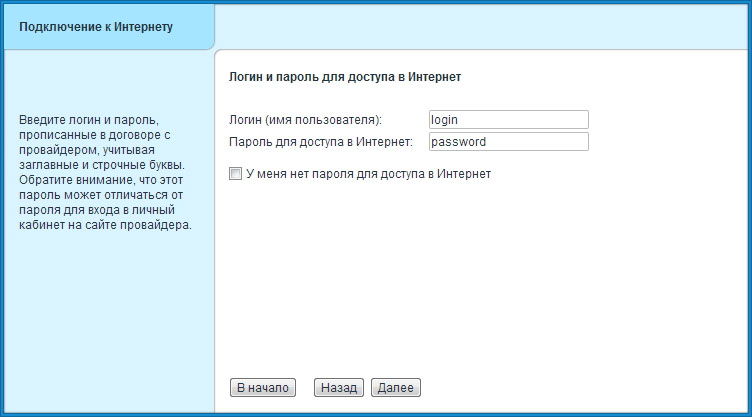
- In the next menu you specify a login and password for connecting to the Zyxel Keenetic Start network. Here there are several options - if the provider uses Dynamic IP technology, then you mark the line "I do not have a password to access the Internet." If access is via PPPoE or L2TP, PPTP, then you must specify the data from the service provider contract.
- After all the actions, the connection to the Internet must be made - the basic setting is completed.
When you have completed the quick setup, use the "Web Configurator" button to go to the other router parameters menu.

If, after a quick setup, the Internet does not work, enter the connection data again, for this, follow these guidelines:
- Go to the PPPoE / VPN section.
- Enter the data for the connection - turn on the network and activate the line "Use for Internet access", enter your login and password, select the type of connection and other parameters.

The first time you enter the advanced settings, a window appears for changing the login and key for entering the configuration interface - this is done for security reasons so that no one can hack the network, so come up with your username and password.
Connect to Wi-Fi
When the connection is established on the Zyxel Keenetic Start router, Wi-Fi distribution is activated immediately, but many are wondering: "If we did not enter the network name or password, how to connect from the rest of the equipment to the Internet via Wi-Fi?"
The answer is that the network gets the name and password automatically when installing the equipment, and to find out this information, look at the back of the router.
It is noteworthy that each router of this brand is assigned its own combination, which is more secure than when there is no password and no Wi-Fi login at first, and the network is open to all users.

If you want to change the default network name and password, follow these instructions:
- Go to the settings of the router and select the Wi-Fi network section.
- Click the Access Points tab and set the new network name, key combination, select the WPA2-PSK encryption type (it is the most reliable for hacking protection).
Note. If you change the SSID in Zyxel Keenetic Start below there is a function "Hide Network", with which you can make the access point invisible. In this case, other users will need to manually add the network, enter its name and password to get an Internet connection, which will further protect you from interference of foreign equipment.
Install the firmware
From time to time in the work of Wi-Fi-router there are errors and problems, because of what you need to reinstall the software. But even if the router works without failures, from time to time it is worth updating the firmware, because the manufacturer is constantly improving the firmware for its correct operation.
You can update the firmware via the options menu, but if you want to manually install new software, perform the following actions:
- Download the installation file from the Internet (make sure it is designed specifically for the Zyxel Keenetic Start model). After downloading, unpack the archive.
- Go to the options menu, System section, open Files.
- Find the Firmware file in the list, click on this line - you will see a window for selecting a new firmware.
- Specify the path to the file, click on "Replace", after which the firmware for the router will be updated.
- After the completion within a few seconds, the equipment will restart, which will cause the menu to be unavailable for about a minute.

The data on installing the new firmware version will be displayed by viewing the first window of the configuration menu, where the current status of the router is indicated.
Following the above instructions, you can connect Zyxel Keenetic Start to the Internet, configure a Wi-Fi connection and perform the firmware of the router. This equipment will allow you to use a high-speed connection with a high-quality and powerful signal.
There was a beta version of the firmware called NDMS 2.0. The invitation to drive it was also received by registered-interested owners of the usual "Kinetics". The annotation says that this is not another update, but the second generation of the software platform, radically different from the previous one and addressed to advanced users. The most interesting of the claimed (in comparison with the microprograms of the first generation):
- Full-featured mechanism of address translation (Full feature NAT) with support for multiple external IP addresses; port forwarding with the ability to select the destination port on the local network; reassigning the roles of network interfaces.
- Support for multiple PPP tunnels for accessing the Internet and connecting to virtual private networks (VPNs).
- The ability to assign several additional physical WAN interfaces to the ports of the built-in Ethernet switch.
- Reservation of Internet connection via 3G / 4G USB modems and optionally assigned WAN interfaces.
- Professional interface configuration through the command line (Cisco like CLI). All functions can be configured from the command line and saved as a text file.
- Batch assembly firmware "on demand." The functionality of the device is selected by the user in the web interface of the device and is automatically stitched.
So, the new firmware has been downloaded from the ZyXEL website and successfully installed on Keenetic (there may be nuances, but they can be solved through support of the manufacturer in a special subject and in this case are not fundamental). Let's get to know each other. The web configurator also opens to the address 192.168.1.1 with the login / password admin / 1234. Immediately we see that the new web interface has almost nothing in common with the previous version:
He made a double impression on me: on the one hand, he became more likable, but on the other hand, I was much more absorbed in it. (Looking ahead, you can add that the skin-organization of the web interface then, in the list of components, you can choose from two options to your taste.)
Like the first generation of firmware, NDMS 2.0 supports many types of connections, each of which now has a separate tab in the "Internet" section (IPoE, PPPoE, PPTP, L2TP, 802.1X, 3G, Yota, Wi-Fi client). Unlike V1.00, here you can configure several connections at once, and in any combination. Connections are bound either to physical interfaces (Ethernet ports, USB modem, Wi-Fi interface), or to an already created logical interface (for example, you can "attach" one PPTP tunnel to another). Each Internet connection is assigned its own priority, which allows to determine which of them will be the main one, and which is the basic, secondary or backup, depending on your imagination and needs.

In the default settings, there is only one Internet connection "Broadband connection (ISP)", which is tied to the WAN port. A DHCP client is raised on it, which automatically receives the address from the provider's network when the cable is connected to the WAN port (of course, provided that the provider issues this address). For the home network, all LAN ports of the router and Wi-Fi access point are by default. They are combined into one logical interface (Home VLAN), on which a DHCP server is allocated, which distributes addresses from the network 192.168.1.1/24.

To connect to an ISP through PPTP, as well as through L2TP or PPPoE, you need to configure two (!) Interfaces: one for connecting to the provider's network (the IPoE tab), the second for the Internet itself. If the address in the local network of the provider is issued automatically, the first interface can be considered already configured - this is the pre-installed Broadband Connection (ISP) interface, which is mentioned above. If the provider gave you a static address, change the settings of the Broadband connection (ISP) interface and do not forget to set the specified DNS servers in the DNS tab. Then open the PPTP tab (L2TP or PPPoE):
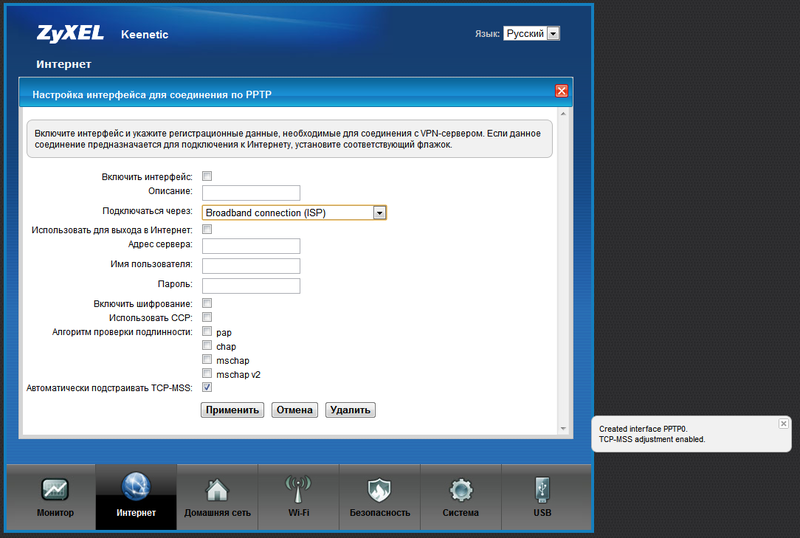
In addition to the usual settings typical for mass routers, there were points "Connect through" and "Use for Internet access". The first one is needed to indicate the router through which connection it should establish a PPTP connection (L2TP or PPPoE), in our case it is Broadband connection (ISP), and the second one speaks for itself: if you want to use this PPTP connection (L2TP or PPPoE ) for Internet access, select the check box, then when the connection is established in the router's routing table, the default route will be the gateway of this connection. After applying the settings and connecting the cable to the WAN-port from the provider, the device will connect to the Internet. If you need to use 802.1x (there are also such providers), then it turns on even easier: as a separate connection does not appear, but "revives" on the specified interface.
In principle, we already got a working router with access to the Internet via PPTP. But, of course, all this garden (firmware and article about it) is not for the sake of such banality. Now let's take a look at how the Internet connections via USB modems are going up. Modems Yota, like in the first firmware, are recognized automatically when included in the USB-port, everything that is necessary for their work is preconfigured. We take the popular iota modem Samsung SWS-U200 and stick it into the router (the availability of money on the account is not fundamentally). The connection goes imperceptibly fast, the modem flickers with a blue indicator, on the status page, the Yota interface was gaily glowed green, and the connection parameters appeared on the Yota tab. As you can see, the state of the SLEEP modem, because its priority is lower by default than the PPTP connection that continues to work:
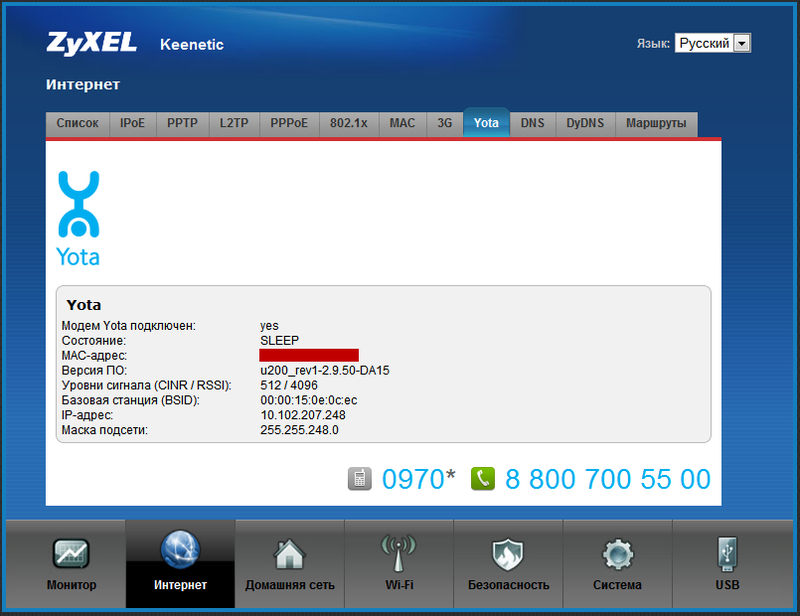
This, as far as I can understand, is a very important feature of NDMS v2.00. Despite the normally functioning PPTP connection to the Internet, the system will immediately establish a connection with Yota, but it will not be used for data transmission. The connection will be in reserve, because by default the priority of the Yota interface is lower than that of the ISP and especially PPTP. Typical priorities are: ISP - 700, PPTP / L2TP / PPPoE - 1000, Yota - 400. What do these priorities mean? And here's what. If the PPTP session for some reason falls and does not recover, nothing much will happen: the system will continuously try to restore it, but Yota will not switch, because the priority of the physical connection to the provider's network is higher and it is working. But if you pull the cable out of the WAN port - the system will immediately switch to iota Internet (I do not lose any ping when switching). Since the PPTP session can fall off with a high probability simply because of the scheduled work on the provider's network, it is rational to set the connection through Yota priority, say, 900. Then the system will switch to the mobile Internet, so to speak, without hesitation, if the PPTP tunnel falls. Once she finds out that the connection through PPTP has come alive, Yota will be transferred to the reserve. Unfortunately, in the current firmware there is no more accurate check of the Internet connection by periodic pinging, but let's hope that in future versions the developers will add this function. After all, backup connection and provision of uninterrupted Internet access, I believe, this is the main feature of NDMS v2.00 and this rumor is said to be promulgated for the whole line of Keenetic routers.
By the way, in order to deactivate the interface (that is, the system stopped working with it and did not react at all to it), it is enough to remove the checkbox "Enable interface" in the interface parameters. To turn on, you need to do the same, but in the reverse order; The parameters are not erased and remain "ready".
I see no reason why we can not add another backup connection, for example, via ADSL. In the most common variant, the provider also issues addresses via DHCP (with static addressing it is not harder, but to describe a little longer). To create a backup ADSL link, we need any ADSL modem with an Ethernet port and preferably with the condition that the IP address for controlling the modem is desirable to be taken out of the IP subnets configured on the "Kinetics". But this is not deadly, since the modem will work in bridge mode. Preconfiguring the ADSL connection on the modem and transferring it to Bridge mode, we connect it to the free LAN port on the router (in the current example, LAN4 port). Next, in the settings of the Internet Center, create another IPoE interface and bind it to LAN4:
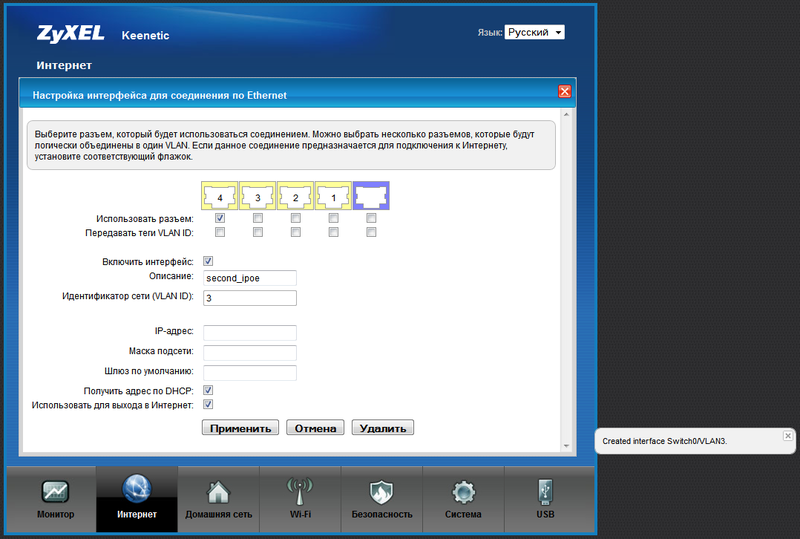
After creating the interface, it appears in the list:
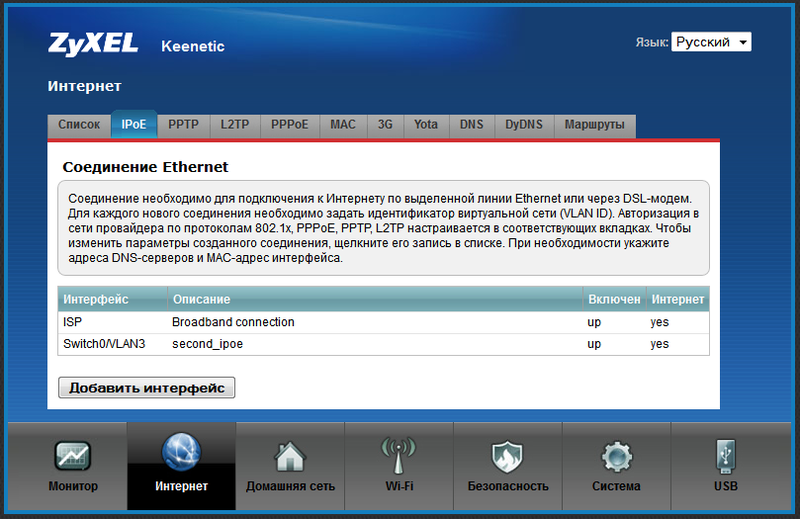
Now we can do anything with this interface (up to the removal). Create a PPP-E connection through it. To do this, go to the PPPoE tab and click Add Interface. After that, we enter the data received from the provider and save the PPPoE interface, without forgetting (!) To specify the IPoE connection we created as an output, or, so to speak, the "bearer" interface.

Actually, we managed to ensure that the router is simultaneously authorized by three providers: PPTP, PPPoE and Yota, to ensure a seamless and uninterrupted Internet access. Priorities I configured in this way, as in the screenshot:
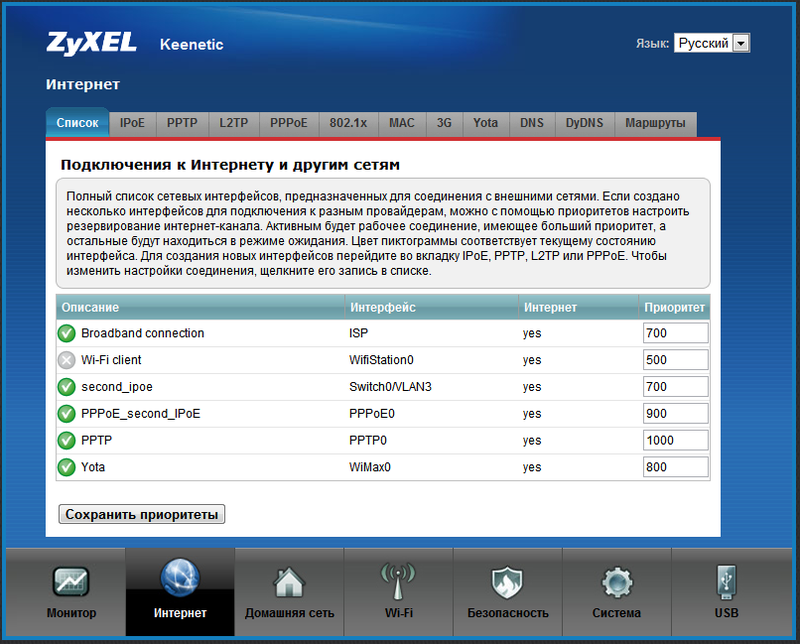
That is, the primary connection is PPTP; if something happens with the connection (in particular, the link will fall off), then the router will automatically switch to PPPoE. If there is any trouble, Yota will join the work. In this case, the router will constantly try to restore the PPTP and PPPoE connections. The WiFi client is present in the default list.

The rules work only between Internet interfaces and local interfaces. We add a rule in which we specify the "Input" interface, that is, the interface to which calls from the Internet will come (we have PPTP). Next, specify the external destination port number and its type (TCP or UDP). Then write the IP address of the internal server and, if necessary, specify which port to broadcast the request to. Similarly, the port forwarding for backup connections is configured (if necessary, of course). After saving the rules, we need to allow the necessary ports to pass through the firewall of the router to the local network. This is done in the "Firewall" tab:
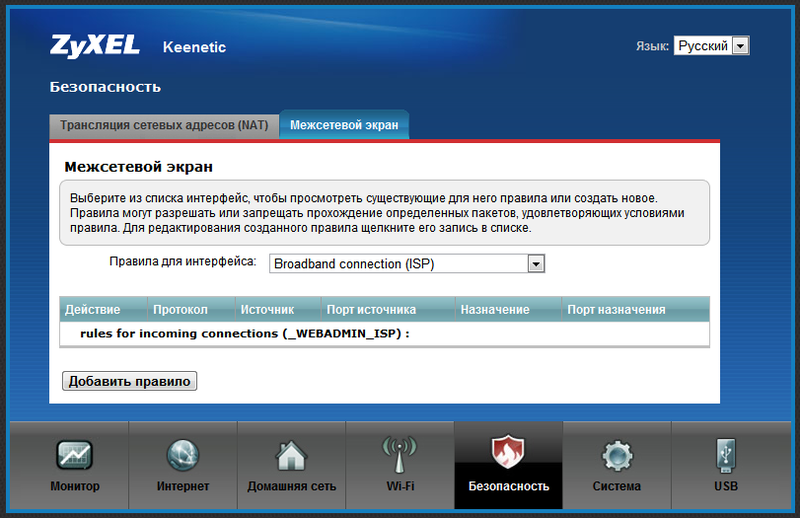
Here we can create rules for the entire device or for each interface separately. If we want to define an interface on which rules will be twisted, it should be selected immediately.
In general, as it turned out, nothing super complicated in the settings there, you just need to understand the logic of the firmware:
1. There are logical interfaces that you can bind to both physical and other logical interfaces.
2. The interface can be "for the Internet" - then the gateway it uses will be the default route for the entire system; and can be "not for the Internet" - such an interface can be used, for example, to connect to a remote network.
3. Each Internet interface has a priority, according to which they will be sorted by the algorithm of reservation of the Internet channel.
I will also add that in the NDMS v2.00 firmware there appeared an interesting and, to a large extent, working on the future, a feature that I have not seen before in any other router or network device. This is stated at the outset support for component-by-sector assembly of the firmware. That is, with the device or on the site ZyXEL, according to the plan, a basic version of the firmware is provided, sufficient for the initial configuration and access to the Internet. By connecting to the Internet, we go to the components menu and create the firmware for you by installing or removing specific modules. For example, we can remove support for 3G modems, but leave Yota support, you can remove Transmission and WiFi-client, while adding FTP and CIFS. It will be logical to leave only the type of authorization that is required to access a particular provider, and all the rest without regret to remove to free up the device's memory. I'll make a reservation that at the moment you can safely leave all the components in the firmware, there is still enough space, but the developers promise to support the "thick" components, such as DLNA, SIP client and other goodies. Then there will be a sense in the thin customization of the firmware.

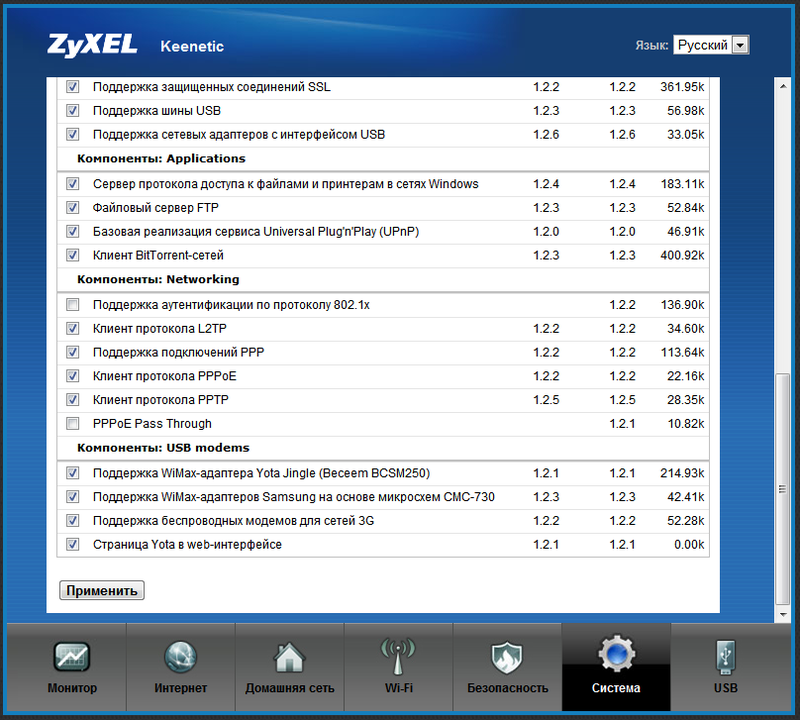
After selecting the necessary components, we press the "Apply" button and wait a couple of minutes until Keenetic receives the firmware from the ZyXEL server and automatically installs it. Settings do not need to be reset.
I want to note that the choice of components is "a useful thing, but dangerous, like dynamite." There is no "protection from a fool". You can, for example, remove the component necessary to authorize your ISP's network (which I actually did accidentally did) and then not be able to put it back, because you no longer have access to the Internet. In this case, you have to fill in the firmware in the standard way by selecting the firmware file previously downloaded from the manufacturer's website. Well, according to a beautiful idea - the user should never need the firmware file again, because here the components are not only selected again, but also updated as already installed, if updates are available (as reported by the table).
In addition to the configuration web configurator, both the Command Line Interface (CLI) and the configuration file have been subjected. Through the CLI, you can configure absolutely any scheme (of course, not beyond the functional limitations of the device), not subject to the web interface. I note that users familiar with Cisco routers, having got into the new CLI from ZyXEL, will feel like a fish in the water. Here is an example of what the CLI console looks like:

The Keenetic configuration file is now a text file that can be downloaded to a local machine, edited in any text editor and poured back into the device. After reboot, the device will start working with the new settings.
In general, the NDMS v2.00 firmware leaves a good impression and is quite workable. Among the advantages are the flexibility and the logic of the settings, which are not at all characteristic of home devices, and also the already well-working redundancy of the Internet channel, which allows creating and simultaneously using several network interfaces. Among them can be wired interfaces (with or without VLAN), wireless (access point or WiFi network client), connections via USB modems (3G / 4G, CDMA). The firmware supports a variety of authorization methods for accessing the Internet (PPPoE, L2TP, PPTP and 802.1x), as well as creating secure VPN tunnels based on common L2TP and PPTP protocols. For people who work remotely, now there is no need to create a secure tunnel to the office on your computer, it can be implemented by the router itself.
The well-proven functionality of the ZyXEL Keenetic Internet centers also seems to be in place (although so far, in the status of beta, judging by the forums, v2.00 works not so smoothly). In particular, it remained possible to use the USB port of the device to connect external USB-drives and printers with the ability to work with them simultaneously. There is also built-in torrent-client Transmission, and work with USB-disks via FTP.
The main drawback for me was the lack of support for IPTV over Wi-Fi. I will not write about minor shortcomings and shortcomings here, but they certainly are. Let's wait for the firmware to come out of the beta state. While wishes and remarks I express directly to developers in ISK (my.zyxel.ru) and in the corresponding topic on iXBT.
P. S. The screenshots were taken about a month ago, since then the versions of the components have changed significantly. IPTV via Wi-Fi has earned, but not yet perfect.
Zyxel Keenetic Giga is a representative of new generation network equipment, an Internet center dedicated to working in Gigabit Ethernet networks, meeting all modern requirements for building networks. Among its features are four Gigabit LAN-ports, two antennas with a gain of 5 dBi and two USB-ports, allowing to connect a print server, USB-drive or even 3G / 4G-modem.
A router can connect multiple devices in different ways
Keenetic Giga helps you create and configure a local (home, office) network with a wide variety of devices:
- PCs and televisions over the LAN, including devices with new network controllers running at speeds up to 1 GB;
- mobile devices via Wi-Fi - high-speed access point with a total bandwidth of up to 300 Mbps, a wide range of operation;
- a network printer, available on both USB and Wi-Fi;
- FTP-access to drives from an external network;
- IPTV receiver for watching TV without losing quality.
How to configure the switch
To configure the Zyxel Keenetic Giga, you need to connect it to your computer via a LAN cable connected to the PC network card and any of the subscriber's ports on the switch. The browser should open the Kinetics Giga control interface, whose start page is a quick setup. If nothing like this happens, type manually in the address bar my.keenetic.net or IP address 192.168.1.1, after which the start page will appear.
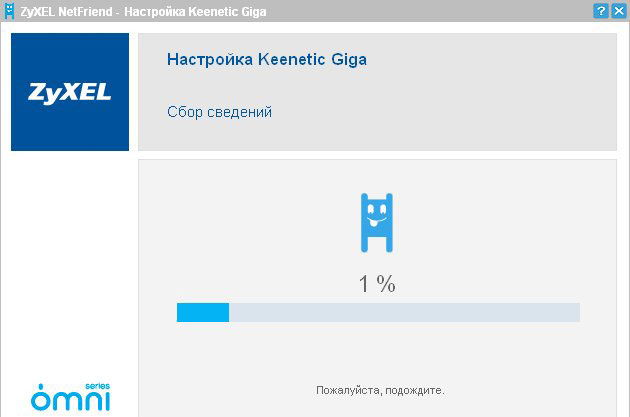
At the top left is the button "Quick setup of NetFriend". NetFriend is a program for configuring the Keenetic Giga switch, which contains the base of existing Internet providers. To configure, you can find and select your operator in this database, and the main parameters will be automatically displayed.
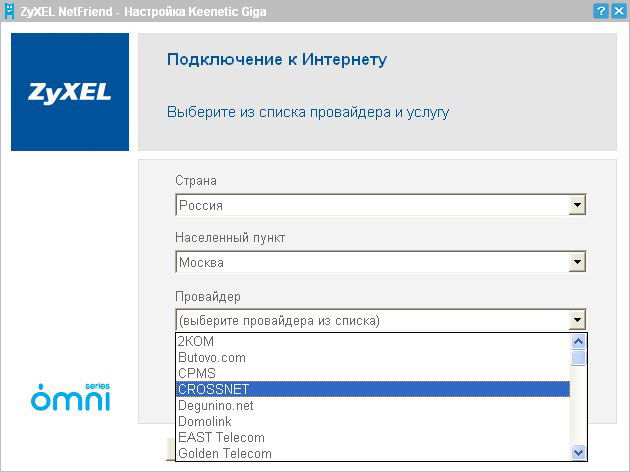
In addition to this utility, there is an option to quickly configure the Internet center without selecting a provider:
- Make sure that the network card of the computer is configured to "get the IP address automatically".
- Insert the Internet cable into the "0" connector on the back of the device.
- On the start page of the web interface, click the "Quick Setup" button.

- On the binding page of the MAC address, select the appropriate option - in accordance with the provider's policy regarding binding to the MAC address.
- Select the type of IP receipt: received automatically or issued by the provider. In the second case, you need to enter in the appropriate fields the data specified in the contract.
- If the connection requests a user name-password, enter it on the next page. If they are not, just skip this step by checking "I do not have a password to access the Internet."
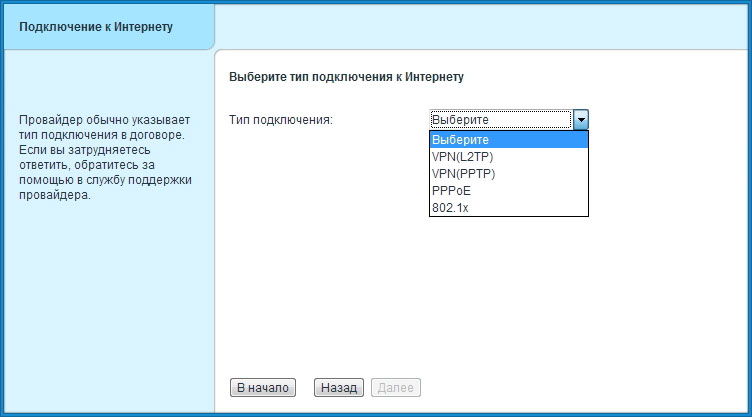
- And the last one is choosing the type of connection. Find your variant and enter the data corresponding to your connection protocol.
When the configuration is completed, the Internet center will have access to the Internet and will probably start downloading updates. Updating the program, Keenetic Giga will reboot and give out a page with a report on the connection to the Internet, which will display all information about the connection. By clicking on the "Go to the Internet" button, you will be taken to the homepage of the browser and will be able to start working on the network.
And clicking on the "Web Configurator", you will get to the web interface of Giga for more fine-tuning. Completely Russified menu management Keenetic Giga structured as a sub-tree, so it will be easy to find the necessary functions. Setting up a Wi-Fi access point, for example, is done in the "Wi-Fi network" section. Here you can turn on the access point, assign an SSID (network name), select the standard and the number of the broadcast channel, configure security and other parameters necessary for wireless connections.

Firmware Upgrade
The Keenetic Giga Internet Center also provides the ability to update or reinstall the software if necessary. The firmware is executed according to the following algorithm:
- Download to the computer a file containing the new version of the software (* .bin extension).
- Connect the Gig to the computer (LAN cable between the network card of the PC and the subscriber port).
- Go to the web interface.

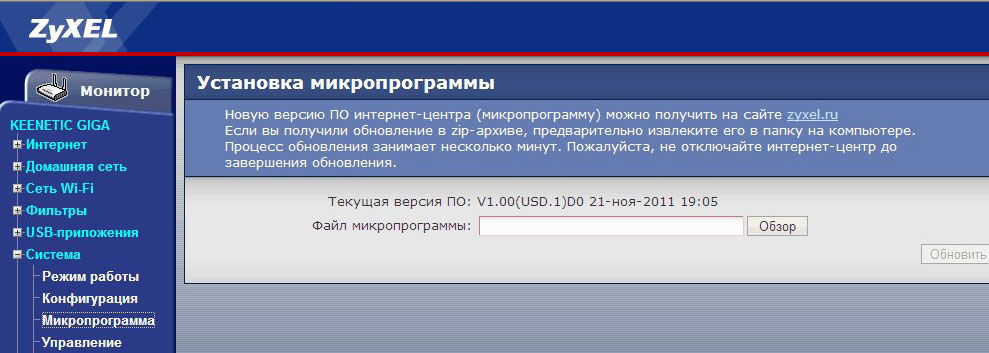
- In the "System" section select the item "Firmware", register the path to the file with the new firmware and click "Update".
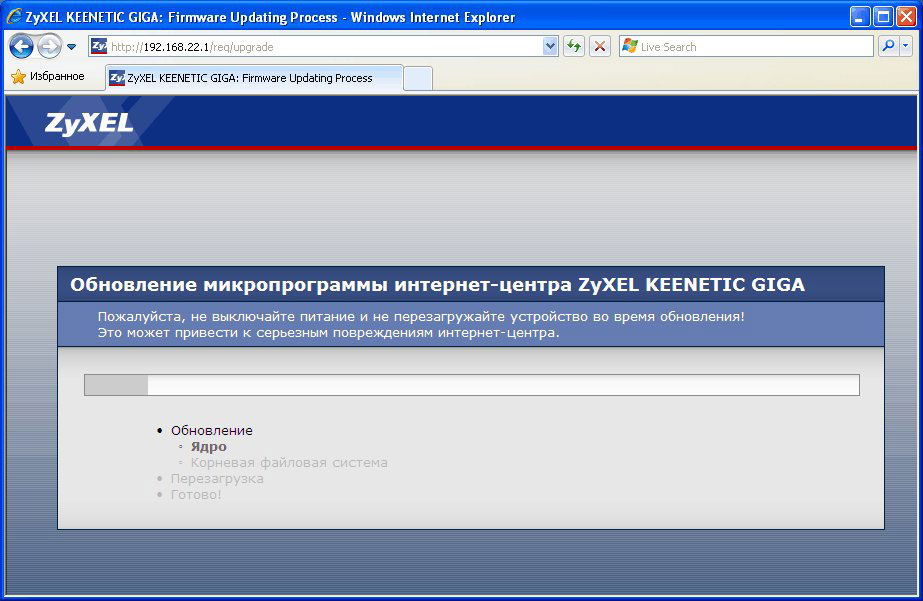
- Wait until the process is complete. The switch will reboot - this is a sign that the firmware has been successfully updated.
Conclusion
Keenetic Giga Internet Center from Zyxel is a universal switch for creating a home network with almost any needs. It can act as a simple router, distributing the Internet for one hundred megabit adapters, and as a full-fledged modern switch with more demanding hardware (gigabit network controllers, USB drives, print servers, mobile modems, etc.).
Setting up and flashing the Giga switch will not even make it difficult for ordinary users - its software is optimized for trouble free navigation and quick setup. Do you have any experience of using gigabit routers for local networks? Tell us about it in the comments.
Upgrading the firmware is a very important point for the stable operation of any device. Since everything in our time is being modernized, improved, new technologies are used, it is necessary to constantly improve the devices already purchased. Plus, the manufacturer himself can make mistakes in writing software, as a result, the equipment may not work correctly. Whatever your equipment, no matter what - the router, TV, video card, pleased you with your work, use only the latest version of the software.
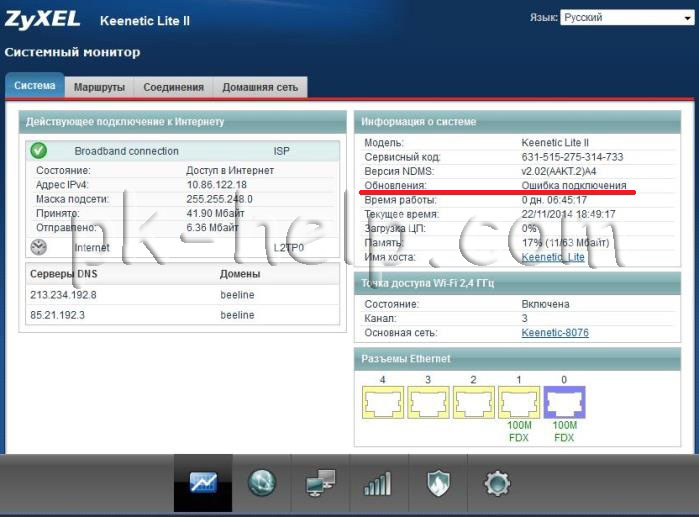
Always, when I write a review about network equipment, in particular about Zyxel routers, I recommend updating the firmware. To do this, you need to connect to the web interface of the router, open the " System"-" Components ", tick off which components need to be updated and click" Update", then the router will download, install updates and reboot.But there are times when in this way you can not update Zyxel Keenetic, for example the router is not connected to the Internet or the window with an error appears" "
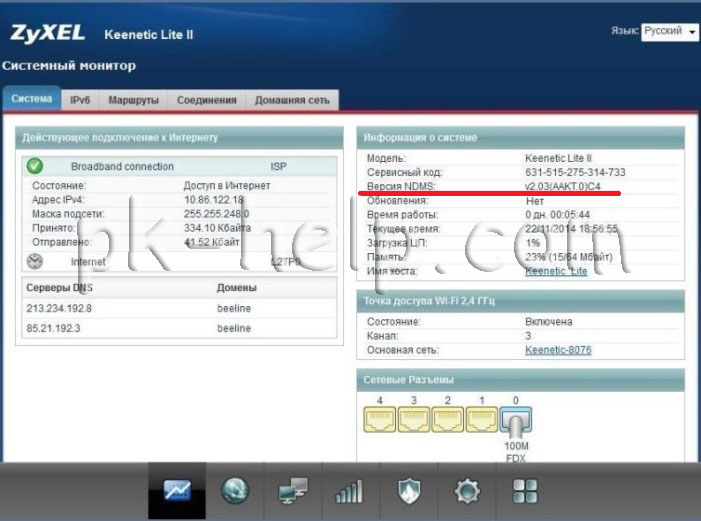
And in the "System" window you can see in the line "Updates" the inscription - Connection error.
In this case, you need to go to the Zyxel website from your computer with access to the Internet, find your router model and download the latest firmware:
In order to download the firmware, select the "Support" tab and in the Firmware field download the latest version of the software for the router.
Then unzip the downloaded archive with the firmware, as a result you should get the folder with the extension file * .bin.

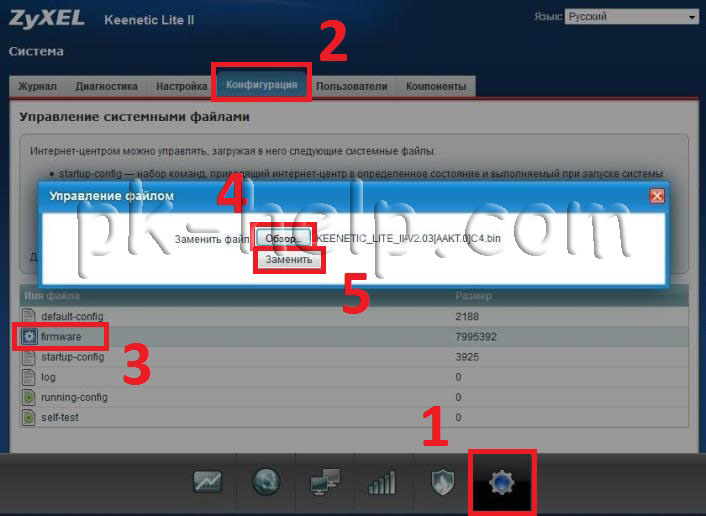
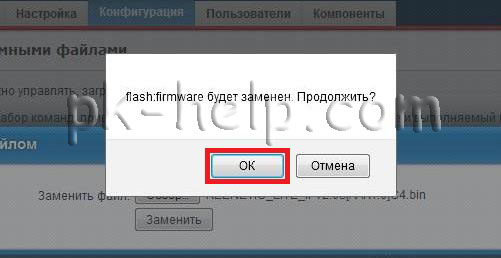
Now you need to connect to the router using a network cable, go to its web interface, do so in the browser, enter 192.168.1.1, enter your login and password. Then go to "System" select the "Configuration" tab, click on the file name "firmware". In the File Management window that appears, click the Browse button, specify the location of the firmware file (* .bin extension), click the "Replace" button.
Attention!!! When updating the firmware, do not turn off the router and do not turn off / restart the computer from which you update the firmware.
After a few minutes, the firmware will be updated and the router will be ready for use.
Thus, even if your Zyxel router is not connected to the Internet or gives an error when updating the " Could not connect to the component update server. Please check your Internet connection."you can still update the firmware of the router and use it successfully.
This instruction is suitable for the Zyxel Keenetic Lite and Zyxel Keenetic Giga firmware. In advance, I note that if your Wi-Fi router is working properly, it makes no sense to change the firmware, unless you are one of those who always try to install the very latest.
Where to get the firmware file
In order to download the firmware for Zyxel Keenetic series routers, you can visit the Zyxel Download Center at http://zyxel.ru/support/download. To do this, in the list of products on the page, select your model:
- Zyxel Keenetic Lite
- Zyxel Keenetic Giga
- Zyxel Keenetic 4G
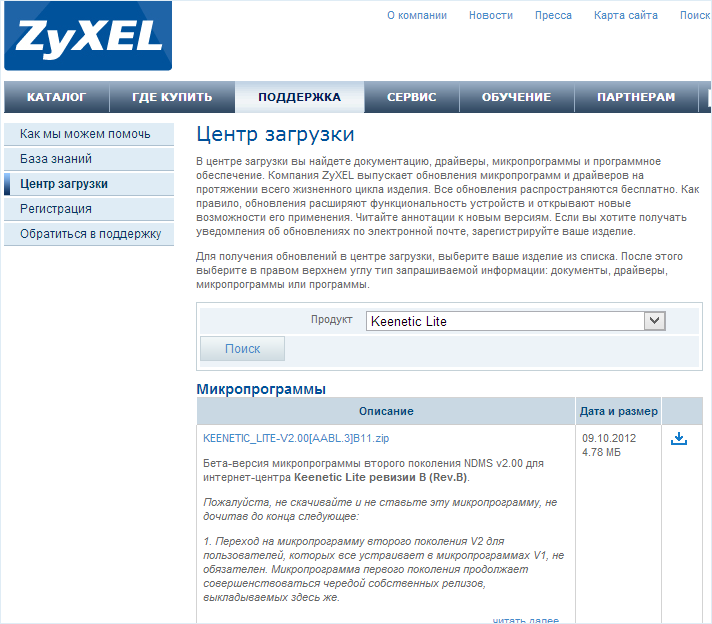
And click search. Various firmware files are displayed for your device. In general, for Zyxel Keenetic there are two versions of the firmware: 1.00 and second-generation microprograms (while in Beta version, but works stably) NDMS v2.00. Each of them is present in several variants, the date specified here will help to distinguish the last version. You can install both the usual firmware version 1.00, and a new version of NDMS 2.00 with a new interface and several advanced features. The only disadvantage of the latter is if you are looking for instructions on setting up a router on this firmware for the last provider, then there are not any on the network, but I have not written it yet.
After you find the desired firmware file, click the download icon and save it to your computer. The firmware is downloaded to the zip archive, so before starting the next step, be sure to extract the firmware from there in the bin format.
Install the firmware
Before installing a new firmware on the router, I draw your attention to two recommendations from the manufacturer:
- Before starting the firmware update, it is recommended to reset the router to the factory settings, for which when the router is on, you must press and hold the Reset button on the back of the device for a while.
- Steps for flashing should be done from a computer connected to the router by an Ethernet cable. Those. not over a wireless network Wi-Fi. This will save you from many troubles.
In order to install a new firmware on the router, run your favorite browser (but it is better for this router to use the latest Internet Explorer) and enter 192.168.1.1 into the address bar, then press Enter.
As a result, you will see a prompt for a user name and password to access the Zyxel Keenetic router settings. Enter admin as your login and 1234 - the standard password.
After authorization, you will enter the settings section of the Wi-Fi router, or, as it will be written, the Zyxel Keenetic Internet Center. On the "System Monitor" page you can see which version of the firmware is installed at the moment.

In order to install a new firmware, in the menu on the right, in the "System" section select the item "Firmware". In the "Firmware file" field, specify the path to the firmware file that was downloaded earlier. After that, click the "Update" button.

Wait until the firmware is updated. After that, go back to the administration panel of Zyxel Keenetic and pay attention to the version of the installed firmware in order to make sure that the update process was successful.
Firmware Update on NDMS 2.00
If you have already installed a new NDMS 2.00 firmware on Zyxel, then when new versions of this firmware are released, you can update as follows:
- Go to the settings of the router at 192.168.1.1, the standard login and password are admin and 1234 respectively.
- At the bottom choose "System", then - the "Files" tab
- Select the item firmware
- In the window that appears, click "Browse" and specify the path to the Zyxel Keenetic firmware file
- Click "Replace" and wait for the update process to finish
After the firmware update is completed, you can go back to the router settings and make sure that the version of the firmware installed has changed.