What you need to do immediately after installing postgresql. Parameters for PgBadger. Disks and file systems.
PostgreSQL (pronounced "Post-Gres-Kew-El") is a free, modern database with broad capabilities. It is used by such companies as Alibaba, Instagram, Skype, Yahoo and many others. This indicates the reliability of the system, while it is easy to install, use and maintain. You can get a closer look at it from Wikipedia article: https://en.wikipedia.org/wiki/PostgreSQL
For more cleaning, increase the value of this setting. However, for transaction banks with many write operations, the default value may decrease performance. However, it is important to note that a significant increase in the value of this parameter can lead to data loss during a possible power outage as data is stored. Ideal values are between 32 and if the set of disks on the server is almost safe, try using 128 or.
As an example, if the database table has 20 MB and the size of this configuration is limited to about 8 standard megabytes, then the optimizer will load the table step by step, until everything is searched in the Search records. Determines the cost of choosing a database access plan. If you have fast hard drives, try using values such as 1 or 2 for this value.
PostgreSQL is a cross-platform open source database, so it can be installed on almost any server. All server configurations and all operating systems provided by vscale allow the use of PostgreSQL.
Consider installing and configuring the example of Ubuntu 16.04 64bit.
In this case, return the backup and make sure that the changes are correct. You can achieve a significant increase in performance with the correct choice of values for the above configurations. It can be installed only when the server is started.
By default, the computer name is used, which is indicated by an empty string. Allows the use of user names for each database. When the value of this parameter is true, global global users can still be created. This function was created as a temporary measure until a final solution is found when it is deleted. Minor values shorten planning time, but can lead to lower query plans.
Technical requirements
• User with sudo rights
• Ubuntu 16.04
Step 1. Select the source to install
PostgreSQL is a very popular database server, so it is present in official Ubuntu repositories. However, in PPA developers PostgreSQL you can find the latest version. For example, at the time of this writing, PostgreSQL 9.5 is available in the Ubuntu repository, and 9.6 can be installed from the PPA. If you do not have a need for the latest features of this DBMS, then the current step can be skipped. Otherwise, add the PostgreSQL repository to the system source list:
Then the scheduler was improved so that internal records written in this way could be rearranged; This configuration parameter controls to what extent this reordering is performed. Therefore, the join order specified in the command will be the actual order with which the relationship is connected.
The command optimizer does not always choose the optimal join order; advanced users can decide to set the value of this variable to 1 temporarily, and then explicitly indicate the desired connection order. Includes the collection of statistics at the block level of the database activity.
Sudo sh -c "echo" deb http://apt.postgresql.org/pub/repos/apt/ `lsb_release -cs`-pgdg main" \u003e\u003e /etc/apt/sources.list.d/pgdg.list "
and add a key for it
Wget -q https://www.postgresql.org/media/keys/ACCC4CF8.asc -O - | sudo apt-key add -
This will allow you to receive the most recent versions when upgrading packages.
Step 2: Install PostgreSQL
If the system is installed recently and you skipped the previous step, you can skip this step, because during the system installation, the package index is updated. Otherwise, run the command:
Allows you to collect statistics at the level of a row of database activity. If enabled, the collected statistics will be reset every time the server is rebooted. If it is disabled, statistics will accumulate between rebooting the server. For more information on schematic manipulation, see Section 8.
The value can be a table space name or an empty string to specify the default table space for the current database. In section 6. Sometimes it is useful to turn off the scan to avoid problems such as direct links when restoring role definitions from a backup. This parameter controls the default isolation level for each new transaction.
Sudo apt-get update
This command will update the index, which will allow you to install fresh and current packages.
Installation of PostgreSQL from official repositories and from PPA is carried out in the same way. Download and install PostgreSQL packages and contrib (contrib provides some additional functionality and utilities):
Step 3. Connecting to the database server
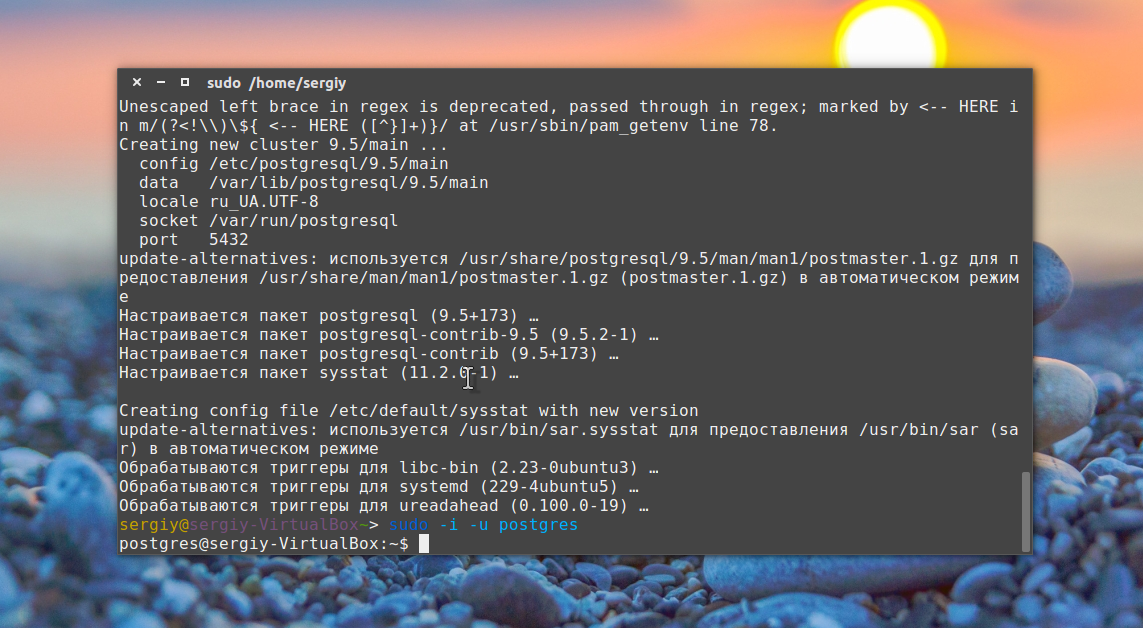
During the installation of the program, the database administrator account was automatically created in the system - postgres. At this stage, access to the database system can be obtained only through it.
You can either switch to the postgres session and run the shell of the program:
This parameter controls read-only status for each new transaction. Stops any ad that exceeds the specified number of milliseconds. The zero value, which is the default, disables this restriction. The value of the parameter is added to the number of digits by default. The value can be set to 2, including partially significant digits; Particularly useful for floating-point data in backups, which need to be accurately restored.
It can also be set to a negative value to suppress unwanted digits. Sets the encoding on the client side. By default, database encoding is used. Specifies the language in which messages are displayed. Section 1. In some systems this language category does not exist; Setting this variable works, but it does not affect.
Sudo su - postgres
psql
or run the shell on behalf of postgres without switching the session:
Sudo -u postgres psql
Once in the psql command line, in one way or another, you need to know how to get out of it. You can do this by entering the exit command:
(short for quit).
Step 4: Create a new role
If you have performed the installation according to the instructions, by that time in your DBMS there is only one role - postgres. It is recommended not to use this role to work with your databases, but to create a new role for each database (or several if necessary). To create a new role, there are two standard methods:
If this variable is defined as an empty string, the value is inherited from the server's production environment in a system-dependent manner. Sets the language that will be used to format the date and time values. If the value is set to an empty string, automatic path search is disabled.
This parameter can be changed at runtime by superusers, but the setting made in this way is saved only until the end of the client connection, so this method should be reserved for development purposes. Controls semantics of inheritance, in particular, whether subtitles are included by default in several commands. They were not included in earlier versions. In Section 5. Displays the language used to classify text data. In section 1.
- an interactive mode in which it is enough to answer some simple questions;
- command to create a role through the command line of the DBMS.
We will not elaborate on the interactive mode, since we can create a role that fully meets the requirements in most cases, we can only do one simple command (before this we need to be in the command line mode as described in Step 3). Do not forget to replace username with the desired username, and password - in the password for this user:
The value is determined when the database is initialized. Displays the language that defines the character classification. Indicates the maximum number of arguments to a function. Indicates the maximum length of the identifier. Displays the maximum number of index keys.
Shows the encoding of the database. It is determined when the database is created. Displays the version number of the server. The following instructions are for the personnel of the infrastructure of the information infrastructure of the court, in particular those responsible for. Although this is not essential, it is very useful for the person responsible for performing the following actions.
The name is given without quotes, and the password is in single quotes.
Step 5. Creating a Database
In the psql command-line mode, we can create the database using the create database command and specifying the name of the database. For example, to render a database named vscale_db, run the following command:
Create database vscale_db;
Step 6. Assign rights
We created the previously created role for assigning the rights to the database. In most projects, where you will use only one database user, it will require full rights. You can issue them as follows:
Database management system
Depending on the operating system of the application host, the person responsible for installing the system must have the following software. Despite this choice, there is backward compatibility of the database with version 4, if the database structure is repeated in this version.
Since we can not cover all the installation possibilities, we will describe the configuration of the database already installed in the operating system. If this password was not set during the installation, the host operating system administrator must do this.
where vscale_db is the name of the database selected in step 5, and username is the user name specified in step 4.
All minimally required presetting is complete. You can exit psql by typing "\\ q".
Step 7. Authentication and getting started with the database
By the moment you have everything you need to get started with the database. To connect to it, run psql with the following parameters: host "-h localhost" (as we connect to the local database), the database name "vscale_db" and username "username":
Depending on the configuration of the operating system, the user will have to enter his user password to execute this command. The password must be set by entering it, and then enter the key and repeat the procedure. After that, just run the command to log off. This file has a long explanatory documentation. Thus, the purpose of this file is fine tuning and access to remote access. This sometimes requires preparation of more than one transaction at a time.
Because of this, it closes a significant number of settings, which, made by hand, will make it difficult, if not impossible, to use the script in a reasonable time. Because of this, copies of databases with a minimal configuration, from which the courts can begin setting up the system according to their characteristics, become available with a binary version of the system. After all, they can be accessed in binary format.
Psql -h localhost vscale_db username
After that, you will be able to interact with your database: create tables, compile information in them, make selections, etc.
Conclusion
Summarizing the above, we get a very simple sequence of steps for preparing PostgreSQL for use. Install the database server and start the shell:
Install and configure the application server
This is necessary for the administrator to register users of the application in the service of consultations of individuals and legal entities of the Internal Revenue Service. To ensure correct operation of the system, make sure that the following steps have been completed successfully.
These libraries are a condition for the perfect functioning of messages through the web service. It should be noted that some operating systems allow you to install these servers through installation packages that already configure the startup and shutdown of the server. Therefore, you must modify the files referenced by these links.
Sudo apt-get update
sudo apt-get install postgresql postgresql-contrib
sudo -u postgres psql
Create a user, a database, and assign rights:
Create user username with password "password";
create database vscale_db;
grant all privileges on database vscale_db to username;
\\ q
We looked at the installation and initial configuration of PostgreSQL on Ubuntu 16.04. More details about the features and fine tuning can be found on the official website:
Here is a procedure, for example, creating a keystore and trust store. The package successfully completed the process status: a reboot is required. Two more remarks. Below is the step by step of what was accomplished. We always use the most modern possibilities. So, we need to install it manually.
The following information is displayed. You are currently disabled. If everything happens, the request will change to. Currently, the information will not be displayed. Let's return to the console if the deployment was successful. The first is the driver configuration, and the second is the data source. Here is an example of what a full driver section looks like. Only above the section is the partition. Values here are not reference values, they are just examples.
Relational database management systems are a key component of many websites and applications. They provide a structured way to store data and organize access to information.
Postgresql is an object-relational database management system that increasingly replaces MySQL and production servers. Its advantage is in a number of additional features and improvements, such as reliable data transfer and parallelization without read locking. You can use this DBMS from various programming languages, and its PL / pgSQL query syntax is very similar to MySQL from Oracle.
Each installation should check the optimal values of the connection pool and, if necessary, can be larger. As mentioned above, you can additionally create a data source for bean. These parameters are optional, but recommended. Otherwise an error will be generated.
By default, the string looks like this. The above command must be executed once on each modified server. For example, suppose that there is a server "170", and on this server there are ten databases. The settings will already work for all other server databases. If the new database is created later, it already recognizes the settings.
In this article, we'll look at how to install Postgresql Ubuntu 16.04, and how to perform the initial setup and preparation for this system.
Installing Postgresql in Ubuntu 16.04
This is a very popular database server, because the program is in the official repositories. But if you want to get the newest version, you'll have to add to the PPA system. To do this, run the following commands:
Setting options for uploading files
If you have another database server, you need to do the same procedure. For example, you can use the following line.
Configuring databases on the application server
One of the sources is the system's metadata database, which stores all information about the details, processes and documents. The second data source is a database in which only binary documents are stored, that is, the actual contents of those documents that were sent by the parties to the system, and are not created in the system itself.sudo sh -c "echo" deb http://apt.postgresql.org/pub/repos/apt/ `lsb_release -cs`-pgdg main" \u003e\u003e /etc/apt/sources.list.d/pgdg.list "
$ wget -q https://www.postgresql.org/media/keys/ACCC4CF8.asc -O - | sudo apt-key add -

Then update the package lists to get the newest available version:
sudo apt-get update
Installing Postgresl Ubuntu from PPA or official repositories looks the same:
It is possible to use the third data source responsible for saving the system log data. We recommend this feature to improve performance. Regardless of whether you are using a separate data source to store logs, the journals are referenced separately in the data source files. In our tests, we set the minimum number of base connections in the logs with half the maximum size of the application database and the maximum amount with the same basic application values.
sudo apt-get install postgresql postgresql-contrib

When the installation is complete, you can proceed with the configuration.
Configuring Postgresql in Ubuntu
You know how to install Postgresql Ubuntu, but it's not enough to start a full-fledged work. First, open the terminal and switch it to the postgres user with the command:
sudo su - postgres
This account is created during the installation of the program and at the moment you can access the database system only with it. By default, postgress uses the concept of roles for authentication and authorization.
This is very similar to Unix accounts, but the program does not distinguish users and groups, there are only roles. Immediately after installation, Postgresql tries to associate its roles with system accounts, if there is a role for the system account name, the user can enter the management console and perform the actions allowed to it. Thus, after switching to the user postgres you can enter the management console:

And see the connection information:

To exit dial:
Now let's look at how to create other roles and databases.
Creating the Postgresql Role
You can already fully work with the database using the postgres account, but let's create an additional role. The postgres account is an administrator, so it has access to management functions. To create a user, run:
createuser --interactive

The script will ask only two questions, the name of the new role and whether it should be made by its superuser.
Database creation
Just as role names are mapped to system users, the database name will be matched by user name. For example, if we created the user segiy, then by default the system will try to access the segiy database. We can create it very simply:
sudo su - sergiy
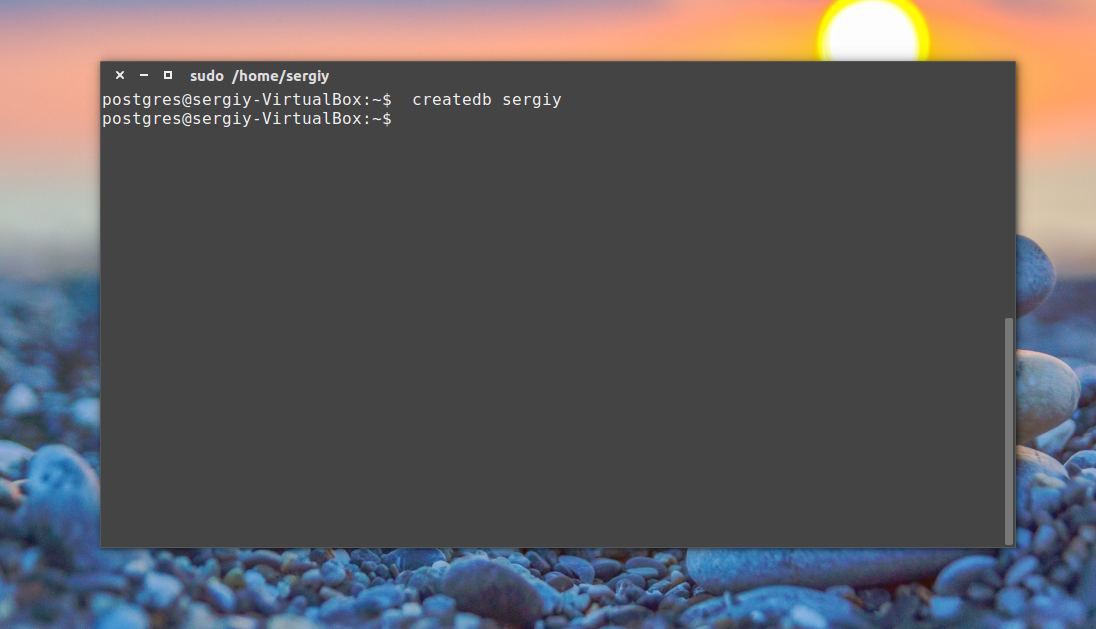
We go into the console and watch the information about the connection:

It all worked. We connected using the segiy role to the segiy database. If you need to specify another database, you can do this with the -d option, for example:
psql -d postgres
![]()
All worked correctly, provided that all components were configured as described above.
Creating tables
Now that you know how to connect to the Postgresql database, let's look at how the main tasks are performed. First, let's look at creating tables for storing some data. To create a Postgresql table, use the following syntax:
CREATE TABLE and ME table (
column_name1 type_column (length) of the constraint,
column_name2 type_of_column (length),
column_name3 type_column (length)
);
As you can see, first we set the name of the table, then we describe each column. The column must have a name, type and size, and you can also set limits for the data that will be contained there. For example:
CREATE TABLE playground (
equip_id serial PRIMARY KEY,
type varchar (50) NOT NULL,
color varchar (25) NOT NULL,
location varchar (25) check (location in ('north', 'south', 'west', 'east', 'northeast', 'southeast', 'southwest', 'northwest'))
install_date date
);

We created a table for the children's playground to describe the equipment that is on it. First comes the identifier equip_id, which is of type serial, which means that its value will automatically increase, the primary key means that the values must be unique.
The following columns are normal lines, for them we specify the length of the field, they can not be empty (NOT NULL). The next column is also a string, but it can contain only one of the specified values, the last column is the creation date.
You can display all tables by running the following command:

Here we see that in addition to our table, there is another variable - playground_equip_id_seq. It contains the last value of this field. If you want to display only tables, execute:

Inserting and deleting data
We have a table, but so far it is empty. We can add some data to it. Let's add an item describing the swing. For this, the following commands are used:
INSERT INTO playground (type, color, location, install_date) VALUES ("slide", "blue", "south", "2016-04-28");
INSERT INTO playground (type, color, location, install_date) VALUES ("swing", "yellow", "northwest", "2015-08-16");
Note that column names do not have to be enclosed in quotation marks, but the value names are required. Now look what happened:
SELECT * FROM playground;

You can delete records by any criterion, for example, delete records whose type field is slide:
DELETE FROM playground WHERE type = "slide";
And again we look what happened:
SELECT * FROM playground;

Installing phppgadmin
It is not always convenient to manage the database from the terminal. Sometimes you need to access everything through the web interface. For this, there is a phppgadmin program, but for its operation you need the Apache web server. To install the program, type:
sudo apt install phppgadmin
When the installation is complete, open the /etc/apache2/conf-available/phppgadmin.conf file and comment out the line:
And instead of it add:
It is necessary to open access to this address not only from the local computer, but also their other network devices. Note that you will not be able to log in to the postgres account, this is for security reasons. When done, restart Apahce:
sudo service apache2 restart
conclusions
Now the installation of Postgresql Ubuntu 16.04 is completed and you even went through a short excursion into the syntax of PgSQL, which is very similar to the usual MySQL, but has some differences. If you have any questions, ask in the comments!