Description and configuration of the access point Ubiquiti NanoStation Loco M5. Buy, Ubiquiti NanoStation Loco M5 street, all-weather access point and subscriber station WiFi and AirMax with delivery, mail.
Ubiquiti Networks (UBNT) is one of the leading developers and manufacturers of wireless equipment, video surveillance and monitoring systems. One of the company's main product lines is AirMax - devices designed for both providers of wireless Internet services, and for business and private users.
All devices of the AirMax line are operated by airOS® - a flexible, intuitive operating system that requires minimal training for use. Thus, the adjustment of any device of this line is completely analogous. In this manual, we will discuss the configuration of Ubiquiti wireless devices using the example of Nanobeam M5-19.
When using the AirMax series, several basic scenarios are assumed. The creation of a distributed wireless network has already been discussed in the article / helpful-information / base / 3523 /. In this manual, the settings of the "transparent" wireless bridge, allowing to combine two distributed networks, of the client device for connection to the wireless network of the provider and a typical "home" router will be considered.
Initial connection to the device and firmware update.
To perform the initial setup of the device, you need to connect it to a computer (laptop) with an Ethernet cable. The network interface of the computer must be assigned an address from the subnet 192.168.1.x. By default, the IP address of the device is 192.168.1.20, the user name and password are the same (ubnt). Access to the settings is via the WEB interface.
The first time you open the interface, the system prompts you to specify the country of use and to confirm the agreement with the terms of the license agreement.
Figure 1. Start screen of WEB interface.
Important! Indication of the country of use means that the power of the device and the available frequency range will be limited in accordance with the law. In the firmware version before 5.5.6 debugging mode "Compliance test" was available, in which the power and the frequency range were not limited, however, in newer versions of firmwares this mode was removed at the request of the regulatory authorities of many states.
The operating system airOS is constantly evolving, new features are being added, the deficiencies are being corrected. Therefore, it is advisable to use the latest current firmware versions. This is especially important for new models of devices (for example, the Nanobeam series), since the "factory" firmware may not be fully adapted to new hardware capabilities.
To update the firmware, you must download to the computer from the manufacturer's website (http://www.ubnt.com/download/) the file corresponding to the desired device. After that, on the "System" tab in the "Upload Firmware" item, specify the path to the downloaded file. After downloading the file to the device and restarting the firmware will be updated.
Important! Currently, there are 3 versions of firmware for AirMax devices. The XM firmware is designed for the current generation of AirMax devices (release before summer 2014), XW for the new generation and TI firmware for devices having the term Titanium in the name. The "new generation" of AirMax devices was originally presented by the NanoBeam series (some of the devices in the series have been renamed PowerBeam since mid-2014). Around mid-2014, the release of the Rocket M, Nanostation M and Nanostation Loco M devices of the new generation began. These devices use XW type firmware. Before flashing the device it is necessary to check which type of firmware is used in the existing equipment.
Before beginning the further configuration, it is also very desirable to change the administrator name and password. Many administrators also recommend changing the network ports "by default". You can do this on the "Services" tab.
Figure 2. The "System" tab of the management interface. ![]()
Figure 3. Services tab of the management interface. 
Scenario 1. Setting up a "transparent" network bridge.
One of the most common tasks in building a network infrastructure is the need to network on a remote site or in a separate building. In doing so, conduct the wire either unnecessarily expensive or impossible due to the distance or terrain conditions. The problem is easily solved with a pair of AirMax devices configured in a transparent wireless bridge mode.
Figure 4. "Transparent" wireless bridge. 
In bridge mode, one of the devices operates as an access point, the second as a client. Unlike the work of a standard access point that processes data packets and replaces the MAC address of origin with the MAC address of the access point, the point operating in Transparent Bridge Mode (WDS) stores the MAC address of the packets unchanged and does not process them - traffic is simply transferred to destination. In fact, the bridge works like an Ethernet cable - traffic is transmitted without any modification, "as is."
To configure the first device as an access point in the "Network" tab, you must select the "Bridge" network mode. To have permanent access to the management interface, you must specify the network address of the device (DHCP or static). The "DHCP Fallback IP" item allows you to set the device address to access the control if you can not obtain an address from DHCP - for example, when the device is directly connected to a computer.
Figure 5. Network settings for the access point in the transparent bridge mode. 
In the "Wireless" tab, you must specify the operating mode of the wireless network "Access Point" (access point) and set the "WDS (Transparent Bridge Mode)" checkbox. After that, specify the wireless network ID (SSID), the wireless mode, the type of security, and the network key. Ubiquiti devices can automatically select the frequency (depending on the ambient conditions, a free frequency channel is selected) or operate at one fixed frequency, which can be selected in the "Frequency" item. You can also select several frequencies by setting the "Frequency List" checkbox. Also in the settings of the wireless network, you can select the width of the used frequency channel. Increasing the bandwidth of the channel increases the data transfer rate. Reduction - to increase the stability of communication and to avoid interference in conditions of high density of competing wireless networks.
The radio module power can also be changed in the wireless network settings. At relatively short distances, it is desirable to reduce the power of the radiator, which will avoid unnecessary interference.
Figure 6. Wireless network settings for the access point in the transparent bridge mode. 
Figure 7. List of frequencies available when selecting the country code "Russia". 
In the case when only Ubiquiti devices work in a wireless network, it is desirable to enable the use of AirMax technology. AirMax is a Time Division Multiple Access (TDMA) technology developed by Ubiquiti for use in wireless communications equipment. This technology improves overall performance and throughput in point-to-point (PTP) and point-to-multipoint (PtMP) networks by reducing latency and better protection against interference. One of the main advantages of AirMax is also the increase of the maximum possible number of users per access point.
When using AirMax, it should be remembered that this technology is compatible only with Ubiquiti equipment (devices of the current M series can act as access points and clients, outdated Ubiquiti 802.11 a / b / g devices with firmware 4.0 and higher only as clients). If the wireless network plans to use equipment from other manufacturers or standard WiFi clients (laptops, tablets, etc.), the AirMax function should be disabled.
You can enable AirMax on the first tab of the access point management interface.
Figure 8. Enabling the AirMax mode for the access point. 
Ubiquiti devices allow you to configure many other wireless network settings. For the wireless bridge, the "Distance" parameter (the "Advanced" tab) is important. This parameter determines the response time when receiving packets. After the packet is transmitted, the access point must receive the ACK response packet from the client to confirm the transmission success. If there is no response, the packet is sent again. Ubiquiti recommends automatic distance detection, but in some circumstances it may be necessary to manually set the distance (for example, with a high packet loss rate).
Figure 9. The "Advanced" tab of the access point management interface. 
After configuring the access point, you can proceed to configure the client device (station). Network settings are completely similar to those for the access point.
Figure 10. Network settings for the client device in the transparent bridge mode. 
On the Wireless tab, you must specify the "Station" mode, set the "WDS (Transparent Bridge Mode)" checkbox and specify the wireless network ID of the access point (manually or by selecting the desired network from the "Select" button list). Security settings and other network settings are set in the same way as for the access point.
Figure 11. Wireless network settings for the client device in the transparent bridge mode. 
Unlike the access point, for the client device in the settings AirMax indicates the priority of the device - that is, how many "time slots" will be given to this device. Since in this case the device is only one - the priority is set to the maximum. The settings are also made in the first tab of the management interface.
Figure 12. Enabling the AirMax mode for the client device. 
The distance parameters for the client device are set in the same way as for the access point.
Figure 13. The "Advanced" tab of the client device management interface. 
This completes the configuration of the devices. Now the access point and station work as a transparent bridge connecting the two remote local networks. The bridge works almost like a cable, transferring all traffic between networks "as is". Information on the current status, quality and connection speed is available on the "Main" tab of the access point management interface and the client device.
Figure 14. Main tab of the access point management interface. 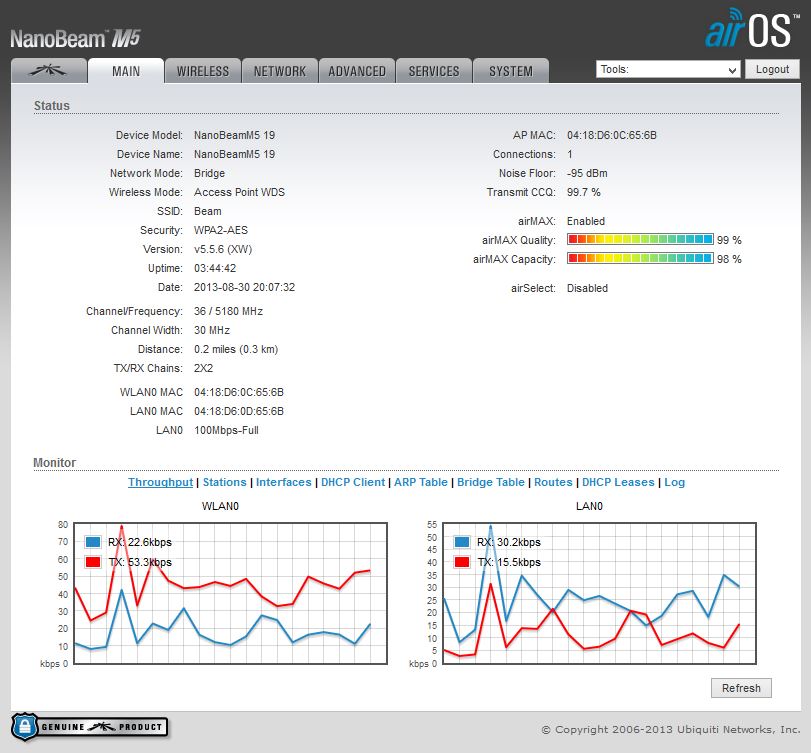
Figure 15. Main tab of the client device management interface. 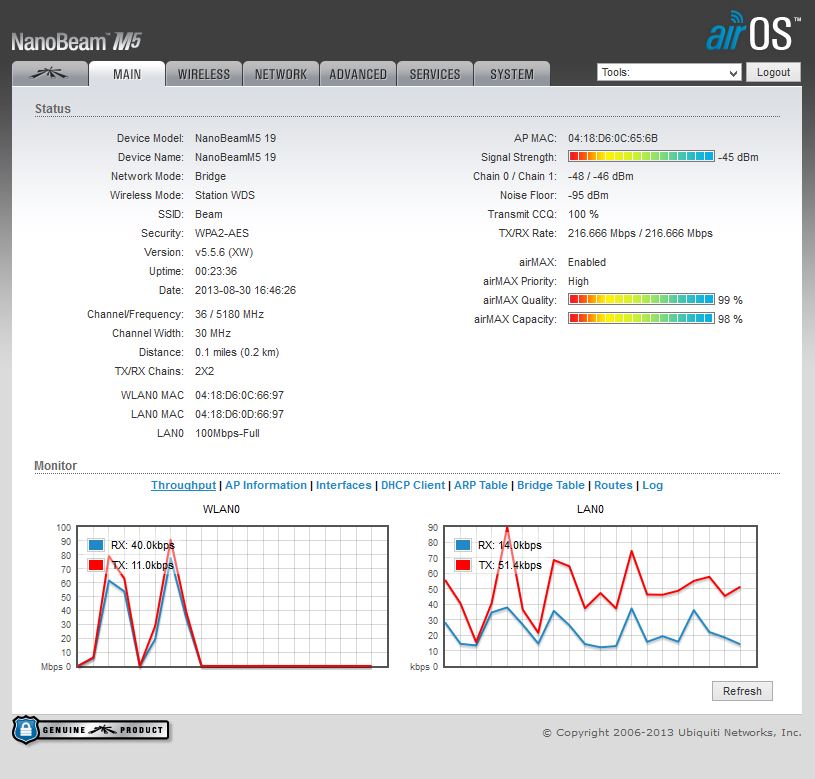
Ubiquiti NanoStation M5 is used as an access point or it can be used to create a wireless bridge. The device can provide access to the global network of many customers in the sector of the radiation angle. At the same time, the data transfer speed will allow you to view online video in high quality, comfortably use IP-telephony and keep all synchronized electronic devices in constant synchronization. Below is a detailed guide to making Ubiquiti m5 settings for the loco m5 model, as well as the main features and capabilities of the device.
Device Description
The Ubiquiti NanoStation Loco M5 provides significant signal power at a frequency of 5 GHz. It can be used as a radio bridge with a length of more than 5 km.
The device is effectively used for both retransmission and for use as a powerful access point, that is, it has two modes of operation. Despite the small size, the Yubikvity M5 is equipped with a 400 mW transmitter, as well as an antenna with an angle of at least 45 degrees. All parameters of the device settings are made using the proprietary software.
Main characteristics Loco M5
The device supports 802.11a / n / AirMax wireless network standards. Equipped with a high-performance processor "Atheros". A built-in antenna with a gain of 13 dBi, supports a wireless connection speed of up to 150 Mbit / s. Due to the small dimensions (80x31x163 mm) and the manufacture of high-quality materials, external mounting of the device is possible with attachment to the surface of any wall. The weight of the device does not exceed 180 grams. Operates on the operating system «AirOS v5». The output power of the transmitter is 23 dBM. For data security standards apply: 802.1x, WEP, WPA, WPA2. Type of power - 220 V. It can be effectively operated in the temperature range from minus 20 to plus 70 degrees Celsius and at an ambient humidity level of 10 to 90%.
In this article we will pay attention to tuning NanoStation M5, we learn about all the features and functions of this device.
Before you start describing the settings, you need to update the firmware to the latest version 5.3.3, which has been significantly improved compared to the previous ones. It is worth noting that Ubiquiti Networks decided to make a separate section of the customization of its proprietary technology AirMax, as well as an integrated spectrum analyzer AirView.
A few words about AirMax and AirView.
AirMax Is an intra-company wireless data protocol developed by Ubiquiti Networks. This protocol optimizes the work in the point-to-multipoint network.
AirView - a spectrum analyzer based on NanoStation M5, which allows scanning of radio frequency air.
Let's go directly to the setting itself NanoStation M5.
1. Connect NanoStation M5 to the device PoE (POE port), port LAN we connect to the local network or directly to the computer (the device needs several minutes to load the operating system).
2. Then in the address bar of the browser we type http://192.168.1.20 (IP-address is indicated on the product package).
3. As soon as the login window appears, enter the password and login ubnt. After we have successfully done everything, we get to the main menu Main.
4. Field Device name - The name of our device.
5. Wireless mode - here it is indicated in which mode the device is operating - Station or Acsses Point (client or access point).
6. SSID Is the name of the network.
7. Seсurity Used encryption.
8. Version - firmware version.
9. Channel width - the used channel width.
10. Signal strength - The signal strength received from the access point.
11. AirMax - connection quality level in AirMax mode.
12. Next, go to the tab Wireless.
13. In the field Wireless Mode there are several modes Access Point (access point) and Station (subscriber unit). Mode WDSmeans the integration of multiple access points into a single wireless network.
14. In the field SSID you can specify the name of the network.
15. Field Country Code contains a list of countries. This parameter is responsible for the norms and standards adopted in various countries for WiFi equipment.
16. Channel Width - this is the channel width field, this bandwidth depends on the bandwidth: 40 MHz to 300 Mbps, 20 MHz to 130 Mbps, 10 MHz to 65 Mbps, 5 MHz to 32.5 Mbps.
17. The parameter Channel shifting by default it is Disabled, we do not touch this field.
18. Meaning Frequency Determines the operating channel (frequency) on which the access point will operate. Therefore, I recommend always specifying a certain frequency range.
19. The parameter Extension Channel is enabled by default only when using the Access Point or Access Point WDS modes with a channel bandwidth of 40 MHz. This allows the system to use for data transfer two channels in 20 MHz simultaneously to increase the bandwidth
20. Significance Frequency List allows you to scan a certain frequency range when searching for access points.
21. In the field Output Power - transmitter power.
22. Field Max Data Rate, Mbps allows you to set a fixed data rate or select the Automatic mode.
23. The field Security allows you to secure the network from unauthorized access. I advise you to choose the most secure encryption WPA2-AES.
Note: When access point mode is in WDS mode, WPA2-AES encryption is not available.
The next step is to configure the second device in the Client mode.
24. We connect the second device, we do the same procedure as with the first device, points 1-3.
25. Next, go to the tab Network and change the host address, for example, to 192.168.1.21.
26. It will take some time to save the address, after which the device will reboot and we will enter the specified IP address in the browser.
27. In the field Wireless Mode should be a mode Station.
28. In the end, we are looking for our access point. To do this, you need to click on the button Select, where our access point should appear in the additional window.
29. Opposite our access point, put a tick, copy it MAC Address in field Lock to AP MAC, then you need to click on the button Change, and then Apply to save the changes.
If we did the right thing, the access point will ask for the encryption password.
30. Next, go to the tab Advanced.
31. Here we are interested in the parameter Distance, we set this value depending on the distance to the access point.
32.Value of value ACK Timeout it is set automatically, it is not recommended to change it.
33. Tick Auto Adjust means the autoconfiguration of the parameter ACK Timeout.
How to connect NanoStation M2
Consider the connection diagram of the NanoStation M2, which is often used at home.
To distribute the Internet with the NanoStation M2 over Wi-Fi we will need:
- Router or ADSL modem with router function;
- Two cables twisted pair with straight crimped (used to connect the type of computer-switch);
- Computer or laptop.
Connect the equipment:
- The first cable of the twisted pair is connected to the router and to the POE power supply unit to the LAN connector;
- The 2nd twisted pair cable is connected to the NanoStation M2 in the Main connector and in the POE power supply to the POE connector.
Configuring the network card of the computer
Attention! It is understood that the computer is connected to the router using a cable.
If the computer is connected to the router via Wi-Fi, the Ubiquiti NanoStation must be connected to the computer using a cable and configured. After configuration, the NanoStation must be connected to the router using a cable.
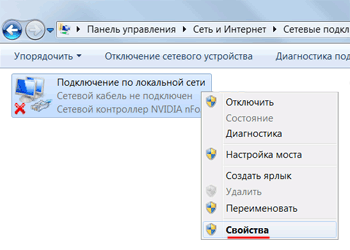
Right-click on "Local Area Connection" and select "Properties".
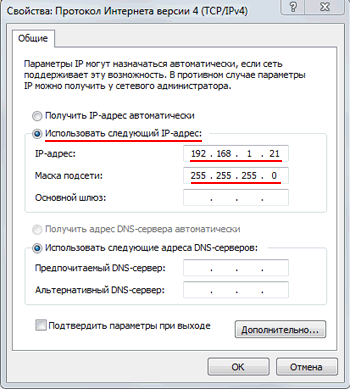
In the window that opens, select "Use the following IP address" and specify the IP address 192.168.1.21 , Subnet mask 255.255.255.0 and click "OK".
Configuring the NanoStation M2 in the "Access Point" mode
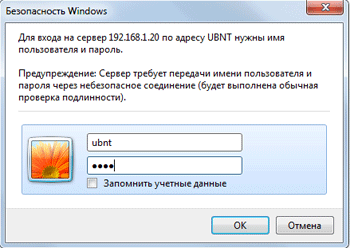
Open Internet Explorer (or another browser) and enter the address 192.168.1.20
Enter the username in the window that appears. ubnt, enter the password ubnt and enter the Web interface.
Attention! If you can not access the settings at 192.168.1.20 , then Ubiquiti NanoStation changed the IP address, which is used by default. To reset the device to the factory settings, press and hold the Reset button on the NanoStation M2 for 10 seconds.
Set up Wi-Fi hotspot
Go to the tab WIRELESS.
Configure the parameters:
- Wireless Mode: Acces Point (the operating mode of the "access point")
- Country Code: Ukraine (or another country in which the device is used)
- SSID: specify the name of the access point
- Security: WPA2-AES (specify the type of encryption)
Attention! Some Wi-Fi devices may not support the WPA2-AES encryption type. In this case, select the encryption type that is supported by your device.
- WPA Preshared Key: enter the password to connect to the access point via Wi-Fi

Change.
The top of the page is confirmed by changing the settings by clicking the button Apply.
Setting up a local network in the Vridge mode
If the router to which the NanoStation M2 is connected provides automatic network settings via DHCP, then:
- Configure the NanoStation M2 local network in Bridge mode and choose to receive the settings by DHCP;
- In the network card settings of the computer, select to automatically receive network settings.
Go to the tab " Network"And in the field" Bridge IP Address»Choose DHCP.

To save the settings, press the button Change. The top of the page is confirmed by changing the settings by clicking the button Apply.
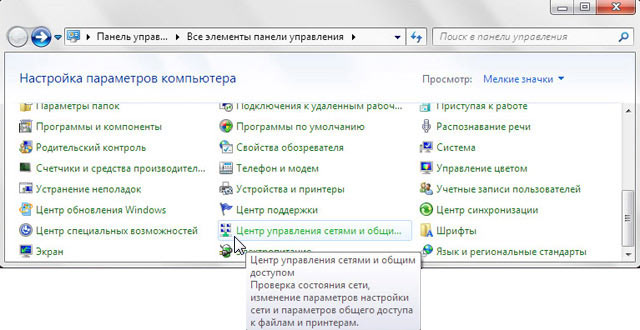
Open the "Control Panel" and select "Network and Sharing Center".
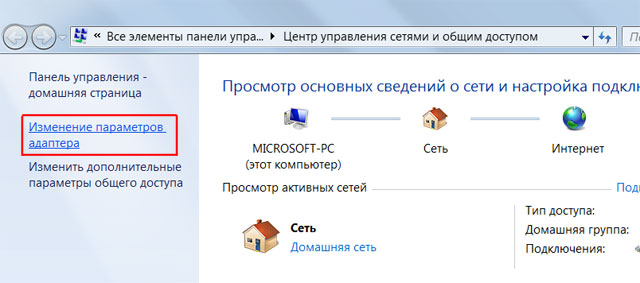
Go to the "Change adapter settings".
Right-click on "Local Area Connection" and select "Properties"
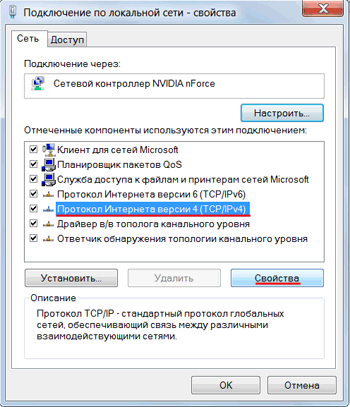
Select "Internet Protocol version 4 (TCP / IPv4)" and click "Properties".
In the window that opens, select "Obtain an IP address automatically" and click OC.

Now the computer will receive settings from the router by DHCP.
The access point is configured and can be connected to it via Wi-Fi.
Searching for the NanoStation IP address in the local network
After applying the settings, the router will assign the NanoStation a new IP address via DHCP. Therefore, you will not be able to enter the settings at 192.168.1.20.
The new IP address of NanoStation can be found using the utility Device Discovery Tool.
Run the utility and it determines the IP addresses of all Ubiquiti devices.
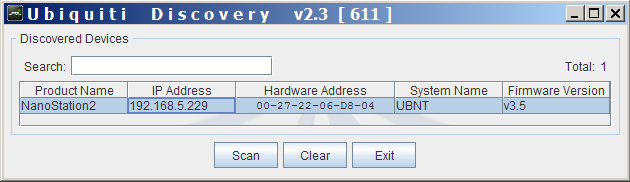
Open the browser, enter the address found by the Discovery Tool and get into the settings of the NanoStation.
Security Settings NanoStation
Only the administrator must change the NanoStation settings. To no one else can access the settings, you need to change the access password.
To do this, go to the "System" tab, in the "Administrative Account" section we change the default password for entering the settings.
Reviews of the article
Rating: 5 , Votes:
Oleg 08/22/2017 05:30:52
Tell me, two points are set up for airgrid m2, Accses poin and Station in bridge mode static aipishnik, if I connect another station to Accses poin it kind of connects, sees the level of the synapse, but Accses poin does not ping and does not pass PPOE through itself, because of what is it, can only connect one point in bridge mode?
Reply Cancel reply
Eugene 02.07.2017 13:02:08
Good afternoon, comrades.
It is necessary to transmit tagged traffic over a radio bridge on two NS M5 between two switches. The distance is 150 m. Visibility is straight.
What modes of operation are better to use? Access point - client, bridge - bridge? Do they have peer-to-peer mode?
Thank you.