What is the name of the plug on the wire of the Internet. Twisted pair: crimp and pinout for different types of connections.
When conducting local network in apartments and private houses, there is often a problem with crimping the network cable. Sometimes even with all the necessary tools to perform this operation correctly fails. And all because RJ-45 has its own characteristics, which are necessarily taken into account when carrying out such work. And today we will look at how to properly crimp the Internet cable with your own hands. To do this, you will need to prepare certain tools and carefully read the instructions presented.
Features of network elements
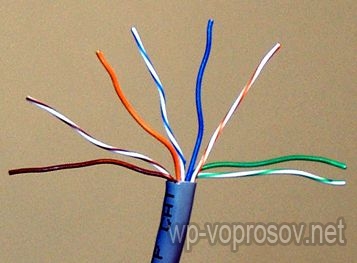
Most often, RJ-45, which is used when connecting a computer to a local network, is called twisted pair. This cable represents 4 or 8 small wires intertwined with each other in pairs. Each of them has its own dense shell. Why it is All is very simple - such a cable structure allows to reduce interference with the passage of electric signals. By the way, if this is an Internet connection with a speed of up to 100 Mbit per second, it is enough to use only two twisted pairs, that is, four wires, to conduct electrical signals. However, to build more high-speed Gigabit networks, it is necessary to use cables with 4 pairs. Experts say that the use of such conductors in the future will become more common. But for now in most of the houses where cable internet, used RJ-45 with four wires.
Crimping methods
In total there are two methods of crimping the power cord:
- Straight.
- Cross.
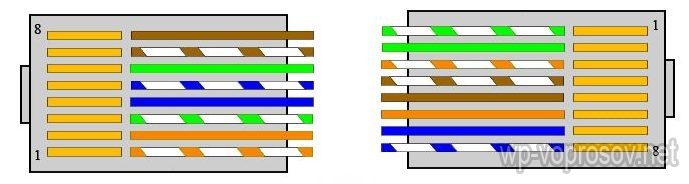
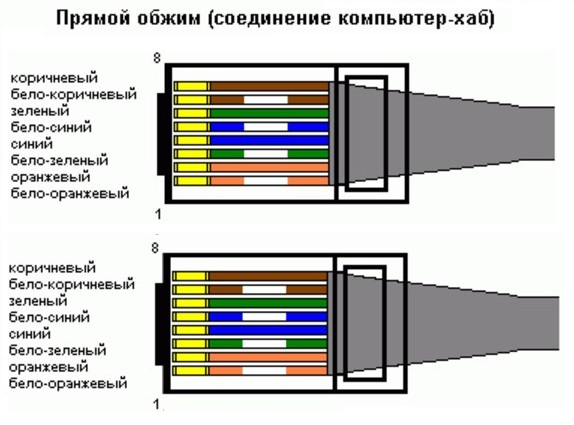
Schemes for both you can see in the photo below. 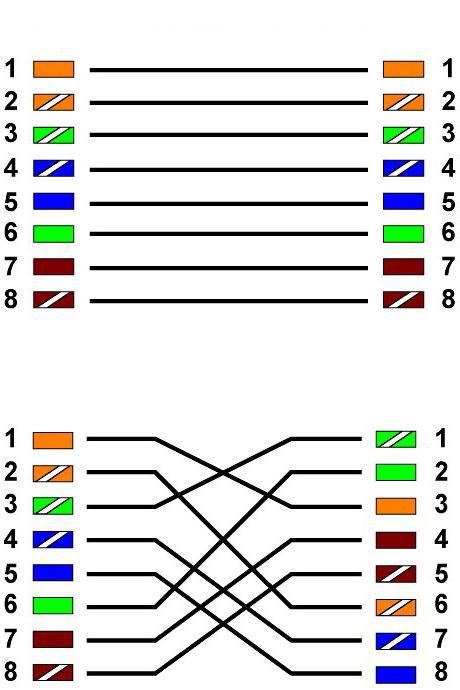 As we see, with the direct version, both ends of the cable have the same arrangement of conductors in the connector. The cross method also involves crimping a pair on different sides of the cable. It uses a different order of connecting conductors.
What is the same method to use to connect your home network? It's very simple - the direct method is used in cases where one computer connects to the Internet. The cross is applied only when the need arises between them. That is, having one laptop or PC at home, it is better to use the direct method of connecting the cable. 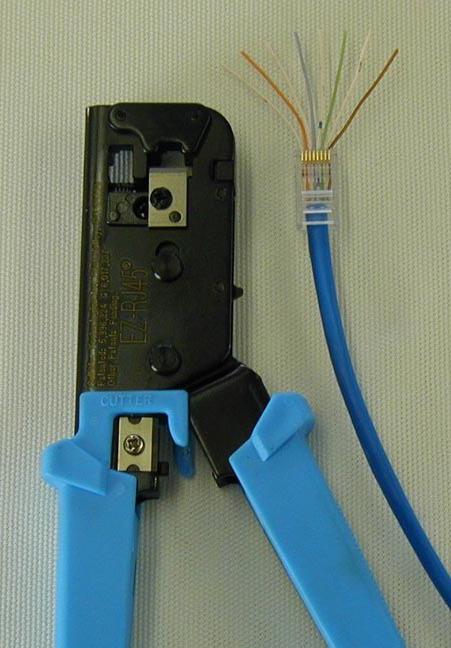
How to compress the Internet cable at home? Cooking tools
In fact, you can cope with a twisted pair with your own hands, even if you do not have a great idea about local networks. As for the tools, they can be bought at any computer store in the city, and for a small price. So, what we need to purchase:
- 1.5-2 meters of RJ-45 cable.
- Special connectors.
- Caps.
- Scalpel or side cutters.
- LAN tester.
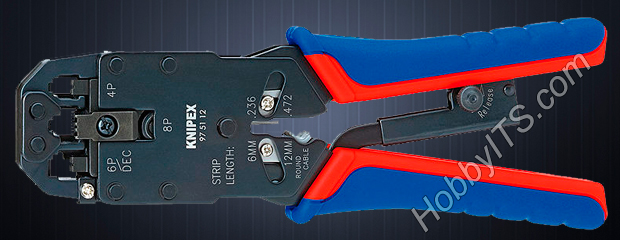
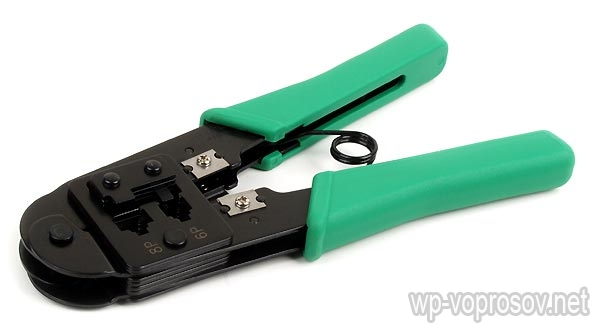
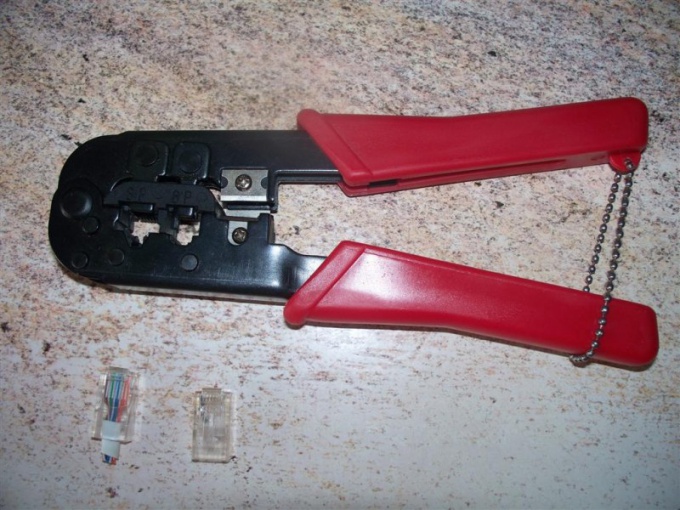
- And most importantly - a tool that allows you to compress the cable "twisted pair" for a few seconds. It is called krimper. It can be purchased at a price of 500 to 2 thousand rubles, depending on the modification, as well as the number of functions performed. With it, we can fix the connectors and crimp the cable. Externally, this unit is a mechanism such as pliers.
How to crimp the Internet cable "4 cores"? Getting Started
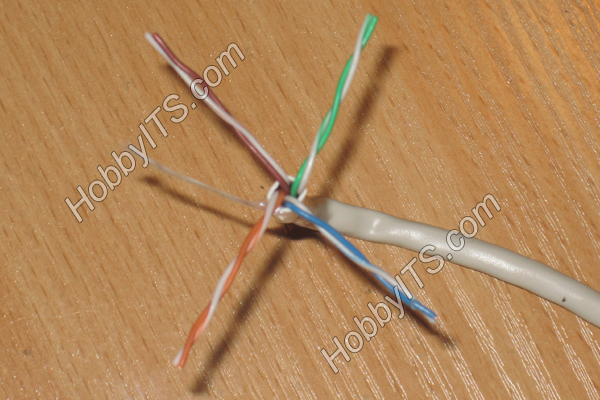
Having prepared all the necessary materials and tools, you can start working. Before you compress the Internet cable, you must first remove the layer of external insulation from it. As for the length, for connection it is enough to remove 2.5-3 centimeters of wire insulation. You can remove the thick plastic sheath with the help of a knife or with the help of the crimper itself. Now, almost all crimping tools have a special blade for removing excess insulation from a twisted pair. After that, a thin nylon thread will be visible near the wires - it can be safely cut off.
By the way, when stripping a cable, the twisting pair unwinding length should not exceed 1.25 centimeters. To make it more convenient, it is desirable to use special “tongs”, which have knives with a limiter.
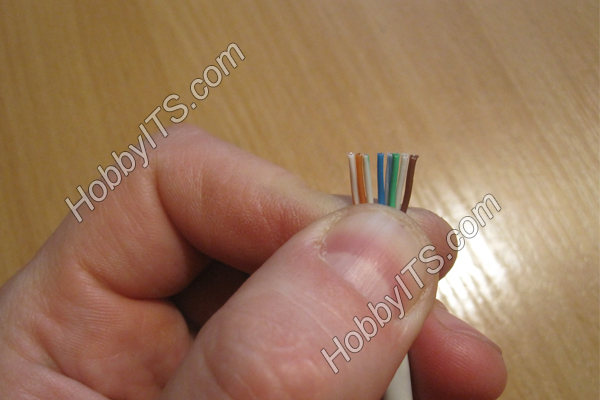
How to crimp internet cable now? We disentangle two twisted pairs of conductors and align them for the following operations. After preparation, you can proceed to the crimping procedure. It is done strictly according to the scheme.
Please note that before processing a twisted pair by a crimper, it should be as flat as possible, and the wires should be parallel to each other. If necessary, you can shorten the conductor twice in order. This is done with a blade on the crimper.
Work with crimper
Next comes the most critical part of the work. So, put on the connector and gently compress it with a crimper. To do this, we introduce the conductors into the RJ-45 network cable connector. It is important to remember that all colors should match each other, that is, white is connected strictly to white, blue - to blue, and so on. 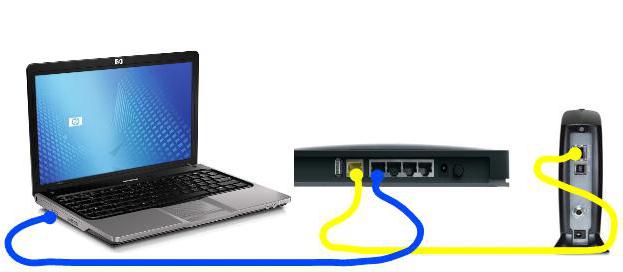 But here it is necessary to note one small point. Before you compress the Internet cable, note that the network will work even if different shades of wires were connected to the connector. True, this applies only to several types of elements. For example, instead of blue, you can connect white-blue, instead of orange - orange-blue, etc.
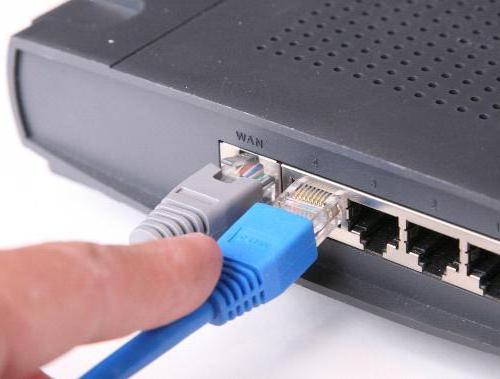
Also, make sure that the conductor accurately fits into the allotted hole in the connector. Otherwise, the transfer of data, and accordingly, the work of the Internet on a PC will be impossible. Making sure that the colors and arrangement of the conductors are correct, we take the crimper and crimp the power cable. It is done this way: the cable and connector are inserted into the device and at the last handles are compressed. Please note that this item has several holes for different types wires (4Р2С, RJ-12 and many others), namely three. Specifically for the RJ-45 cable, this hole is in the middle.
Verification of work results
But this question, how to compress the 4-wire with your own hands, has not been fully resolved. Next, we have to verify the correctness of the work done. This is done not by the “spear method”, but with the help of a special device - a LAN tester. How to use this tool? First you need to insert the cable connectors into the tester. Next, the device is connected to the power supply. If the tester does not detect any errors, all the indicators on it will light up alternately, one after the other. If you noticed that one of the conductors “missed” the tool (one indicator did not light up), it means that there is a loose contact in the socket. In this case, the network cable is re-crimped and tested again.
What should I do if re-crimping does not solve the problem?
In this case, the problem may be hiding in the connector. It so happens that at the entrance the cores can twist in it, and then it is simply impossible to guarantee the tightness of the contacts. Try replacing the connector with another one. In most cases this helps in connecting the local network.
Conclusion
Everything, at this stage our cable is ready to work. Similar to the above case, we process the second end of the wire. After that, you can safely bring it to the computer. The main thing here - do not forget the order of connecting conductors. 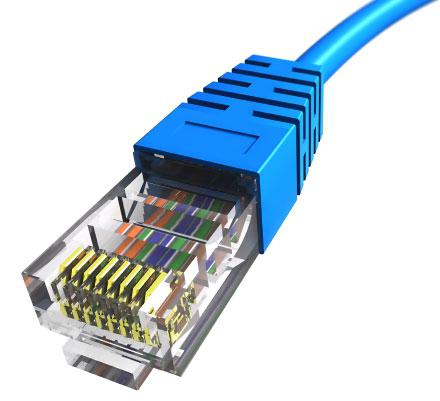 So, we figured out how to compress the Internet cable with your own hands. As you can see, the whole procedure is very simple and straightforward, and in time it takes only a few minutes.
Recently, I needed to compress the LAN cable, and I didn’t have a special tool at hand. It is about how to crimp the twisted pair without a special tool and will be discussed. Of course, you can buy a finished cable, but we are not looking for easy ways, right? Well, seriously, the situation when it is necessary to press the twisted pair is very different.
For example, due to the frequent removal from the Ethernet port of an RJ-45 plug on a crimper, a non-quality signal could arise or the standard cable length (patch cord) for connecting several workplaces was not enough. Or maybe you just need a home (for example samsung tv) or in a local network. You never know, you may need to connect via a network cable.
Here are the factory standards for patch cords with forks RJ-45: 0.5m, 1m, 1.5m, 2m, 3m, 5m, 7m. The manufacturer manufactures a cable of smaller or greater length to order.
I had a "twisted pair" cable at home (described in detail here) and several RJ-45 connectors, but I didn’t have a special crimp tool (crimper). As you probably already guessed, the way out was found - I decided to replace the crimper with a screwdriver. Of course, without a special tool, the installation process becomes a routine and takes more time, but then, with the right approach, the quality of the crimping is not affected.
Circuit crimping twisted pair.
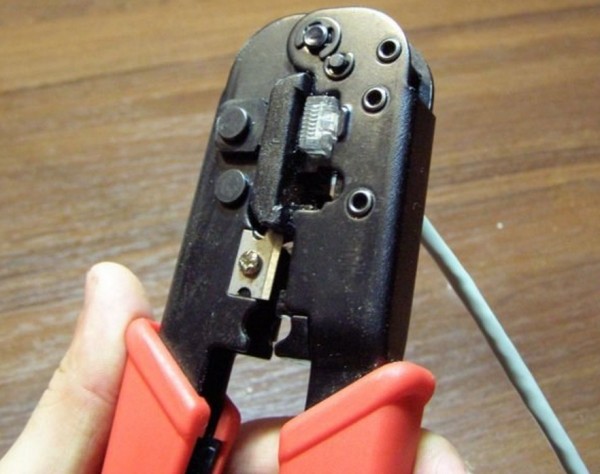
I think you understand that quality means head and hands because the quality of crimping a twisted pair will depend on them. I say this because I have met people who manage to press a twisted pair with a crimper at times worse than the amateur makes a screwdriver with the right approach. The image below shows one of the many types of crimpers.
To begin, I’ll give you a few twisted pair crimping schemes. Below is an image in which I drew two twisted pair crimping schemes: straight cable and cross-over cable.
- The first scheme is used to connect PC - Switch (computer - switch), Smart TV - Router (TV - router), Switch - Router (switch - router) and Router - PC (router - computer).
- The second scheme for connecting PC - PC (computer - computer), Switch - Switch (switch - switch), Router - Router (router - router). Usually used to connect devices of the same type.
It is worth saying that many modern digital devices automatically detect the type of cable (straight or crossover) and work fine together on any of them. Most modern devices already have such an interface (Auto MDI-X), and therefore cross-type crimping is gradually becoming a thing of the past.
Straight cable (Straight-through - straight through).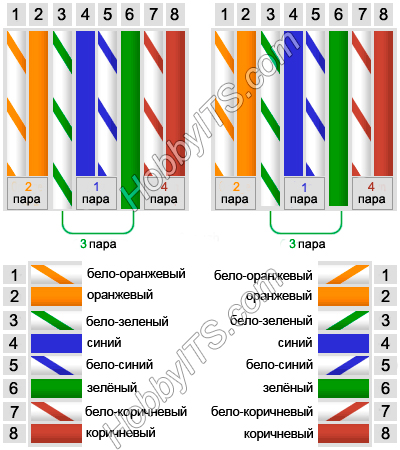
Cross cable (cross over - zero hub).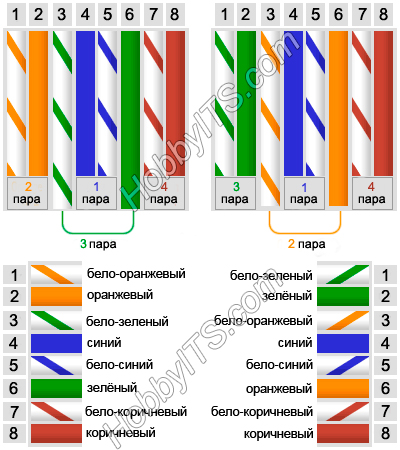
I think that the necessary scheme with the help of which you connect your devices to the network you have chosen, now let's proceed directly to creating the LAN cable itself.
Detailed instructions for crimping an RJ-45 connector.
First of all, you need to remove the outer sheath of the cable. By the way, almost all types of twisted pair contain an internal thread that allows you to easily rid the cable of the outer sheath when connected to RJ 45 connectors (for computer networks).
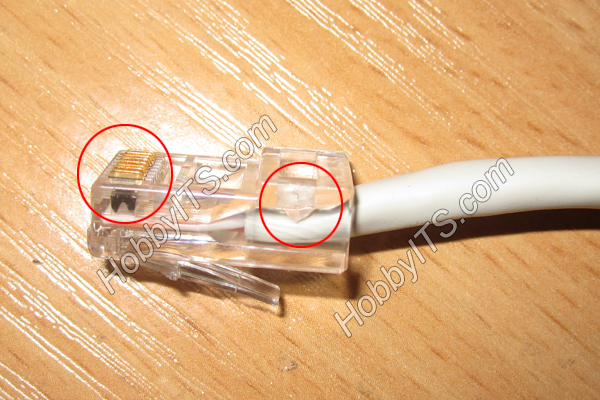
Now you need to straighten all the strands laid together and measure the distance on the plug by attaching a cable to it so that all the wires sit in their seats until they stop. The outer sheath of the cable should fit under the locking clip.
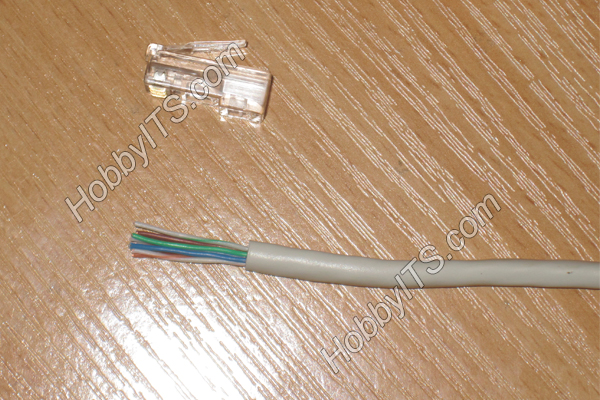
After making sure that the measurement was made correctly, cut the cable to the desired length.
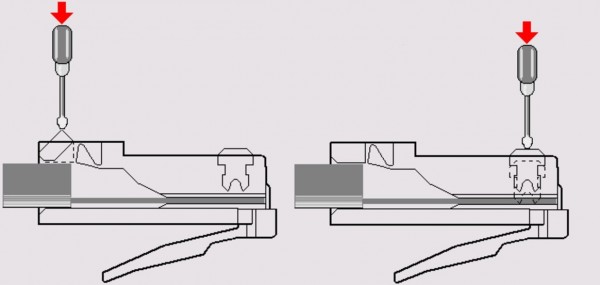
Now it is necessary to insert the cable into the end of the plug so that all the wires will sit in their guide channels until they stop. This must be done so that the external insulation of the cable falls under the terminal of the connector clamp. After that, hold the connector retaining bar with a screwdriver, while you need to ensure that the wires do not come out of the landing channels. For convenience, you can fix the cable with your hand in which you hold a screwdriver.
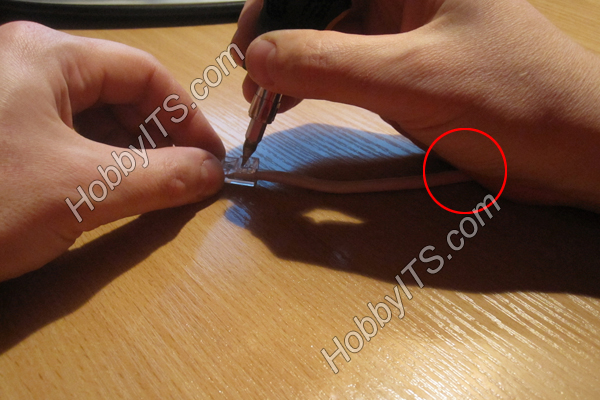
At this stage of crimp, the connector should look like the one shown in the photo below. Please note that the contacts are not embedded into the cable cores yet.
It remains to drown the connector pins in the cable cores. You need to be extremely attentive and with a feeling to put pressure on the contacts with a screwdriver so that they sit in their places while cutting the sheath.
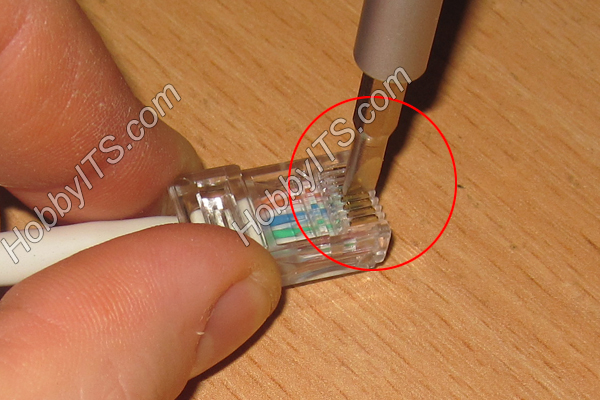
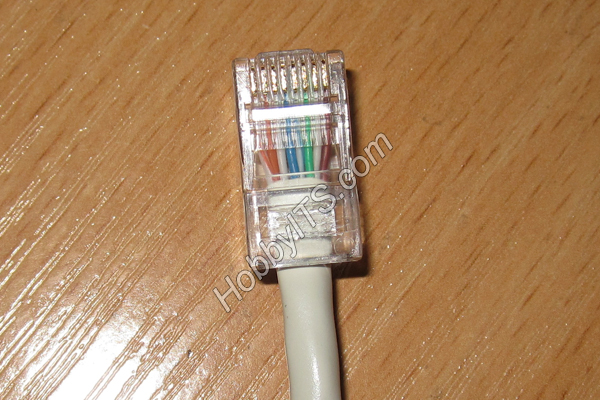
When you plug the connector contacts into the cable cores, make sure that they sit in the same place in one line. At the end of crimping, it is advisable to ascertain the quality of the work performed and check the connection using a conventional tester. To do this, on the tester, you need to set the switch to the resistance measurement mode or to the sound signal position and test all the working wires of the network LAN cable that you are compressing.

In the absence of resistance or a sound signal, press the connector pins to their seat. Of course, it is much more convenient and faster to do it with a crimper, but if you do it right, you will get a compressed twisted pair with a screwdriver at the output.
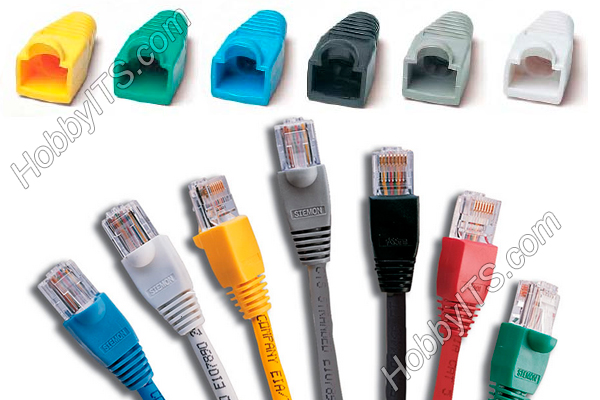
It would not be superfluous to use an insulating cap as it will protect the cable from bending and the connector from dust and moisture, but I did not have it at home. In addition, the cap gives the cable some completeness and beauty.
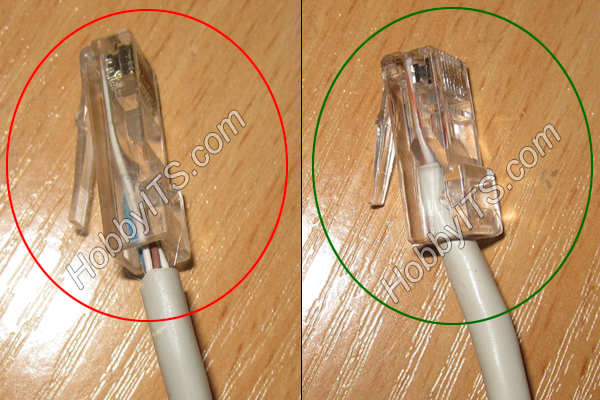
In the photo below, I decided to lay out a comparison of a crimped twisted pair by specialists of a famous provider in Ukraine, who crimped the connector with a crimper about a year ago in my home. Their work on the photo is circled in red, and the connector is crimped with a screwdriver, circled in green.
P.S. It is important to remember that the quality of the connection of your network depends on the quality of crimping the network cable. A poorly crimped or secured connector can work intermittently, which will further lead to its complete failure. If you find a broken LAN cable in your home network, then how to connect it. By the way, I recommend to expand your horizons and read a small publication about between the continents. Till!
If you find an error, please highlight a piece of text and click Ctrl + Enter.
Surely, many were faced with such a situation, when the “plug” of the Internet cable was dirty and broke during operation (it often happens with a plastic latch) - in general, the contacts went off and the Internet did not work well. Everything is treated simply - you need to re-compress the power cable.
For this we need:
1. Actually cable Internet - it is also called patch cord, or twisted pair.
2. Multiple RJ-45 connectors (one is required, and the rest are needed)

3. Crimping pliers - all this can be purchased at any radio market.
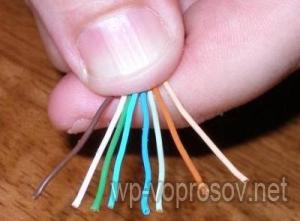
We start with the fact that before crimping a twisted pair, you need to bite off and save the old connector - it will be an example for us in the future. And, of course, carefully, without damaging the "twisted pairs", clean the end of the new cable from isolation. To do this, you can use a special double knife on the acquired tongs, or simply open and clean the insulation with a penknife. Before you will be 4 twisted pairs of colored wires. It is necessary to detach them from each other and evenly bite them so that they are all the same length.
Next you need to decide on what scheme we will crimp the cable. And there are two of them. It’s safest to see how it was crimped before - on the bitten connector. If you are crimping a twisted pair from scratch, you have to think.
Straight type - It is suitable for the case of crimping a network Internet cable in order to connect their computer to the Internet or router. It is called straight because both ends are crimped the same. Since one end is already connected in the box of your provider, we need to do this procedure only 1 time. If you need to connect a PC with a router, then the other end is crimped in exactly the same way as the first - therefore this type is called “direct”. It should be noted that for Ethernet 100Base-T (speed up to 100 Mb / s) only 4 wiring is used - orange and green. The rest are reserved for a faster 1000 MB standard. And for direct crimping, there are two more subtypes - “A” and “B”. The difference between them is that the orange and green wiring are reversed (green instead of orange, green-white instead of orange-white). The sequence of wires in type “B” looks like this:
After the outer sheath was removed, it is necessary to straighten all the wiring from our cable and put them in the correct sequence according to the scheme - the main thing is not to confuse.
Next, the most responsible - take the connector with the latch down in the left hand, the cable in the right. And carefully insert the wiring into the grooves - the main thing is not to disrupt their sequence, otherwise nothing will work. We insert all the way, then we take the crimping pliers, insert the connector into the appropriate "connector" - there are several of them for different types of cables. Now it remains only to compress the twisted pair - clamp the clamps tightly to the stop, so that the wiring on the connector cuts the insulation and comes into contact with the wires from the cable.
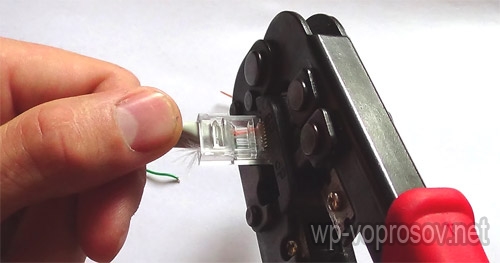
At the same time, the total outer braid should fit inside the connector to securely fix it and prevent damage to small wiring.
Another way to compress a twisted pair?
Another type of cable that is suitable only for connecting directly two computers - crossover. Here the two ends have a different order of wires - one on type “A” and the other on type “B”.
If everything was done correctly, then when you connect the patch cord to the computer, you should earn the Internet. As you can see, there is nothing difficult in squeezing the network cable! To consolidate knowledge, I recommend to watch a visual video, after viewing which I recommend to subscribe to blog updates - I promise that you will have many more interesting practical information from the world of IT technologies.

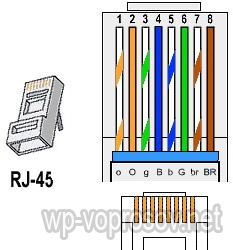
You need to arrange the conductors in the same order. As a rule, the sequence of lived is as follows: white-orange, orange, white-green, blue, white-blue, green, white-brown, brown.
Now you should bring all the wires together in one row, after which the knife cut off unnecessarily protruding tips. When this operation is completed, you need exactly the same as in RJ-45, plug the wires into the new connector. At the same time, it is necessary to make sure that the ends of the cut cable are evenly and completely entered into their groove.
In the last step, you need to flip the connector. There you will see a small notch that runs across all eight cores of the cable. Take a flat screwdriver (a knife with a rounded end) in your hands and insert it into this recess, then press firmly. This will clamp the wires inside the connector and ensure good contact.
After that, lightly pull cableto check the reliability of the cable crimp. If the wires are holding up badly and start to gradually get out of the connector, try to shove them back and repeat the previous step. If this did not work out, you will have to get another RJ-45 and start all over again, so try to be careful.
If you decide to ever do home network or simply to connect two home computers, then one of the tasks that you need to solve is crimping the UTP cable or just the “twisted pair” cable.
You will need
- RJ-45 crimping tool, two RJ-45 connectors, UTP cable.
Instruction
The first thing you need to do is special crimping pliers. It is possible to do with a flat head screwdriver when crimping, but with this option, a too large percentage of scrap, so it’s better to use tongs, especially since they are equipped with a device for stripping insulation and side cutters that you still need.
Remove the insulation from the cable at a distance of 2-3 centimeters from the edge. Twist each pair, straighten the wires and spread them in different directions. Now collect the wiring in order, according to the color scheme. White-orange, orange, white-green, blue, white-blue, green, white-brown, brown. Carefully cut the wires with side cutters about a centimeter a half from the edge of the insulation. Take the RJ-45 connector with the pins up and insert the wiring until it stops. Check the wire sequence again, sometimes they can get messed up. If everything is in order, insert the connector into the tongs and squeeze their handles all the way down. The connector is compressed.
If you want to connect a computer with a hub, a switch, a router, etc., then the other end of the wire should be pressed in the same way. If you planned to connect two computers directly, then you need to compress cable on the cross-over system. The difference in this case will be only in the sequence of wires at one end of the cable. To assemble the wires for this should be as follows: white-green, green, white-orange, blue, white-blue, orange, white-brown, brown.
After the cable is crimped, you should check it on a special tester, but if it is not there, simply insert the wires into the connectors. If the LEDs flash on the network card, then most likely everything is in order. But finally it will be possible to answer this question only after setting up the network.
To connect several computers to each other or with various network devices - modems, routers, network hubs, etc. - a cable is used which is called “twisted pair”. To attach the tip to it there is a special tool - crimper. However, the need to use it in home or office conditions occurs every few years, so if you can’t get a crimper for a while, you don’t need to purchase it - you can do with improvised means.

You will need
- Knife, flat screwdriver.
Instruction
Start by stripping the right end of the cable from external plastic insulation. To do this, measure and mark a distance equal to half an inch - about 12.5 mm. This can be done as a ruler, and attaching the tip to the cable. If a nylon thread is placed inside the braid together with connecting wires, use it - pull it in the direction from the end of the cable and slightly to the side so as to rip the plastic insulation to the desired length. This method ensures that the insulation of the wires inside the braid is damaged. If there is no special thread in the cable you are using, carefully carry out this operation with a knife.
Loosen all four twisted pairs and arrange the wiring in the sequence corresponding to the type of connection - for communication between two computers it should not be the same as, for example, for connection network card to the router. Having previously straightened these wiring, insert each of them into the corresponding groove of the tip, and then slide it all the way. At the same time, the sharp inner edges of the tip contacts will cut through the plastic sheath of each wiring and form a secure connection. Such a device tip allows you to do without stripping wires.
Turn the tip over with a latch away from you and press a plastic screw into each of the eight slots with a screwdriver, fixing all the wiring in this way. Properly dose your pressing force — by overdoing it, you risk breaking the tip, and insufficient fixation can cause the connector to disconnect from the wiring during connection. When done with this, place the plastic insert in the opening at the base of the tip - this small part should be included with the connector. If you measured the half-inch distance correctly in the first step, the UTP cable under this hole must have an unopened outer braid. Insert the insert too with a screwdriver, fixing the tip on the outer sheath of the cable.
Sources:
- how to compress the power cord
When you create a local network It is very important to properly crimp the LAN connectors of the patch cords. This will allow you to ensure the correct connection of devices and stable operation. network generally.
You will need
- - Crimper;
- - UTP-cable;
- - RJ45 connectors.
Instruction
For crimping the patch cord, it is best to use a special device - a crimper. Prepare two LAN connectors for each network cable. In this case, it is recommended to use the RJ 45 tips.
Measure out the desired length of twisted pair and cut cable. Remove the plastic protective tape. If you use a crimper, plug it into the network cable in the special groove and rotate the device, first removing the handles of the tool. Clean the inside of the cable from the insulation. If you do not have swage, use a thread that is stretched inside the cable to remove the braid.
Unwind the twisted inner wires. Bare 1.5-2 cm of each wire. Carry out this procedure very carefully, so as not to damage the veins of the cables. Now position the wires in the grooves using the desired circuit. The layout of the wires in the cable with straight crimping should look like this: 1. White-orange. Orange.3. Belo-green. Blue. Belo-blue. Green 7.. Belo-brown.8. Brown.
Check the wire placement. Close the connector without snapping it completely. Insert the tip into the desired crimper hole and connect the tool handles. Similarly, install the connector on the second end of the patch cord.
This method is recommended to use when connecting a computer to a network hub or router. For creating network computer-computer apply the method of reverse crimping. Install the first connector, as described in the previous steps.
Prepare the second tip. Arrange the cables in the following order: 3, 6, 1, 4, 5, 2, 7, 8. Follow the numbering described in the third step.
In the absence of a crimper, you can use a screwdriver with a flat tip. Gently press the veins of the desired colors into the grooves. After performing this procedure, press the plastic retainer located near the base of the connector.
Related Videos
Now in home and small office networks, to connect computers to a switch or modem, a twisted pair cable is usually used. To connect to the Internet was stable and worked without problems, it is important to properly compress the patchcord with RJ-45 clips.
Instruction
Take a piece of twisted pair of the correct length and cut the protective coating at both ends approximately 2 cm so as not to damage the insulation wires cable. If the patch cord will be used to connect the computer to a modem or switch, then both ends compress the same scheme; if to connect two computers, then cross-over (crossover).
Computers mainly connect to the Internet using a special wire for Internet with a connector fixed to the end of the wire. Such a cable under the Internet is called a twisted pair or patch cord.
Ethernet Crossover Cable
Sometimes there are such cases that the Internet cable crimp in the connector crashes or the latch on it breaks and so the Internet stops or the Internet seems to be connected, but the pages are still not available or an error appears. The network cable is not connected. In this case, many people do not know how to fix the Internet cable, and this will require the replacement of the Internet cable connector, but for this you will have to buy a new RJ-45 connector and re-crimp the network cable.
 Crimping pliers for Internet cable
 Crimp wires for the Internet can be made using crimping pliers for Internet cable or with a screwdriver.
How to fork the internet cable
For you to have an example of how the pinout of the Internet cable in the connector was made, you need to bite off the old connector with a wire cutter together with a small piece of wire. If you get a bite off the wire with the old connector, then you need to use a small pair of scissors or a knife to clean the main insulation somewhere 2 cm. The network cable usually consists of four twisted pairs. This 8-core cable for the Internet can support the Internet speed up to 1 Gb / s.
After making the network cable, you need to create colored wires in order, as on the old connector. Then you need to arrange the color wires arranged in order to measure the length of 12 mm from the insulator, and the remainder to bite off the wire cutters. If you do not have an example how the internet cable was unplugged in the connector, then first you need to determine which wire you want to compress.
How to crimp a cable for the Internet
After inserting the wiring into the connector, the common insulator of the wire must enter the connector. When the wires are inserted into the connector, you must carefully insert it into the appropriate opening into the crimper of the network cable and press firmly on its handles. As a result, conductors on the collector cut through the insulation from the colored wires and come into contact with them, and the overall winding of the wiring will be securely fixed by the connector.
 Correctly squeeze the network cable with a screwdriver
 If you do not have a special tool for crimping the Internet cable, then you can use the usual flat screwdriver and pliers. First, the connector with the colored wires inserted should be slightly pressed all the contacts, and then using a screwdriver to squeeze them separately. After pushing the contacts, you need to screw the screwdriver down on the lock so that it fixes the wire insulator.