Customize the Windows7 toolbar.
Hello dear readers. We continue to get acquainted with the interface of the operating system Windows 7. Today we will consider the device Task Pane and its basic settings.
The taskbar is designed to always have before the eyes of the buttons (icons) of all open programs and that, by clicking on any of these buttons, you could instantly move to the selected program. In addition, the Taskbar allows you to open a single program or application with a single mouse click, the shortcut of which is fixed on it.
At the same time, you can select the current layer, the ability to turn on the visibility of the layer and its color. The toolbar allows you to assign attributes to components. This can be, for example, the position of the component, its size, rotation and behavior. Interaction with the dynamic component allows you to change the component in accordance with the specified properties. The properties of the component return their main property list. The attributes of the component will detail the information about the component, including. Parameters for editing and adding attributes.
Taskbar device
The Windows 7 taskbar is a horizontal bar at the very bottom of the screen. In the Taskbar, you can select five main areas.
- "Start" button
- The area of the icons for programs and applications, both fixed on the panel, and simply running at the moment
- Language bar
- Notification area (system tray)
- The button " Collapse all windows»
On the taskbar, you can see three kinds of buttons.
Dynamic properties of components allow them to be optimized in terms of their interactivity. If you want to save work on creating items for your apartment, you can download them from the gallery. Likewise, you can share your own models in the gallery.
Always remember the relevant copyright when using this feature. The "Big Tool" toolbar combines a relatively large number of functions from other specialized toolbars. From the above list it is clear that in this panel there are almost all the functions necessary to create your own model.
- Button of a program that has been fixed but not started
- Button of the running program
- Button that combines several open windows of one program
You can attach the icon of the desired program to the taskbar in several ways.
The "Get Started" toolbar contains a simplified content function on the "Big Tool" toolbar. The "Getting Started" toolbar. Drawing is mainly used for drawing. The functions contained in this toolbar are described in the "Large Toolbox" - 6.
It is also possible to use the functions of penetration, combining, subtraction, perforation and division. The sandbox includes functions of landscape design, respectively. reliefs. The terrain can be created using a contour or network function. For contour functions it is necessary to have contours, which then merge into the relief. Using the network, you create a network of sizes that you modify yourself. The created landscape can be edited by dragging, from the ground to the terrain, and then pulling, overlay, grid and reverse.
- Drag the shortcut of the required program to the Taskbar from the desktop or.
- Right-click (PCM) on the shortcut of the program and in the opened context menu select the command " Freeze to taskbar».
- Click on the PCM button on the running program and in the appeared window choose the command " Lock the program in the taskbar».
The language bar is one of the additional panels that can be enabled or disabled using the Taskbar context menu. This panel is necessary for almost all users of the computer. It switches the input languages. The language bar icon displays the current input language (Ru - Russian, EN - English, etc.).
Adding a location allows you to select a specific location from the map and transfer it here. Terrain screen adds to the added place a simplified plasticity in height. The panel design includes measurement, text, three-dimensional text, counter, protractor and axis functions.
The measurement toolbar displays the measurement values, respectively. Here you can enter specific parameters. Depending on the function used, the description panel changes. This can be, for example, information about the size, distance, radius, angle, etc.
If the language bar, for some reason, disappears from the Taskbar, it (the language bar) can be restored using the technique described.
The notification area (system tray) is used to display program icons that are running in the background, some system icons, and to temporarily store notifications about system events. Rarely used icons Windows automatically hides in a separate window.
The main panel contains four functions. You can call it by default by right-clicking on the free space on the taskbar and selecting the "Properties" command. The Setup dialog box opens. The local menu of the taskbar also has another option under the heading "Lock Taskbar". If you activate it, you will not be able to navigate anywhere from the taskbar.
This is the default value, but you must turn it off to make it more flexible with the main panel. The default tab of the taskbar configuration dialog contains a convenient taskbar name and allows you to set some important elements of its behavior. Namely.
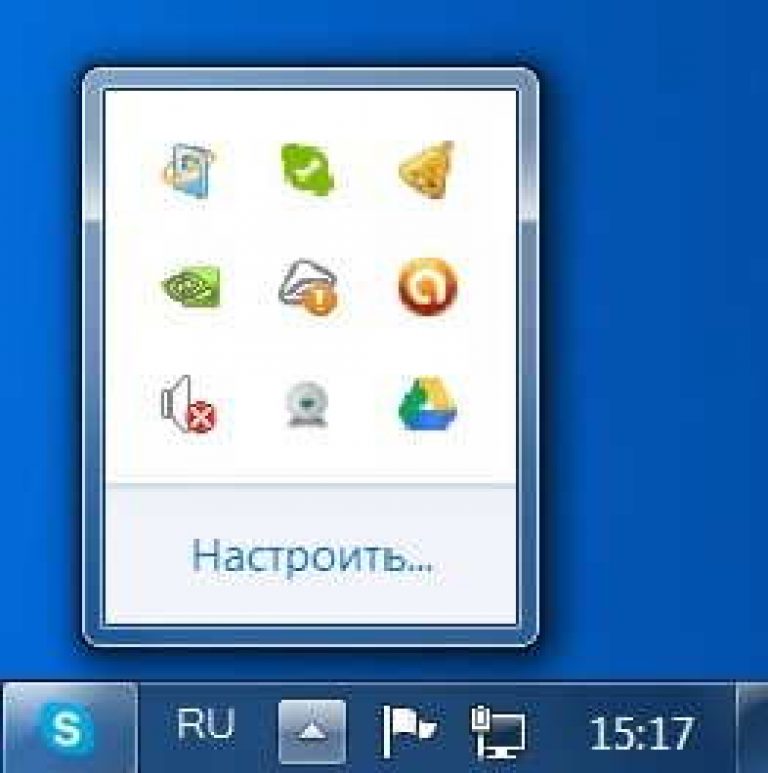 You can see a window with hidden icons by clicking on the button with a white triangle at the top of the notification area. You can drag-and-drop the icons to the Taskbar and return them.
The button " Collapse all windows"Allows you to minimize all open windows on the screen with a single click. Pressing the button again returns the window to its previous position.
Lock the taskbar. As described above, this option allows you to prevent changes to the taskbar. Automatic taskbar hiding. When the user activates this option, the taskbar is always hidden after the action. Then you can re-display it by placing the mouse cursor on the bottom of the screen. Once the user leaves the taskbar boundary, it immediately disappears. The advantage of automatically hiding the taskbar is to expand the workspace.
When multiple monitors are connected, the corresponding settings can be made
Use the small buttons on the taskbar - opens thumbnail thumbnails for more compact views. Location of the on-screen bar - in this drop-down menu you can select where the panel will be located. At the bottom of the screen there is not only the default location, but also the top edge, left and right. If you do not want to set the position this way, you can drag the taskbar after unlocking it by dragging it. You can choose how the icons in this drop-down menu will be displayed. They group them and turn off the thumbnail display. Notification area - if you click the "Configure" button in this section, a dialog box opens with the options for displaying and hiding inactive icons. Buttons on the taskbar. . In addition, the next tab of the configuration dialog box is marked with jump lists, and this name assumes that it is used to configure the local menu bar for open programs and other windows.
Customizing the Taskbar
To configure the taskbar, use the " Taskbar and Start Menu Properties". Open this window by clicking on the PCM in the free space of the Taskbar. The tab "Taskbar" contains the following check boxes for setting up the panel.

Pay special attention to the number of the last items displayed in the navigation lists, which allows you to limit the size of the list of the last processed items. The last tab in the configuration dialog is called Toolbars and allows you to directly activate some other items that can be displayed on the taskbar. This, as a rule, complements a purely practical focus.
Below we show you how to adapt them to your needs. In most distributions, after logging on to the user account created during the installation, we'll see a preconfigured desktop with stylish icons, backgrounds and window styles.
- Lock the taskbar. By removing this checkbox, you will be able to expand the taskbar or move it to the other end of the screen.
- Automatically hide the taskbar. If you check this box, the screen area will increase due to the disappearance of the Taskbar. To see the taskbar again, you need to move the mouse pointer to the bottom edge of the screen.
- Use small icons. If this checkbox is selected, the icons (buttons) on the Taskbar will decrease in size.
- The position of the taskbar on the screen. Using the drop-down list, you can select the location Task Pane on the screen (Bottom, Left, Right, Top).
- Taskbar buttons. Using the drop-down list, you can select one of the options for displaying buttons on the Taskbar.
- Tune. When you click this button, the notification area setup window opens. In this window, you can enable or disable the display of system icons (clock, volume, network, etc.), and also set the need and form for displaying application icons and notifications.
The icons on the Taskbar can be freely moved from one place to another by holding down the mouse button and thus setting them in the correct order. How to fix the necessary folder on the Windows 7 Taskbar, it says.
When you display the panel properties window and click the button, you can delete the panel, for example, the bottom panel. "Block" - the panel can not be moved, if we want to place it somewhere else, that is, from the bottom, from the side, remove this option. On the "applets" tab you can see which applets contain the panel.
Editing the contents of the panel can be started by changing the icon and text, invoking the main menu. Simply right-click Programs, select Properties, and specify the settings in the dialog box. The Add Applets dialog box appears, in which we select the appropriate items from the list and click Add.
Today, we have dealt with such an important tool of Windows 7, as Task bar. You have become more familiar with the taskbar device and how to configure it. I hope that the information was useful to you. Good luck!
With all questions please contact in the comments.
26 february 2:34
Activators are buttons that allow you to run freely defined actions. When added to the panel, they are marked with a red cross icon. When you right click on them and select "Properties", you can configure them, that is, click the icon, select the action and confirm by clicking "Add".
Each predefined activator can be edited after selecting "Properties" and clicking on the last preference button. For example, you can change the icon or command options. Applets can be moved to any place on the panel by right-clicking and selecting "Move". The reference point of the moved panel is marked with a red line. You can also delete applets by selecting "Delete" from the pop-up menu.
AE Marychev Category: 2 comments
Customize the Windows7 toolbar
Hello, friends! I am glad of our new meeting and in this lesson, I want to continue to acquaint you with the device and tricks. And we'll talk today about the toolbar, and in particular about the Quick Launch bar and language bar. We learn how to customize and change everything for yourself, and also how you can restore the language panel, if it suddenly disappeared from your desktop.
Shutdown and reboot the system. The default value is located to the right of the top panel and displays the name of the registered user. Once you have selected its properties, you can select the actions that you see when you click. Another often confusing applet is a preview of the workspace.
The number of virtual desktops can be reduced to. First, look at the appearance, after which we usually evaluate the graphical environment. Click the Appearance icon, and then specify the style, icon set, and fonts. We'll change the desktop background by selecting the Desktop icon in the Settings Manager or Desktop Settings from the pop-up menu that appears when you right-click on the desktop.
And so let's get acquainted and understand what a toolbar is? Typically, it is located at the bottom of the desktop and is a long panel, conditionally divided into three parts. The Start menu icon is located in the lower left corner. It is an intermediary between the programs and folders of the computer. Here you can easily open any folder or run the program. This menu is opened simply by clicking the left mouse button on the Windows icon or the button with the Windows logo.
Keyboard shortcuts are defined in the "Keyboard" window and the "Shortcut keys" tab. Here you should add, for example, add a shortcut that launches a screenshot. After clicking "Add" enter the command or specify on the program, having chosen "Open". We recommend that you define the following shortcuts. We configure the default applications by selecting "Preferred Programs" in the preferences.
Autostart and preferred programs
A list of automatically started services and applications is managed in the "Session and Startup" window. In the "Preferred programs" window, the default browser, the mail reader, the file manager and the terminal emulator are selected. The default is as follows.
Onboard removable disks
First, enable automatic installation of such disks by selecting "Disks and Removable Storage" in the "Device Manager" and selecting the following options.The Start menu is used to perform the following tasks: launching programs, opening the most frequently used folders;
search for files, folders and programs;
setting up computer settings;
getting help on working with Windows operating system;
shutting down the computer;
Terminate a user's Windows session or switch to another user's account;
The list of files and files by default is icons, the list is also available, and the list is compact. All can be selected from the "View" menu. Just grab the folder name with the mouse, drag it when the cursor looks at the horizontal dark line. Added bookmarks not only act as shortcuts, you can drop files on them, call up their pop-up menus and open them on separate tabs.
Associated file types with applications
If the file is opened by default not by this application, which we would like to use on a daily basis, you can quickly change it by selecting "Properties" from the pop-up menu of the file, and then the preferred program from the "Open With" list. If there is no application in the list, select "Other" and look in the window containing all applications registered in the system.
The Start Menu is a pretty big topic, so we'll devote a separate lesson to it and review it later.
In the meantime, continue our lesson. In the middle of the taskbar are the buttons of all running. at the moment, programs and applications. Thanks to this, we can quickly switch between them. It is enough to click the left mouse button on the program icon and it will open. You can run several programs, and then just switch between them.
That's why it would be a shame not to use the maximum element of the interface, which we almost always have before our eyes. From there, you can disable the sidebar "Charms" and "Hot corner". In addition, you can select the system directly in the classic interface through the "Skip subway screen". As more and more portable systems come with wide or even enhanced resolutions, if vertical space is a problem on your desktop, moving the taskbar to the left or right of the screen is an easy solution, So you get more reading space for web pages , documents and any other content.
And finally - the notification area (still sometimes called the tray). Here, first of all, there is an input language switching panel (language bar). The presence of it allows you to control the layout of the keyboard. Here - the clock, the Internet connection indicator and the current loudness of the speakers are located. If you click on the small triangle, the hidden icons area will open. In the corner of the button (indicated by the arrow), which serves to quickly close all active windows, and again press-opens again.
All three areas have their own settings. To open the settings menu, in the Start button area, right-click, select the tab Properties. The window opens. "Taskbar and Start Menu Properties", in which you can perform actions to configure and change the toolbar.

In the top there are three tabs. Taskbar, start menu and toolbars
. At the bottom of the window there is an instruction, how to configure the taskbar. You can use it or read the article to the end (h then I advise you).
How do I customize the taskbar?
Freeze taskbar
. If you check this box, you can fix the taskbar on the monitor screen in the place where it is currently located. In this case, it will not be possible to stretch, shift or collapse. As a rule, the check mark on this item is set by default. If you want to increase the height of the taskbar (when you are positioned at the top or bottom of the screen) or its width (when you are on the left or on the right of the screen), and also change the size of the notification area and the toolbar, you must uncheck the box, click the Apply button "And" OK ". After that, you can do all the above operations by dragging the borders of the required areas with the mouse.
Auto hide taskbar
. Activating this parameter will allow you to use the maximum desktop area during operation, since the control panel will be hidden and will stop displaying all the time on the screen on top of all windows. To open the panel in this mode, move the mouse cursor to the edge of the screen along which it is located.
Use small icons . This option allows you to reduce the icons of programs and open applications located on the taskbar. Thus, you can achieve the expansion of the workspace and increase the number of displayed items on the panel itself.
The position of the taskbar on the screen.
Allows you to select the place from the drop-down menu where the panel will be placed on the screen. At your disposal are four options: Bottom, Top, Right or Left.
Buttons on the taskbar.
At this point you can choose how the icons of running programs and open windows will be displayed on the taskbar:
Always group, hide tags
. This mode is activated by default and allows to expand free space on the taskbar due to the fact that icons of similar open applications are grouped, and icons themselves do not have signatures of their names. For example, if you opened several Explorer windows at once, they are grouped in the taskbar into one icon, which will be displayed as several rectangles overlapping each other.
Group when the taskbar is full.
Unlike the previous version, this mode is more informative for the user. All the icons of open applications are located on the taskbar separately and have the names of the windows in which they are launched. Grouping icons occurs only when the taskbar is full and there is not enough free space to place new icons.
Do not group.
Grouping of open program icons does not occur, under any circumstances.
In the middle of the Taskbar tab, the Notification Area is located, which is responsible for setting the display of system icons and background program icons, as well as their messages in the notification area (tray).
The notification area is customizable. After clicking on the button Customize , before you open a window with a list of all the icons of the background and system applications, next to which you can select their behavior in the tray of the three available options:
Below the general list of all icons are the items Enable and disable system icons (Clock, Volume, Network, Power and Support Center and so on), as well as Restore the behavior of icons by default. Also you can activate the option Always show icons and notifications on the taskbar.
Finally, in the lower area of the bookmark we are viewing, we set up the option Preview desktop with AeroPeek. AeroPeek functions do not support all versions of Windows7, but only from the Home extended version. Activation of this function allows you to hover the mouse over the button Collapse all windows, make a quick temporary viewing of the contents of the Desktop. In this case, open windows do not collapse, as happens when you click this button, but become transparent.
The next tab is the "Start Menu". Here are the options that are responsible for configuring the Windows system settings. When you click on the "Configure" tab, you will see a huge number of settings. I will not describe everything. As I said above, we will get acquainted with this element in detail later.
Finally, the "Toolbar" .
Initially, the system includes only a few standard toolbars: Address, Links, Tablet Input Panel and Desktop. But as new applications are installed, the list of these panels will expand.

Also you can create your own toolbars yourself. To do this, right-click on the free space in the taskbar and select the Panel item in the context menu that opens, and then click Create Toolbar.
Next, in the window that opens, you must specify the folder whose elements the created panel should display.
Managing the display of toolbars is carried out at an intuitive level. To do this, simply remove or check the box next to the desired panel and click the Apply button.
And one more nuance. Sometimes, under some kind of your actions, the "language" switching icon disappears. In such cases, do not panic, call someone to help, and try to solve the problem yourself. There are at least several ways to solve the problem.
The easiest, it's in the free space, in the toolbar area, right-click. In the menu that opens, select "Panels" and here you will find the "Language bar". You check that there is a tick against it. If it's not there, put it. The icon in the language bar should appear. If this does not happen, do the following. Start Menu ---\u003e Control Panel ---\u003e Language and Regional Settings ---\u003e Language tab ---\u003e More ---\u003e Advanced and uncheck the box that is opposite Disable additional text services. Everything should fall into place.
Here on this and finish this lesson. Of course, this is all the secrets of Windows7, do not stop and we will return to this topic more than once. Write whether the lesson was useful, and whether everything is clear. If you have questions, ask. And in our next meeting, we'll talk about the difficult things - about the correct removal of programs and files from your computer. To avoid missing the article, subscribe to my blog's news. See you!