Extension of the antenna cable. How to connect or enhance a television cable. How to extend the TV cable using the "F" connectors.
If your TV is far away from tV aerial or from a cable of satellite television, it is necessary to exert a little effort to extend the cable. In this case, there is no need to move the furniture along with the equipment.
You will need
Antenna cable;
- F-connector;
- I-connector;
- Antenna amplifier;
- soldering iron;
- solder;
- Insulating tape.
Connecting the plug to the socket
Experiment by connecting the wires to one screw, and then to the other, to find out what gets the best reception; The only rule is to "do everything that works best." Often, cable companies can provide very good signals over long distances from stations.
If you are still experiencing problems with receiving an antenna, think. Dipoles are T-shaped wire antennas intended for indoor use. You can buy them in many hardware stores or radios, and they are very inexpensive. You will need a cable with two leading cables, which we mentioned earlier.
Sponsor of P & G placement Articles on "How to extend a television cable" How to set up an aerial antenna How to choose an antenna splitter How to connect a cable to an antenna
Instructions
See which antenna cable is connected to your apartment. It can be a cable with a solid or stranded wire in the center. Buy an additional TV cable of the required length, pre-measured it and adding a couple of meters. Must be the same type as the one already available. Usually it can be done in any store where TV and radio equipment is sold, or on the radio market. Buy two F- and one I-connectors, i.e. two connectors such as "dad" and one type of "mother". You can also use a single male-to-female connector. Prepare both cables. To do this, cut the cable's edge evenly, gently cut approximately 15-20 millimeters of the upper layer of insulation. Importantly, do not damage the braid of the cable. Also carefully wrap the braid back, remove the foil that the cable is covered with. Bare the center wire, cutting off 10-15 millimeters of insulation. Try not to break it or cut it off with careless movement. Insert the cable into the F-connector of the "daddy" type. Screw it as far as it will go. At the same time, the core of the central cable should get into the protruding central connector, and the wrapped braid will be clamped between the outer cable sheath and the connector housing. For the outer edge of the connector there will be a small fragment of the wire of the central core. Trim it with scissors or pliers, leaving about 2-3 millimeters. Similarly, connect the second cable. Now connect two F-connectors of the "daddy" type with the help of an I-connector of the "mom" type. Instead of an I-connector, you can use a special antenna amplifier. It has inputs for connecting F-connectors. Such an amplifier is necessary if the cable has a longer length and the signal power is lost. When using a combined connector, connect one cable to the F-connector, and the second one in the same way to the I-connector. You can solder the wires together with a soldering iron and solder. Be careful not to short the wires between each other. How simple
Other Related News:
The custom di-pole that you are making will be the same as the ready-made one that you can buy, except that you can adapt it to your needs. However, you need to observe these or brief of these measurements; The top panel should be 5 1 or 10 2 or 15 3 or 20 4, etc. and the lower part must be connected in the middle of this top panel. You can fix a special dipole over the roof of your house or climb the tree in the front yard and tie it to the appropriate branches.
Double lead is so cheap that you can be very proud that for some time the reception time has significantly improved, but very little money. Cut a suitable length of double for the top panel. In the middle of this length, cut one of the two wires and separate the plastic cover. Now connect the other length of the double wire to the two bare wires of the top panel. The other end is connected to your radio antenna terminals.
The need to increase the TV cable often occurs when the TV is moved to another location in the room. In order not to deteriorate the image quality, when extending the cable, you must follow certain rules. P & G Placement Sponsor Articles on "How to Connect a Tv Cable"
The second and even the third TV at home is not a luxury, but an integral part of a comfortable life. But in order to enjoy it to the fullest, it is necessary to properly connect the antenna splitter. You will need an antenna splitter; - cable television; - plugs; - knife. Accommodation Sponsor
If the custom di-pole sounds like too much trouble, you can make a di-pole with a cut-out and a section. Take a little lead and divide it into the middle. Attach the other end to the radio. Very simple, although not as effective as the custom di-pole.
Preparing the cable. Video
Home antennas can work very well. Often a piece of wire becomes an antenna without any problems. It can be a thick or thin wire, and free or cheap - the best wire around. Wire with plastic coating is safer, but the bare wire is OK.
Many users complain about the weak Internet when using a router or modem. It turns out that the level of the Wi-Fi signal can be increased, and for this you need to purchase a special extension cable. There will be such a "miracle" on average 15-20 dollars, but you will get instant effect. Needless to say, folk craftsmen have long realized that it is not necessary to pay so much money for a simple adaptation, because you can build it yourself. How to get a high-quality signal extension for wireless antennas? Let's figure out more!
When is it necessary to build a cable?
Attach it to the antenna terminal. Run it on top of the drapery rods and window casings. Throw it out the window and into the next tree. Spend some time experimenting with the placement of these wires; Often opposite directions work well.
Usually there are no antenna terminals or telescopic antennas on the radio clock. Try to wrap a lot of wire around the radio; Do not connect the wire to anything. The idea is to get a thick wire loop next to the radio. Almost any large metal structure above the ground can act as an antenna. Aluminum gutters, air conditioners and heat channels, metal window frames, aluminum siding and metal roofing are excellent antennas. Using the alligator clip, attach one end of the solid wire to one of the above elements to the previously mentioned massive loop of wire surrounding your radio station by simply wrapping the free end around a massive wire loop around your radio.
The Wi-Fi signal amplifier can be made from improvised materials
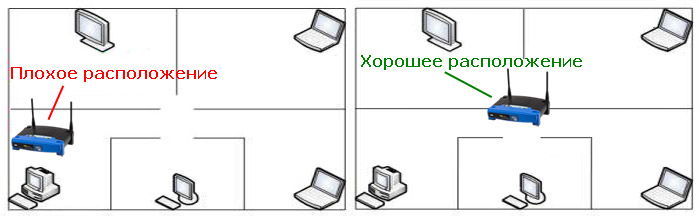
The factors that make wireless communication lame differ depending on the type of network. If we talk about the home network, then distinguish the following:
- disadvantageous location wi-Fi antennas in room;
- in the immediate vicinity of the device operates a microwave oven;
- on the signal path there are many walls of brick and concrete.
Obviously, the quality of Wi-Fi depends on the presence of interference in the house. Sometimes the cause of disconnection is the illiterate connection of the modem to the system unit.
You should notice a good improvement in reception. Other portable radios have telescopic antennas that can be improved by wrapping the "flag" of the aluminum foil around the top or attaching the length of the wire to the telescopic antenna.
Rabbit ears are cheap, and they can be very effective. They make it convenient to move them in many directions to achieve best performance. Buy an amplifier or amplifier for your existing antenna. Sometimes they work miracles, sometimes they just work. Boosters need a certain amount of signal to work, otherwise they ultimately amplify the noise, not the sound.
In the case of public-type networks, there may be other nuances. The network in this case has to be registered according to the legislation, that is, to use the license. In addition, it is important to monitor the level of electromagnetic background in residential buildings.
Buying Antenna on order
James and Eric Stevens are very helpful in helping you choose the right one. They are also very patient listeners. Cut out the paper or disposable plastic cup in the middle. Cut off half the shaft from the bottom of the cup so that the remaining half is attached to the undamaged bottom. Throw away the selected half of the shaft.
Separate about a quarter of the remaining half of the cup from the bottom on each side, then gently press these "wings" back to slightly open the curve. Align the inner half of the cup with aluminum foil as smoothly as you can. Point the antenna through the slot in the bottom of the cup until the bottom of the cup sinks onto the antenna base.
To solve the problem will help the antenna extension, which is easy to build on its own.
Passive antenna manufacturing
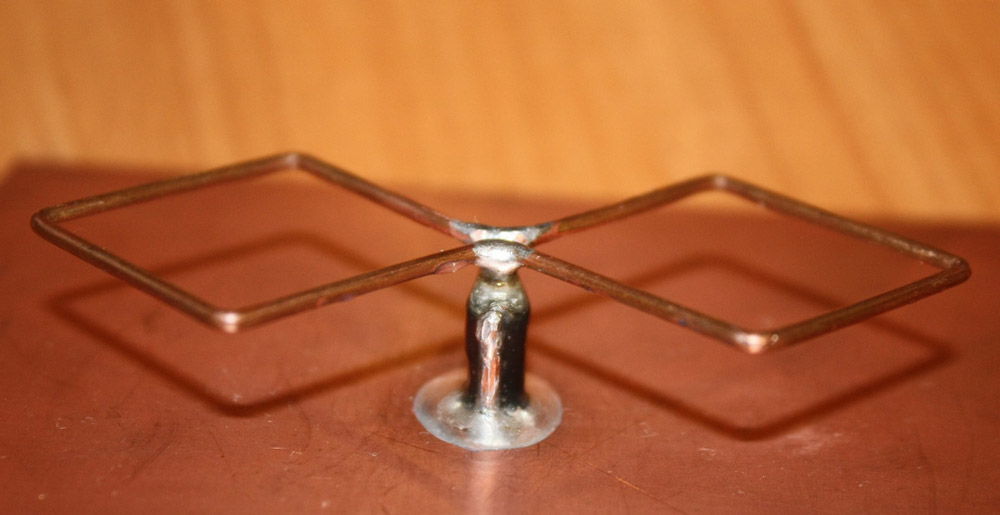
The product is made relatively easy, while it is considered to be quite effective. The amplification is possible due to the directional pattern. As a resonator wire is used, folded in the form of a square. The diameter of the material is from 1.5 to 2.5 millimeters. As for the inner side of the square, it is selected in the range of 2.5-2.9 mm. As a result, you must build an "eight" with angles of 90 degrees. The end of the design should be carefully soldered to its beginning.
Venture Art has a Bachelor of Arts degree in Creative Writing from the University of Pittsburgh. A parabolic dish is an ideal form for focusing electromagnetic radiation on a focus. This, however, will reduce the signal in the opposite direction. Cut two lengths of copper wire to 6 inches in length and two lengths of wire to 4 inches in length. Cut six more wire lengths to 5 inches in length.
Put two 6-inch pieces parallel to each other, 4 inches apart. Put a 4-inch piece on each side to create a rectangle of copper wire. Connect the corners of the rectangle by twisting the two ends of the wire together with the two turns of your wrist.
Now it's time to take care of the reflector for the extension cord. An iron plate with a layer of foil on one side can be used as this component. In the center, it is important to drill a hole in which the RG-6U wire for the antenna will enter.
Connect the four parts of the 5-inch conductor, equidistant from each other, parallel to the short sides of the rectangle. Fold a half inch of wire around each of the long sides of the rectangle, and then turn the wire to hold it in place.
Using two sets of pliers, fix the wire once around the antenna so that it can hardly slip off the end. Draw a rectangle so that it forms an arc with squirrel cords that are located to the left and right of the same width as your loop wires. Bend and twist the ends of one of the loop wires above the wires on the short side 1 inch from the top of the rectangle on both sides. Repeat with the remaining loop wire 1 inch from the bottom of the rectangle.
The order of the assembly is as follows:
- On the non-flown side, it is necessary to pass the wire. Outside he will come out from the side with foil.
- Put a plastic cylinder 20 mm long on the wire. Do not forget to make in this element special cavities for a two-millimeter wire.
- Solder the core and shield to the neck of the "8" signal extension.
- Press the cylinder from the plastic to the resonator, and fill the voids with a sealed solution.
To achieve maximum antenna efficiency, it is necessary to arrange the reflector in parallel to the resonator.
Wrap the copper wire mesh over the back of the arc rectangle. Slide the hinges over the antenna and place the dish in the direction in which you want to increase the signal. A larger dish will generate a greater signal gain. . James T Wood is a teacher, blogger and author. His work experience covers the world of computers, from sales and support to training and repair.
If you do not get the right range from your home or office wireless network, you can expand your coverage a lot. In this guide, we will discuss some of the most popular methods, many of which include upgrading and acquiring new equipment. If these tips do not do the trick, keep reading a few more specific ways to extend the range of your wireless network. To find out which device you own, you should be able to see which standard your router uses by simply looking at it.
Passive antenna application
A homemade antenna extension can be used in conjunction with a laptop, access point or wi-Fi modem. It is important to understand that after such manipulations, the result may not always be positive, and in the event of a breakdown, it will be impossible to repair the equipment under the guarantee.
Update the network adapters to match your router
If this is not the case, find your model number on the Internet to see its exact specifications. Of course, depending on which devices you own, find out which standard wireless communication they can use.
Buy or build an antenna with a high gain
Most wireless routers and wireless adapters with external antennas are supplied with cheap omni-directional antennas.Turn your cable or electrical outlets into wireless access points
If you want to double or even treble the wireless network range, you can try adding additional wireless access points to the network. However, this performance degradation may be acceptable if you plan to do basic web browsers on these computers; You will not really like the transfer of large files or streaming video between computers on the network.
Additional wireless access points
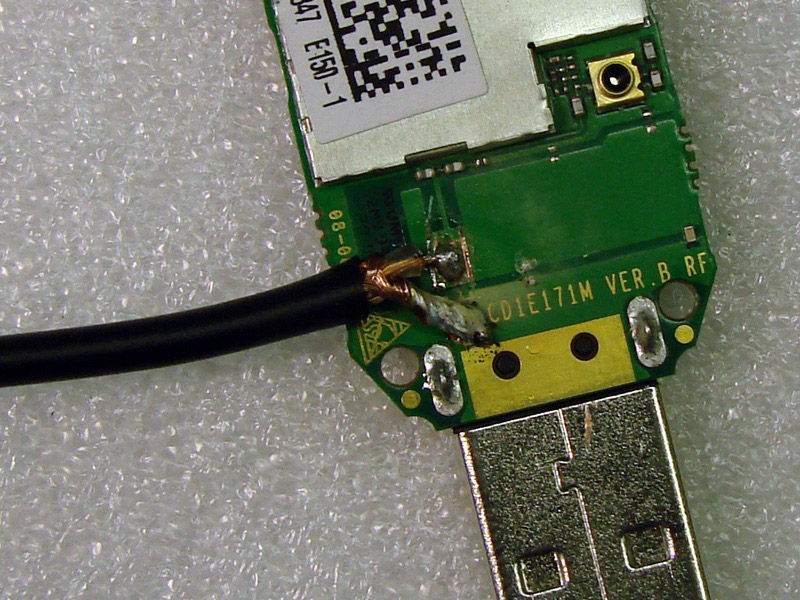
A router is basically a network controller, and it connects to your Internet modem or is integrated with it.If you decide to connect the antenna to the modem, then you need to study the features of the process. The thing is that there is a small antenna inside the modem, to which the homemade antenna is attached. To perform this process, you will have to disassemble the modem-flash drive. You can remove the cover with a scalpel, screwdriver or clerical knife (pull towards the top of the USB connector, you can not press hard, otherwise the case will break).
When the signal passes through any cable, it loses power. Thus, the shorter the cable, the fewer the losses. Less is more in this situation, and the correct length of the cable is important for maintaining the quality signal. All cell phone signal accelerators are complete sets and come with the appropriate cable type and length to maintain a reasonable gain in dB. But there are times when you need a little more reach, so it's important to find out how much length you can afford before losing the signal compensates for any signal gain.
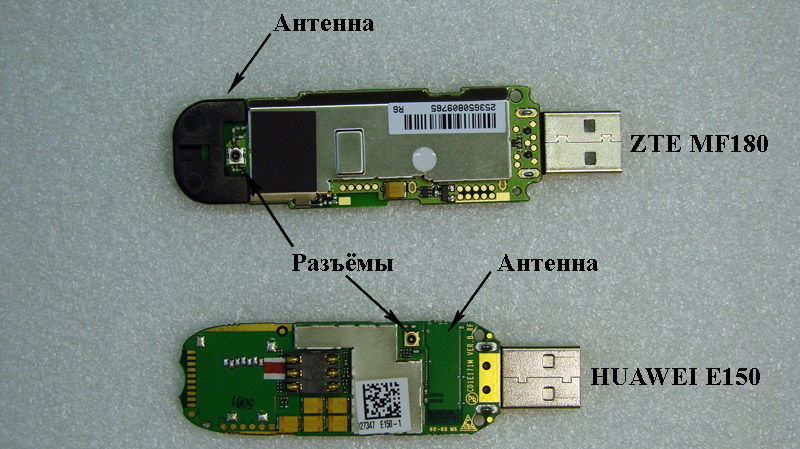
Opening the modem, you will see two paper-covered connectors. Follow these instructions:
- remove the protective layer from the modem elements;
- connect to the left connector a self-assembled antenna (the hole you need will be on the left side, if the device itself has a USB connector to itself);
- use a not too long coaxial cable, otherwise the result will not be much different from using a modem without an extension cable.
There are three types of cables for home cellular signal accelerators. As mentioned earlier, when the length of the cable increases, a large signal loss occurs. The amplification and loss of the signal is measured in decibels. And decibels are measured exponentially.
And as always, you can convert your cable installation. Think of a signal like a drink and cables, like straws. Cables 75 Ohm - this is your typical straw soda, and 50-ohm cables are big straws of the carl throat. Nothing is more frustrating than trying to install a new TV on a cable or satellite system and discover that the existing coaxial cable is not long enough to be placed in the right place for viewing. A coaxial cable, often called ",", can become costly in length, so replacing the entire cable can be out of the consumer's budget.
Using the adapter and extension cord
To obtain effective amplification of the wireless signal, you can use the following components:
- hot melt, tape or wire;
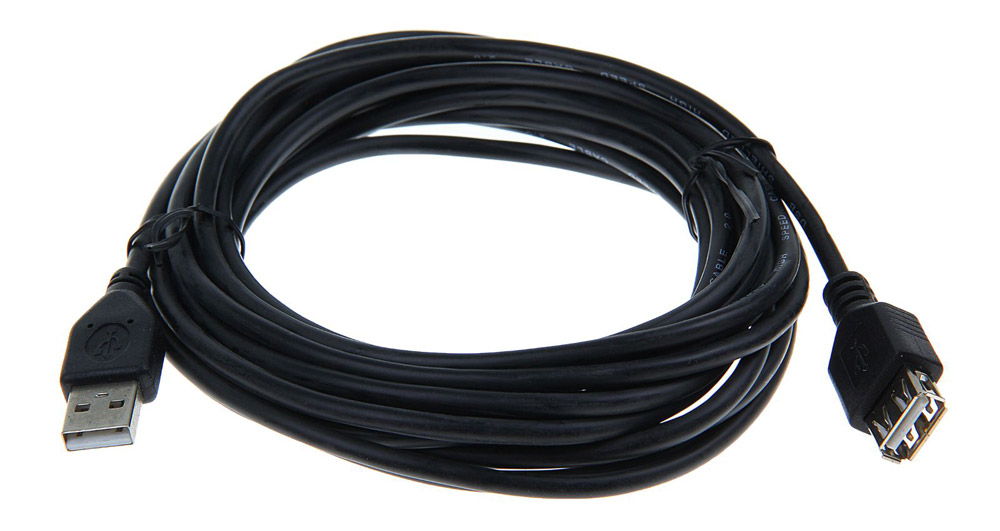
- uSB extension cable (A - A);
- a garden hose or a small length bar for fastening;
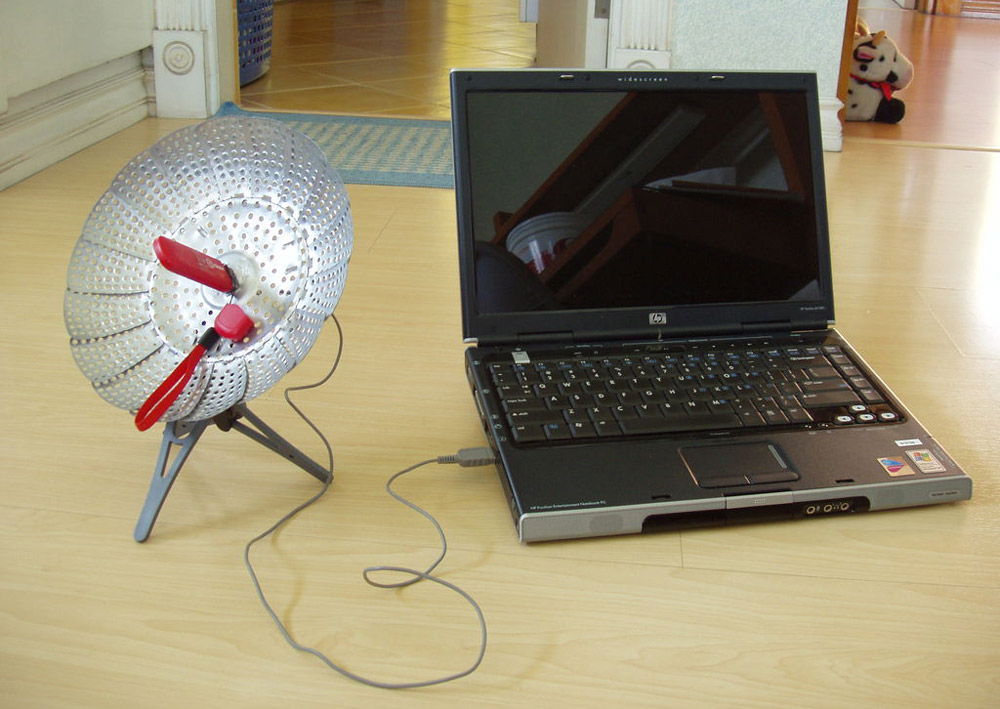
- colander or any other utensils, which has the shape of a hemisphere;
- an adapter that connects to the PC via the USB interface.
At the first stage, the passive USB extension cable (you can find it in any computer store) is connected to the adapter with one end, the other ("dad") is inserted into the connector of the laptop or PC.
Fortunately, the coaxial cable is simply lengthened with a shorter cable length and the correct connectors. Coaxial cables transmit audio and video data, with the two channels concentric along one axis. Fully insulated from fire and water, the coaxial cable has an external conductor that provides a grounding shield, minimizing electrical and radio frequency interference. Thus, it provides excellent signal performance.
Several elements needed to extend the coaxial cable include an additional cable, cable clamps and connectors or splitters. It is important to first evaluate the existing cable, and then decide how to extend it. Evaluate the existing coaxial cable to achieve and determine the amount of additional cable that is usually offered from the manufacturers by the foot. If the consumer fixes the cable on skirting boards or walls, it is useful to measure along these lines to calculate the required length.
Next, the extension cord and adapter with adhesive tape or hot melt adhesive should be connected to the tray. The adapter is important to locate at the focus point of the dish (to determine this point, it is enough to cover the surface of the plate with foil and to estimate where the rays of the sun reflect best).
Using the hose, you can fix the Wi-Fi adapter in the correct position. You can also use a rope, barbell or chopsticks.
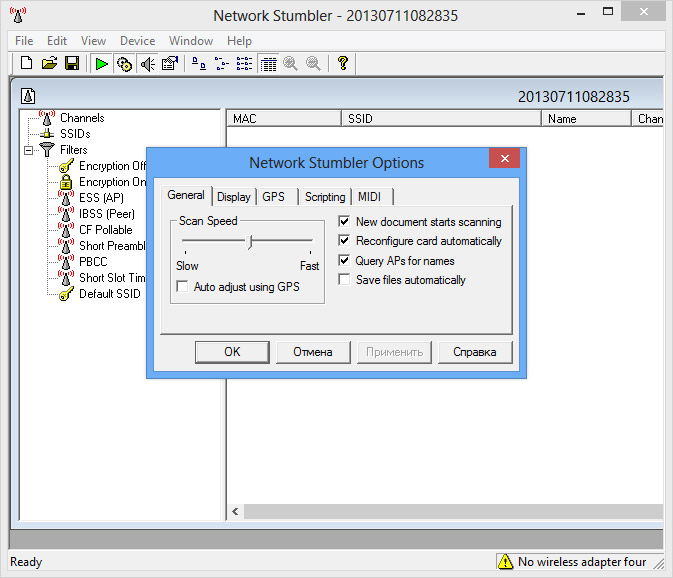
If you do everything correctly, the system will amplify the signal and give its owner a better connection. You can correct the connection using special utilities. For Windows, it is recommended to use NetStumbler, and for OS X it is recommended to use KisMAC.
Tips for the last:
- In the event that the adapter is taken out of the premises, it must be protected from rain and snow. You can save the product by using a conventional plastic bottle.
- For the design, the active type of extension cord is also suitable. The product costs about 10 dollars, with its help you can use a longer wire.
- Organize the foil wall behind the router, this will also help to strengthen the signal.