Windows bios flash utility is not installed. Flashing BIOS in windows mode. Prepare the necessary files.
on motherboard Asus or Gigabyte (on a laptop, personal computer). Therefore, it is worth discussing first, why, in general, to flash BIOS? Let's not be wordy and say that, like any update absolutely on any device, here the firmware also serves to make improvements in the product.
You may think that this is understandable, but, on the other hand, judge for yourself: have you ever flashed BIOS on a motherboard? The answer is likely to be negative. If it is positive, then we can congratulate you - it will be much easier for you to carry out the following manipulations. However, it is not clear what you are doing in the open spaces of the network in search of your answers. So, if you have never flashed BIOS, it is better to think again before, perhaps, to make a fatal mistake. Why fatal? You just may accidentally disable the software components. Then you can not do without the help of experts. That is why we will talk further about the points to remember before flashing the BIOS of Gigabyte or Asus.
Flashing the BIOS of the motherboard is a very important process. Do not follow unless you are sure
What you need to know before installing BIOS?

Preparing the necessary files
ASUS new BIOS
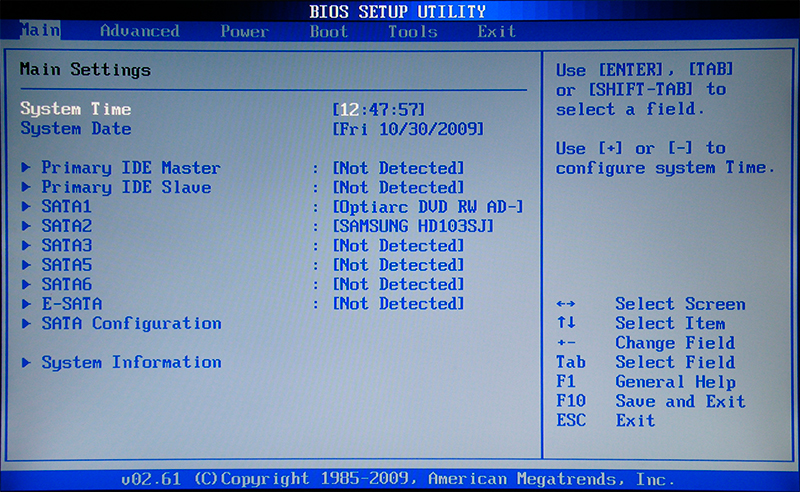
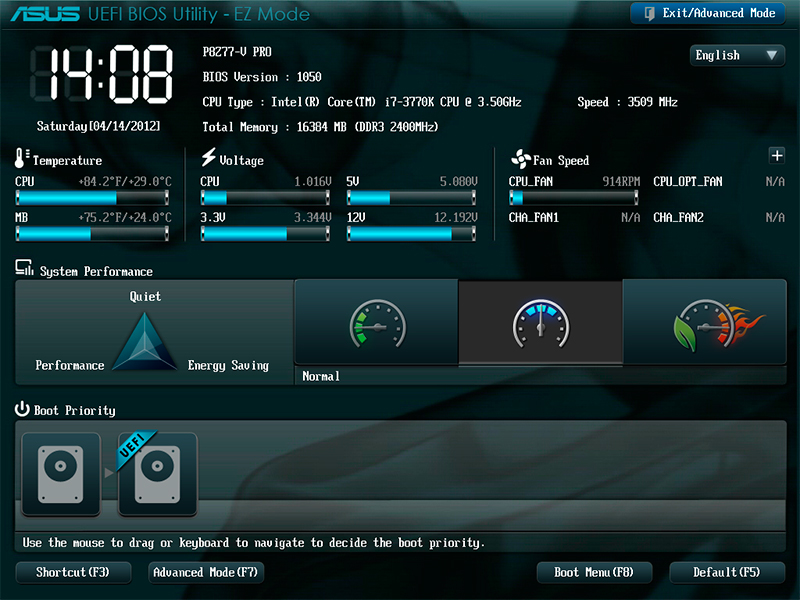
How to understand that you have a new BIOS? It is very simple to do this: go to the BIOS menu when you turn on the computer, then pay attention to the external interface of the program. If in this window you can work with both the keyboard and the mouse, if the window does not look like a standard BIOS (gray or blue background with a frightening menu), but as a modern application, then you have a uniquely modern motherboard with the UEFI standard. This standard has replaced the old BIOS system to make it easier for the user to navigate the program space. Therefore, a special thank you to programmers and developers for such care.
- In the BIOS window, select the item at the bottom of the Advanced page. The program will clarify your action - click OK;
- Now in the top menu, find the tab "Service" and click on it. In this window, we will need just the above-mentioned utility ASUS EZ Flash;
- Next, we find a previously recorded firmware file for your motherboard (if you don’t understand what is being said - run to read the items “What you need to know before BIOS firmware” and “Preparing the necessary files”! information). Left-click on the file;
- In a new window, the utility will ask you to read it. Click OK;
- Again a notification pops up where the BIOS update itself is updated - here we also agree with the OK button;
- We are waiting for the completion of the flashing. This process may take some time, so be patient and do not touch anything. When everything is finished, you will see a notification about the successful completion of the update. We press OK again;
- The system will reboot with the reset BIOS settings and its new version. You can congratulate yourself, because you safely coped with the task!
ASUS old BIOS
If you are sitting disappointed that you have an old version without mouse support and a beautiful interface, you shouldn’t be too upset. Yes, you will be a little more difficult. But this is only in terms of ease of use of the utility. By the way, the update will occur using the same program ASUS EZ Flash 2! We repeat once again, the difference between the old and the new version of the module only in the interface. What do you do?
- Naturally, first go to the BIOS;
- Next, go through the tabs using the keyboard on the penultimate, called Tools;
- Here we will need to run our utility Asus EZ Flash 2;
- Now in the window, select our prepared flash drive with the firmware files. This file will need to be pressed twice;
- In the notification window you will be asked if you really want to update the BIOS? It seems to us that if you have reached this point, then you can safely click Yes. However, if for some reason you change your mind - click No;
- We are waiting for the completion of the flashing. This process may take some time, so be patient and do not touch anything. When everything is finished, the computer or laptop will reboot, and you will have a new version of BIOS;
- You can congratulate yourself, because you safely coped with the task!
Gigabyte
Employees and specialists of this company when creating software for the BIOS did not begin to re-invent something new: that is, installing updates for their product will be little different from previous instructions. However, it is worth remembering that the program interface may be somewhat different, but the method remains the same. Therefore, for users it’s more of a plus than a minus - you don’t need to learn anything new and, if you’re already familiar with BIOS firmware on an ASUS motherboard on a laptop or computer, you’ll definitely have no problems with how to flash Gigabyte.
Finding the firmware is as easy as, in fact, updating it: all information is freely available on the company's official website on the Internet. Searching for a long time is also not necessary, since the developers took care of the convenience of searching for the necessary documents and did not hide them anywhere in the site menu. As mentioned above, the company does not highly recommend performing a similar operation (that is, flashing the BIOS), if this is not absolutely necessary. With proper and stable operation of all installed components, why touch something? As you know, such actions do not lead to anything good. It is also worth remembering that if you do not get along well with computer equipment, then it is better to provide this business to specialists in different service centers or workshops.
The moment of the name of the motherboard module remains important: Gigabyte can give the same designation for different models (for example, if the second is a re-release of the first). But for them will be perfect different files firmware: if you install incorrectly, you can simply break the software, disable it. Therefore, we repeat and recall that you should not reflash the Gigabyte BIOS just because of your whim.
Let's sum up
Firmware or flashing the BIOS on the Asus (or Gigabyte) motherboard on a laptop or computer will allow you to make improvements and fixes for problems with the device at the program level. Before you begin these actions, you need to consider a number of factors that can protect you from unforeseen problems and breakdowns. It should be noted that the versions of the BIOS interface on computers may differ, so we are not afraid, but are just looking for a suitable option.
If you are not confident in your abilities, it is better to give this case to the master, especially with real problems of the motherboard: perhaps the failure lies not in the hardware work, but it is worth replacing the board completely. Do not forget also that if the board is damaged on a laptop, you cannot replace it. Then you can say goodbye to your device. However, we hope that everything worked out for you, and nothing broke. Do not forget to share your opinions and experiences in the comments!
After the release and sale of new computers, manufacturers often eliminate many problems with them, releasing new versions of BIOS. Problems can be very different.
For example, Acer has created a new BIOS for laptop aspire E5-574G, which improves performance on nvidia video cardsand also solves problems with a black screen when connecting a laptop via an HDMI cable.
In addition to eliminating problems and shortcomings, manufacturers improve performance their products, creating a new BIOS. For example, manufacturers of motherboards with a processor socket FM2 +, releasing a new version of BIOS, enable users to use the latest processors.
So that the user can independently update the BIOS of his PC, we have prepared a material in which we will describe this process in detail. For new computers, there are now two options for updating the BIOS:
- The first is an update via a USB flash drive.
- The second is an update using the utility for Windows.
In our examples we will use installation using a flash driveas this option is more reliable.
New BIOS version
The very first thing that needs to be done to install a new BIOS is to load a new version of it.
Downloading a new version of BIOS is necessary only from official sources, that is, from the websites of manufacturers of laptops, netbooks, nettops and other types of PCs. Do not download BIOS from any third-party sources.
Using BIOS from third-party sources, you can disable your computerand also lose the warranty, after which you will have to repair the computer in the service center.
Consider loading a BIOS for Aspire E5-574G laptop, netbook ASUS Transformer Book T100HA and a stationary PC based on MSI A58M-E33 motherboard. To download the firmware to a laptop Aspire E5-574G you need to go to the official website of Acer - www.acer.com. On the main page of the site we are looking for the link “ Support"And go through it to the support page for Acer devices.
On this page, open the tab " Search by category"And we will enter in the appeared parameters a series and number of our laptop. After these steps, the Aspire E5-574G laptop support page will open. This page has a tab BIOS / Firmware, which contains all versions of firmware for Aspire E5-574G.
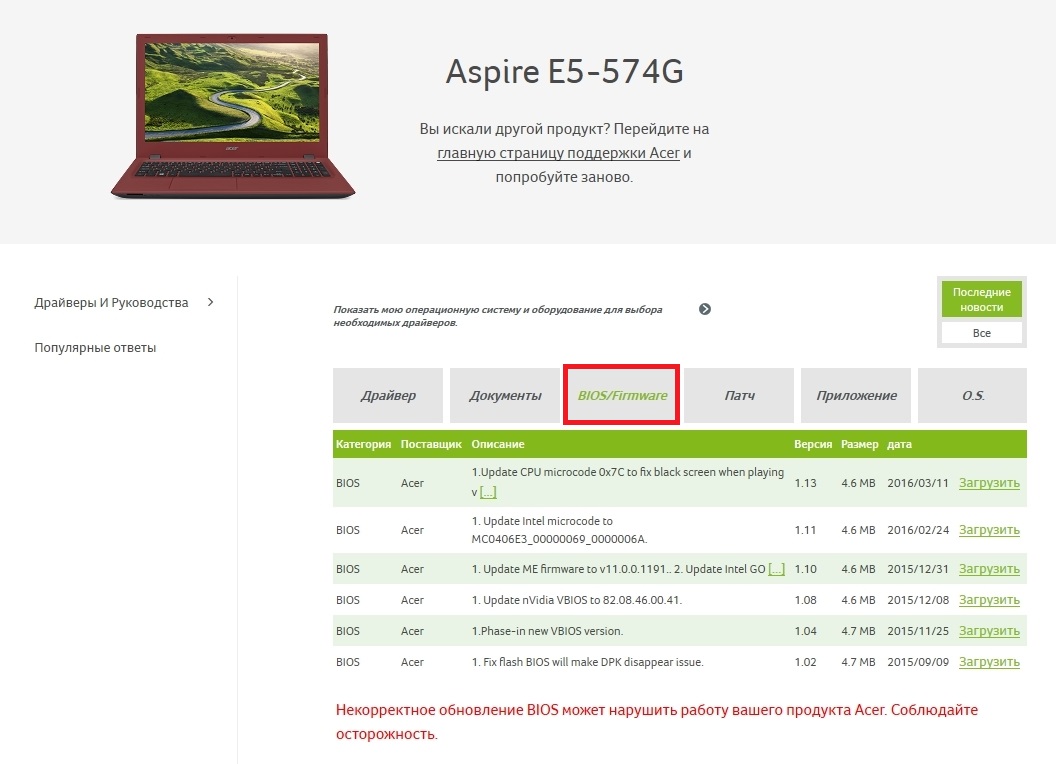
At the moment, the latest firmware version of the firmware is numbered 1.13. This version contains bug fixes for March 2016. In addition, all new firmware versions also include all microcode fixes that were in previous versions.
Download this BIOS firmware version and save it to your local disk. The BIOS microcode is distributed in the archive, so we will unpack it on a local disk and find the file “ZRW_113.exe”. The file with the extension "exe" means that the firmware for laptops and netbooks Acer is installed only through Windows.
When updating the BIOS from under Windows, you need to be extremely careful, as any antivirus program can disrupt the upgrade process, thereby damaging the laptop, after which its restoration will be possible only through the service center.
The ASUS Transformer Book T100HA tablet, which is able to transform into a netbook, is an interesting model for our review, since it can be updated via BIOS from a flash drive.
You can download the new version of BIOS on the official notebook page www.asus.com/ru/Notebooks/ASUS_Transformer_Book_T100HA. To do this, go to the tabs " Support / Drivers and Utilities"And upload a new one bIOS version.

After downloading the archive, you need to unpack it to a local disk and write the firmware file for an example update.
The principle of loading a new BIOS for a desktop PC based on the MSI A58M-E33 motherboard is similar to the previous examples. Downloads can be made from the official motherboard page on the support tab https://ru.msi.com/Motherboard/A58M-E33.html.
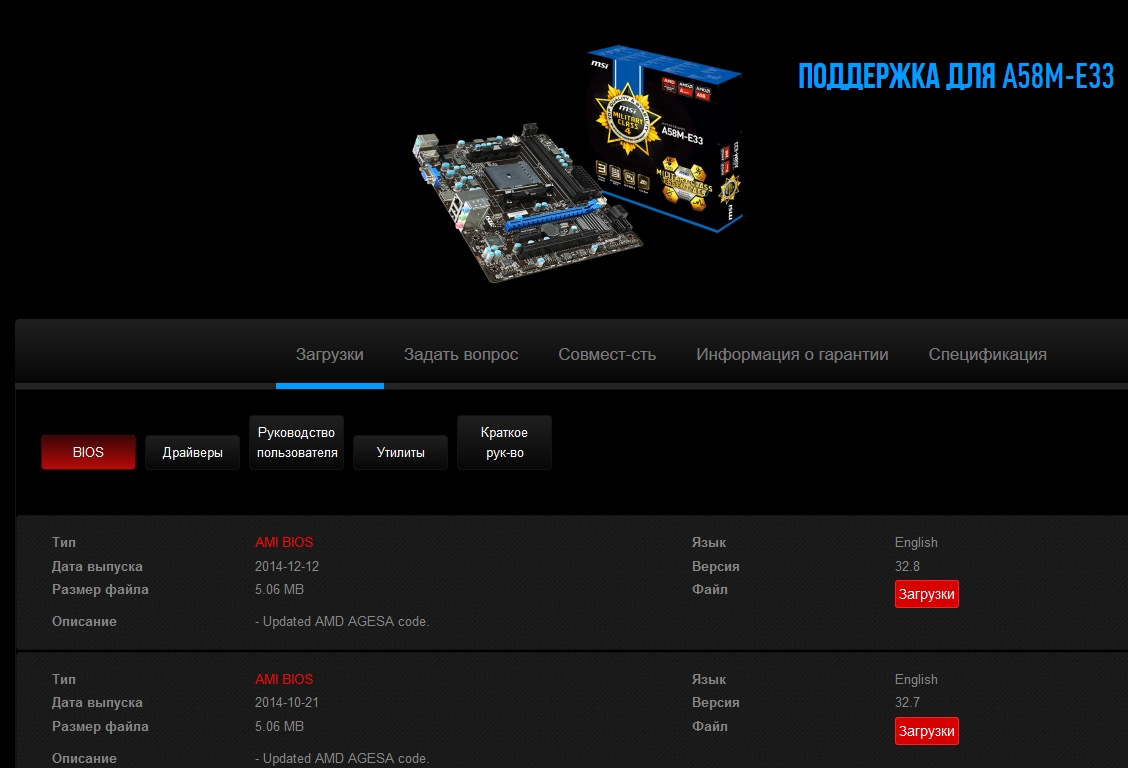
Load latest version an archive with BIOS on a local disk at number 32.8 and unpack the file with microcode also on a flash drive for an example of installing the firmware.
Updating the BIOS of the ASUS Transformer Book T100HA netbook from a flash drive
First of all, we describe the process of updating the netbook ASUS Transformer Book T100HA. We use a flash drive with a saved bIOS file and restart the netbook. At the start of the netbook, press the Delete key and go to the main BIOS window. In this window, open the tab " Advanced».
With the help of this utility, you can select the update file both from a USB flash drive and from a local disk. In our case, we will select the file not from the local disk, but from the flash drive and confirm the installation of the BIOS.
After the done actions will begin updating the BIOS.
As you can see from the example, it is quite easy to flash the BIOS of the ASUS Transformer Book T100HA netbook, especially if you do not have a flash drive, you can easily flash it from a local disk.
We update the BIOS of the motherboard MSI A58M-E33 from a flash drive
As in the example with a netbook, we restart the computer and go to the BIOS using the Delete key.

In the main window, go to the tab " M-FLASH", Then the parameters will open bIOS updates.
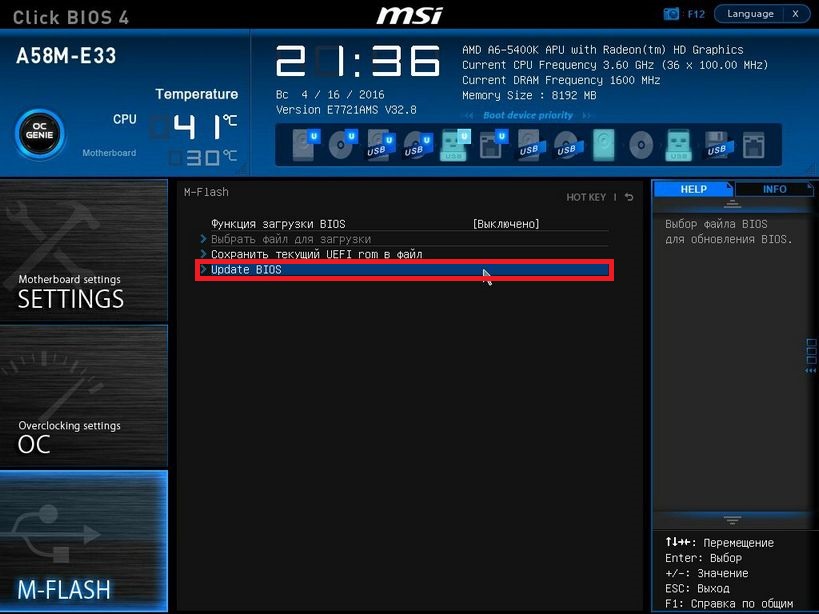
To update from a flash drive, we will select the item “ Update BIOSWhich will open the next window. In the window that opens, select the file BIOS from our flash drive.
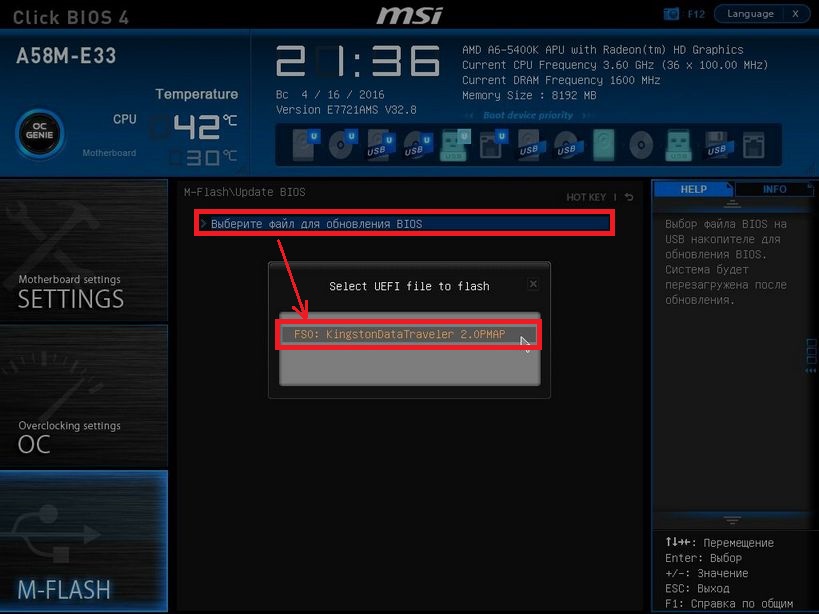
After these actions, the process of updating the BIOS microcode will begin.
At this stage, you need to make sure that the power supply to the computer does not turn off, as this can lead to a breakdown of the motherboard, after which you will have to order its restoration in the service center.
Therefore, when updating the BIOS of a stationary computer best use uninterruptible power supplies.
Conclusion
From the considered examples it is clear that updating BIOS is a simple task. But when you upgrade you need be extremely attentive and prevent the computer from shutting down during this process.
I would also like to remind our reader once again that in no case do not use BIOS files for firmware from unofficial sources, as this may lead to a breakdown and you will have to restore the computer in the service center.
We hope that, guided by our examples, readers will be able to update the BIOS, thereby ensuring stable operation of their PC.
Related videos
Hello everyone, dear friends! Just the other day, I acquired a brand new ASUS laptop for myself, in which I had to immediately update the BIOS. Therefore, in this article I would like to tell you how to update the BIOS on your laptop and why this procedure is performed on a new laptop.
So, sooner or later the time comes when we can no longer tolerate glitches and brakes in the operation of the operating system. Some users prefer to carry their laptop to a service center for professionals to reinstall the system. Other users choose a more complicated way - self-reinstalling Windows. This article is dedicated to the second category of users. We will understand how to update the BIOS on Asus laptops. The procedure requires 10-15 minutes, not counting the installation of the operating system. Rarely, the owners of laptops independently decide to perform the BIOS update, usually there is a reason - an error that does not allow to install a new version of the operating system. Most often this is an error 0 × 000000A5. If you are well versed in computers, but are not faced with a BIOS update, then immediately proceed to the appropriate section of the article.
In today's article will address the following questions:
- For which laptops is suitable instruction?
- When is a BIOS update required?
- How is the BIOS update process?
- What should I do if the BIOS is new and Windows 7 is not installed?
- What should I look for before installing?
Reference! The BIOS abbreviation stands for Basic input-output system, which translates into Russian as Basic Input-Output System. BIOS is a collection of firmware that helps to optimize the performance of computer components, as well as carry out the loading and installation of the operating system. Here you can read the necessary information about the BIOS itself.
The base system can even be seen on the motherboard. Look at the photo, the screwdriver's sting points to the BIOS chip.

For which Asus notebooks is a BIOS update desirable?
The answer is simple - for those who have an outdated BIOS. Usually these are the ASUS X551 and X553 series notebooks. This also applies to older models. In any case, the computer will independently inform you that you will not be able to install the new version of the operating system on this BIOS. And he will do it with error 0x000000A5. We need to install a new BIOS version that will support ACPI, then the error will disappear, and you can safely install the correct version of the Windows operating system.
I will give an example of a BIOS update on an ASUS X553 MA laptop. The update procedure follows the same scheme, so the owners of other Asus models will be able to use my instructions. If you have a laptop from another manufacturer, then all the difference will be in the source for downloading the BIOS firmware. I download it from the official website of Asus, you will need to go to the page of your laptop manufacturer.
What are the reasons for updating the BIOS in general?
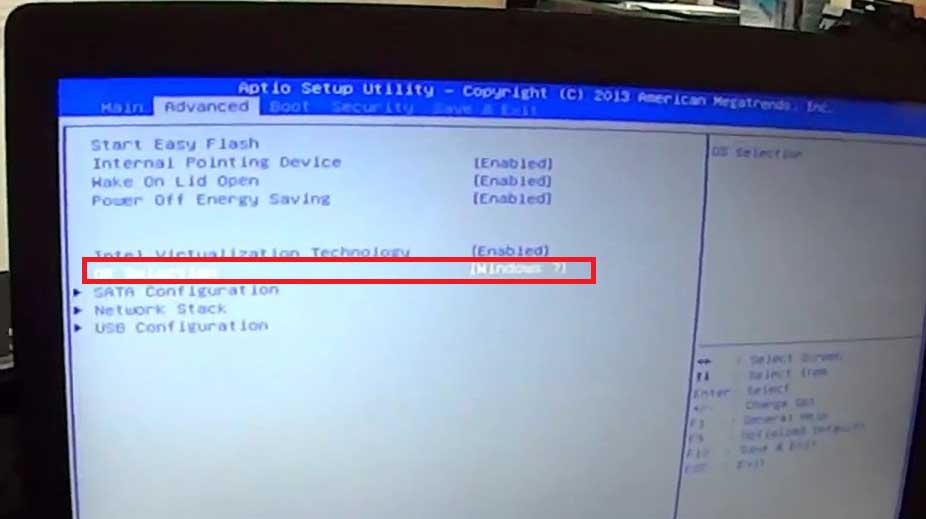
First of all, you need to check if there is an OS Selection option in your Advanced section of your BIOS. If not, then you will need an update. In other cases, simply set the position of "Windows 7" in this parameter, on this instruction for you will be completed.
Below are two main reasons for installing an upgraded version of the base system:
- Error. The appearance of the code 0x000000A5, which is accompanied by a blue screen of death. Most users switch to the updated version because of this error. In some cases, owners of laptops with built-in Windows 8 or 10 can not deliver more old version operating system, in this case also helps update the base system.
- Work with utilities. Some utilities are not loaded from the operating system, but from the BIOS, as is the case with the installation of the operating system. For example, you can take the program Acronis, with which you can make adjustments to hDD, change the number and size of disk partitions. There are many such applications, and new versions require that the BIOS on your computer supports the ACPI download format.

This is how the death screen looks with the error 0x000000A5, as a rule, it is she who reports the outdated version of BIOS.
The updated BIOS is on the laptop, but the error still pops up when you install Windows 7. What to do and how to be?
How to update the BIOS on a laptop asus?
In this case, the cause of the error is incorrect settings for the "seven" in the BIOS itself. This is especially true for owners of laptops with more modern systems. You can fix the situation as follows (try installing Windows 7 after each step):
Let's start with the simplest - reset the BIOS to the default settings. To do this, we need to go to the "Exit" section and select the item called "Load Default Settings", as shown in the photo below:
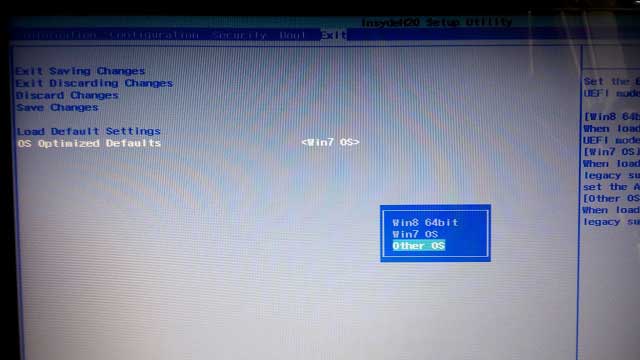
Nothing has changed? Then try changing the position on “OS Optimized Defaults” from “Win8 64bit” to “Win7 OS” in this section. The image below shows the process of changing parameters.
If you are trying to install an operating system from a flash drive, then it is worth checking in the “Configuration” section a parameter called “USB mode”. Try changing the position from “USB 2.0” to “USB 3.0”.
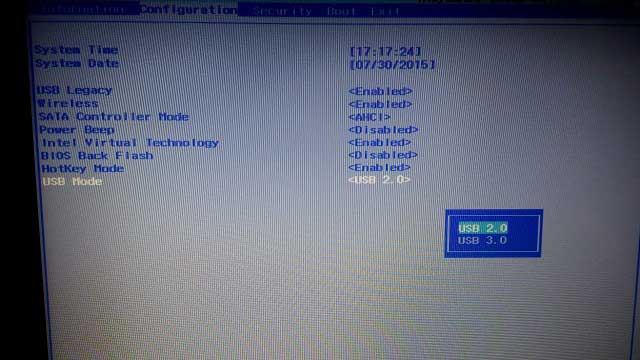
IMPORTANT! If the reason was in the third step, and you have successfully installed the seventh windows versionthen after the installation is complete, go back to the BIOS and return the “USB Mode” parameter. Otherwise, USB 3.0 drivers will be lost, as a result, all uSB devices will work with reduced speed.
We update BIOS on asus laptop - step-by-step instruction
So, you entered the BIOS, opened the “” section to configure the boot and did not find the “OS Selection” option there. In this case, we need to update the BIOS. The desired parameter looks like this:
To install the latest BIOS version, you need to go to the official Asus website https://www.asus.com/ru/ At the top of the screen you will see the products tab, select “Laptops” and specify your model in a special field.
We are interested in the X series, since it is the model 553 MA that applies to it. You can always find out the series on the laptop itself or on the box. Before us there was a window dedicated to our model - select the "Support" section, and then click on the "Drivers and Utilities" button.
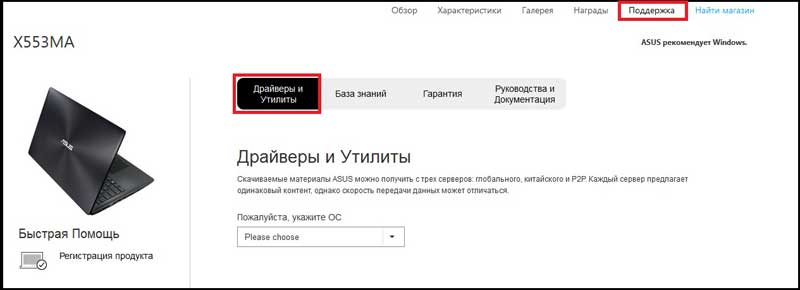
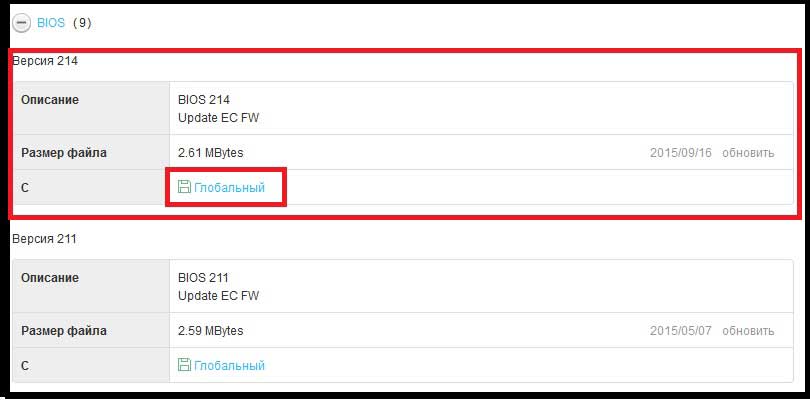
To begin, choose the type of operating system, here it is worth putting your option. After that a list of categories with drivers will appear. Everything is simple here - click on the BIOS category, after which a tab with the latest updates opens. We choose the most recent, in my case this is version 214. If you read the article later, you will have more recent drivers. In general, you need to select the highest version.
Install Windows is better best of all from a flash drive, so it’s best to flush the BIOS files to a USB drive. Unzip the archive and discard the contents to the root folder of the flash drive. We will also need the Start Easy Flash utility, which is located in the BIOS. Perhaps she is already at your place. In another case, the utility will need to download, you will find it on the official website.
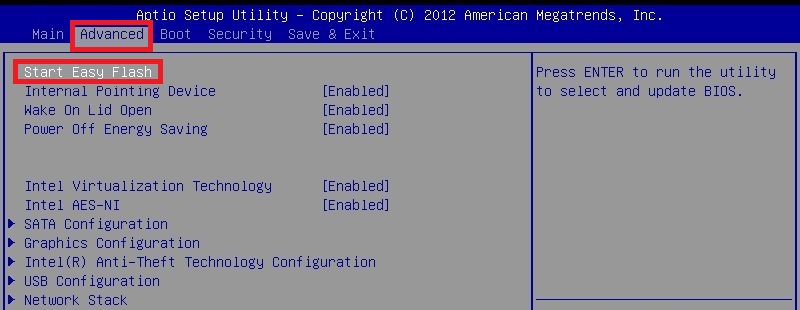
We insert a USB flash drive with BIOS firmware into a laptop and run it. In the first seconds of loading, press the "F2" key on the keyboard to get into the BIOS. Here we are interested in the tab «Advanced», immediately go into it. Here we click on the button "Start Easy Flash"
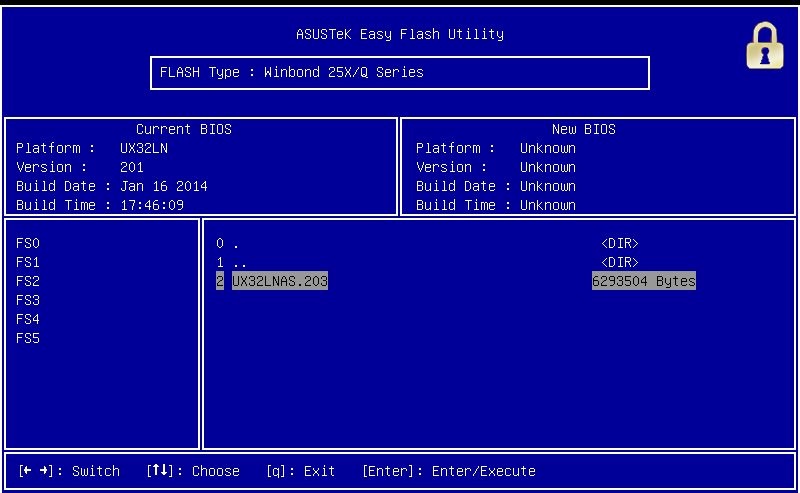
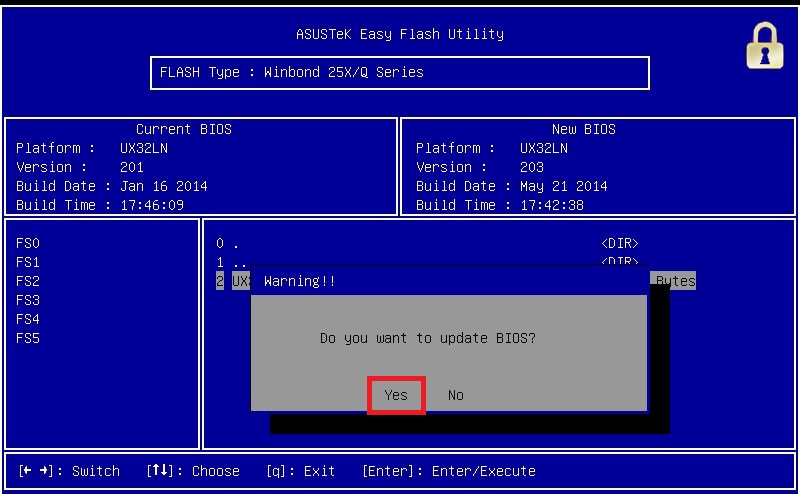
Now you need to select the firmware file that is on the flash drive. He will have exactly the same name as when downloading. Press the "Enter" key to start the BIOS update.
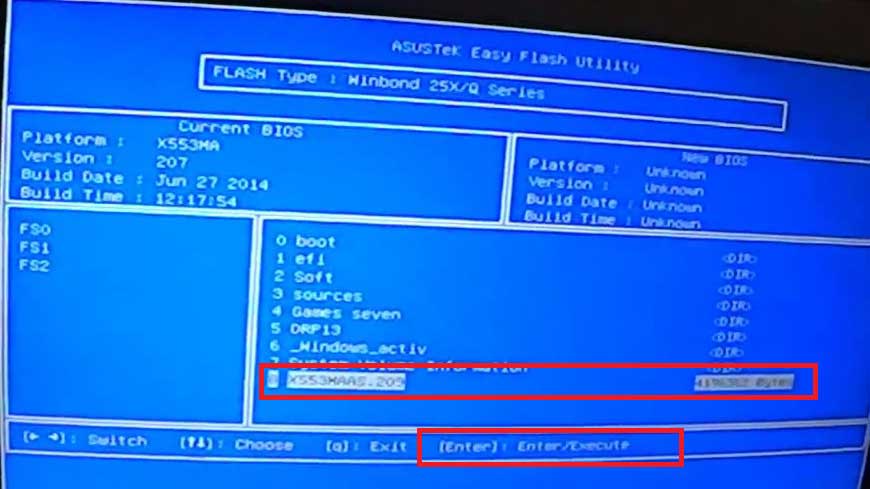
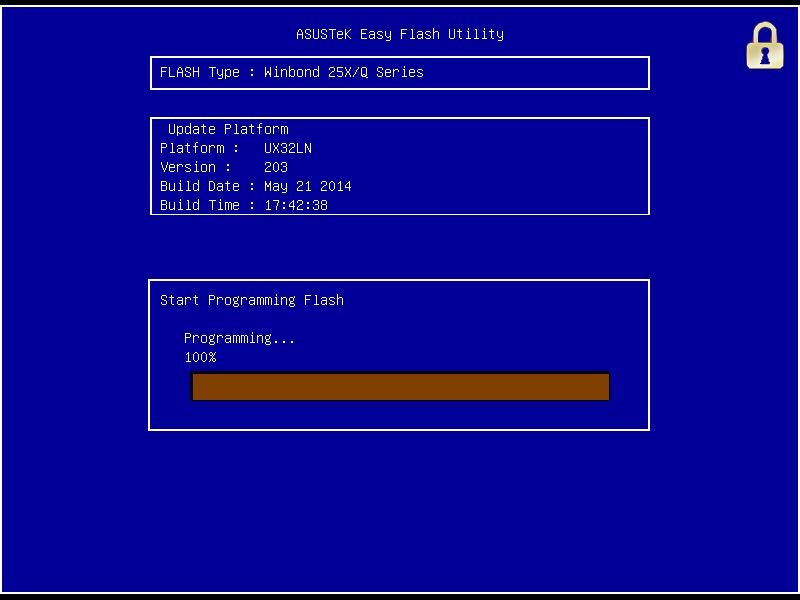
After that, the loading bar will appear on the screen, it remains for you to wait for the process to complete. Do not turn off the laptop during the firmware upgrade; it is recommended that it be connected to the network. After completing the process, the laptop will restart. Again, go to the BIOS and go to the tab "Advanced". Now there is an option "OS Selection". Click on it to set the installation mode "Windows 7".
If you are going to install the seventh version of the OS, then you need to go to the "Boot" section and select the media from which you will install the system.
If this is a flash drive, then the name will contain the word “USB”, if the disk is “DVD”. It looks like this (in my case a flash drive is used):
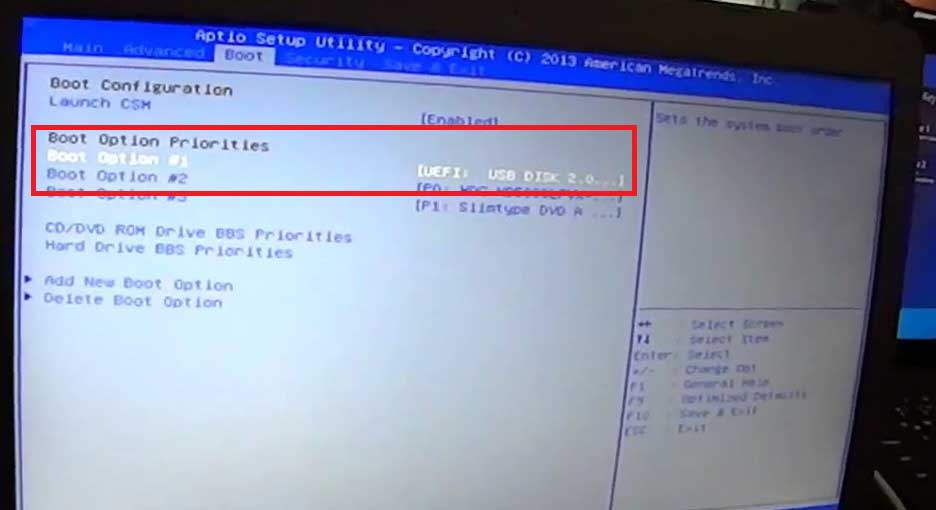
Now you can safely insert the media with the installation files of the operating system and proceed to the installation of Windows 7. Do not forget after completing the installation, set the priority to boot from hard drive, otherwise, the computer will try every time to boot from the flash drive.
As you can see, the update process is pretty fast. In 95% of cases, the BIOS update will help solve the problem with the error 0x000000A5. The rest of the settings do not touch, follow only those steps that are listed in my instructions. Experiments can adversely affect the performance of your computer. Done, now you can fully use the seventh version of Windows.
Before proceeding to the process itself, it should be noted - updating the BIOS is quite a serious matter. If you do not have a good reason to carry out such an operation, and the PC is working properly, it is better to leave everything in its place. In the event of a failure, the computer will need specialist intervention, up to repair in the service center.
How to update the BIOS on the Asus motherboard - do you need updates
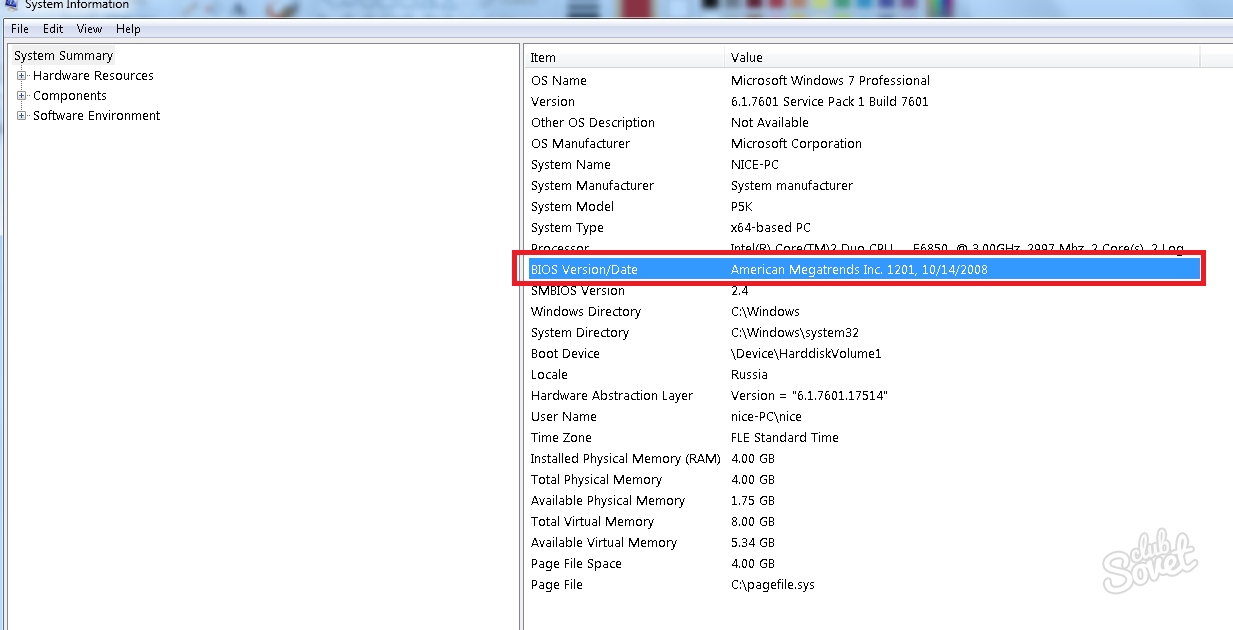
The first step is to determine if there are updates for your BIOS. Will help us in this revision of the motherboard and the current version of the BIOS itself. The audit can be considered on the “motherboard” itself, along its perimeter, on the shopping box or in the warranty card. The BIOS version will be recognized as follows:
- click Win + R;
- write in line msinfo32,click on "OK";
- in the "System Information" look for the string "BIOS Version";
- now go to the official website of the manufacturer;
- in the search bar, enter the model of your motherboard (for laptops - the model of the entire device);
- select the section “Support” -\u003e “Drivers and Utilities”, as well as your version of Windows;
- go to the "BIOS Utilities" and check which date indicates the latest available software version;
- if a newer version is posted on the site - download it;
- you should also download and install Winflash hosted on the site as a necessary prerequisite for updating.
Bios update on Asus motherboard
In theory, there are different ways BIOS updates — for example, via DOS, third-party programs either from the BIOS itself. However, the most simple, modern and secure way to update is to use special tools from the manufacturer’s website. At the same time, if you bought a computer in the assembly from some famous brand (for example Dell, HP, Lenovo), it is best to apply for software and details of the update process on their sites. In the opposite case, with Asus motherboards we do the following:
- unpack all the archives that were downloaded according to the instructions in the previous paragraph;
- run the Winflash utility;
- the program interface will ask you to specify where the received BIOS update file was saved;
- the program will check the file and launch it for execution (before that, it is desirable to close all other programs, connect the laptop to the network, PC to the uninterruptible power supply);
- after a few minutes, Winflash will finish working and will offer to reboot - press the “Enter” button for this;
- when the computer turns on again, check the BIOS version through msinfo32.
Automatic update of BIOS on the Asus motherboard through “Asus Manager”
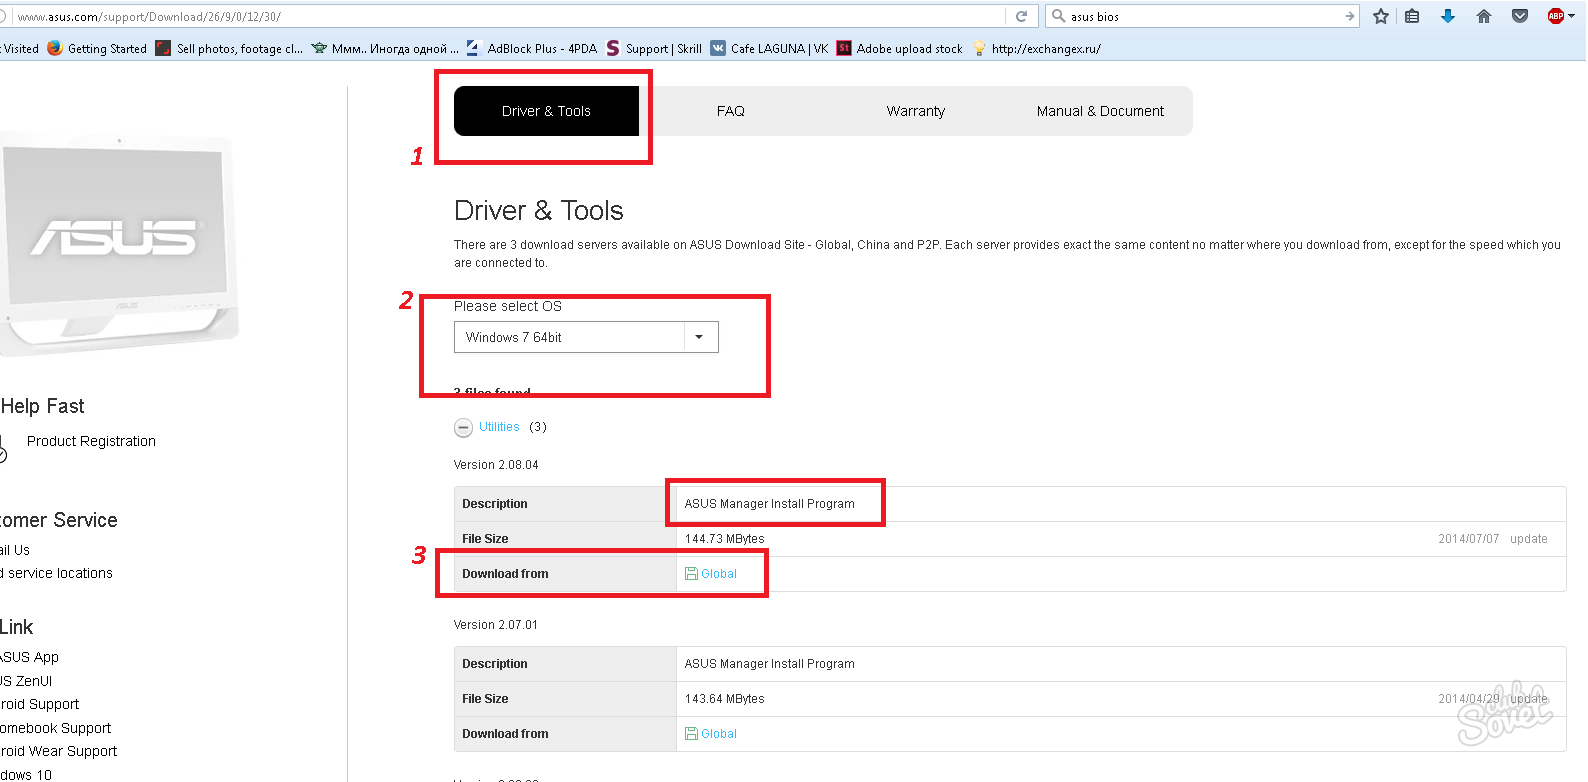
There is another useful program that independently checks the relevance of installed drivers, BIOS’s and other important system components. To use Asus Manager:
- click on the link to the company's website;
- choose the version of Windows, download the utility;
- unpack and install as usual PC program;
- launch “Asus Manager”, go to “Update” -\u003e “BIOS”;
- click the button "Connect to server";
- one-click program will update everything to the latest version;
- if updates are not required, you will see the inscription "No critical updates available".
You can use both programs at the same time, for example, in order to update only the BIOS without affecting the driver, and vice versa.
The combination of the above conditions opens up the possibility when you can raise the performance of your laptop to the highest level, at the expense of deeper and more subtle settings in BIOS.
Well, the conditions are met - tell me, what will be needed next? The answer is inspiration and desire, which is useful in mastering our material. Well, straight arms, of course! Curves - corrected by experience. So, let's get down to the question, how to flash the BIOS on the Asus motherboard?
Before starting the firmware, you need to realize that this is a crucial step, where you need to throw all the pros and cons on the scales. And also you need to stock up on an uninterrupted power source so that in case of an accidental power outage there is no system failure. Of course, there are motherboards that, in case of unsuccessful flashing, can “roll back” everything back to factory settings, but, alas, not all motherboards can do this. Now you are frightened, and you understand how serious this step is, so you need to measure it 7 times and reflash it once. And if you still decided, then proceed.
So, mankind knows three ways of flashing BIOS on the motherboard:
- Resorting to the DOS mode;
- Using the Windows mode;
- Using the utility kindly provided by the motherboard manufacturer for flashing BIOS from the BIOS itself, without going into DOS or Windows.
Flashing in DOS mode
Above, we figured out that the first thing before BIOS firmware is to determine which manufacturer your motherboard belongs to. Then find out its model, version and installed BIOS. And after that we perform the following actions:
- Download the firmware file, which will help you to update the BIOS of your "motherboard", ideally, if you download it from the manufacturer's website;
- If the manufacturer maintains several firmware versions, you should download the “sharpened” file for updating in DOS mode;
- After that, you will need a blank disk or USB flash drive with a small volume, format it and make it bootable;
- We place the previously downloaded file on the prepared digital medium.
- Download on the same manufacturer's website and the program itself for flashing, for example, it will be awdflash.exe, and in the file autoexec.bat we set the path to the firmware file.
- Just in case, you can protect yourself by specifying the file name to save the current version of BIOS.
Flashing BIOS in Windows mode
As for flashing the BIOS of the motherboard in the Windows mode, there is a heated debate, in which those who dared to update the BIOS in this mode are defeated. The fact is that it is possible to reflash the "motherboard" in Windows mode, but it is not safe. After all, sometimes operating system "Lives its own life", and at the most important moment it can fail, and this is fraught with the fact that the error that occurred while written in BIOS, and for the "motherboard" it is not good, since it can fail and write "lost ".
Flashing BIOS using the utility (AFUDOS)
Updating the Asus device BIOS in this way is possible in the following sequence:
So, we have knowledge of how to flash the BIOS on the Asus motherboard, we hope that our efforts were not in vain, and if you need to update the BIOS, you will not have difficulties.