How to make a grid in Photoshop. How to make a grid in Photoshop.
There is a tool with which to edit graphics will be much easier. This is a grid. It helps in creating images and folding collages. On it you can estimate the size and distance, estimate how objects will be located relative to each other, make markup. Orient where to place this or that part of the picture. This is a useful tool if you know how to use it. Learn how to turn on the grid in Photoshop, how to set up its attributes and how to remove it.
The grid helps you more accurately and symmetrically arrange the elements in the composition
In fact, these are guide lines. Flat table. It overlaps the image, but does not overlap it. It is easier to calculate proportions with it, to see the symmetry, to put individual elements correctly.
As an analogy, we bring a school notebook in a cage. Graphs were drawn and geometric figures were drawn in it. On such a sheet it was possible to draw a straight line segment without a ruler, to set an angle of 45 or 90 degrees, without using a protractor. On her eye was determined what the length of the side of the rectangle, and how many cells make up its area. In Photoshop, the table has about the same functions.
It can be seen only in the program. It will not appear when printing. In the digital version of the picture of the cells also will not. This is not part of the image, but an editing tool.
Do not confuse it and the pixel grid. The last is splitting the picture into dots. It is useful for detailed editing. It can also be enabled and configured.
Even if you do not need these options, it will still be useful to know about them. For example, to remove a table if you accidentally activated it.

How to turn on?
- Open any image file or create a new one.
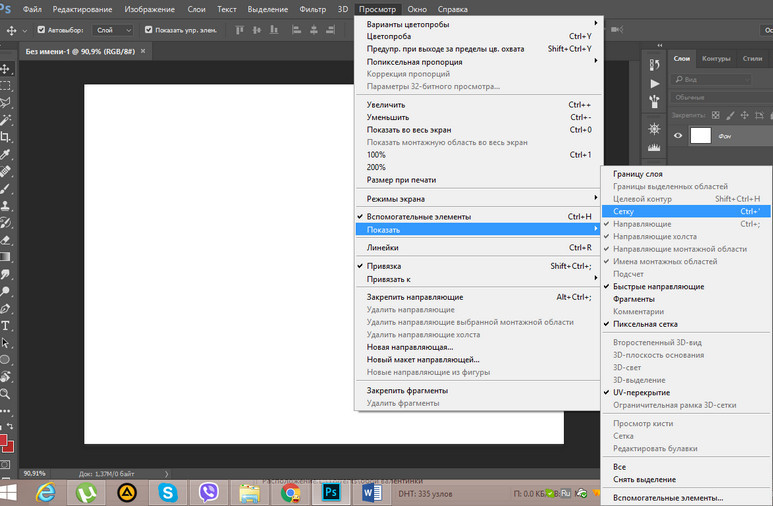
- In the menu bar, click on the “View” button. Usually it is located between the "3D" and "Window".
- Hover over the item “Show”.
- In the drop-down menu, click on the "Grid". It will appear on the layer.
- You can also press the Ctrl + ’keys (in the Russian keyboard layout Ctrl + E).
How to setup?
You can make a different cell size (for example, so that they visually indicate segments of length 1 centimeter), select the type or color of lines.
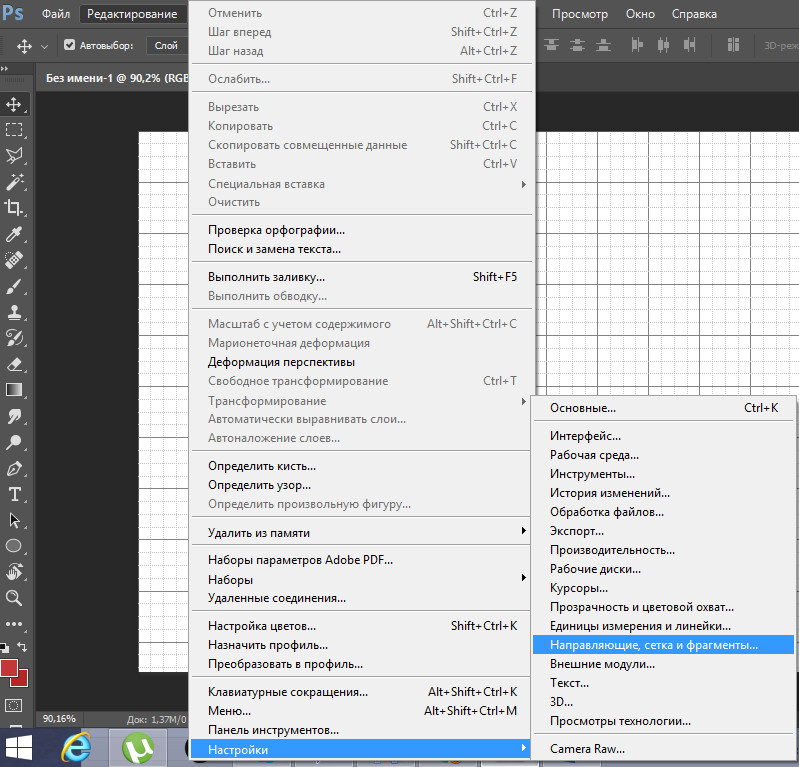
- Open the "Edit" menu on the top panel.
- Mouse over the item "Settings". He is at the bottom of the list.
- Click on "Guides, Grid, and Fragments."
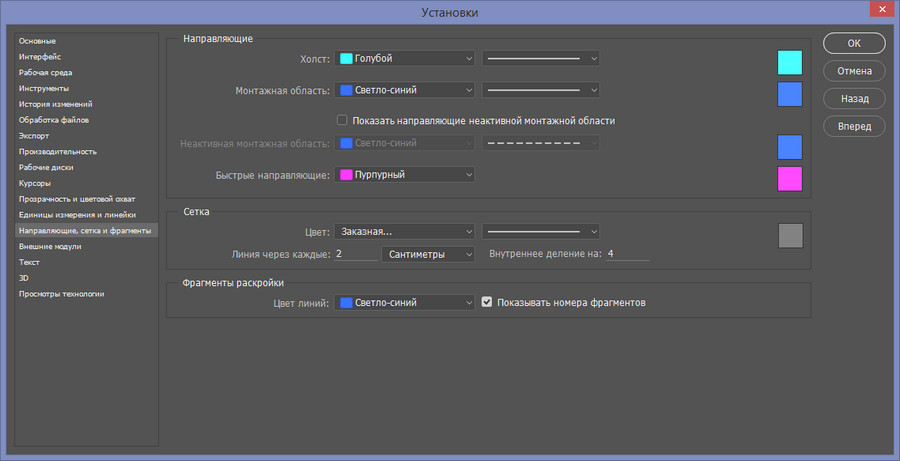
- In the window that opens, set the desired cell size. This can be done in the “Line through every ...” field. Different units of measurement are available: inches, millimeters, points, and so on.
- In the "Style" section, specify how the grid should be displayed: a solid bar, dotted line, or dots. This is not so important, as the markup will be visible only when editing the picture.
- In the item "Color" select the fill. The setting can be used when the table merges with the background.
How to remove?
You can get rid of cells in the same menu through which they were added. Here's how to remove the grid in Photoshop:
- Go to View - Show.
- Uncheck the corresponding item.
- Or use the keyboard shortcut Ctrl + Oe.
Pixel grid
Pixel grid is visible only near. To see it, you need to zoom in and change the scale. But when working with graphics, it can interfere. Here's how to insert or remove it:
- Open the View - Show menu.
- Click on the “Pixel Grid”.
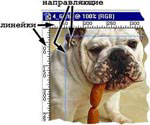
Rulers
Another measurement method in Photoshop is the rulers. They are outside the picture. With this tool, you can estimate the length and width of objects and the image as a whole. You can activate the rulers in the View menu. To select their parameters, go to Edit - Settings - Units and Rulers.

The table is useful when drawing diagrams. Or for any other job that requires precision. But this tool is useful outside the professional sphere. Indeed, while drawing a lot, "pretends to be an eye." If you turn on the markup, you can focus on it. And in the end you get a verified, developed and beautiful picture.
Consider the auxiliary tools that are used to create and edit images in the program Adobe Photoshop CS5. These are rulers, guides and a grid.
Rulers in Photoshop
Rulers can be seen on the left and top beyond the borders of the image. Turns rulers on and off using the menu View - Rulers.
The units of the ruler can be changed in the settings. To change, go to Editor - Settings - Units and rulers, and choose what you need in the top paragraph.
The starting point of the rulers by default is the upper corner. You can change the point of reference if you click at the intersection of the rulers with the left mouse button and drag it to the drawing. to the place where you plan the origin of coordinates. Then release the mouse button.
To return the starting point to the place, double-click on the place where the rulers intersect.
Guides in Photoshop
 Guides are lines to which you can attach some objects and selections. To create guides, click the left mouse button on the ruler and, without releasing, pull pressed to the picture. A guide appears that will be parallel to this ruler. Using rulers, you can precisely position the guides in the figure, at a predetermined distance from the edge.
 For example, you want to select a round or oval object. To do this, make four guides: two horizontal and two vertical, in order to limit the desired object by them. After that choose the tool Oval area and diagonally from the first intersection of the guides to the second intersection, make a selection. The selection will definitely stick to the guides.
After highlighting, you can do with the selected area what is required, for example, to make it more contrasting, or bright, or to change the color.
To move an existing guide, press and hold Ctrl, and move the rail to a new location. You can also use the tool Move.
When installing guides in Photoshop, to put them more precisely, use the zoom.
Sticking objects and selections to the guides can be turned off or turned on using the menu. View - Binding. You can also select different binding elements by selecting View - Snap to. At this point, you can bind to guides, grid lines, layers, borders of the document.
To remove the guides, go to the menu Preview - Remove guides. You can also remove guides by dragging outside the image.
In addition, a new guide in Photoshop can be created using the menu View - New guide. When creating a dialog box appears in which you select the orientation of the guide and the position. This method is good when you know exactly where the guide should be.
You can also change the orientation of the guide, from vertical to horizontal, or vice versa. To do this, press and hold the key Alt then click on the guide where you intend to rotate it 90 degrees.
Grid in Photoshop
Grid is another useful tool in Photoshop for creating collage, editing, and for other cases when you need an exact location of objects.
 In order for the grid to appear, choose in the menu View - Show - Grid. The size of the grid is adjusted in the settings of Adobe Photoshop CS5. To enter the settings. choose in the menu Editing - Settings - Guides, mesh and fragments. In the settings you can specify. how often gridlines will be placed, using items Line through each, and Internal division by, which regulate the frequency of the main and auxiliary grid lines.
Now, if you pull the guide out of the ruler, it will automatically stick to the grid lines. If you create a selection, it will also stick to the lines and nodes of the grid. Binding can be disabled using the menu Preview - Snap to - Grid Lines.
To remove the grid, go to View - Show, and uncheck the box Grid.
Hello to all site visitors site
In the program Photoshop there is a great tool to help with pixel accuracy to arrange objects, draw objects of a given size, etc. This tool is called Grid. Frequently web designers use it, but this tool is so useful that everyone should know about it. If you still did not know what Grid in photoshop, how to turn it on and how to use it - you this lesson will be very helpful.
It should be noted that the Grid is not visible when saving images in jpg, png, gif formats. The same grid is "invisible" when printing. The grid is visible only in the Photoshop program itself or if you save the image in PSD or TIFF format. If you save the image in PSD or TIFF format and transfer the file to another person, he, after opening the file on his computer, will be able to see the Grid created by you.
How to enable / disable Grid (Grid)
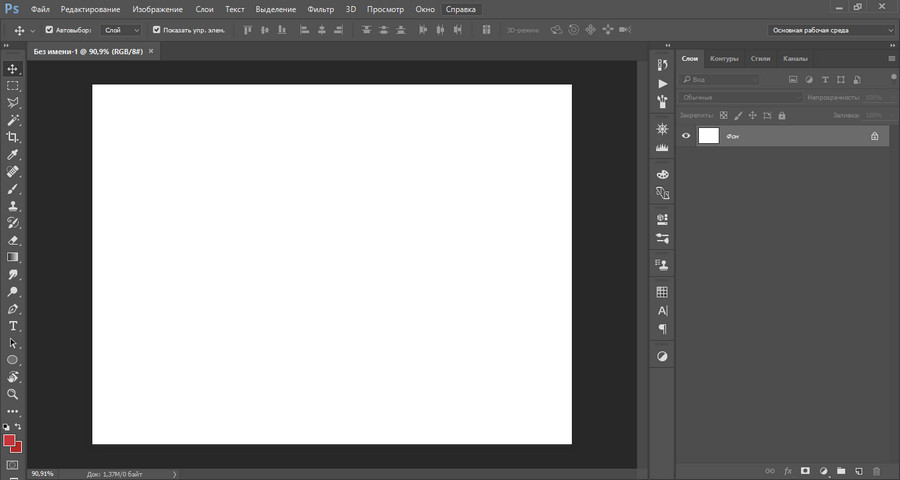
To begin with, as always, we create a new document in Photoshop (Ctrl + N) with an arbitrary size, I have 800x600 pixels:
By default, a tab with a new document will look like this:
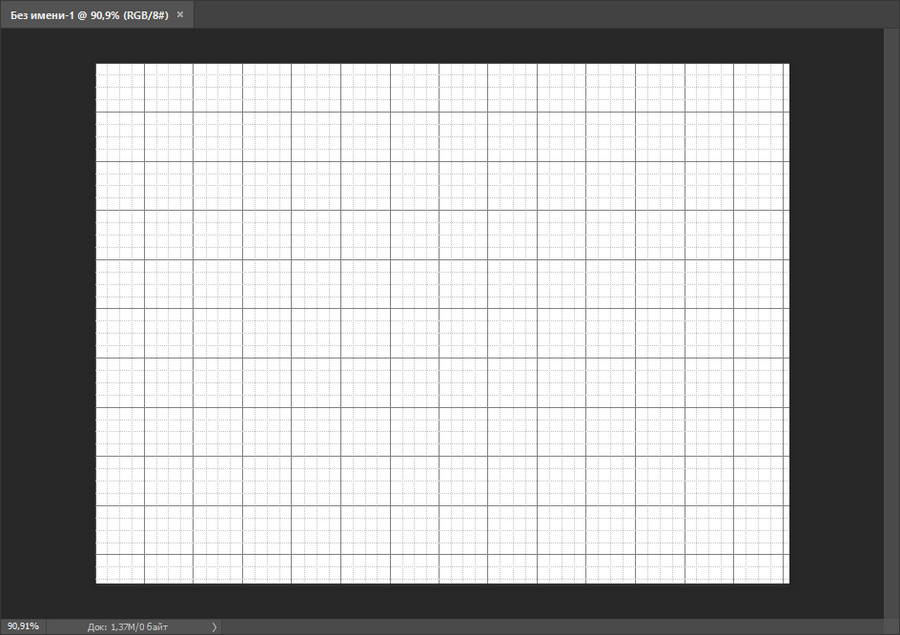
In order to enable Grid, you need to go to the menu View - Show - Grid (View - Show - Grid) or press the key combination Ctrl + “("E" in the Russian keyboard layout):
The grid appeared:
By the way, in order to turn off the Grid, you need to do the same actions - go to the View menu and uncheck the “Grid” or re-hold Ctrl + “.
How to configure the Grid
By default, the Grid is divided by bold lines, the distance between which is 2 cm, in turn, these blocks are divided by dashed lines into 4 parts.
It is possible to change these settings to your needs by going to the menu. Editing - Settings - Guides, mesh and fragments ( Edit - Preferences - Guides, Grid & Slices) or by pressing the key combination Ctrl + K and Ctrl + 8.
The following window will open in which you can change the color settings, the units of the Grid, etc.
How to use the Grid
Suppose we need to cut a rectangle on a layer to make a frame, leaving 50 pixels along the edges.
Change centimeters to pixels and set a step of 50 pixels:

Activate the tool Rectangle selection (Rectangular marquee), hotkey for calling the tool - M.
Instruction
The grid can provide significant assistance in reconstructing an image after any operations have been performed with it, and it has turned out to be distorted. Open the tool “Reconstruct”, it will allow you to undo the changes, restore the original image of the image or apply the distortion to other objects. In addition, the Liquify section may distort the object. The grid will allow you to track changes and distortions in any object created, and you can at any time save the grid with the shape of the transformed object so that you can later apply it to it. Similarly, you can save the grid for a normal undistorted object in order to restore its parameters after unsuccessful actions.
The grid will become your indispensable assistant if you work with fuzzy images, in which it is difficult to catch specific boundaries. It will allow you to more accurately mark the zones of certain changes. In addition, if you uncheck the “Show image” option in the grid settings, you will be able to see the distortions on the grid in their pure form.
You will need
- computer;
- photoshop of any version;
- fantasy.
Instruction
For the calendar, we need a grid, which can be downloaded on the Internet by request. Next, open a new document by pressing Ctrl + N. In the "Set" section, select A4 paper size with a white background color.
Take the second picture, placed on the other side of the document. If necessary, use the "Free Transform" to reflect or reduce the image.
Now you can arrange the calendar grid. So that it is not too small for reading, we place half a year on one side, and the second half - on the second. Using the "Text" tool we type the year. Here you can also increase the font, change the opacity or color, change the position. Along the edges we make a frame for beauty.
Go to the second side, turn the canvas 90 ° clockwise 2 times. Just do not reflect it vertically, otherwise we get a mirror image. We do the same with the grid: we place the second picture, the text and the grid, we make out beautifully.
In the end, you can hide the guides and start printing. To print, select A4 format and tick the box "Real size". It is very important. If we do not tick, we may not have a calendar on A4 paper. It's all.
Related videos
note
Try not to work on the Background layer, as some changes on it may be irreversible. It is always better to secure yourself with a new layer.
Helpful advice
If you make a mistake, you can always use the function "History".
Sources:
- How to make a calendar in Photoshop
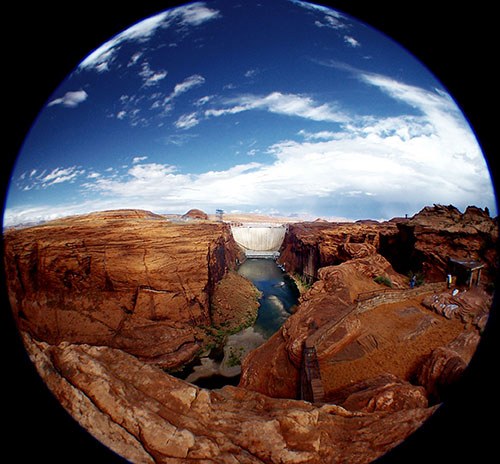
There are many techniques of artistic photography, allowing you to get unusual visual effects. One of them is “fish eye". It is achieved using a wide-angle lens at short focal lengths. Therefore, it can not be played on amateur cameras. However, make the effect of "fish eye»Can be in the Adobe Photoshop editor from a regular photo.
You will need
- - installed Adobe Photoshop;
- - image file.
Instruction
Open the original image in Adobe Photoshop by selecting "Open ..." from the File menu. Use the text box at the bottom of the document window or the Zoom Tool to set the appropriate viewing scale. It should be able to manipulate the entire area of the image to be processed.

Create a base layer from the background. In the main menu, select Layer, New, "Layer From Background ...". Click the OK button in the Layer dialog that appears.
Select the area of the image to which you want to apply the “fish eye". Use the Rectangular Marquee Tool or the Elliptical Marquee Tool. If the entire image has to be processed, skip this step.
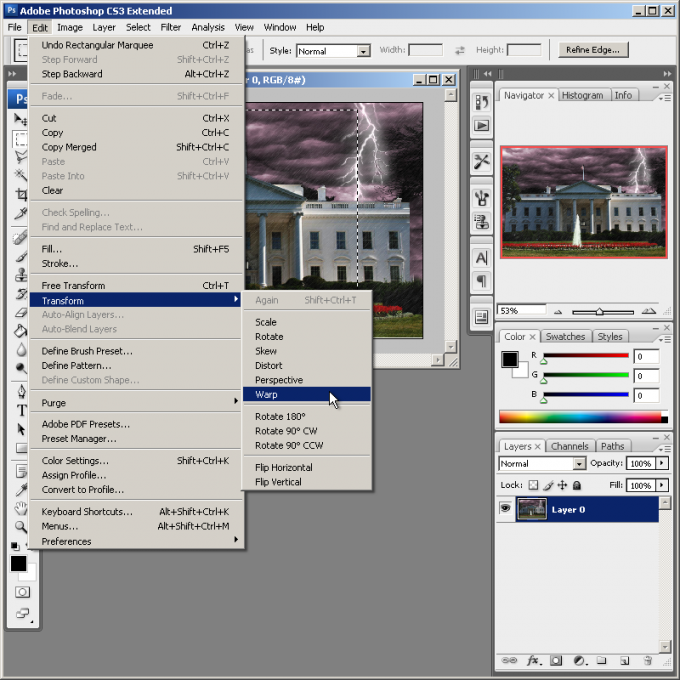
Activate image processing mode by introducing distortion. From the menu, select Edit, Transform, and Warp. After that, a grid will appear in the document window to control the effect parameters.
Change the type of applied distortion to “fish eye". Click on the Warp drop-down list in the top toolbar. Select Fisheye. The control grid in the document window will change its appearance (only one marker will remain).
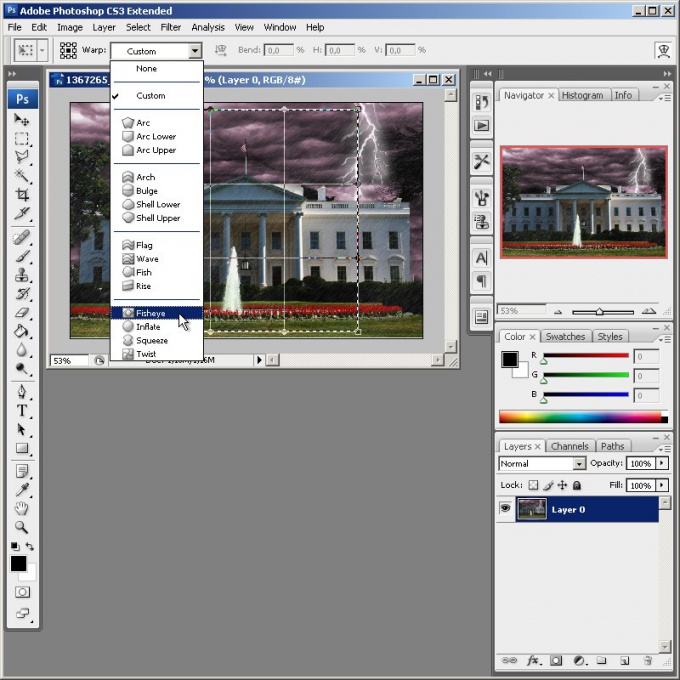
Apply the fish effect eye"To the image being processed. Move the control grid marker until the desired level of distortion is reached.
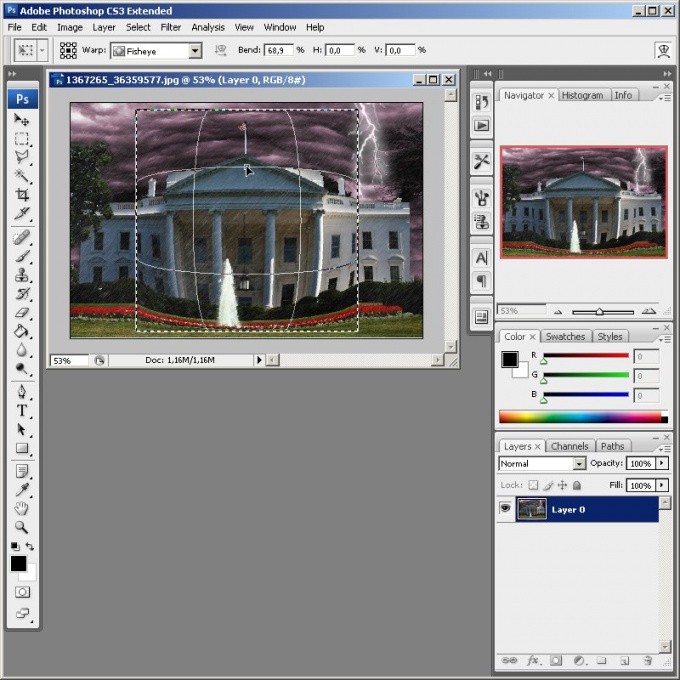
If you need to make additional changes to the image, for example, give the distortion area a rounded shape, select the Custom item in the Warp list. Move the grid nodes for the desired effect. Apply your changes by clicking on any button on the toolbar and clicking OK in the dialog that appears.

If necessary, modify the image with the effect of “fish eyebut". For example, invert the current selection by pressing Ctrl + I, clear the background by pressing Del, and then fill it with the desired color using the Paint Bucket Tool. Crop the Crop Tool.

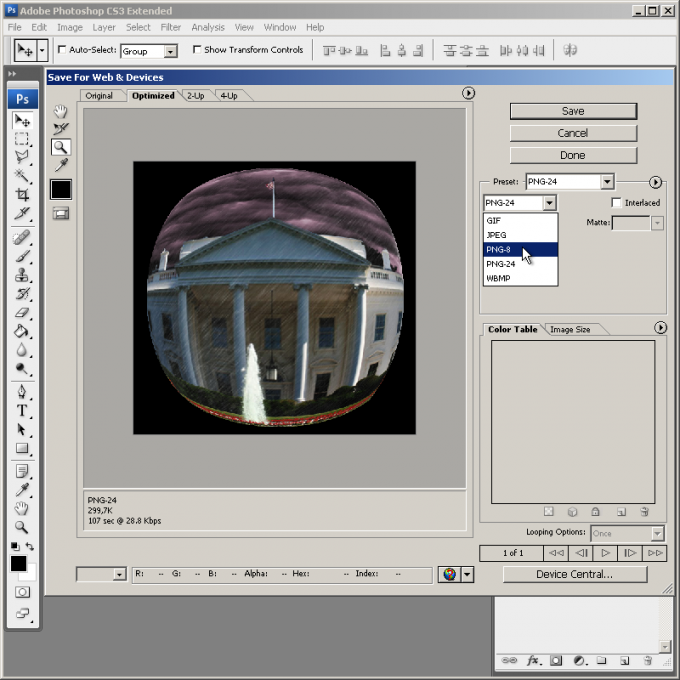
Save your work to a file. Use the "Save As ..." or "Save for Web & Devices ..." item in the File section of the main menu. When saving, pay special attention to the choice of format and data compression ratio. If the image requires further work, save a copy of it in PSD format.
Professional raster graphics editors, such as Adobe Photoshop, provide today the most powerful tools for editing photos. The effects created go beyond the usual reality. For example, in photoshop can do fangs, presenting the character of the photographic composition in the image of a vampire.