Add-on for proxy browser. Disable, change and configure the proxy server in Google Chrome
A proxy server is a special computer that connects you to a site that you would like to view. From the side of the administrator sees that you are not just viewing the contents of the resource, but turned on from a specific computer that has its unique ip-address on the network. In this article, we will look at what proxy for chrome is, what are its features and how to manage it, as well as how to disable the proxy in Google Chrome.
If you do not need to be seen on the network, you can turn off the proxy for Google Chrome. Or vice versa, enable it so that your server can be seen by the administrators of the resources you are viewing. But how to disable it if Google Chrome simply does not have such settings? After all, this browser uses only the proxy server settings that Internet Explorer has and which is system-wide in it. Probably, on this system, Chrome and convenient to use them, which is very explainable. Although not always it is really convenient, since the global changes of this component are often used in many programs, and not exclusively in Chrome, as you would like.
Proxy disconnection
Users of this browser should be aware that their changes to this parameter it is not provided. What to do, how to disable the proxy? Go to the menu, click on the symbols “Settings” - “Advanced” - “Network” - “Change proxy server settings”. By clicking on the last symbol, you get to Internet Explorer, where you will disable the parameter, which can be done using the Explorer rules. If you disable the function for Internet Explorer, it will automatically stop working in Google Chrome.
To disconnect, go to the Explorer browser, then to “Tools” - “Internet Options” - “Connections” - “Network Settings”. Opposite to the notation “Automatic detection of parameters” it is necessary to uncheck the box. And the designation “Use proxy server for local connections”, on the contrary, should be ticked. Next, click "OK", saving the changes.
Configure the proxy server
Windows Chrome runs on the same platform with Internet Explorer, so the proxy server setting is always borrowed from Chrome. Consequently, Chrome is perfectly “friendly” with the proxy settings for Explorer. In order to be able to configure this value not only for Explorer, but also for Chrome, there are two ways to get to the window with the parameters:
Why are we so deep in changing the parameters? For another button that is there: "Exceptions." These are values that dictate to the browser which sites can be opened directly, without using a proxy. Without this it is difficult to do if your local network has its own web server, because it is simply ineffective to visit them through a proxy. In order to remove it only for these servers, it is necessary to register exceptions. We are looking for a field located under the following designation: “Do not use a proxy for addresses starting with:“ we write all the websites we want the browser to access directly. ” We enter there everything that we want to exclude from the general rule, between the values we put a semicolon. And how to disable the proxy for several sites that are recorded under one domain? You can simply label them with a single domain entry. For example: site1.mail.ru and site2.mail.ru in the list of exceptions can be written simply: .mail.ru.
From 7.13 Moscow time, all networks from the St. Petersburg data center are not available. We were informed that the accident at the transit hub and the DC was left without the Internet. Unfortunately, even the approximate timing of troubleshooting is not reported to us. Please wait, the network will be restored soon, everyone will receive compensation!
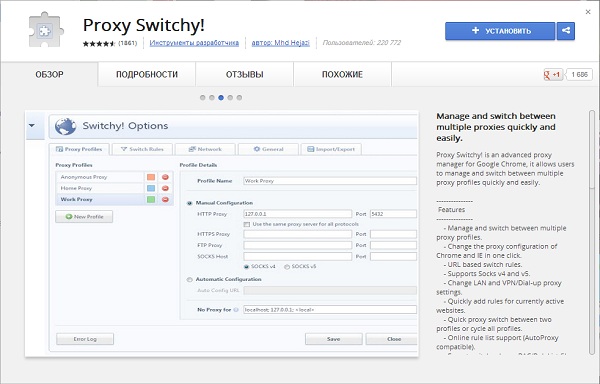
Expansion Proxy switchyomega (formerly known as Proxy SwitchySharp) provides a simple and fast way to add and switch proxies in Google Chrome browser. Proxy SwitchyOmega is put in a couple of clicks and after setting it works automatically according to the specified rules.
Install the extension "Proxy SwitchyOmega":
- Go to the extension page.
- We find there the "Install" button and click on it.
- The browser will ask you if you really want to install this application. Click "Install extension".
- After installation, the extension icon appears on the extensions panel.
Add proxy:
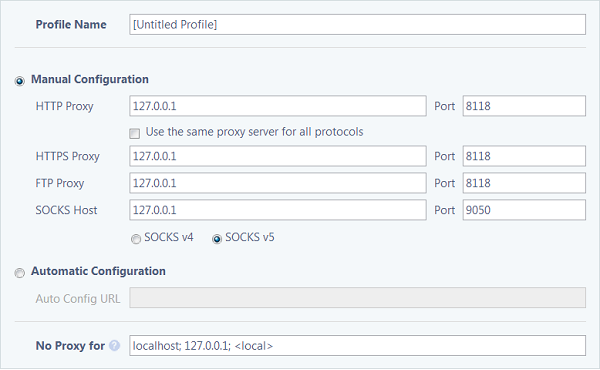
Create a new profile, or fill in the one that was created by default.If you have an HTTP (s) proxy, then in the field Protocol select HTTP, if SOCKS4 / 5, then select one of them accordingly.
In field Server we specify IP, in the field Port specify the port.

If you have proxy with authorizationi.e. private, then click on the lock icon and specify the login and password from the proxy:

Next, save the entered data by clicking on " Apply changes":
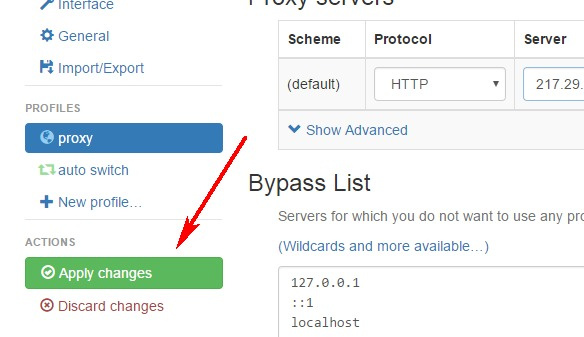
Close the proxy settings window. Left click on the extension icon in the upper right corner of the browser and select our profile (proxy):
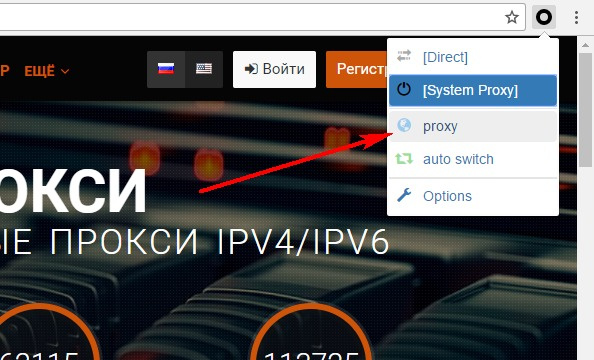
The extension icon will turn blue when the proxy is identified.
Good day, friends! Today I have a long planned post on the topic anonymous surfing the net. The idea to write about it originated at the time of the adoption of the amendments to the Law “On Information”, but it still dragged and finally reached the draft.
Since already a couple of years ago I finally and irrevocably switched to the Google Chrome Internet browser, it will be a question of anonymous visiting sites in this particular Internet browser.
I will describe a method that will help you to visit sites that are blacklisted by Roskomnadzor (not always reasonably), as well as those that are denied access by the administrator. For example, you are sitting and the system administrator has closed access to social networks - VKontakte, Odnoklassniki, etc.
Browser Embedded: Incognito Mode
As in other browsers, Chrome has a built-in tool for private browsing, which is called Incognito mode. What is this mode and how is it different from the usual?
- Firstly, while surfing the Internet, the browser in Incognito mode does not store the history of viewed pages, as well as downloaded files.
- And secondly, after closing the browser, all cookies stored on the hard disk are deleted.
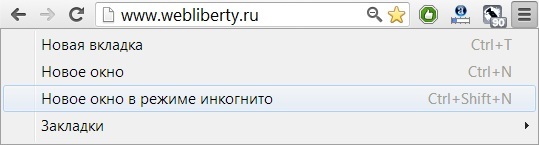
In order to open a new window in Incognito mode, in the upper right corner of the browser, click on the icon with the settings and select the item with the same name in the list or use the Ctrl + Shift + N hot keys. I admit honestly - I almost never use hotkeys, although in vain, they greatly simplify user interaction with the computer.
Conclusion: thus, Incognito mode allows to partially solve the problem of anonymity, but not completely. And to open in this way blocked sites admin and does not work.
Proxy switching plugin for Google Chrome
For complete anonymity and opening sites that are closed, I use the Google Chrome extension called Proxy switchysharp It is a proxy manager that allows users to manage and switch proxies quickly and easily.
Key features of the Proxy Switchy plugin:
- management of proxy server profiles and fast switching between them in one click;
- change proxy settings in Google Chrome;
- quickly add viewing rules for the active website.
- support of various operating systems: Windows, Linux and Mac OS X.
Installing and configuring the plugin Proxy SwitchySharp
You can download it in the Chrome online store, it is completely free and is available at this link:
Install the plugin. In order for it to work, we will also need to install the Vidalia Bundle - this is a free program that uses anonymous proxy and encrypt internet connection using Tor. You can download it.
After the first launch, Vidalia will automatically boot along with the operating system and in order not to betray or distract itself, I recommend removing the check mark in the initial window below “Show this window on startup”, which means “Show this window on startup”:

The program has a multilingual interface and, if you wish, you can switch the language to Russian and become familiar with other settings. And now, when everything is ready, you can proceed to the settings of the plugin. Immediately after its installation, the settings window will open, in which you need to fill it in by analogy with the screenshot:
Profile name (Profile Name) can be used any, I left what was by default, the rest of the ip-addresses and ports are written as in the screenshot. Be sure to click on the Save button to save the changes to the settings.
Go to the General tab, where we tick off the Quick Switch and in the Profile 2 line select the name of the newly created profile only. Let me remind you that I did not change the name and left Untitled Profile. Pay attention to the screen shot, this is what should happen:
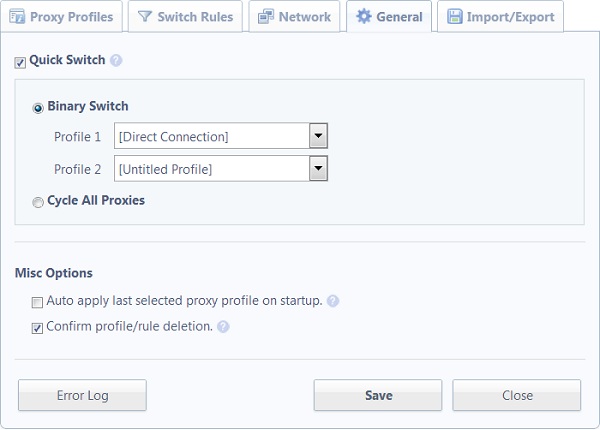
Just do not forget to save the settings. That's all! Now, to quickly switch between a regular profile and a profile using a proxy server, use the quick switch icon to access blocked sites. This icon is located in Chrome in the same place as everyone else, on the toolbar next to the address bar:
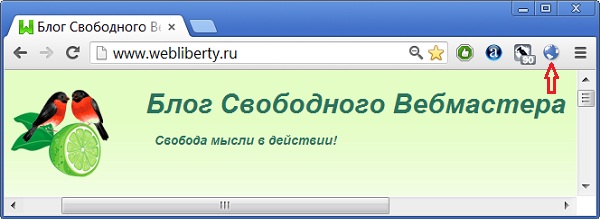
This is an icon in the form of a planet, when you click on it, the ip address is quickly changed and traffic encryption is turned on, I marked it with a red arrow in the screenshot above.
At first glance, all these manipulations may seem complicated ... In fact, this is not so! Installing and configuring the Proxy Switchy plugin for Google Chrome, as well as Vidalia will take no more than 5 minutes! A few minutes of your time and you have in your arsenal a simple and convenient way to get around the administrator's ban on access to any other sites!
In this article, I will show you how to set up a proxy in the Google Chrome browser. Make it very easy. I must say that the article is designed for a regular user. An advanced user is strictly not recommended to read this article!
In the previous article I already told you and what types of proxies exist. I strongly recommend reading it if you are going to work with a proxy.
Before we start setting up the browser, we need to find out your real IP address, you can find it out here. The numbers at the top are your external IP address.
We need to know our real IP address so that after all the settings have been completed, you can make sure that everything is done correctly, and the remote server to which we are trying to enter is not able to determine and fix our real IP address.
In the settings window, go to the "Network" section and click the "Change proxy server settings" button.
In the Internet Properties window that appears, go to the "Connections" tab.
At the bottom of the window, click on the "Network Settings" button.
In the window that appears, set the checkboxes to “Use a proxy server for local connections” and “Do not use a proxy server for local addresses”, specify the proxy port in the corresponding fields and uncheck the automatic configuration checkboxes if they are installed.
If the proxy that we want to use can support all protocols, or we do not know which protocols it supports, close the window by clicking the “OK” button, otherwise, additionally, perform one of the following steps.
If proxy north only supports HTTPS (SSL) and HTTP protocols
In the "Configuring the local network settings" window, click the "Advanced" button from the "Proxy server" subsection. In the window that appears, remove the checkbox "One proxy server for all protocols", make sure that the FTP fields "Secure" and "HTTP" contain the proxy address that we want to use, and the "Socks" field is empty, then close this window, clicking ok.
If the proxy server only supports SOCKS protocol
In the "Configuring the local network settings" window, click the "Advanced" button from the "Proxy server" subsection. In the window that appears, remove the checkbox "One proxy server for all protocols", make sure that the FTP fields "Secure" and "HTTP" are empty, and the proxy you wish to use is recorded only in the "Socks" field, then close the window by pressing the OK button.
All, now we will close the settings window, from now on your browser Google Chrome will go online through a proxy.
To check the proxy, we’ll check in and make sure that your connection information mentions another third-party IP address, and your real IP is hidden. If the site opens for a long time or does not open at all, try setting up another proxy server.
Disable proxy server usage
To disable usage, uncheck the “Use proxy server for local connections” checkbox in the “Configure LAN settings” window and press the “OK” button.
Proxy settings in other browsers:
- How to set up a proxy in Firefox browser
- How to properly configure a proxy in Opera