Enable or disable the Windows test mode.
When you boot your computer from Windows 8 or Windows 7, one of the following messages may appear in the lower right corner of the screen (the exact text of the message depends on the version you are using).
Windows 8.1
Test mode Windows 8.1, build 9490
Windows 8
Test mode Windows 8, build 9200
Windows 7
Test mode Windows 7, build 7600
Note. This message can also indicate a specific edition of Windows. For example, the message may look like the following: "Test mode Windows 8 Professional, build 9200".
This message is displayed because the computer is running in test mode.
To solve this problem manually in Windows 8, you must perform the following actions:
- Slide your finger from the right edge of the screen, touch Search and enter cmd, or enter the cmd command on the the initial screen.
- In the search results, tap Command line and hold it (or click it right-click mouse). In the menu that appears at the bottom of the screen, select .Note. When the User Account Control window appears, click the Yes.
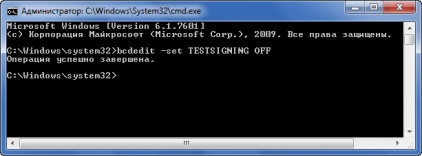
- At the command prompt, type the following command, and then press ENTER. bcdedit -set TESTSIGNING OFF
- When the confirmation appears, close the window command line.
- Save the data you were working on and reboot the computer.
Windows 7
To resolve this issue manually in Windows 7, follow these steps in the order listed.
Method 1
- Click the button Start and enter cmd in the Search.
- In the list Programs cmd.exe and select the command Run as administrator.
- At the command prompt, type the following command, and then press ENTER: bcdedit / set TESTSIGNING OFF
Note. If this method does not fix the problem, use Method 2.
Method 2
- Click the button Start and enter cmd in the Search.
- In the list Programsright-click the file cmd.exe and select the command Run as administrator.
- At the command prompt, type the following commands, pressing ENTER after each of them: bcdedit.exe -set loadoptions ENABLE_INTEGRITY_CHECKS
bcdedit.exe -set TESTSIGNING OFF - Close the Command Prompt window and restart the computer.
A test mode message indicates that the test signing mode is running on the computer operating system. The test signature mode can start if installed program is in the testing phase due to the use of drivers that do not have a Microsoft digital signature. Microsoft Corp. has added a test mode to Windows so that users can test the programs without an authentication certificate.
Found on the computer and do not know how to remove the inscription "Test mode assembly ..." on Windows? Many users face this problem. There is nothing critical here, but the lines at the bottom of the screen can interfere. Therefore, it is worthwhile to know what it's like to turn on or turn off the test mode of windows 7 or 10.
Functionality Win 7 and Win 10 provides testing of software without certificates.
What is it?
Test mode is a special function that allows you to test programs without a verification certificate. Not all software works with drivers that have an electronic signature from Microsoft. For example, the utility has not yet appeared in the official versions or is about to be released, but it needs to be checked. Any user can sooner or later encounter such a program, after which he will be offered to include "Test". Its activation will be indicated by the inscription "Test mode Windows 10 assembly 0000" in the lower right corner of the screen. The instruction how to remove test mode windows 10, is resulted more low.
![]()
Activation
Activation of this option Windows 10 and 7, as a rule, passes without the user's knowledge. Only then he notices that on the screen appeared incomprehensible inscriptions. However, there is a way how to activate this option yourself, without the help of those applications for which it is intended.
- Find the command line utility. Usually it is easy to find it through the menu "Start" - in the search or in "Standard applications".
- Run the line as administrator (right mouse button, select the corresponding option).
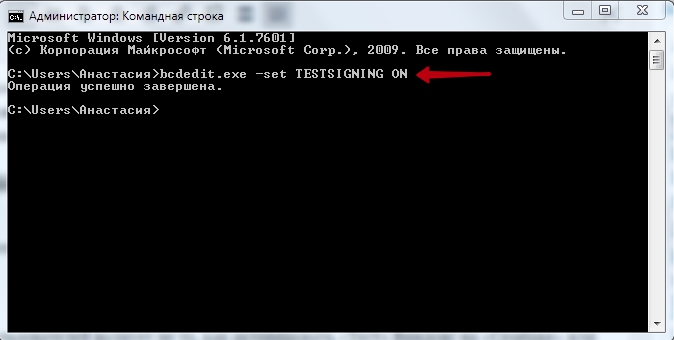
- Enter the following: bcdedit.exe -set TESTSIGNING ON
- We press Enter.
Live and learn, you know, the well-known proverb again forced itself to remember the other day. It would seem that we know all of these windows long and wide, so it's quite difficult to surprise with your freaks, as for versions 7 and earlier. But the recent moment has slightly puzzled. The reason was hundreds of times the operation to flash the smartphone through a computer on which the operating system Windows 7 was installed.
As usual, after connecting the smartphone, the system began to load the necessary drivers and software, where already practical without looking I pressed the next button. After completing the installation, the system asked to reboot, and after downloading an interesting inscription appeared on the desktop in the corner "Test mode Windows 7, build 7601". Since the inscription appeared in a place where the system usually swears on the activation of Windows, the first suspicion was that the activation was gone. However, remembering that this Windows is licensed and activated by all rules, a strange inscription was simply goggled.
Everything turned out to be simple, clicking without looking at the Next and Yes buttons, I saw that when installing the drivers for the smartphone, I was asked if I wanted to go into test mode, as a result my frivolous consent led to the loading of the operating room windows systems 7 in the test mode, as evidenced by the corresponding inscription - "Test mode Windows 7, build 7601".
Any software product must certainly undergo the appropriate testing, which allows you to identify errors, ensure full functionality of the program, and optimize it. The only question is how to conduct such testing, Paul Gerrard, who is the director of Gerrard Consulting Limited and leads the UK Test Management Forum, gives an interview where he talks about the advantages of manual testing before automatic testing.
According to information from the Microsoft website, the test mode allows you to work with programs that do not have an authentication certificate. That is, nothing terrible happened, there was a problem how to return to normal mode, because a simple restart did not allow to exit the test mode. But here also the official Microsoft site helped, it was enough to perform three simple steps.
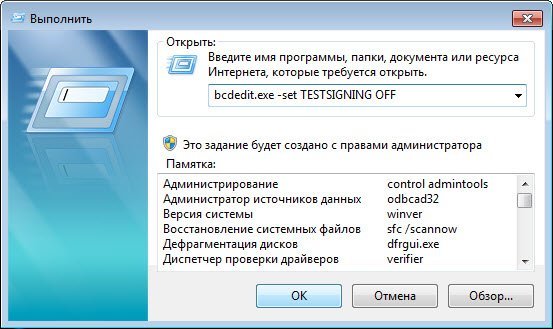
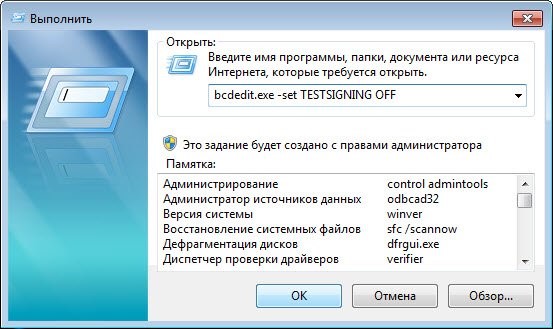
1) Run the command window with the combination of keys Win + R
2) In the command window, enter the following command: bcdedit / set TESTSIGNING OFF (for Windows 8, the command will be bcdedit -set TESTSIGNING OFF
3) Click OK and reboot the system
In this way, you can turn off the test mode in Windows, if you want to turn it back on yourself, we do the same three steps, just write OFF instead of OFF.
You are not a developer or do not conduct testing software products, drivers or other elements of the software, but you have the inscription: "Test mode" and the assembly number? It happens, if you accidentally, when installing a program, you have chosen permissions to go into the test mode, which was included after the computer reboot. Let's examine how to turn off the test mode in windows 7 and get rid of the annoying label in the lower right corner of the desktop.
Probably, transition to a test mode at you was carried out after installation of the program of the small size under name OpenedFilesView. When it is installed, the installer asks the question "Do you want to go to test mode?" And the user, considering this a useless action, agrees. When the system rebooted, the following appeared:
As it turned out, the problem, if it can be called so, is solved quite easily. Everyone has already remembered that we used the "Run" utility many times in our articles - this case is not an exception. So, go there with Win + R and enter the following command: bcdedit.exe -setTESTSIGNINGOFF.
After clicking on "Ok" and rebooting, the system will exit the test mode. But remember, if you ever need to turn it back on, you'll have to do the same thing, but use ON instead of OFF. Now you are convinced that it's very easy to turn off the test mode of windows 7.
Windows 8
To solve this problem manually in Windows 8, you must perform the following actions:
- Slide your finger from the right edge of the screen, touch Search and enter cmd, or enter the cmd command on the the initial screen.
- In the search results, tap Command line and hold it (or right-click it). In the menu that appears at the bottom of the screen, select.
Note: When the User Account Control window appears, click the Yes.
Bcdedit -set TESTSIGNING OFF
Windows 7
To resolve this issue manually in Windows 7, follow these steps in the order listed.
Method 1
- Click the button Start and enter cmd in the Search.
- In the list Programs cmd.exe and select the command Run as administrator.
- At the command prompt, type the following command, and then press ENTER:
Bcdedit / set TESTSIGNING OFF
Note: If this method does not fix the problem, use Method 2.Method 2
- Click the button Start and enter cmd in the Search.
- In the list Programsright-click the file cmd.exe and select the command Run as administrator.
- At the command prompt, type the following commands, pressing ENTER after each of them:
Bcdedit.exe -set loadoptions ENABLE_INTEGRITY_CHECKS bcdedit.exe -set TESTSIGNING OFF
- Close the Command Prompt window and restart the computer.