Parameters adsl Rostelecom. How to set up an internet connection for adsl
In this article we will talk about how to connect to aDSL Internet after its configuration, and the written information will be clear even for beginners.
The main options for connecting to the Internet: fiber optic, ADSL, 3G, GPRS. In this article, we will talk about one of the variants of Internet connection - ADSL.
What is ADSL?
Asymmetric Digital Subscriber Line is a technology that allows high-speed data transmission over a telephone line (conventional copper telephone wire).
At the same time, the differences between telephone modems of the tonal frequency are significant - the transmission is organized at a higher frequency than the analog telephone signal.
Result: you have independent flows from each other and can conduct conversations, while being on the Web. ADSL is currently capable of providing an incoming data rate of up to 8 Mbit / s and an outbound one of up to 1 Mbit / s, a huge advantage over modem access, in which more than 56 Kbit / s can not be produced. Access via LAN can, of course, amount to competition, but it has a drawback - it is necessary to have a suitable network in the area and pull a cable, which can be a lot of problems in the time of installation and operation.
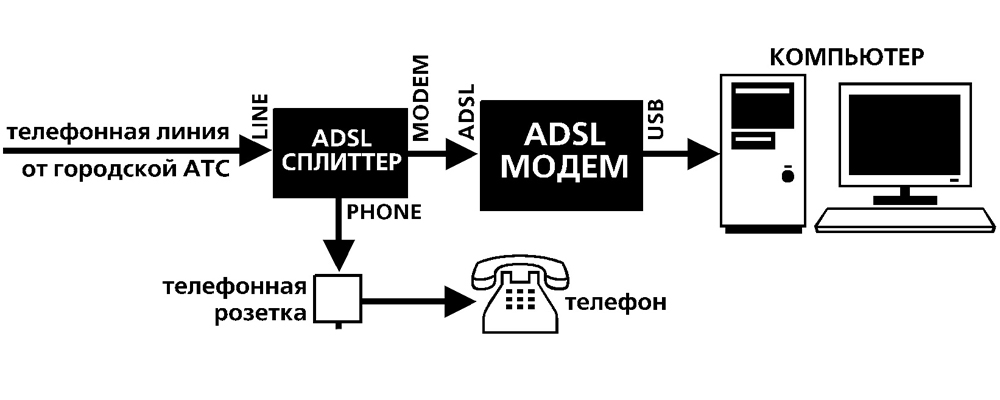
In the case of ADSL, you simply connect to a telephone socket through a special device that carries out the splitting of frequencies-this is a splitter, a modem and a telephone are connected to it, and the device gets an output directly to your telephone line. The splitter can be integrated into the modem, then the connection is even simpler. 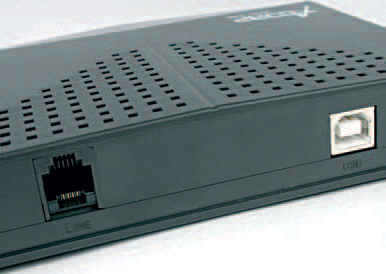
Now turn to the equipment that is installed on your PBX. This DSLAM (DSL Access Multiplexer) - a hardware complex, it includes a huge amount of sophisticated electronics, including modems with splitters. It turned out to be something like a telephone exchange for servicing DSL connections. It is with him that you establish a connection, and after you have been authorized, you get an Internet connection.
Choosing equipment
You need to make sure that your PBX can shelter you with an ADSL modem, and there will be no problems when connecting. The provider must deal with the issue - it is necessary to make an application for checking your phone number, and after a positive result you can purchase equipment. 
At the moment, ADSL modems with interfaces for Ethernet and USB connectivity are available, and wireless device - with a Wi-Fi interface. The choice depends on your needs - the difference here is in the features of the connection and in the features provided: modems that connect as network devices offer more than USB analogues.
For example, to connect to the network one computer is quite enough for a simple model, and if there are two or more, then you need to pay attention to devices with a router function - the modem will have in any case an Ethernet or Wi-Fi interface.
You can find variants from Ethernet models with a built-in hub and without it (in which case you will need to use an additional hub when connecting several computers). If you need increased security, you can see models with Firewall functions, anti-virus scanning, the ability to work with a virtual private network and other "benefits".
An important detail: if there are parallel connected phones in the apartment, and they can not be connected through a splitter (they are located in other rooms), then each incoming call will deliver a lot of headache, which is associated with permanent ruptures of joints.
To avoid this, it is necessary for each of the devices to buy an additional device, microfilter, and connect them through it.
ADSL setup is a very simple task if a contract was signed with the provider from which you received the login and password, as well as a notification that the line was connected to the Internet.
For example, we bought a D-Link modem. Unpack it. To begin with, you need to make a modem connection to the phone network via a splitter (a small box with telephone inputs).
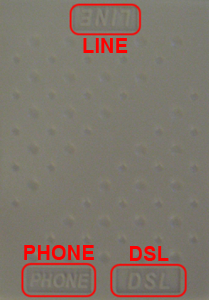
One of the sides of the splitter has two inputs (Phone and DSL), the DSL-input includes a telephone cord from the modem, and in the Phone there is not. The splitter is a frequency splitter, or, as it is easier to say - it allows you to sit on the Internet and communicate over the phone without any interference.
Now we need to turn on the modem itself and look at it. The light bulbs should flash, which will flash. The main indicator is dSL light bulb, which should burn, not blinking, after the modem is restarted. If the light is on correctly, you can connect the modem to a laptop or computer with an Ethernet network cable RJ45. It happens that the lamp flashes quickly or just does not burn. You can solve the problem by calling the provider.
Go ahead. Lamps are lit as needed. When you turn on the computer, connect the modem to the output of the network card, which is slightly wider than the telephone card.
When creating a new Internet connection, you just need to configure the modem.
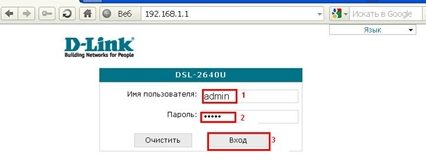
Do you want to connect the modem to one computer? You can do this in the so-called bridge (bridge) mode. You need to enter any browser that is on your computer and enter "http://192.168.1.1" (if you have D-link) in the address bar, when prompting for a name and password, enter not the data that was provided by the provider, but simply enter the word "admin" in both fields.
After that, a window will open, on which there are different settings buttons. If you have a D-link, go to the WAN (one of the menu items), click the Add button, and set VPI to 0 and VCI to 33, then click Next and select Bridging, then , click Next, and then Apply.
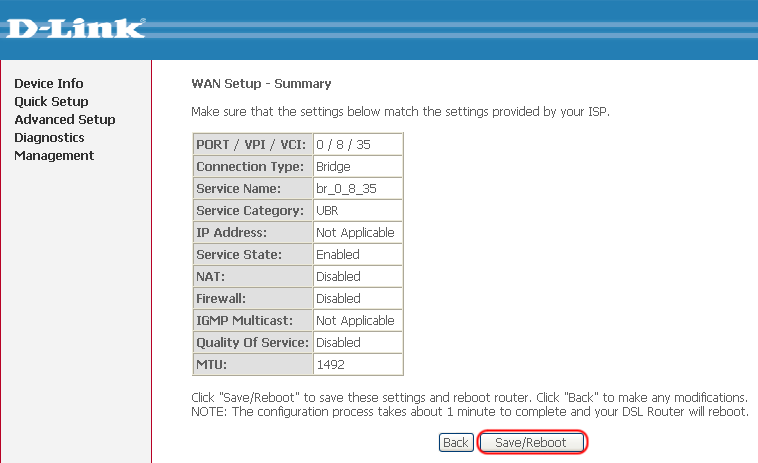
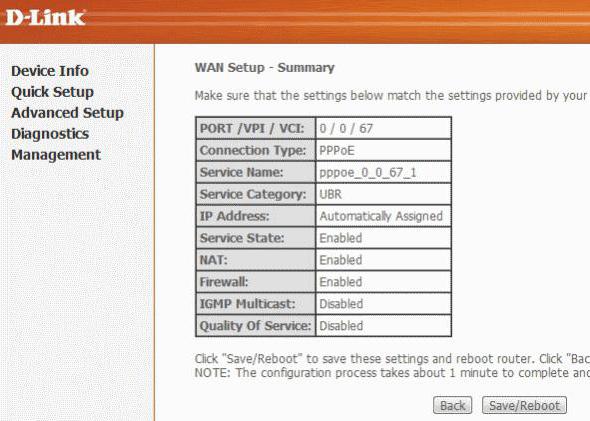
The last window will contain a label with the inscription: VPI / VCI: 0/35 Connection Type: Bridge Service Name: br_0_35 Service Category: UBR IP Address: Not Applicable Service State: Enabled NAT: Disabled Firewall: Disabled IGMP Multicast: Not Applicable Quality Of Service : Disabled
After clicking the "Finish" button, the modem will be restarted, and in a minute it will be possible to create a new Internet connection on the computer. Now everything is simple. We go along the path: Start - Connection - Create a new connection, and select "High Speed", then "Configure manually", now enter the name of the provider, and in the last window the name and password given by the provider.
A shortcut for this connection was created on the desktop. Launch the shortcut and go to the right page on the Internet.
More than one
Tuning the modem is quite trivial for accessing the network of one machine and it is unlikely that any difficulties will arise, especially since the connection process is described in detail by the provider itself.
But what if you want to connect two computers connected by an Ethernet cable, or a whole network connected by a hub? In this case, there are several exits from the situation. The first and the simplest is for users of the network to make a connection with a common net. We do it this way: we need to call up the properties of your ADSL connection and go to the "Advanced" tab in the window that opens.
There, other network users are required to use this connection Enable the permission (there are still active several items, they should be left marked). After that, the address 192.168.0.1 will be assigned to the network card of the machine. The remaining computers in the TCP-IP settings of the network connection must accordingly assign 192.168.0.2, 192.168.0.3, etc., in the "Subnet Mask" field enter 255.255.255.0, and the system with the modem connected as the gateway to expose, that is 192.168.0.1. Now you can access the Internet from any computer, use an open connection for access. The advantage of this method is the only possibility to organize access to the network with a USB modem. Disadvantages more: on the gateway computer must be installed 2 network cards when using an Ethernet device.
The condition for this method is that the gateway must be permanently turned on, otherwise computers so desired connection can not be used. But if you are all well thought out and purchased an Ethernet-modem with router function - everything can be much more literally organized! Such devices can function in two modes: a bridge and a router. The first mode is usually turned on by default
in them
and has just been described - is to gain access to the network through one computer. The second modem, thanks to the support of the PPPoE protocol, connects to the Internet itself, obtains an IP address and takes over the functions of the gateway, you need to connect a network hub to it, if it is not in the modem itself, and can freely use the Internet from any computer on equal terms!
Let's say you directly connected the modem to the hub of your network, computers to it are also connected - now you need to configure the device itself.
The menu of its settings is called either through WEB, or through not such "good" Telnet. Of course, it's more convenient to use the first method, so you'll have to open the browser and dial the IP-address of the modem in the address bar. It is easy to learn from the attached documentation, there we take login and password, which must be entered immediately to get into your device. By the way, before this, make sure that the system with which the setting is done has an IP address from the same range as the modem - for example, if the modem address is 10.20.0.2, then the "wheelbarrow" should be set to 10.20.0.1 - otherwise to the settings you will not get.
Now in the service menu of the device, you will see many different incomprehensible items in front of you, among them there may be the "Setup Wizard". I will explain the process with the example of Zyxel modems - the models of other manufacturers are almost identically configured, with the difference in the configuration of the settings. Let's take as an example of a provider the popular "Tochku.Ru" and its "Stream".
Running the "wizard", in the first window you will see the basic settings for the connection. In "Mode" you should immediately set "Routing", in the "Encapsulation" field there should be "PPPoE", in addition, the "Multiplex" parameter should be set to "LLC", and "VPI" and "VCI" (identification) = 1 and 50, respectively.
The next window is the PPPoE protocol settings that are required to connect to the Modem Network, and everything is simple: the "Service Name" field is the connection name, and you can enter anything into it. Then, in the "User Name" and "Password" fields, you must enter your login and password to access the Internet and mark the field "Obtain IP Address Automatically". There you also need to set the desired connection mode "Connection".
If you select "Nailed-Up Connection", the connection will be kept continuously, and if "Connect On Demand" you can set the idle time, after which the connection will break the device.
"Network Address Translation" - to access computers from the internal network to the external one, you need to change their IP address to the one that was given to the modem and back, and this is what this function does. In our case, we need to set the parameter "SUA Only".
Click "Next" and go to the next window, there is a button "Change LAN Configuration", behind it is another important menu - network setup. We are interested in the following settings: we enter the IP address of the modem in the network in the field "LAN IP Address", the network mask goes further - 255.255.255.0, and the group of DHCP settings. About it in detail: if NAT is responsible for translating the internal IP-address of the modem to external and vice versa, DHCP is engaged in issuing internal addresses to the connected computers. Accordingly, we need the "DHCP Server" in the "ON" position, and the "Client IP Pool Starting Address", the starting address, which will be issued to their users, can be set following the address of the modem (for example, with the IP device, = 10.20.0.2 , enter 10.20.0.3).
We set the parameter "Size Of Client IP Pool" = 32, but the DNS servers, respectively, are registered by the provider. Click "Finish" and reboot the modem, and you can start using the Internet from any computer!
In addition, you can configure additional modems in the modem's menu: the firewall or - it's not difficult to configure them, they can do a good job by providing the on-network security space.
Possible problems
If you can not install a modem connection to DSLAM, or it is, but unstable, check the splitter - this device must be connected only at the beginning of the line. In other words, at the interval from the "Line" socket of the splitter to your shield there should not be any parallel devices connected.
Some older models of AONs can negatively affect the quality of the connection. If there are problems with incoming calls with a connection, try to disable the determinant-it can cause a reason in it. If you purchased a modem from a provider or dealer, the connection settings can be set to default, and you will have to manually register them, otherwise the device will not connect to DSLAM. The necessary parameters are "VPI" and "VCI" (identification characteristics), "Encapsulation" (encapsulation), and they must be set in accordance with the requirements of the provider.
The actual data transfer rate may be lower than the declared speed. Do not rush to find the cause of the problem immediately. Look at the difference - if it is a couple of kilobytes per second, then this is normal, because the provider indicates the maximum throughput in ideal conditions.
If the losses are serious, it can be a problem with DSLAM or an incorrect channel setup. In this case, it is better to contact technical support. Some ADSL modems / routers have the ability to flash firmware, and this is good - they are corrected, improved and supplemented
built-in functions with new versions.
On this like everything for now and until new cognitive meetings with you, dear friends
General view of the modem:
Connectors and buttons on the modem:
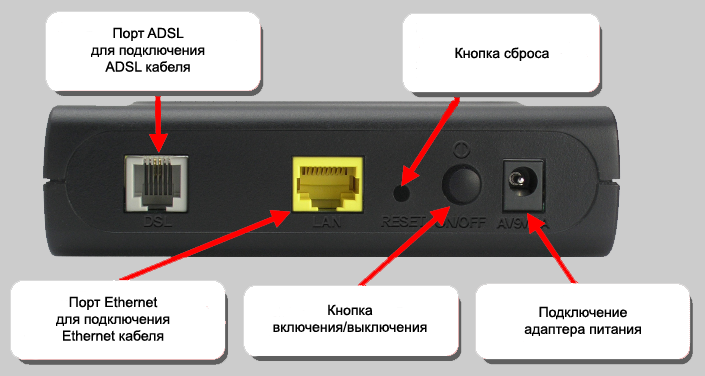
Connection diagram:
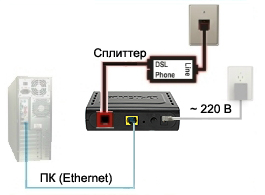
Before starting to configure the ADSL modem, you need to check the correct connection of the splitter (the splitter is a device for dividing the low-frequency signal telephone connection and high-frequency signal ADSL):
To a cell marked as LINE - connect the telephone line.
To a cell marked as PHONE - connect the telephone.
To a cell marked as MODEM - connect the modem.
Splitter (top view):
Configuring the ADSL modem
Step 1. Select Start\u003e Control Panel\u003e Network connections» . Right click on your connection ( pay attention that it was the Internet connection through the ADSL modem, and not bluetooth, wi-fi and other) and select " Properties»:

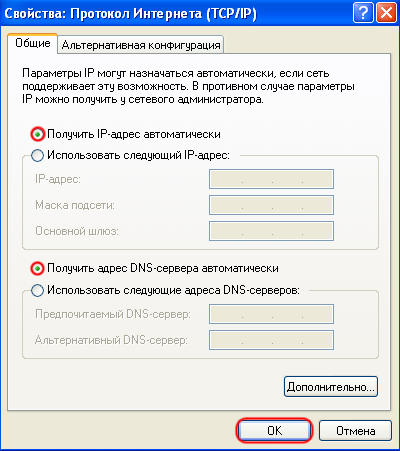
Step 2. In the " Are common»Select the component« Internet Protocol (TCP / IP)"And click" Properties»:

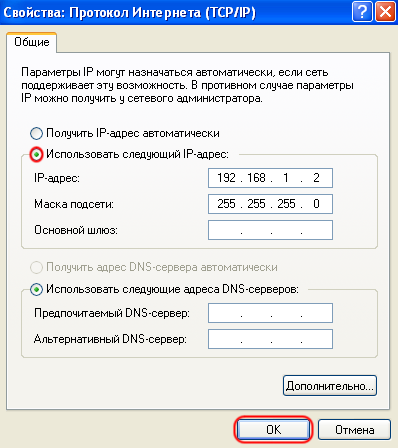
Step 3. Select the item " Use the following IP address"And fill in the fields as shown in the figure, then click on the" OK»:
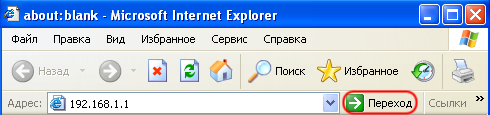
Step 4. Open the window of your Internet browser, type in the address bar 192.168.1.1 and click on the " Transition"(Or to the" Enter»):
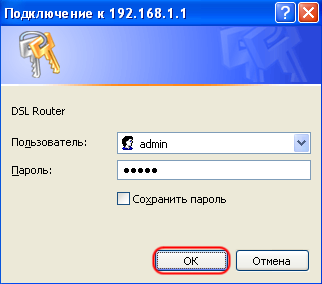
Step 5. In the displayed window fill in the following fields:
User: admin
Password: admin
After entering, press " OK»:
Step 6. In the window that appears, select the menu " Advanced Setup»:
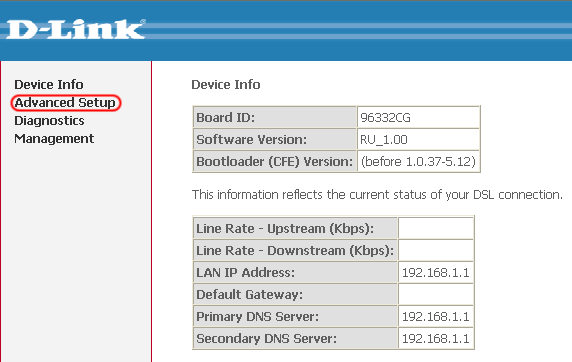
In the new firmware, the navigation bar for options looks like this:
Do not be scared and do not think that this instruction will not help you, since the difference is only that all the options are visible in this firmware beforehand. It should be noted that all these options are located in exactly the same hierarchical order (indent from the left edge), as if you personally opened them in an earlier version of the firmware.
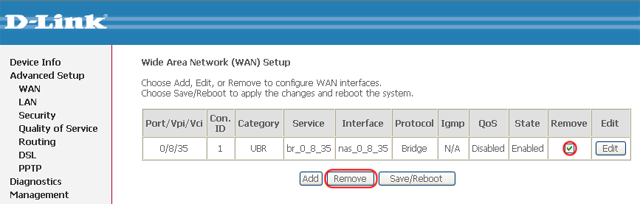
Step 7. Select the checkmark in the column Remove and click on the " Remove"(If there are no settings, go directly to Step 9):
Step 8. After deleting the old settings, click on the " Save / Reboot»:
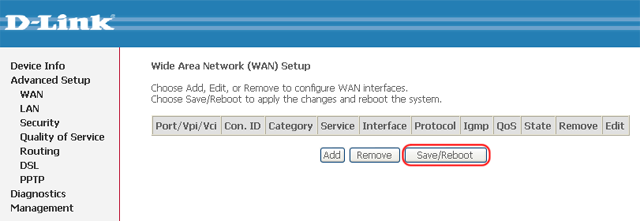
Close the window of your Internet browser and wait a few minutes for the modem to restart.
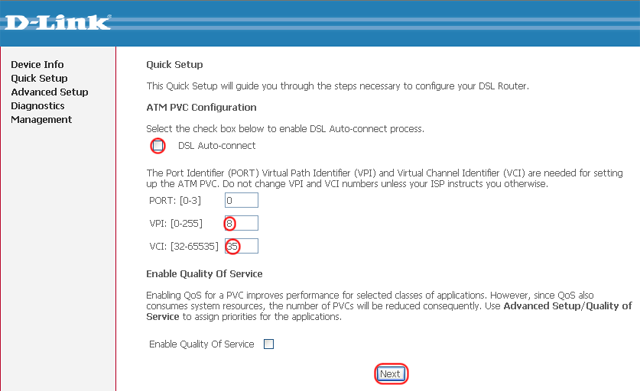
Step 9. Repeat Steps 4-5. Remove the check mark in the " DSL Auto-connectAnd set the following values:
Then click on the " Next»:
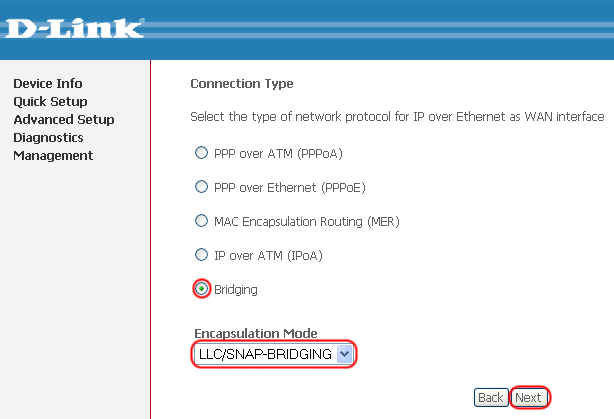
Step 10. Choose the connection type " Bridging»And install Encapsulation Mode - "LLC / SNAP-BRIDGING". Click the " Next»:
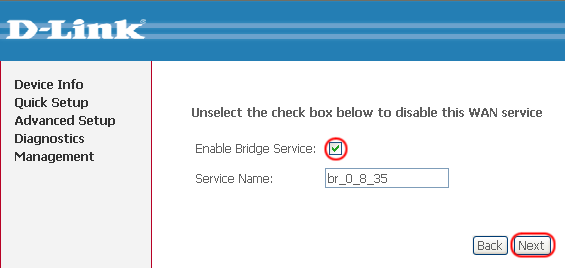
Step 11. Check the box as shown in the picture and click on the " Next»:
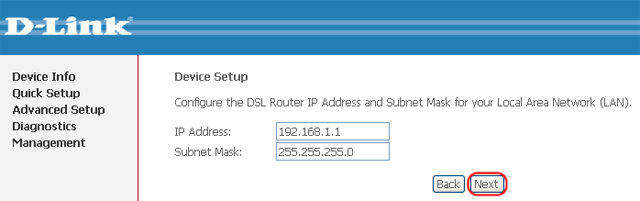
Step 12. Leave it as it is and click on the " Next»:
Step 13. To save the settings, click the " Save / Reboot»:
Close the window of your Internet browser and wait a few minutes for the modem to restart. Do not turn off the modem at the time of reboot!
Step 14. When the configuration is complete, run Steps 1-2 and set the items as shown in the figure, not forgetting to approve the selection with the button " OK»:
The modem is ready for use.
The Russian national provider Rostelecom has long provided high-quality communications services, including the organization of high-speed Internet access at home or in offices. One of the options for connection may be the purchase of a modem "Rostelecom" with WiFi. The price, depending on the model, an average of eight hundred to one and a half thousand rubles. However, some users are faced with the problem of its configuration, in particular ADSL-devices. However, if you understand, nothing particularly complicated in this. The following instruction will help any person to set the correct parameters within a few minutes.
ADSL-modem "Rostelecom": what is it and why is it necessary?
So, we will understand. First, a few words about what the ADSL modem of Rostelecom is and how it is used in practice.
The very technology of ADSL is based on the use of telephone lines, which are now available even in the most remote and inaccessible places. Internet modem "Rostelecom" uses asynchronous data transfer, in which the reception speed is a priority and exceeds the rate of return. In terms of exceptions, only IP-telephony, mail and video calls can be distinguished here.
As recommended by the company's specialists, when connecting the ADSL modem of Rostelecom to the scheme it is better to include a special one. This is necessary so that during the connection the telephone line is not blocked. On the splitter itself there is one input and two outputs, and for different cables, which avoids the imposition of frequencies.
Basic types of models
As for the equipment offered by the company on the market, today among the main devices that can be used to connect to the Internet through a telephone line, there are three main ones:
- D-Link 2640U.
- Qtech RT-A1W4L1USBN.
- Sagemcom [email protected] 2804 v7.
On the issue of how to configure the Rostelecom modem, in principle, the main parameters that can be set are not particularly different, so the settings for the D-Link 2640U will be listed below.
Standard wiring diagram
So, first of all the modem / router "Rostelecom" must be connected to the computer and the telephone line.

The standard connection scheme looks like this: the computer terminal connects to the modem via any LAN port, the modem, in turn, is connected to the splitter by the cable, and the splitter is plugged into the telephone line outlet. It is thanks to the use of a splitter that it is possible to simultaneously use and access the Internet, and to make regular calls on a fixed telephone. When the entire circuit is assembled, the modem must be powered from the electrical network, after which the corresponding indicator should light up and not blink on it, which indicates that the connection was made correctly. Otherwise, you need to check the connection, and possibly replace the cables or even a splitter.
How to set up the Rostelecom modem: installing drivers
With the connection seems to be all clear. Now you need to initialize the device in the computer system. To do this, you need to install the drivers.
If operating system after the download does not do it automatically, you can use the installation disc, which necessarily comes with any purchased device. In case the disk is lost or damaged, the corresponding drivers can be found directly on the official website of the company (though, they will have to be downloaded from another computer and copied to some removable media, and then installed on their own terminal).
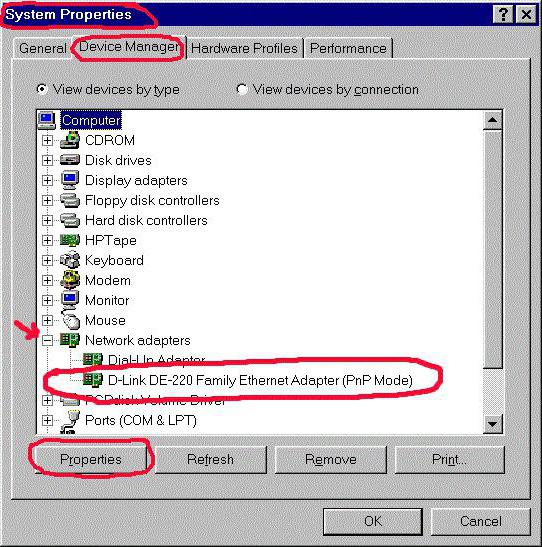
If you want to know exactly what equipment is installed correctly and works, you can use the "Device Manager" (the modem should not be marked in yellow).
Automatic disk configuration
How to connect the modem "Rostelecom" and install the drivers, figured out. At least at these stages no difficulties should arise. Now proceed to setup.
The simplest and most reliable way is to use the disc in the bundle. After inserting it into the drive, the system will launch the corresponding "Hardware Setup Wizard", during which the user will only have to follow his prompts and instructions. Again, if such a disk is missing for some reason, you can simply download the "Master" from the Internet, and then run it yourself.
Manual Modem Setup: Preliminary Actions
However, the situation is unforeseen. Suppose that the user who figured out how to connect the Rostelecom modem, and went to the configuration stage, there is no disk, no less than an Internet connection to download the automatic configuration program. In this case, you will have to enter the parameters manually using the web interface of the modem.

Access to it is carried out from any browser available in the system, where the combination 192.168.1.1 is entered in the address bar. After that, a standard login and password will be requested, which are indicated on the nameplate on the back of the device. As a rule, both for the login and for the password, admin is used. If, for some reason, the modem gives an error, you can reset it with the standard long press of the Reset button.
Setting Internet parameters using D-Link 2640U as an example
Finally, we came close to a practical solution to the problem of how to set up the Rostelecom modem. As an example, consider the web interface modem D-Link 2640U.
Immediately set the PPPoE value for the connection type, which, in comparison with the Bridge method, looks more preferable, because it can be used to access the Internet via Wi-Fi even when the computer is turned off.
Next, you need to manually write the VPI and PCI parameter values corresponding to the region in which the user is located. For example, for Moscow, this is 0 and 35, for the regions of the Volga region - 0 and 33, etc. These data are set automatically, but should be specified in the contract. Also, they can be specified from the provider in the support service.
After that, the user name and password of PPP are registered (again, specified in the contract), then the Keep Alive checkbox is checked.
Now for LCP-dips set to 2, for LCP-intervals is indicated 35, and the check box activates the IGMP item. After that it remains only to save the changes and restart the computer terminal.
Setting up a wireless connection
Now let's see how the WiFi debugging is done when setting up the modem. To do this, you need to log in to the web interface and use the Wireless section.

First, in the Authentication Type section, WPAPSK is set as the primary parameter, and AES is selected for encryption (Encryption). The SSID field corresponds to the network name (it can be changed arbitrarily).
In the password line of the Pre-shared Key access, you must specify your own combination, which is desirable to remember, even better - save in the electronic or printed version.
After completing these steps, go to the Maintenance tab and then to Firmware. When you click on the browse button, you need to find the configuration settings file for ready-made add-ins, which should be saved on your hard disk. It is usually called romfile.cfg. Save the changes. This completes the setup.
Steps to configure the modem TP-Link
If we talk about the devices of the TP-Link series, then there is nothing particularly complicated in the installation parameters.
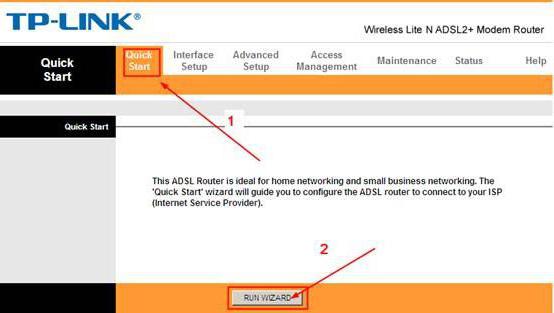
In the browser, the same address, username and password are entered, after which you will need to go to the Quick Start section, in which a special “Settings Wizard” is activated. Next, you need to follow its instructions: set the correct time zone, select PPPoE / PPPoA mode for the router, then enter the VCI and VPI values and fill in the login and password fields for accessing the Internet. Upon completion of these actions, save the changes and enjoy.
Here, in fact, and all that concerns the resolution of the question of how to set up the modem of Rostelecom. As you can see from all of the above, there is nothing particularly complicated and incomprehensible about this. The problem may arise except that only those users who do not know English.
As for recommendations, in principle, the most basic thing that can be advised is the installation of the PPPoE mode, not Bridge. "Bridge", despite the splitter installed in the connection scheme, can block access to the Internet when the computer is turned off, and this, in turn, causes a lot of inconvenience. In addition, you need to be especially careful when entering your Wi-Fi access password (although, if you look at it, if you lose it, you can easily enter the settings of the router / modem and change it).
And if you summarize all of the above, you can confidently assert that any more or less competent user (even if he is at the entry level), following the instructions provided, will be able to configure the modem and organize the Internet connection completely elementary. As they say, there would be a desire.
Designed to connect to the Internet through a telephone line. It can work as a bridge or a router. Many models have Wi-Fi. The device provides asynchronous data transfer. To configure it, you need information that the provider issues (DNS and IP addresses, PVC, login and password). It depends on the type of connection. All parameters must be entered manually.
Rostelecom, for example, comes bundled with its modems with a disk, which itself sets the settings. With it, you can quickly connect equipment to the network. And for this you do not need special knowledge or skills.
If your ADSL modem was previously used, it is better to reset its settings to factory settings. It will also be useful if you do not remember the password from the web interface. Different operators different ways connection. When changing providers (for example, you used Domolink, but moved to a new apartment, which is in Rostelecom's coverage area), it is easier to configure the device from scratch than to change individual options.
To return default settings:
- It is necessary to connect the ADSL-modem to the electrical network.
- Locate the button or hole labeled “Reset” on its body.
- If it is a button, hold it down for 30 seconds. The lights on the device may flash.
- If it is a hole, insert a rod or a clip there. Also hold for a few seconds.
- If none of the methods worked, hold down the On / Off button and wait for the indicators to blink.
After the backup, the device will reboot. You can also reset the parameters via the web interface. How to enter it is described in one of the following chapters.
Connecting to a Computer
Before you configure an ADSL modem, you must connect it to the network and computer. To do this, you will additionally need:
- Splitter Frequency divider. It is a small box with three ports. Internet and telephony "are" in the same wire. But they have different frequencies. Splitter eliminates their influence on each other.
- Ethernet cable. Needed to connect a PC to an ADSL device. You can also use Wi-Fi if you know the password. If you connect a modem via USB, you need a USB cable.

- Telephone cable with two connectors. To connect the router and splitter.
Many operators simultaneously provide Internet, telephony and television services (including Rostelecom). So all communications will work on one wire. Although there are other types of connections. Now fiber optic cables are very popular - they have high throughput. Or twisted pair different categories. They have different sizes and connectors. Therefore, they are not suitable for ADSL.
Setting up the modem begins with attaching it to a computer and network.
- Take a splitter.
- In the slot called “Line”, insert the main telephone cable that is connected to the provider (Rostelecom, Domolink, MTS, and so on).
- The “Phone” (or “Tel”) port is intended for a telephone set (if you have one). You can use sockets to connect multiple devices.
- In the "Modem" socket, insert the telephone wire that you run to the modem. For the Internet cable is intended connector "ADSL". Slots there are different sizes - do not confuse.
- Connect the router itself to the PC in any way convenient for you. To work via Wi-Fi, find the required wireless network on your computer and enter the password (must be indicated on the modem case or in the instructions). To connect using an Ethernet cable, plug one end into the “LAN” slot and connect the other end to the port on the network card. Or use a USB cable.
- Check if the corresponding indicators are lit on the router. The "Internet" light should not be on until you establish a connection.
Wiring diagram
Web interface. Network card configuration
Configuring an ADSL modem is most often done through a web interface. This is a visual display of device parameters and information about it. There you can see logs, statistics, options set. To enter the interface, open any browser and enter "192.168.1.1" or "192.168.0.1" in the address bar without quotes. The address may be different - it is always indicated in the instructions.
If the page of the router does not open, it means that it is connected incorrectly, or it is not in conjunction with a network card. In the first case, check the cables, see if they are properly secured in the jacks. If everything is in order there, you need to configure the network card.
- Click on the connection icon in the taskbar (or open the "Control Panel")
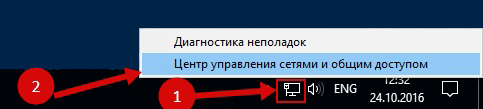
Click on the connection icon
- Go to the Network Control Center.
- Click on “Change adapter settings” (or “Manage connections” if you have Windows Vista).
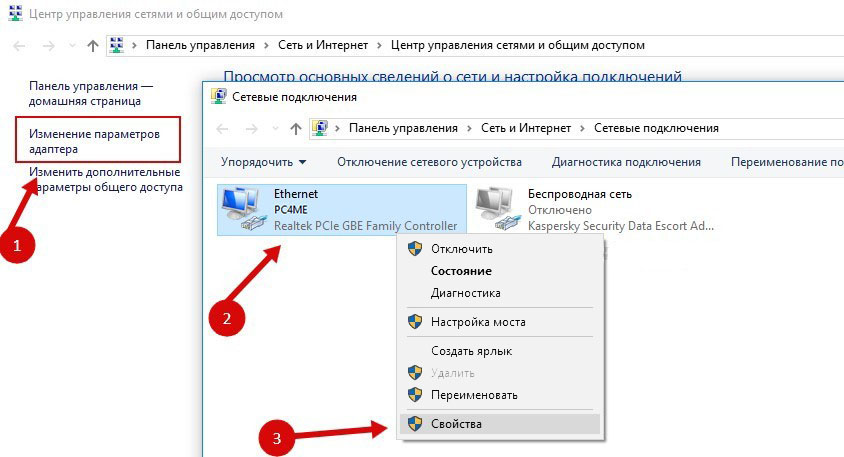
- Click right-click mouse on the desired connection.
- Select "Properties".
- Find Internet Protocol 4 in the list. Double click on it.
- A window will open in which you must specify the IP and DNS.
There should be information that the provider will issue (in Rostelecom, for example, you need to automatically receive addresses). But for now you need to configure network card. To do this, set the following parameters:
- The IP address is "192.168.1.2" (remove quotes).
- The subnet mask is "255.255.255.0".
Save the changes and try opening the web interface again. Upon login, he will request a login / password. The default is "admin / admin" or "admin / 1234". The key is specified in the instruction.
There you can reset the parameters.
- Go to the "Mangement" ("System").
- The "Setting" section.
- Click the "Restore Default Settings" button.
Internet connection
If the parameters are not set automatically, you must connect the device manually. The setting differs depending on the operator and model of the router. But the algorithm of actions is the same. For example, the situation with the D-LINK DSL-2640U:
- Go to the web interface.
- Open the “Net” or “Network” tab. In the 2500U, it is called “WAN”. In previous versions, it is located in the “Advanced Setup” section.
- Subsection "Connections" ("Connections").
- Click the “Add” button.
- In the “DSL protocol” or “Connection Type” list, select “PPPoE”.
- In the "VPI and PCI" fields, enter the PVC parameters. They depend on the region and provider. For example, for Rostelecom in Moscow VPI is 0 (zero) and VCI is 35. This information can be obtained from the operator.
- In the "PPP Username" write your login.
- In the “Password” and “Password confirmation” (“Password” and “Confirm password”) copy the password.
- Check "Keep Alive" and "IGMP" checkboxes.
- “LPC interval” and “LPC fails” (“Interval” and “Failures”) are intended to set the intensity of authorization requests. If you set interval "20" and fail "3", after three unsuccessful attempts to connect the device "wait" for 20 seconds. If the network is constantly broken, the interval can be reduced.
- Click the “Save” button below.
- Restart the ADSL modem.
Some models have the so-called “Quick Settings” - “Quick Setup” or “Wizard”. Just enter the data that received the operator - the system itself will select the appropriate parameters.
Names and sections may vary. But the principle is the same. Consider the situation on a specific example. This is how the Rostelecom ADSL modem looks like:
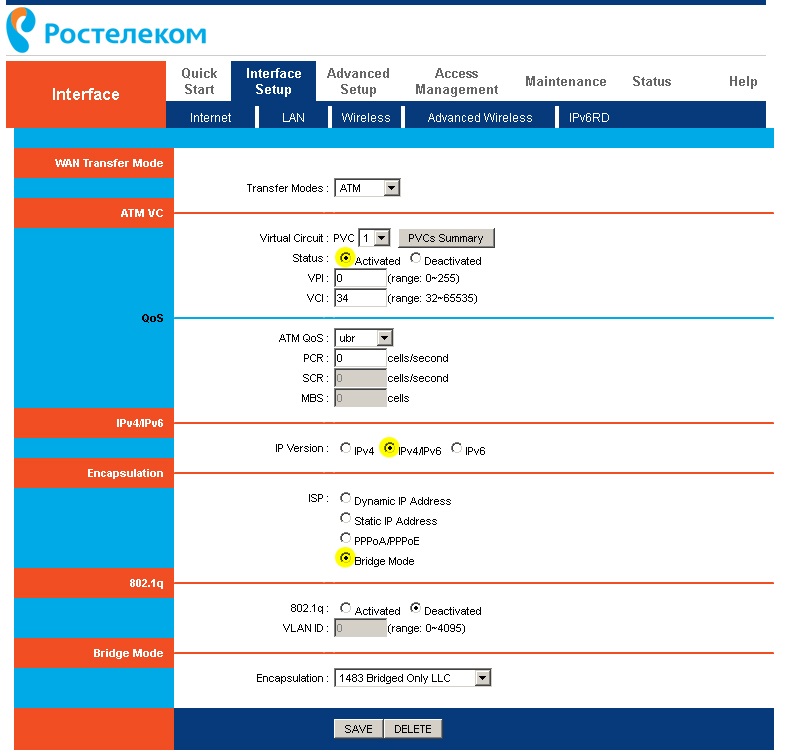
- Go to the web interface.
- Open Interface Setup - Internet.
- In the "Virtual Circuit" section in the "Status" item, select the "Advanced" option.
- In “IP version”, select “IPv4”.
- In the "ISP" section, check "PPPoE / PPPoA".
- In the fields for entering "Username" and "Password" write your login and password.
- In the list "NAT" put "Enable".
- In the “Direction” section, specify “Both”.
- Wi-Fi is configured in the “Wireless” section.
- "SSID" is the name of the network. “Pre-Shared Key” - password.
Rostelecom, like many other providers, together with its equipment provides the installation disc. With it it is easier to connect the Internet. Simply insert the CD into the drive and follow the instructions.
Connecting the router to the ADSL modem
You can use the modem as a link between the Internet connection and the router. Then the “distribute” Wi-Fi signal will be another device. To do this, all equipment must be in the same network. This type of connection is called “Bridge Mode” (“Bridge”). This is convenient if you have several computers at home. After all, the router issued by the provider may not support a wireless connection.
Here's how to connect an ADSL modem to a Wi-Fi router:
- First configure the DSL device separately. So that through it you can go online.
- Plug the Ethernet cable into its LAN connector.
- Reset the router from which you want to distribute the Internet. Even if it is new and has not previously been used.
- The other end of the Ethernet wire is connected to the Wi-Fi router to the WAN slot. The port may be called "Internet". On the body it is always highlighted in color.
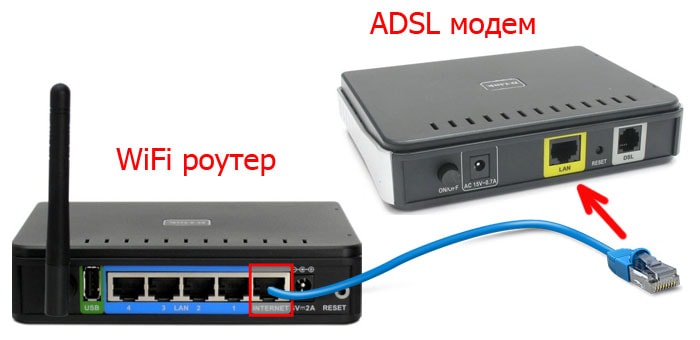
- Connect it to the computer.
- Go to the web interface.
- Open the "WAN" section.
- In the "Connection Type" list, select "Dynamic IP".
- Put the "PPPoE" option. Enter your login and password.
- Save the changes and restart the device.
The network has to earn. If this does not happen, it means that it has specific parameters that need to be learned from the operator.
IPTV setup
Many providers provide Internet and television in one package (for example, the same Rostelecom). To work with IPTV is best suited Wi-Fi router. But you can use the usual ADSL-modem. If it has multiple LAN connectors. To configure it, you need to create a bridge.
- Go to the web interface.
- Open the Network - Connections section.
- In the Connection Type list, select Bridge.
- Specify VPI and VCI. If they are paired, you need two bridges.
- Click “Save”.
- Click the Advanced tab.
- Subsection "Interface grouping".
- "Create group" button.
- Give any name.
- Move the bridge and any LAN port to the right speakers. For example, LAN3.
- Click "Save" and restart the device.
After that, IPTV will work on the selected connector.
Modems ADSL are ideal for working through telephone lines. But to install such devices, it is necessary to understand the parameters. If there is no DSL wireless network, you can configure it to connect to the router.
Instructions for setting up the D-Link DSL-2640U router for using Internet and TV services for Rostelecom users.
The D-Link DSL-2640U router is introduced as an affordable and productive router that fits most networks.
The speed and quality of Internet access is ensured that the D-Link DSL-2640U device can operate using two technologies - ADSL and Ethernet. Thanks to this modem allows you to save on the creation of a wired network, as it does not require the installation of a separate switch.
Multiple channel sharing features, wireless interface, firewall, support for basic security standards and the use of WPS technology are available.
Since the device is equipped with additional security features, the possibility of network intrusions and access to sites that are not desirable for the user is excluded. The device uses such types of protection as safety standards. These are types of WEP, WPA / WPA2. They allow you to not be afraid of hacker attacks, to be confident in the safety of personal data, their network. The modem is equipped with filtering devices that are connected.
To configure the router you can use a convenient web-interface. Provided a choice of work in two languages. This is English and Russian.
- When you first turn on the hardware, you need to follow the following steps: turn off the PC and connect the modem to the line of telephone wires.
- Next, connect the “DSL” connector of the splitter to the “DSL” connector d-link router dsl 2640u, and the “LINE” jack to combine with a telephone jack. For this, a telephone line cable is used.
To connect to a personal computer, you need to run the following algorithm:
- Connect the power adapter and the connection socket and plug it into a power outlet. After a few seconds, the green "POWER" operation indicator will light up;
- Next, connect the Ehternet cable from the splitter to the WAN connector. To work with a PC, you can use one of the four ports of the device, and use the remaining ones for the purpose of wired connection of other computers;
- You need to turn on the PC, wait until the operating system is loaded.
The correct operation of the D-Link DSL-2640U modem and connection with the provider on the Rostelecom network is checked by the condition of continuous operation of the POWER, DSL and LAN indicators.
There are two types of settings to choose from and the user’s professional level:
- using the web interface of the router;
- auto tuning (using the installation disk).
Connection setup
Starting to install the D-Link DSL-2640U modem, you need to open a browser and set the address to enter the modem settings: 192.168.1.1;
Open the browser, enter in the address bar http://192.168.1.1
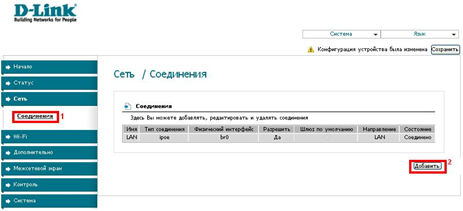
After switching to the modem web interface, you will need to select the “Advanced Settings” item.
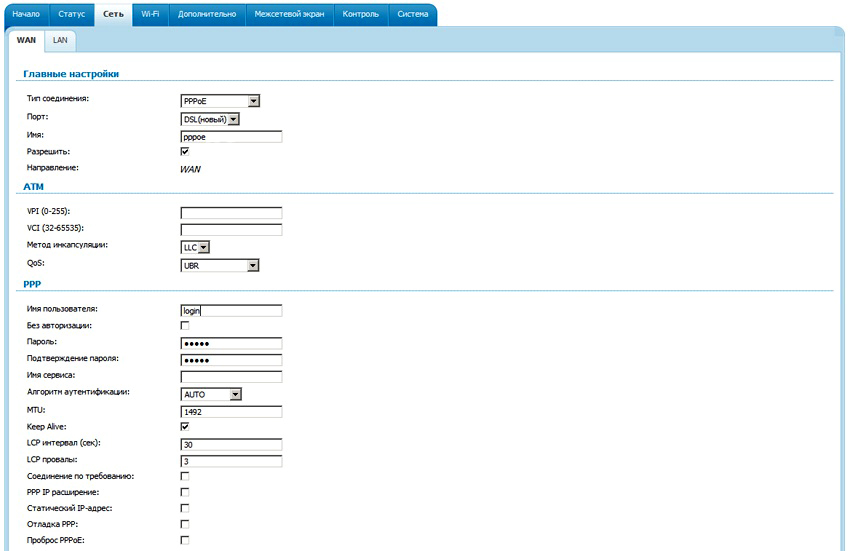
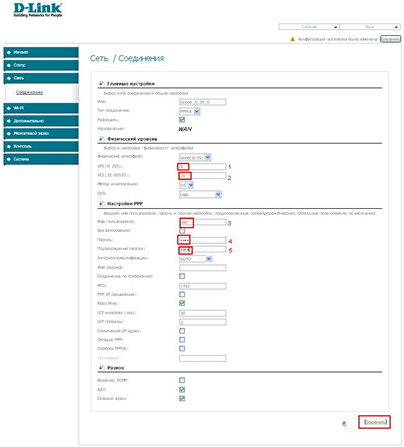
To establish a connection using PPPoE for Rostelecom, you need to enter the "Network" → WAN column and click "Add".
Next you need to fill in information about the connection format: connection type - PPPoE, port - DSL, name - Internet. In the ATM section, in the VPI and VCI fields, you need to enter information about the Rostelecom branch (in the “Username” line specify the login used to establish connection with the Internet, in the “Password” line specify the login password provided by the provider) and click “Save” .
IPTV
Provided that the interactive television service is connected IPTV network Rostelecom on the considered connection will need to put a mark "Enable IGMP."
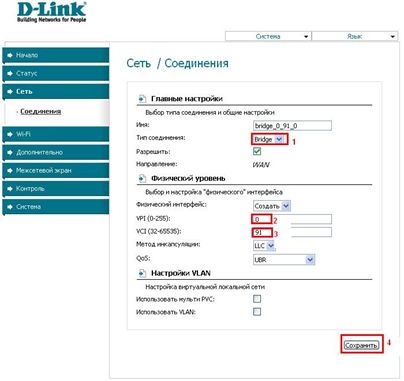
Creating another PVC connection requires a sequence of steps: click “Add” in the WAN sub-item, where such information is indicated: connection type (BRIDGE), port — DSL, name — TV. In the fields of VPI and VCI, the data on the required branch of Rostelecom is reported. This is followed by pressing the "Save" button. After that, another line will appear in the WAN table window.
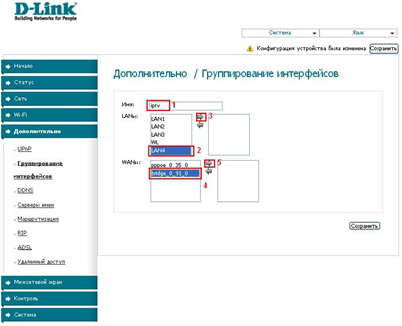
To ensure the functioning of IPTV, you need to create a LAN port for the TB set-top box. This port is combined with a PVC connection. To do this, in the "Advanced" column, select the "Port grouping" sub-item, click the "Add group" button and enter a name in the new tab (iptv, for example). Next, move one of the LAN ports to the right margin from the left one. In a WAN connection, move the TV to the right and save the changes. As a result, we will create two groups. The next step is to preserve the interfaces in the union.
Wi-Fi
First you need to find in the column "wifi" item "Basic Settings", check the checkbox "Enable wireless connection".
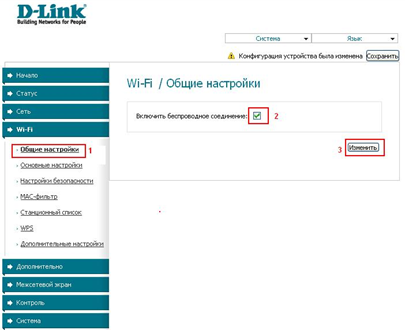
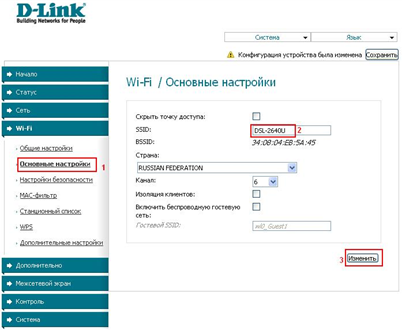
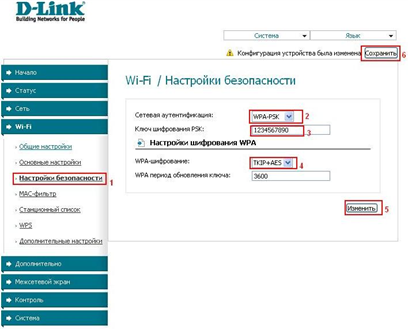
In the wifi subsection “Security Settings” you need to enter the following data: type of network authentication - “WPA2-PSK” and “Encryption Key”, where the password for the created one is entered wifi networks (any combination of letters and numbers of at least eight characters). Next, click on the "Edit" button.
Manual setting of the parameters of the D-Link DSL-2640U router for Rostelecom network using the web interface is completed at this stage.
To save the settings, select the “Save and reload” sub-item in the “System” menu.
Autotuning
When selecting a setting in automatic mode using the installation disc, the sequence of actions after inserting the disc into the CD-ROM and launching the program will be described on the monitor. To properly configure and correct operation device D-Link DSL-2640U is important to clearly follow all recommendations, be careful when performing them.
Setting up a PC
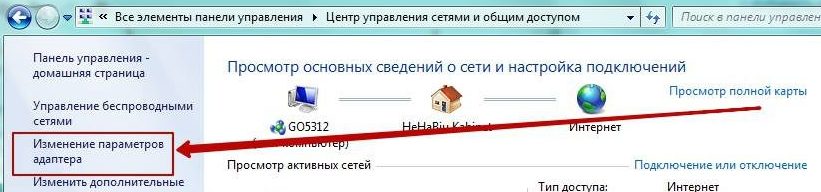
In order to ensure the correct uninterrupted operation of the device, it is necessary to set it up to automatically extract the IP address. To do this, the following steps are performed: “Start” → “Control Panel” → “Network Control Center and shared". After switching to the pop-up window on the right, mark the section “Changing the adapter parameters”.
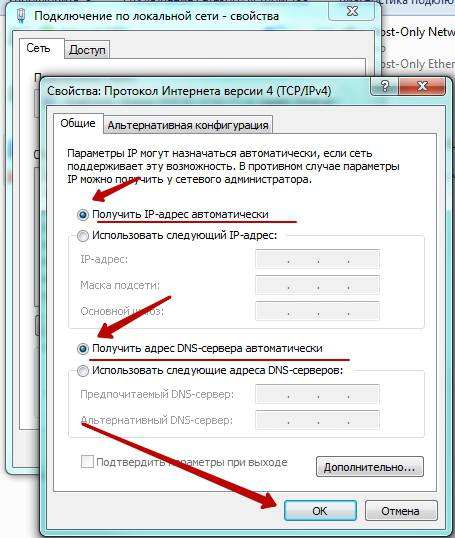
Further actions are as follows: in the lists of connections, find and right-click on the item “Connection by local network". Mark the sub-item "Properties". In the window that opens, select "Internet Protocol Version 4 (TCP / IPv4)", click "Properties". Mark “Obtain an IP Address Automatically” and “Get DNS Server Address”.
Restore factory settings
The D-link modem is equipped with a “Reset” button on the rear panel. It allows you to reset the router settings to factory settings.
- First check the operation of the “Power” indicator (in the active mode it should be green).
- Press and hold the "Reset" button for five to seven seconds. Release the button and wait for all indicators to turn off. After that router D-link returns to the default settings. The restart process starts.
Found a typo? Select the text and press Ctrl + Enter