The router does not work tp link tl wr841n. Learning how to configure a Wi-Fi router using the example TP-Link TL-WR841N
Today every provider offers favorable rates to provide high-speed wireless Internet connection. Wi-Fi router TP-Link TL-WR841N Is an affordable device that can provide a stable connection to the Internet over a wireless network. Below we will consider step-by-step configuration using the example of this router model.
As a rule, after acquiring a router, users are confronted. That is why we decided to consider this issue in more detail.
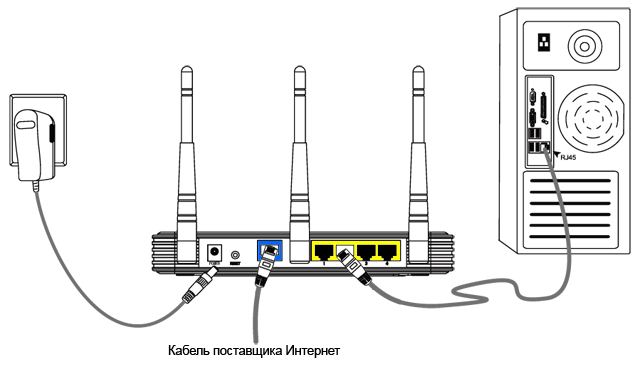
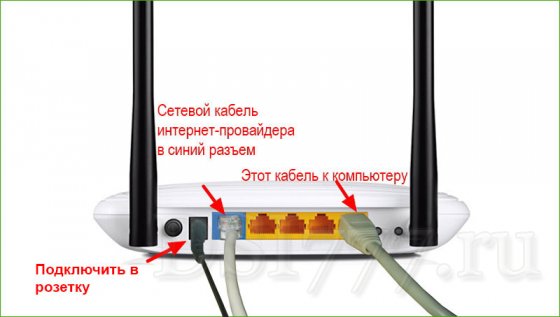
First of all, the router must be properly connected. To do this, connect the provider cable to the router, and then take the LAN cable and connect it to the router and the computer. At the end of the connection, plug the power supply of the router into the network and turn on the device.
Now you can go directly to the configuration process itself. To do this, go to the web interface by going to the address bar in the browser's address bar:
The system immediately asks for the login and password. For this, by default, in either case, the English word is used admin.
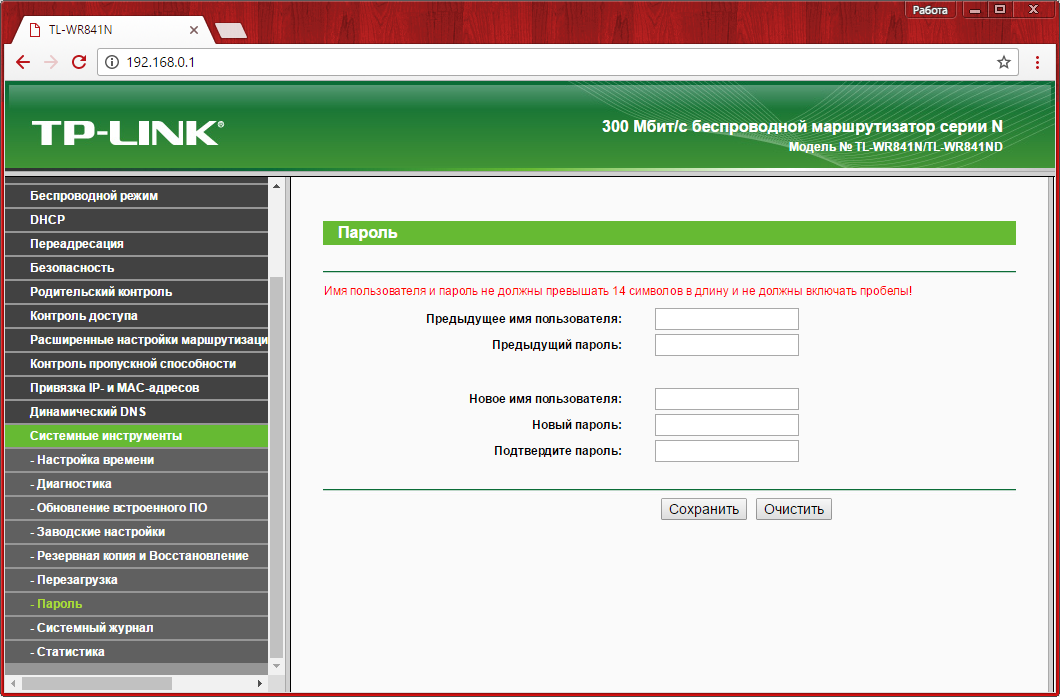
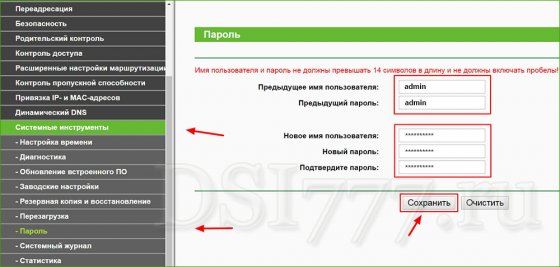
Now you are in the settings of the router itself. Immediately it is desirable to make a change of login and password in order to further secure your network. To do this, on the left side of the window, click the "System Tools" and go to "Password" . Enter a new login and password that will be responsible for entering the router settings into the web interface. Be sure to remember or store this data in a safe place.

Next, we'll go on to configure the Internet connection. You, depending on the type of protocol used by the provider, you may need the following data:
1. The IP address;
2. The main gateway;
3. Subnet mask;
4. Primary DNS;
5. Secondary DNS.
These data must be taken from the contract that you entered into with your provider. If the contract was not at your fingertips, please contact the provider's support service for this information.
The further action plan may differ depending on what type of protocol your provider uses. If you do not know what to choose, contact the provider's help desk.
Configuring PPPoE connection
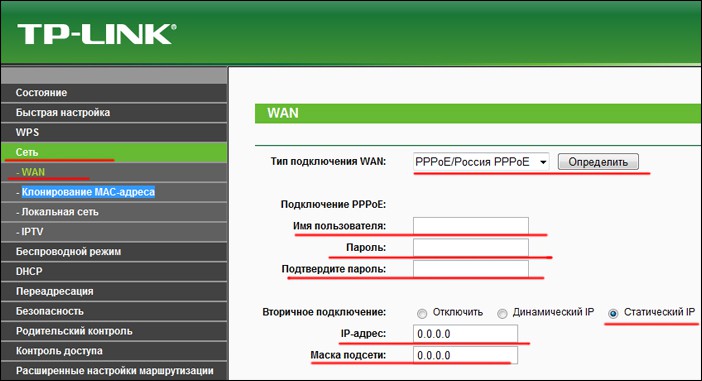
In the left part of the window, go to the tab "Net" and select a section «WAN» . In the column "A type wAN connections» put the option PPPoE, and then enter your login and password, which are specified in the contract with the provider. Some providers use a static IP (this is also specified in the contract), so you need to tick below the appropriate box and fill in the boxes "IP address" and "Subnet mask" .
Save changes by pressing the button "Save" (Save) button.
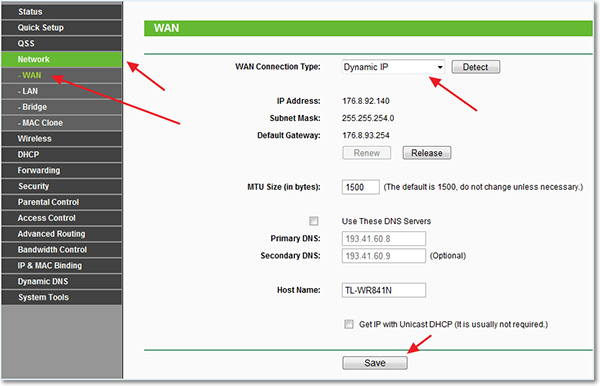
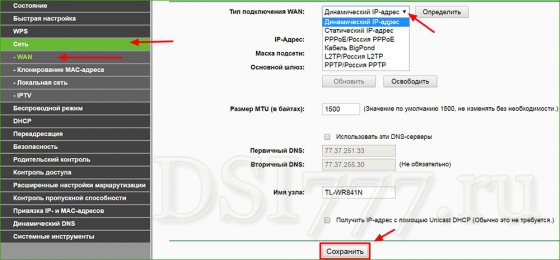
Dynamic IP Configuration
On the menu "Network" - "WAN" in the column "Connection Type" set the "Dynamic IP Address" , then click the button next to it "Identify" , and then "Save" . Further, as a rule, the system should do everything automatically.
Sometimes the provider does not provide automatic settings, so you'll have to manually tick off the item "Use these DNS servers" and then specify the primary and secondary DNS registered in the contract.

Configuring Static IP
On the menu "Network" - "WAN" in the column "WAN connection type" set the "Static IP Address" , and then fill in the indicated fields in accordance with your contract. When finished, click the button. "Save" .

Configuring a Wireless Network
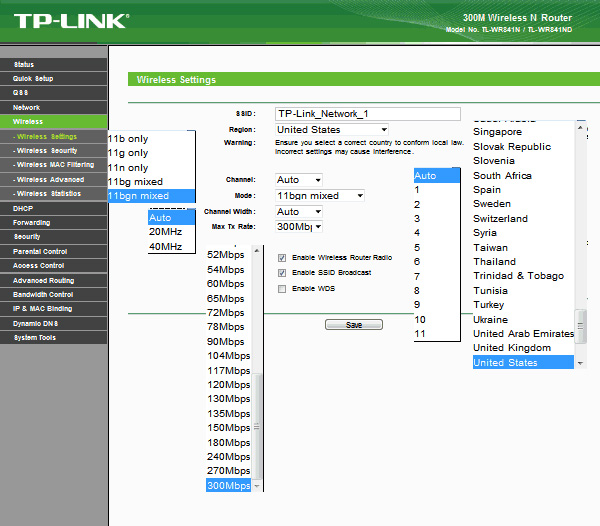
When the Internet on the router is configured, you need to go to the wireless network setup. To do this, select the tab in the left part of the window. "Wireless mode" , and then go to «Settings wireless mode» .
In the first column "Network Name" you must specify the name of the network, which will be determined when connecting devices.
The parameters below "Mode" , Channel width and "Channel" set it as shown in the picture below. Save the changes by clicking the corresponding button at the bottom of the window.

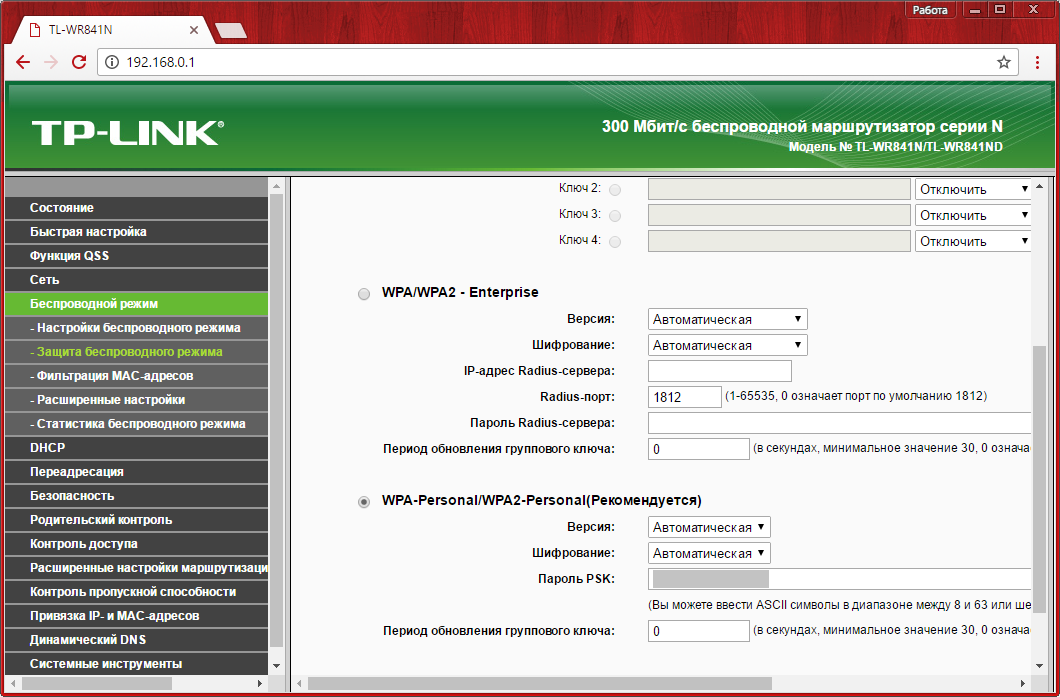
It remains to protect our wireless networkso that other users can not connect to it. To do this, in the left part of the tab "Wireless mode" open the section "Wireless security" .
In the window that opens, check the box next to the item "WPA-PSK / WPA2-PSK (recommended)" , in field "Version" set the WPA2-PSK , and in the field "Encryption" - "Auto" . Complete the setting by entering the "PSK password" any set of numbers, letters and symbols, which will become. Click the button "Save" .

We looked at the configuration of the TP-Link TL-WR841N router in general. Depending on the version of your firmware, the location of some items may differ, but in general.
The router from TP-LINK is a highly efficient device for networking in home and small offices on a wireless or wired channel. Wi-Fi data with the TP-LINK TL-WR841N can be transmitted at up to 300 Mbps, which is enough to watch Full HD video.
To configure the device does not need any special skills
Using this device, you can not doubt the excellent quality of communication and the smooth operation of the Internet. Let's take a closer look at how this router needs to be configured.
- for quick installation The WPA2 connection is designed with a WPS key;
- 2 antennas;
- support for Bridge mode, IGMP Proxy;
- the throughput is controlled by IP-address;
- quick setting option;
- four LAN ports;
- Wi-Fi is characterized by increased performance, in this mode the device can work with online games, streaming video, VoIP;
- for the security of the TP-LINK TP-LINK TL-WR841N is responsible for WPA / WPA2 encryption;
- 9V power adapter;
- connectivity for IP, L2TP, PPTP, PPPoE types;
- DHCP-server;
- support for IPv6, IPv4.
The kit includes a patch cord, power supply, instruction, a disk with useful information and the device itself.
Connectivity
Before you begin to configure, the router must be connected. On the back of the TP-LINK TL-WR841N there are 5 ports. It is necessary to insert the provider's wire into the WAN port (allocated among the others). Next, you need to connect the PC to the router, which requires a patch cord. Specialists recommend changing the configuration of the device solely with a cable connection.

So, connecting the router wires, it remains only to connect it to the power and press the power key.
Login to the web interface
In the interface of the router, all the tuning operations are performed. Enter "192.168.0.1" in the line of any browser, then enter the login information. If the device is new, then the admin / admin parameters will be correct, otherwise it is recommended to reset the settings - it is necessary to press the reset button on the rear panel for a couple of seconds.

After a successful login should be changed standard password router on your own. This is done in the Password item of the System Tools section:
- previous password / previous name - enter already known to us admin / admin;
- new name / password - we enter new data, which we come up with ourselves;
- confirm the password for TP-LINK TL-WR841N;
- save the changes.

Internet Setting
Have you figured out how to connect the TP-LINK TL-WR841N router and enter the settings? Now we know what parameters to enter for each type. As described above, this router can work with different types of connection. To change Internet settings, go to the WAN section of the Network section.
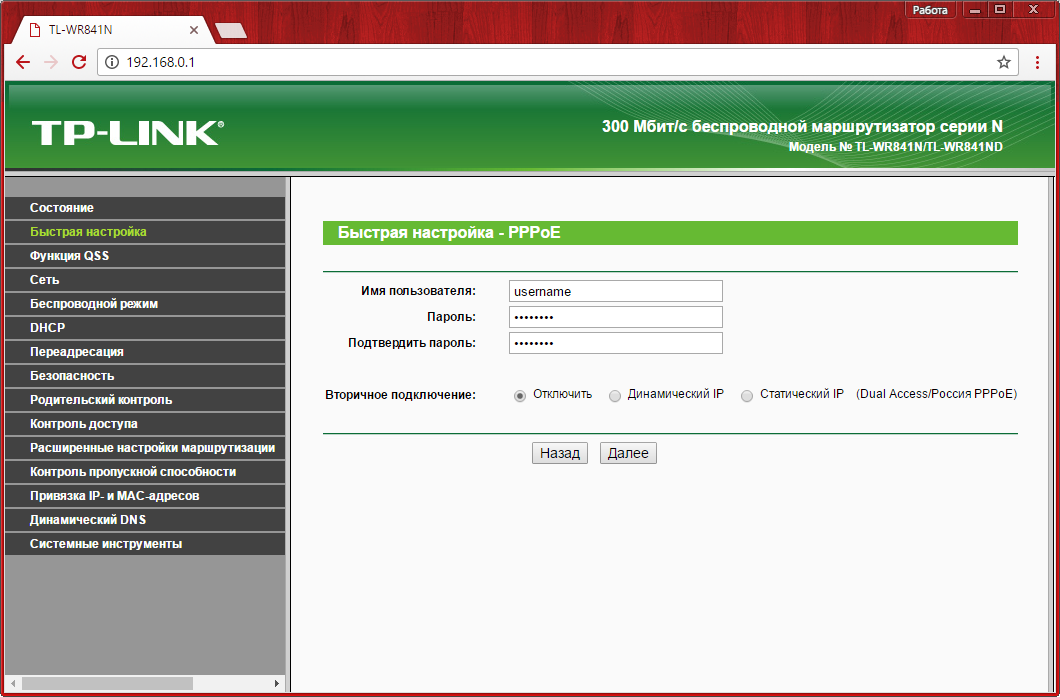
PPP-connect
The instruction looks like this:
- Username / Password - enter the information specified in the provider agreement.
- Connection type - PPPoE.
- Mode - connect auto.
- Confirm the password in the Confirm password field.
- Save the configuration.

In addition to all this, it is important to clone the MAC address. This is done in the MAC clone of the Network section.
L2TP connection
In this case, you will have to fill in the same fields as for the PPP-E connection, but with other data. Read what parameters you need to enter:
- type - L2TP;
- login / pass - this information is provided by the provider company;
- IP-address - dynamic;
- name and IP-address of the server - is written in the contract;
- MTU size is 1450 or lower.
Also set the flag in the connection mode opposite the "Connect automatically".

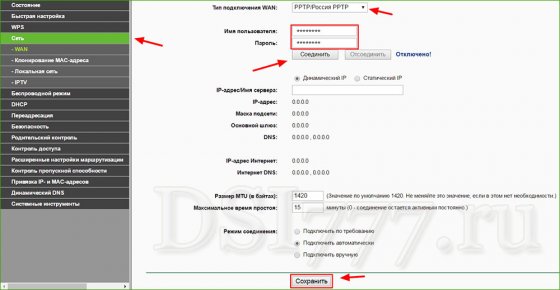
Features of PPTP settings
There are two configuration options for this type of connection. In the first case, the IP address is issued in automatic mode, the second one uses a static address. Consider the parameters of the TP-LINK TL-WR841N router when receiving automatically:
- login / pass, as well as the name and IP-address of the server, you must enter the data from the contract;
- dynamic IP;
- connection type - PPTP;
- wAN mode - connect automatically;
- clone the MAC address (Network - MAC clone);
- save changes.

With a static IP address, it is important to change the IP address parameter to static, and also specify the subnet mask, address and server name (this information is usually prescribed in the contract). Do not forget to enter the DNS address of the provider in the DNS field. Such characteristics of the router will help you connect to the network.

Set up Wi-Fi
TP-LINK TL-WR841N can become an access point, just go to the Wireless item in the interface and enter the following parameters:
- channel - auto;
- region - Russia;
- SSID - think up the name of the network;
- put a flag in front of "Broadcasting SSID" and "Wireless Broadcasting";
- mode - mixed 11bgn;
- apply the new configuration.

You can also set the necessary "ceiling" of the transmission speed.
Port Forwarding
With this option, you can redirect specific requests to the required host local Area Networks at . The function is needed to create a server behind a firewall. This solution is used for mail and web servers. To skip the port, just click on the "Add" button in the Forwarding item.

How to restore or save settings
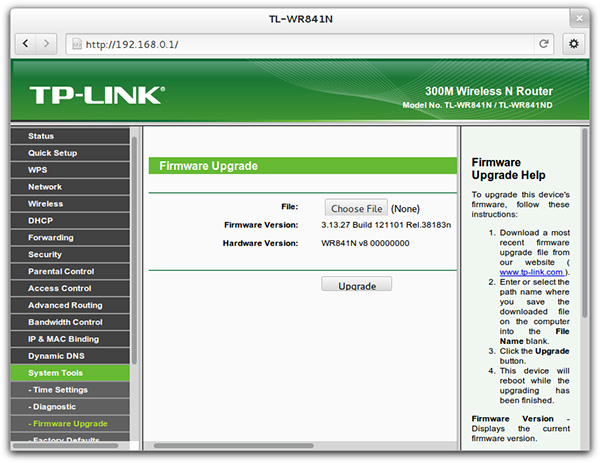
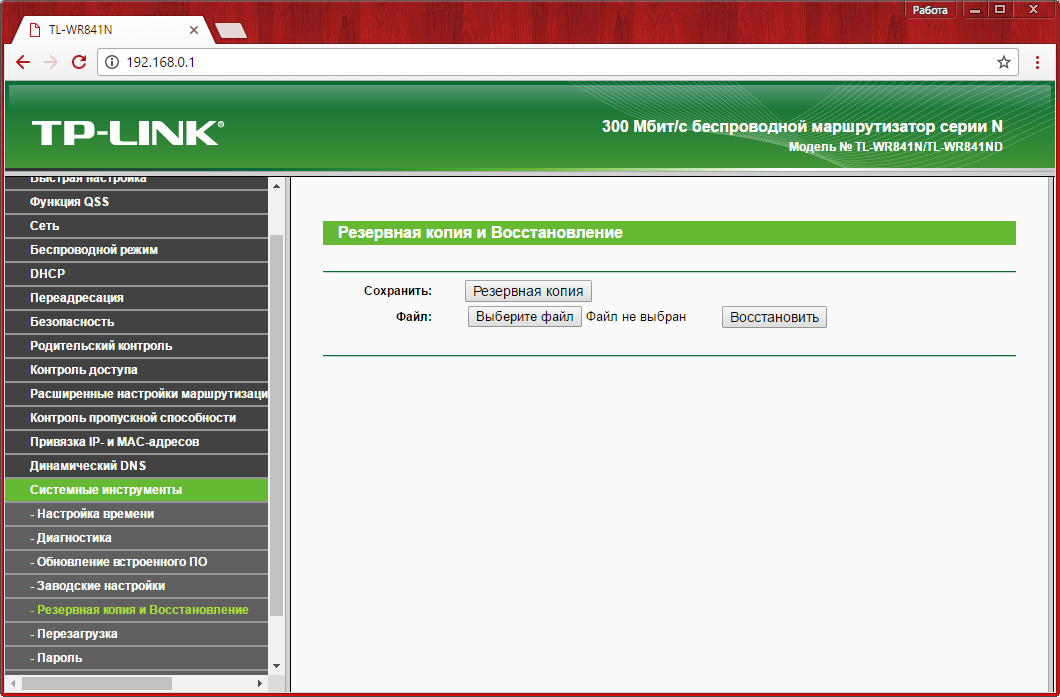
- go to Backup & Restore in the "System Tools" section;
- click on Backup to save the settings;
- do not forget to specify the location where the config file of the router will be stored.

Resumption is carried out in the same section, you only need to specify the location where the file with the required parameters is stored, and click on the Restore button.
Hello! Nowadays, most users use Wi-Fi routers at home. Firstly, it is extremely convenient, unless you are a fan of getting tangled up in wires and being attached to one place. Secondly, with the purchase of mobile gadgets, there is a need to have unlimited high-speed Internet at home. Otherwise, you each have to run to the cafe with wai-fay to download the game to your phone. And this is not serious, is it?
Why all this fuss around the routers? Few people know how to configure a Wi-Fi routerte so that the connection is stable, powerful and fast. On the example of TP-Link router TL-WR841N we will tell you how to configure the tp-link router at home without calling a specialist.
A few words about the model with which we will work today. Without a doubt, this is one of the best offers on the router market, which in its time was bought for 1200 rubles. The router is relatively inexpensive, but it can provide you with a full Wi-Fi connection in the whole apartment.
How to connect the TP-Link TL-WR841N router?
- So, you became a happy owner of a router and brought it home with joy. After opening the box, you will see inside of many different pieces of paper, a disk with instructions in in electronic format, as well as the router itself, a small power supply to it, a network cable for connecting to a home PC.
- The question of how to configure the tp-link router, you and I do not care yet. First you need to connect this device, everything else afterwards. Place the router near the computer in a convenient place on a stable surface. In principle, it can be put in the hallway, and even in the kitchen - if only the wires are enough. Since the bundled network cable usually does not go very long, put the transmitter near a PC or contact a computer store where you will be squeezed more than the cable.
- Connect the power to the router, plug it into the outlet. Then connect the Internet cable to the WAN jack (it's blue). note that LAN portthere are four. Therefore, it will be possible to connect four PCs (if necessary) via a network cable. A computer with a router is connected using the cable that came with it.
- To make it clear to you, we will briefly go through all the connectors and buttons of our router (see the figure below):

1) With this button you can turn the router on and off.
2) Power cord.
3) WAN connector required for Internet connection.
4) LAN connector, through which we connected the router to the computer.
5) Enabling the QSS option.
6) Emergency button (sorry that it is not red). Resets all router settings.

How to configure a Wi-Fi router fast?
How to properly configure the Internet on the router?
How can I set up a full Wi-Fi network on the TP-Link TL-WR841N?
That's all! Just now we have set up work for you Wi-Fi router and saved the money needed to call a specialist. How good it is to do something, realizing that you are doing it yourself, that you have learned this! If you have any questions during the article, do not hesitate to ask them in the comments below. Good luck to new publications!
Now we will talk about wi-Fi settings router TP-LINK TL-WR841N. If you have a series TL-WR841N, then this article is also suitable for you. Let's consider in this article connection of the router, setting up internet Wi-Fi, as well as show you how to change the password to a more complex one so that an unauthorized user can not connect to your network.
A few words about this model. This is the most successful TP-LINK model for the price-quality ratio. For an undemanding user the best router nowhere to find and it works by the way is very stable.
Connecting the router
Connect the power adapter to the router and plug it into the socket. If the lamps do not light turn it on through the button located at the back.
To blue ( WAN) plug the network cable of your ISP. If you are going to configure the router through a wire, connect the cable one end into the LAN port in any of the 4 connectors. Who is interested in having a separate article like. 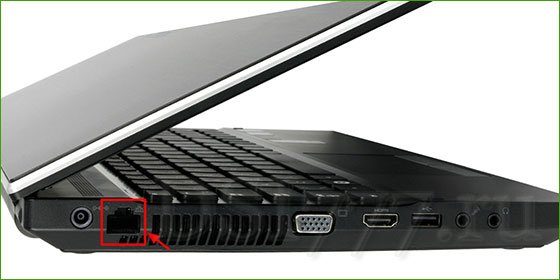 The other end is to the computer or laptop to the network card slot.
Configuring the router via Wi-Fi
If you want to configure the router via Wi-Fi, you can connect via wireless connection, which appears after you turn on the power on the router TP-LINK TL-WR841N.
In addition, you can connect via a tablet or phone and make settings without a PC.
Included with the router is also a disk there is a utility for configuring the router, but we will configure through the Web interface.
The router must be connected to the Internet, your PC, smartphone or tablet must also be connected via cable or Wi-Fi. If you did everything as it should, go to the TP-LINK settings panel.
Configuring TP-LINK TL-WR841N
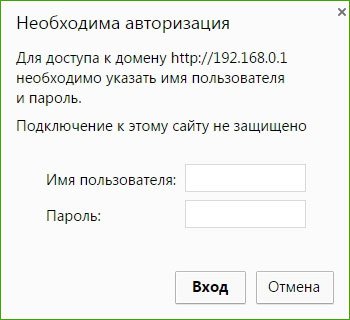 So open on our PC which is connected to the TL-WR841N any browser and drive into the search box 192.168.1.1
or 192.168.0.1
. You will get a window where you will ask for the login and password of the user, drive in the standard login data and password admin.
So open on our PC which is connected to the TL-WR841N any browser and drive into the search box 192.168.1.1
or 192.168.0.1
. You will get a window where you will ask for the login and password of the user, drive in the standard login data and password admin.  There are cases when the settings panel at 192.168.1.1
, or 192.168.0.1
does not open: Another problem may occur when the password admin not suitable. In this case, try to reset all settings. On the back there should be a button Reset, press it with something sharp, your router will reboot and return to the factory settings and try to configure it again. In this case, we have prepared another article:
There are cases when the settings panel at 192.168.1.1
, or 192.168.0.1
does not open: Another problem may occur when the password admin not suitable. In this case, try to reset all settings. On the back there should be a button Reset, press it with something sharp, your router will reboot and return to the factory settings and try to configure it again. In this case, we have prepared another article: Internet Setting (WAN)
 The most important thing is to configure the router so that it works with your ISP. If you do not, then the Internet through your router will not work.
 In the settings panel go to the tab Net-WAN Next, choose the type of connection depending on what your provider uses, if it applies ( dynamic IP), then you do not need to specify any parameters just click "Save".
What if you have one of PPPoE, L2TP, and PPTP
 If you have one of the above types of connection, then select the one you need and prescribe the necessary parameters that your provider will tell you, then click "Save".
 The main thing to achieve in this window is to make it work, if everything turned out to be saved. If you have any difficulties at this stage, call your Internet service provider and find out all the details for configuring the router.
Set up the network and set the password for Wi-Fi
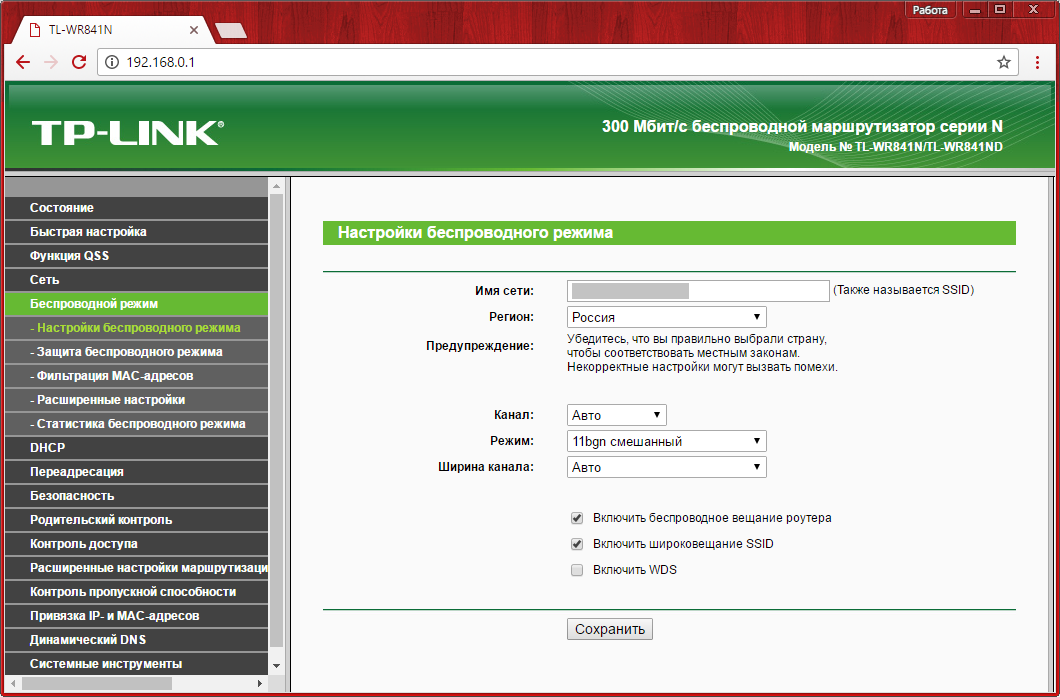
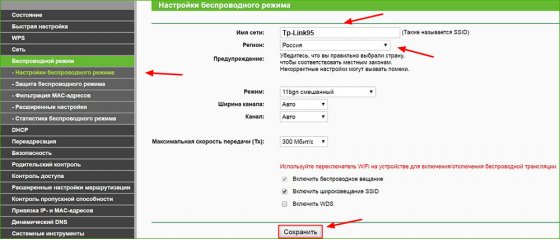 Go to the tab Wireless Mode - Configuring Wireless Mode in the window " Network name"we enter the name of the network that you yourself will come up with," Region"where you live and click" Save. "Set the rest as shown in the screenshot.
 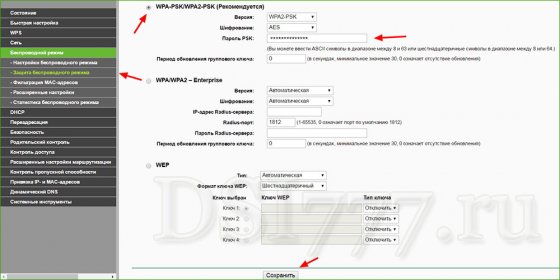 To prevent unauthorized users from connecting to you, you need to open the Wireless Mode - Wireless Security tab and select the protected mode WPA-PSK / WPA2-PSK (Recommended).
 In field PSK password think up and write down some complicated password that will protect your network from intruders, and save the settings.
Password change Admin for personal cabinet protection TP-LINK TL-WR841N
 So, we almost set up our router to protect the router's private cabinet from strangers so that no one could change the settings that you made.
 Go to the tab System Tools - Password enter first the old login and password, then we come up with a new one and click "Save".
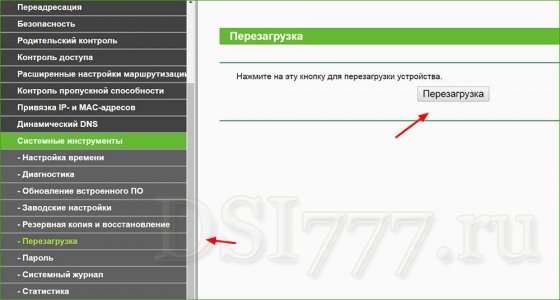 That's all the setup is complete, after that we reboot the TL-WR841N Tp-link by turning on / off the power or from the settings panel.
 The initial task when buying a new router is its correct connection. The rear panel of the WR841N has five inputs for network connectors. Four yellow ports are used for cable connection devices (computers, laptops, TVs and other electronics, equipped with an Ethernet connector). The fifth port is blue, it is necessary to connect the Internet to the router and its further distribution within home network. Therefore, the cable that was pulled into the premises by the provider, it is necessary to connect it to this connector. Then it will be enough to insert the router into the socket and press the power button.
For settings WiFi routerand TP-Link must open any Internet browser and go to the device's control panel. You can access it from one of the following IP addresses: 192.168.0.1 or 192.168.1.1. This combination of characters must be entered in the address bar of the browser. If you do not know which address is set as standard, you can specify it on the bottom panel of the router. You can also use the universal address tplinklogin.net, which will automatically redirect you to the settings panel. Login uses the standard username and password: admin.
If the system does not accept standard data to enter the WiFi control panel of the TP-Link router, they could be changed earlier. You can specify the actual login and password in the company that provided Internet connection and presetting the router. If this is not possible, it is recommended to reset the settings and return them to the factory settings. To do this, you should find on the rear panel of the router a button "Reset", which does not protrude beyond the body. Then press it with any thin oblong thin object (for example, a toothpick) and hold for about 10 seconds. After resetting the settings, there will be no problems with the input.
If the entry is successful, the initial "status" tab is displayed. On it you can get acquainted with the data about the Internet connection, the current settings of the wireless mode (WiFi) and statistics on traffic.
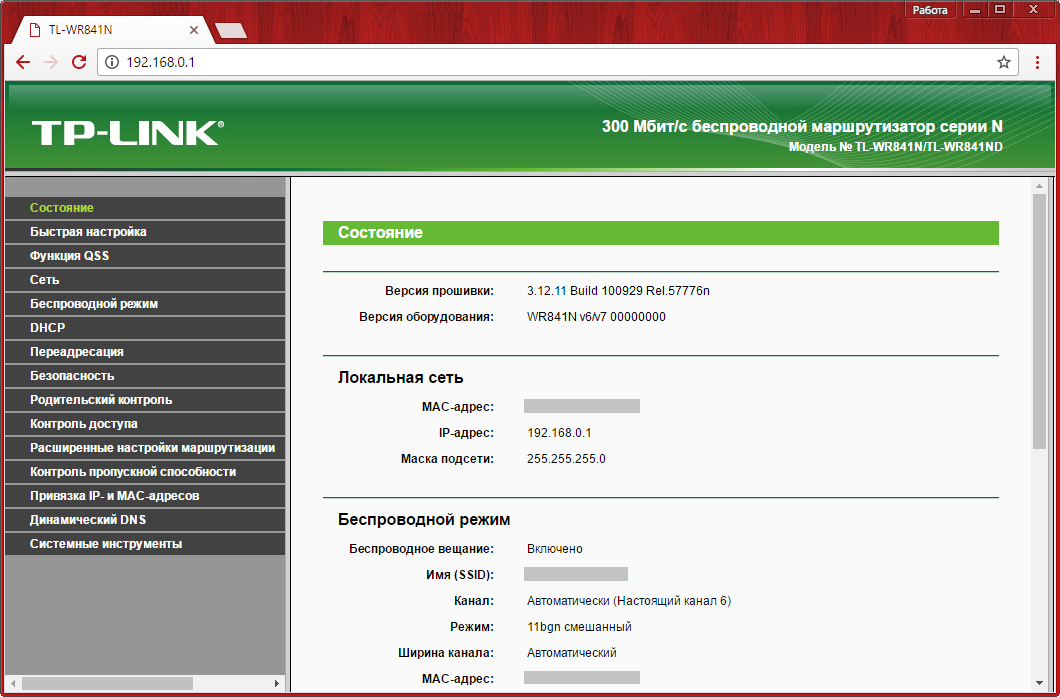
In most cases, no additional action is required to connect to the Internet. The connection is established about a minute after the WR841N router is turned on with the blue cable connected to it. You can check the status of the connection on the "Status" tab, in the "WAN" section.
If the connection is not established, additional parameters must be specified when configuring TP-Link. You can do this not the "Quick Setup" tab, but you can specify the data in your copy of the contract with the provider.
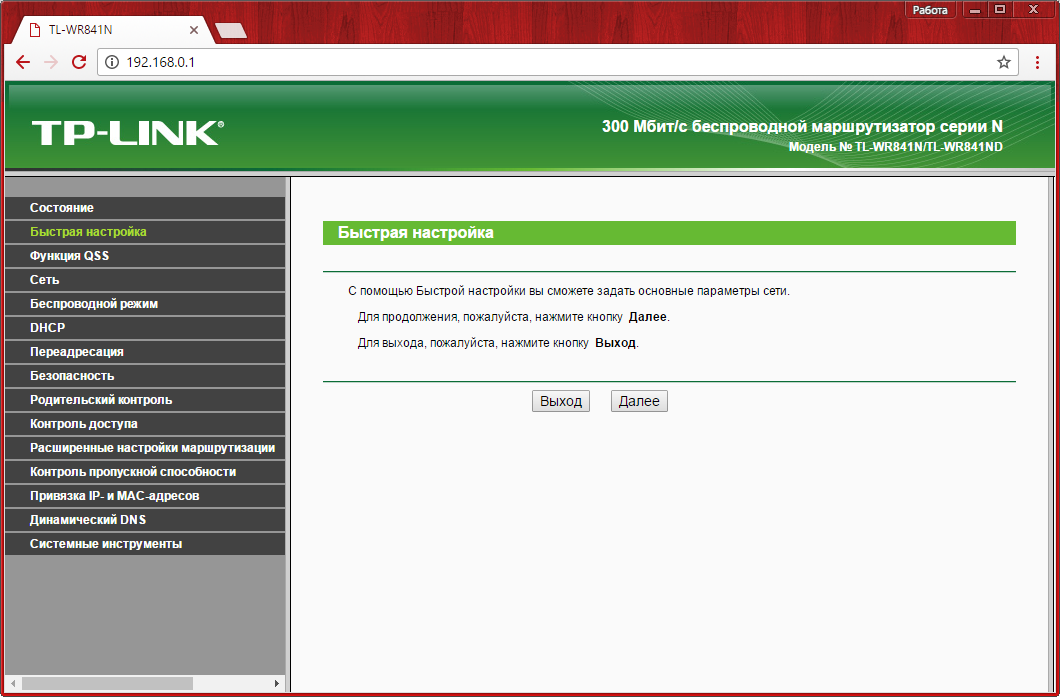
Select the type of connection specified in the contract or specified by the provider. If the connection type could not be recognized, but you have a name account and password, click "Auto Detect". The WR841N will scan the connection parameters and display its recommended type.
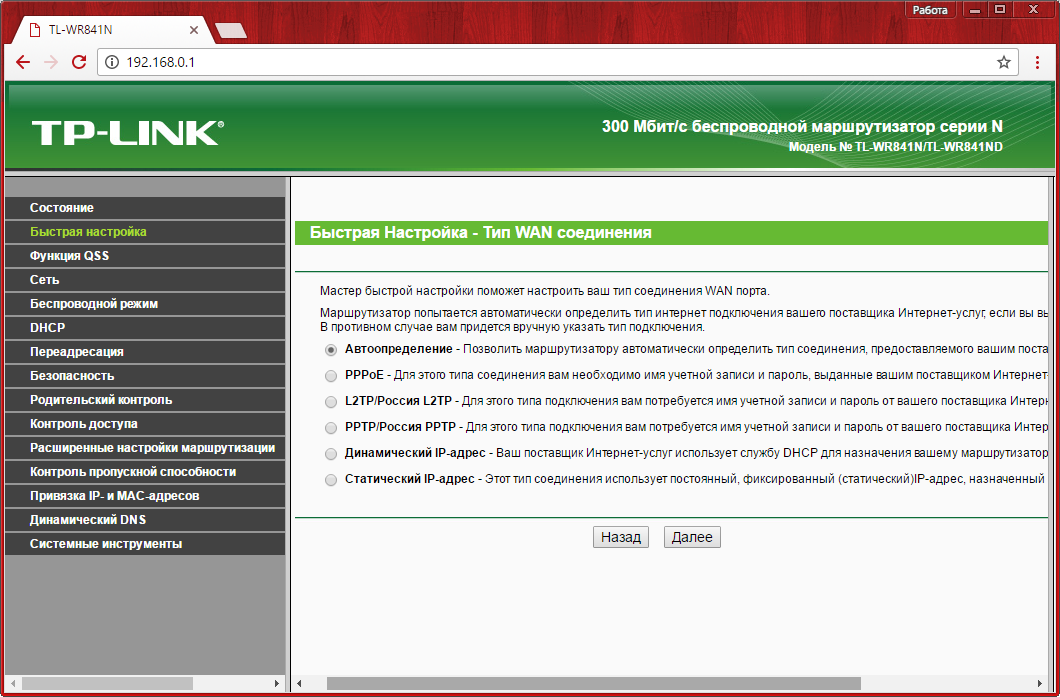
The definition of the type of connection on the TP-Link router, as a rule, takes no more than 20-30 seconds.

After that, you must enter your account information and click "Next". When the WR841N WiFi router is rebooted, the Internet connection will be established according to the parameters you specify.
After the connection is established, any devices connected by the cable will have access to the Internet via the WR841N. The order of the cable connection does not matter, even though the ports on the back of the device are numbered from 1 to 4. For example, you can connect the computer to port 2 and the TV to port 4 (you do not have to use outputs 1 and 2).
Setting up WiFi
The key step in setting up the WR841N is to set the WiFi parameters. To do this, open the first menu item on the Wireless Mode tab. In the "Network Name" field, you must enter a name under which the network will be displayed in the general list when searching for WiFi. Next - select your country in the regional settings. This affects the list of frequencies at which data will be transmitted. The point "Channel" is recommended to remain unchanged, on the value of "Auto". With these settings, the router will automatically select the frequency WiFi Transfer, depending on the current load (occupation of certain frequencies by neighbors). It is also advisable to leave the standard settings in the fields "Mode" and "Channel width", so as not to limit the maximum connection speed.
The checkbox "Enable wireless router broadcast" connects data transfer over WiFi, when it is disabled, a wireless connection can not be established, but the network and Internet access are stored in a wired mode. "Enable SSID Broadcasting" makes the network name public. If you uncheck this box, your WiFi will go to the category of hidden networks. To connect to it you will have to enter not only the password, but also the name.
The next step is to open the "Wireless Mode -\u003e Wireless Security" tab. By default, the option "Disable protection" is selected in this menu. This means that your WiFi is open (no password is required to connect to it). We recommend that you change this setting to "WPA-Personal / WPA2-Personal" and set the network password.
It is important to realize that the encryption settings provide not only access to the network, but also the security of its use. Even if you do not mind that your WiFi is used by outsiders (neighbors, colleagues), access without encryption carries significant risks. Information in open networks is transmitted in its original form. And this means that passwords, payment data and other confidential information will be available to any network user. For the same reason, it is not recommended to enter personal data when connecting to the Internet through public networks.
In the "Version" and "Encryption" fields, leave the values "Automatic", and in the "PSK Password" section enter the desired access key. The harder the password, the less likely it will be hacked in the event of a hacker attack. It is recommended to use letters in different registers (lowercase and uppercase), numbers and special symbols.
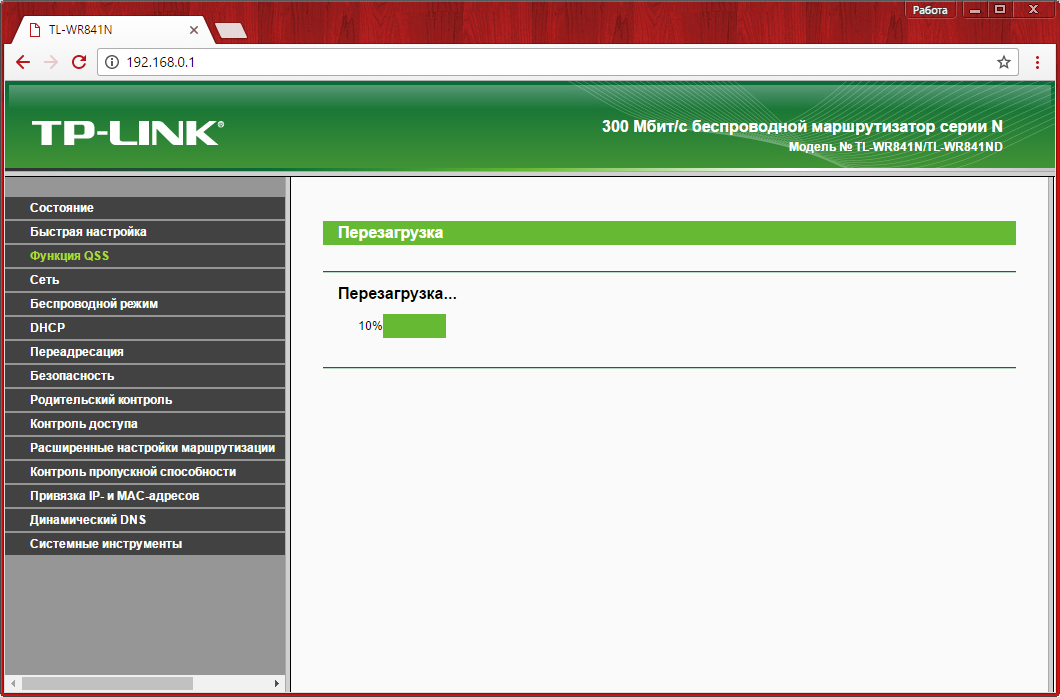
In order to use the new settings, you will need to click on the specified link and confirm the WR841N reboot.
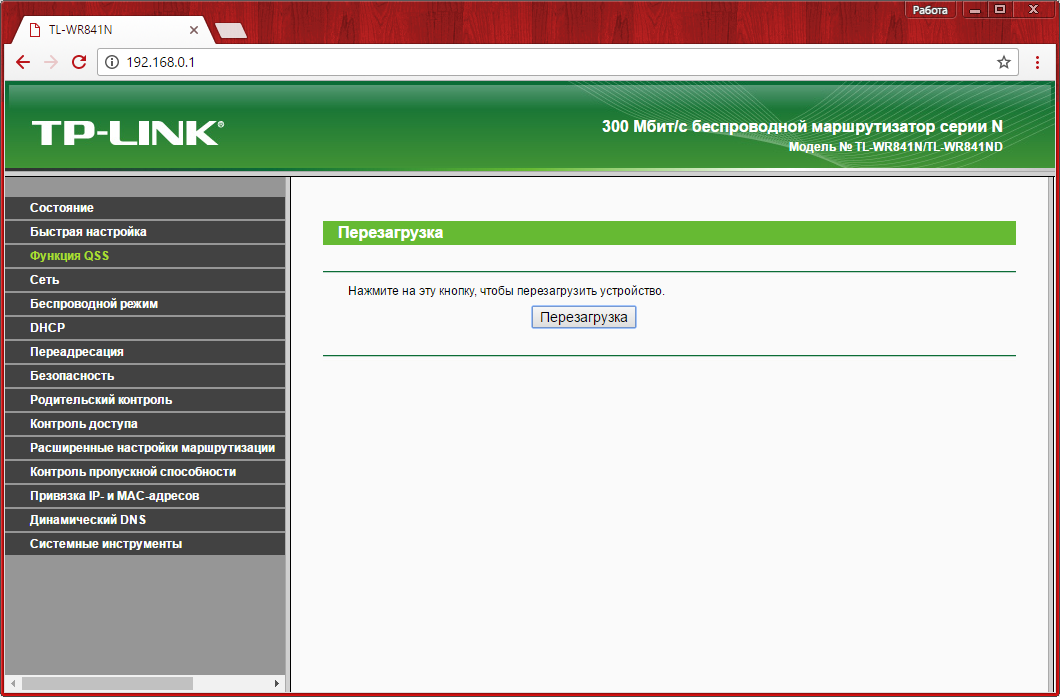
The process of rebooting the TP-Link router takes about 30 seconds. After that, the setup page will be updated.
Security Settings
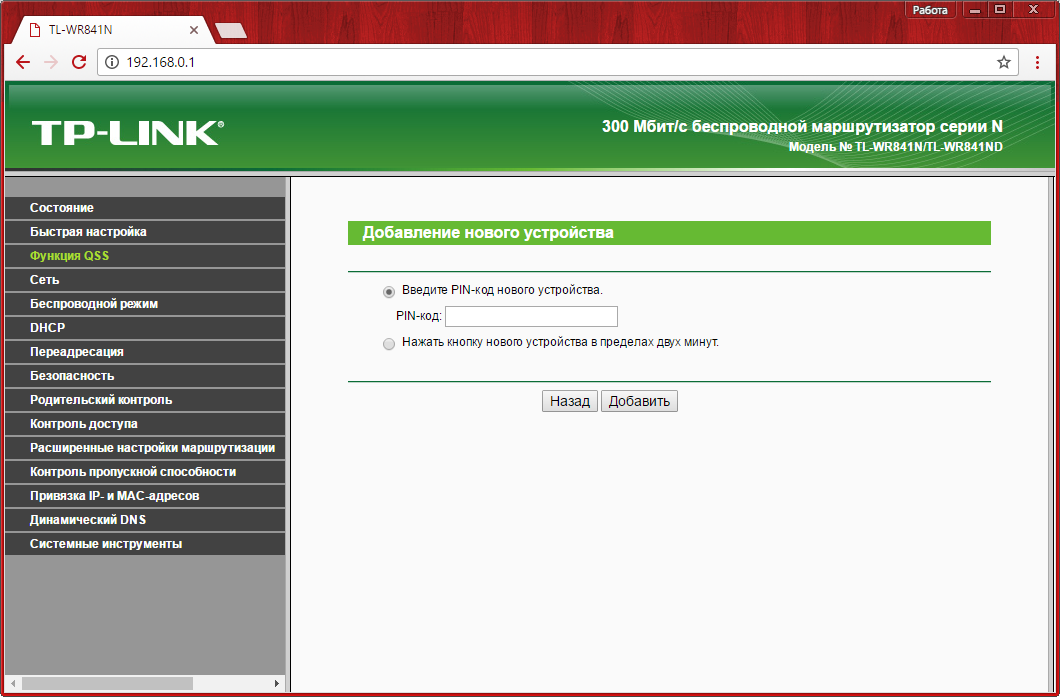
To maximally secure WiFi, it is recommended to disable the QSS function. It allows you to connect any device without entering a password, within two minutes after pressing the WPS / Reset button on the back of the device. Although this option is convenient, in the QSS protocol critical vulnerabilities were discovered, due to which it is possible to gain unauthorized access to the network. At the moment, it is with the use of this function that the largest number of hacking TP-Link routers are performed. To change these settings, go to the "QSS function" tab, click the "Disconnect" button and reboot the WR841N router.

If you wish to continue using this connection method in spite of the risk of hacking, you can change the connection settings in the same menu or add a new device programmatically. To do this, just enter the PIN code of the connected equipment or select the item "Press the button of the new device within two minutes" to activate QSS.
The next important option that provides network security can be connected in the menu "Wireless mode -\u003e MAC address filtering". When the filtering is enabled, it can work in two modes: "Allow access to the stations listed in the list" and "Deny access to the stations listed in the list". Select the desired option and enable filtering. The changes will be applied after the reboot of the router.

If you select the first option, you can disable the connection of individual devices to the WiFi network, the data being distributed tP-Link router. To do this, enter a combination in the "MAC-address" field, which can be specified in the next step. In the field "description" write the name of the device you understand, and change the status to "Enabled".
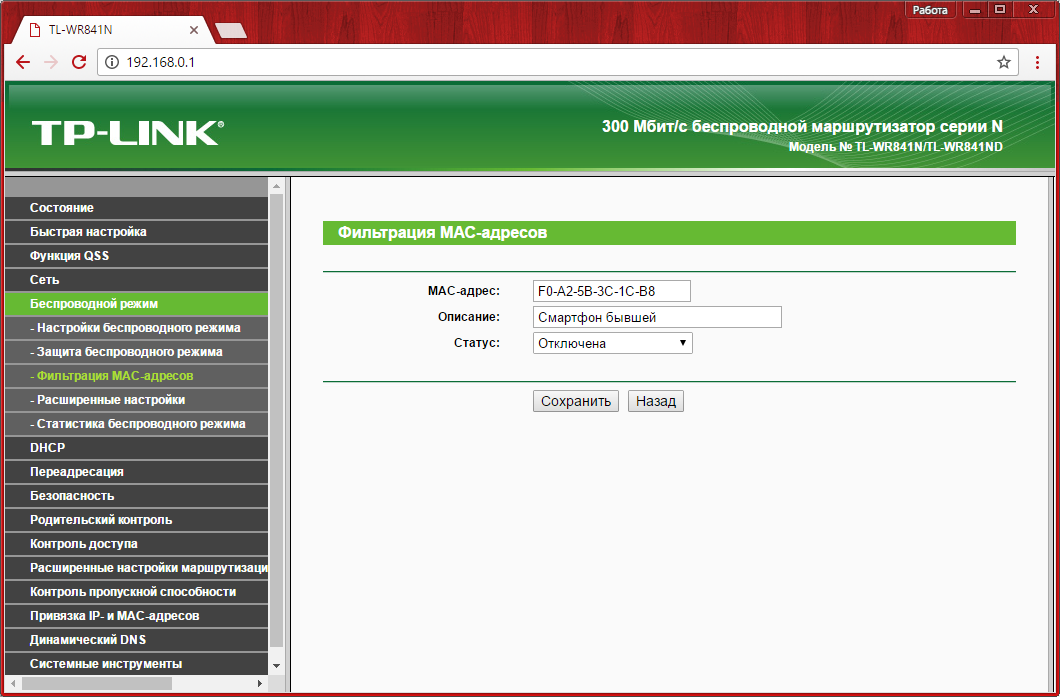
Also you can choose the second option. When you use it, only devices that are whitelisted will be able to connect to the network. As in the case of blacklisting, you will need to enter the MAC address and the name of the device, and select "Enabled" from the "Status" drop-down list.

Although this method also increases security, it does not guarantee full protection against hacking and connecting third parties to your WiFi. Data connection over WiFi can be intercepted, and from them you can extract the MAC address of your device. After that, the cracker will just need to change the address of his computer to the received one, and he will be able to enter the network.
You can check the MAC addresses of the connected devices in the "Wireless mode -\u003e Wireless statistics" menu. It contains only devices that are connected via WiFi. Here you can see the statistics of work on different computers and gadgets (the number of received and sent packets). In addition to receiving the addresses of your devices, this menu can be used to control unauthorized connections. For example, if the speed of WiFi on your WR841N router is down and you suspect that someone is connecting to your network, you can check it in this menu.

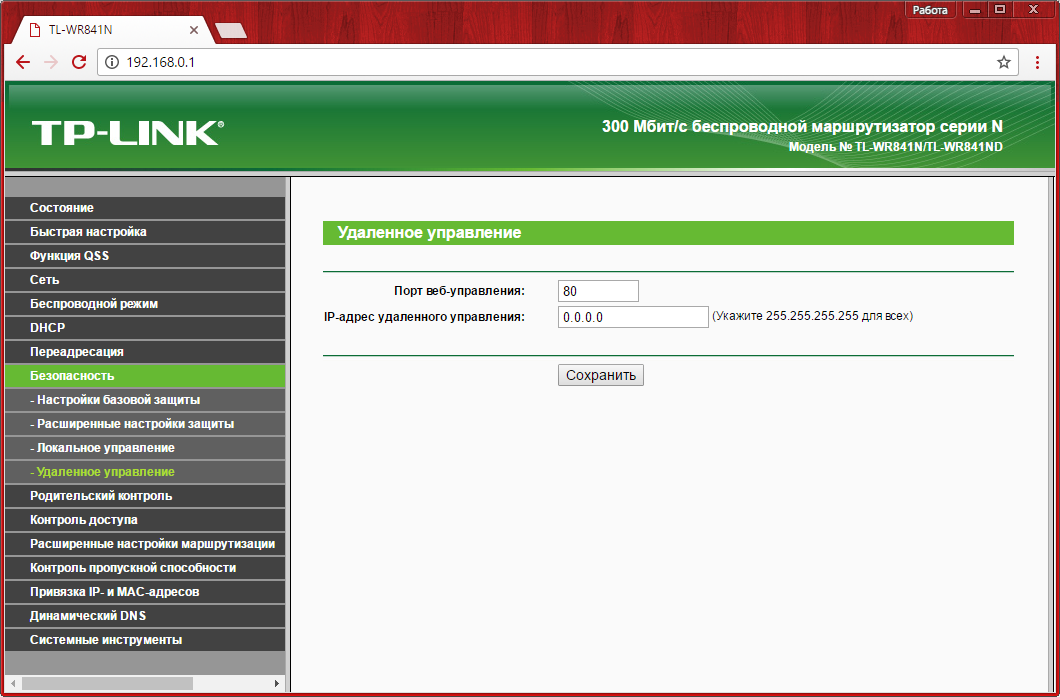
Change the address of the admin panel of the router in the "Security -\u003e Remote control". There you can also set a new port for connecting to TP-Link, however this setting should be left unchanged. After saving a new IP address, you will need to reboot your router.
After setting up your TP-Link WR841N, it is recommended that you save the settings in a separate file. You can do this on the tab "System Tools -\u003e Backup copy and recovery ". The configuration parameters will be saved in the bin format, and through this menu you will be able to restore them. Such a need arises if in the future you make some incorrect changes to the settings or they will be accidentally reset using the "Reset" button on the rear panel.
The last step in setting up the WR841N is to change the user name and password in the "System Tools -\u003e Password" section. In this case, the system will request the current account data. Changes will take effect after tP-Link router will be rebooted.