Buy, Ubiquiti NanoStation Loco M5 street, all-weather access point and subscriber station WiFi and AirMax with delivery, mail.
This manual is suitable for configuring all Ubiquiti M-Nanobridge, Rocket, Nanostation, Airgrid, etc. devices. The manual does not pretend to be complete description - we reflected those settings that are suitable for most cases. In certain non-standard situations, you should refer to the full documentation of the manufacturer.
Let's designate the basic concepts:
Base station (BS): a Ubiquiti device to which the Internet channel is connected and distributing it to several customer access points. The "base station-clients" link is organized in point-to-multipoint mode.
Bridge, bridge bridge, bridge: point-to-point connection. In the structure of the bridge distinguish the leading device (the one to which the Internet is connected) and the slave, the receiving one. The master settings are the same as those of the base station.
Client device: access point - a signal receiver from a base station on the subscriber side. Its settings are similar to those of the receiving device in the radio bridge structure.
Preparing to configure Ubiquiti
Setting up Ubiquiti devices is most often done before installing on a mast or other placement. To access the web-based configuration interface, the access point is connected to the computer via a PoE adapter and power is turned on:
Important! First, connect the PoE injector to the computer and access point, and only then plug the injector into the electrical network.
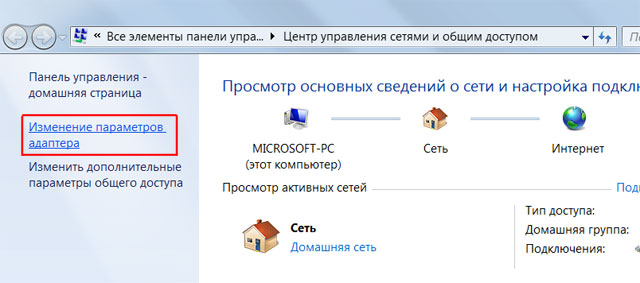
We go to the Control Panel, to the Network Management Center and sharing and choose Change adapter settings:
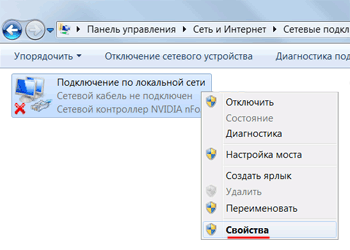
We click right-click on "Connecting to local Area Networks"and choose Properties:
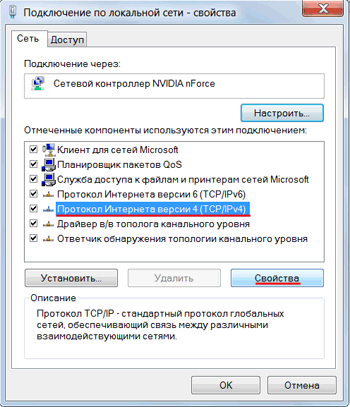
Select "Internet Protocol version 4" and press the button Properties:
Here we assign any IP-address in the 192.168.1.x subnet (except 192.168.1.20 - this address has all new Ubiquiti devices by default). From experience - it is best to register IP either 192.168.1.200 or 192.168.1.254.
And the subnet mask is 255.255.255.0.
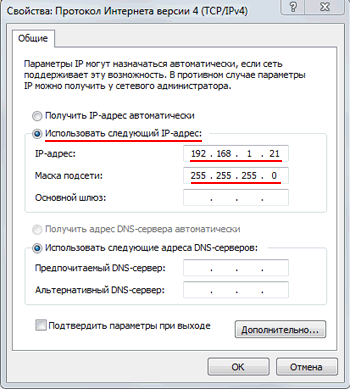
We save.
All, now open any browser, in the address bar, type the address of our access point, enter username and password.
Factory settings for Ubiquiti devices:
Default IP address - 192.168.1.20
Default login - ubnt
Default Password - ubnt
There are also supporters of the setup after installation, not wishing to include next to a device with a fairly powerful radio emission. In this case, note that the default address can be changed if it is assigned by the DHCP server on the network, rather than being prescribed statically. You will not be able to access the Web interface of the access point at 192.168.1.20. In order to determine the new IP-address, it is better to use the proprietary utility from UBIQUITI - Discovery Tool. It can be downloaded from the UBNT website at this link.
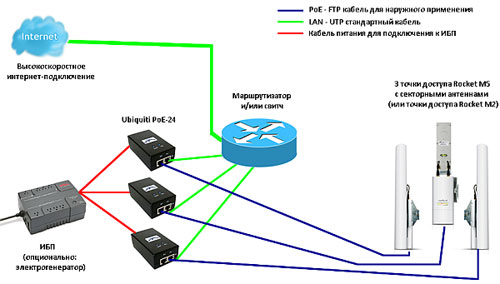
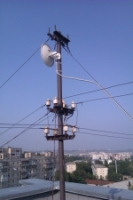
Ubiquiti base station
The standard equipment of a simple base station based on equipment from UBNT usually looks like this:
- 3 access points.
- 3 sector antennas (or cheaper variants -,)
- A router for managing traffic, IP addresses, restrictions, etc. (for example, )
- The switch (if there are not enough free ports in the router). A budget option- .
- FTP Cable twisted pair (shielded) for connecting the access point to the injector ();
- UTP or FTP twisted-pair cable for connecting the LAN port on the injector with the router (.
However, Nanostation, Bullet, and other devices with suitable parameters can act as a base station.
All this is connected to a single network:
To reduce the number of connecting cables, you can use a proprietary PoE switch from Ubiquiti, we wrote about this in an article
Configuring Ubiquiti Devices
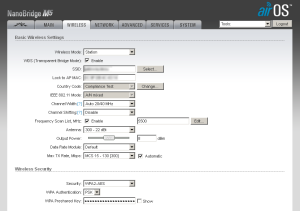
WIRELESS TAB
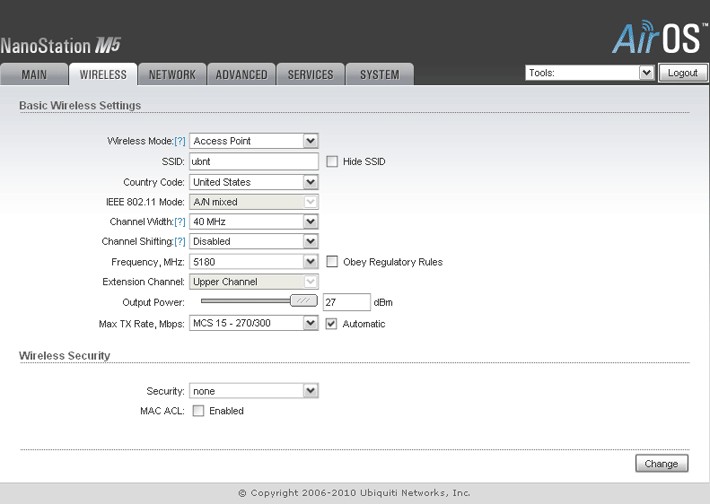
Fig. 1. Example of the WIRELESS tab on the Nanostation M5 base station, the number of clients is 5, max. the distance is -2 km.
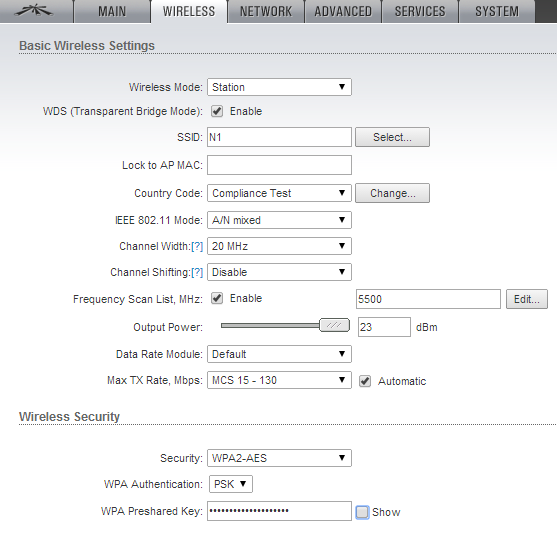
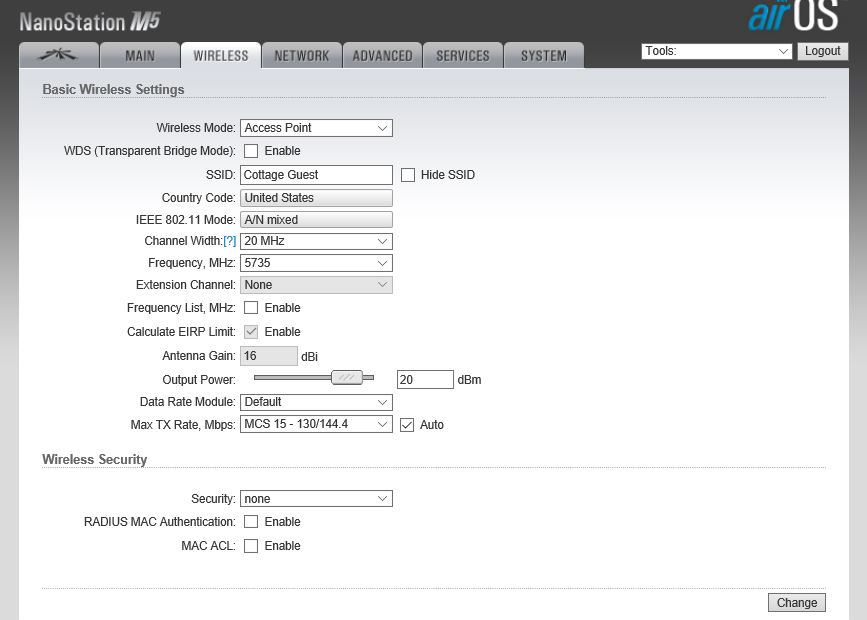
Fig. 6. Example of the WIRELESS tab on the Nanostation M5 loco client point.
Wireless Mode - operating mode
For the base station and the bridge transmitting device - Access Point;
For the access point of the client and the receiving bridge device - Station;WDS - turn on (tick). This setting saves the mac addresses of client devices on the network.
SSID is the name of the network.
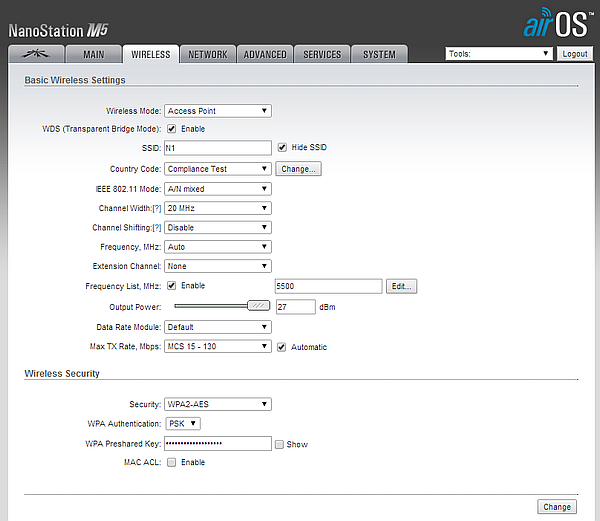
For the base station and the bridge transmitter, we assign a unique name;
For the access point of the client and the receiving device of the bridge, we assign the name of the station to which we will connect.
Country Code - for access to all supported frequencies you can choose Compliance Test, otherwise we choose your country. The value must match on the sending and receiving devices.
Channel Width - The standard value is 20MHz. The choice of others - if necessary. The value must match on the sending and receiving devices.
Frequency MHz - set Auto or choose the frequency at which the base station will work, preferably less noisy. To determine the free channels used programs that scan the air, for example, proprietary utility from Ubiquiti - airView.
It is desirable to distinguish between the channels used on their devices, in order to avoid interference.
Extension Channel - the setting is applied when the channel width is set to 40 MHz, otherwise we do not touch it.
Frequency List - turn on the check mark. Now the device does not scan all the channels in a row, but only those listed in the list.
Output Power power. The optimal value is selected experimentally: we lower it until the speed and CCQ begin to fall and leave it at the level of maximum indicators.
Max Tx Rate - set the transmission speed or put a check mark for automatic speed adjustment depending on the communication conditions.
Wireless Security - section of encryption settings. In field Security choose WPA-AES or WPA2-AES. The value must match on the sending and receiving devices.
WPA Preshared Key password for point access.
MAC ACL - Filtering on MAC-addresses, if there is such a need. With the check mark enabled, only devices from the allowed list can connect to the BS or the bridge transmitter.
How to connect NanoStation2
To connect NanoStation2 to Wi-Fi access point we will need:
- NanoStation2;
- Two twisted pair cables with straight crimping (used to connect a computer-switch type);
- Wi-Fi point access, to which we will connect;
- Computer or laptop.
Connect the equipment:
- The first cable of the twisted pair is connected to the computer and to the POE power supply unit to the LAN connector;
- The 2nd cable of the twisted pair is connected to the NanoStation2 in the LAN connector and in the POE power supply to the POE connector.
Configuring the network card of the computer
Open the "Control Panel" and select "Network and Sharing Center".
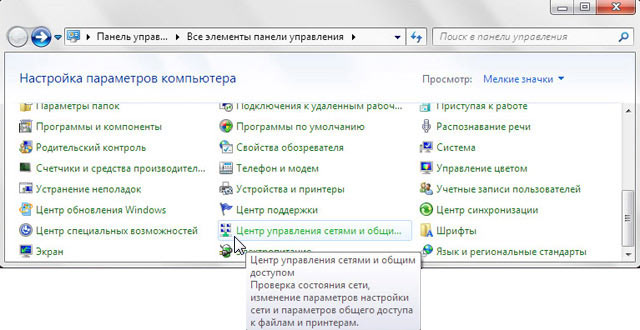
Go to the "Change adapter settings".
Right-click on "Local Area Connection" and select "Properties".
Select "Internet Protocol version 4 (TCP / IPv4)" and click "Properties".
In the window that opens, select "Use the following IP address" and specify the IP address 192.168.1.21 , Subnet mask 255.255.255.0 and click "OK".
Configuring NanoStation2 in Client Mode (Station)
Open Internet Explorer (or another browser) and enter the address 192.168.1.20
Enter the username in the window that appears. ubnt, enter the password ubnt and enter the Web interface.
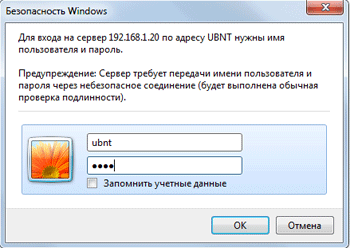
Attention! If you can not access the settings at 192.168.1.20 , then Ubiquiti NanoStation changed the IP address, which is used by default. To reset the device to the factory settings, press and hold the Reset button on the NanoStation2 for 10 seconds.
Choosing a Wi-Fi hotspot
Go to the tab Link Setup.
Configure the parameters:
- Wireless Mode: Station
- Country Code: Ukraine (or another country in which the device is used)
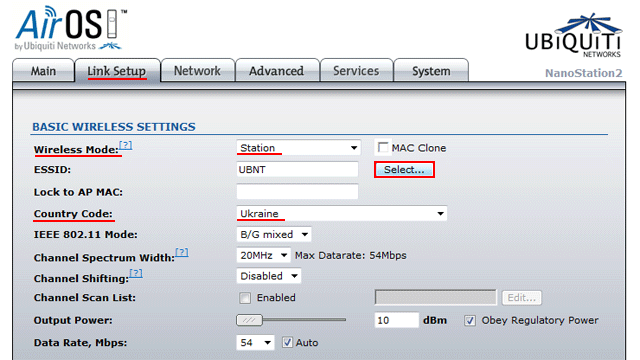
Push the button Select.
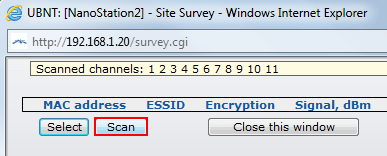
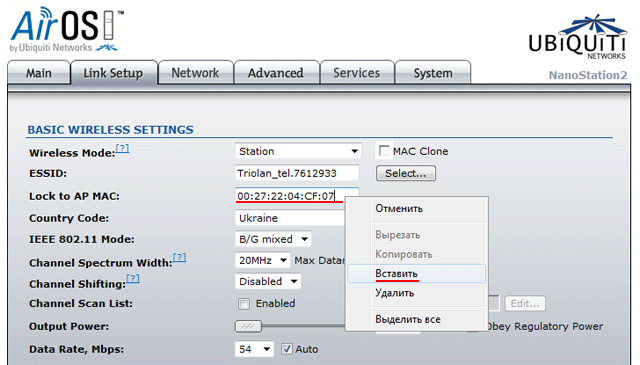
In the appeared window we press the button Scan.
In the list should appear Wi-Fi access point, to which we will connect. Select it and copy the MAC address of the access point. Push the button Select.
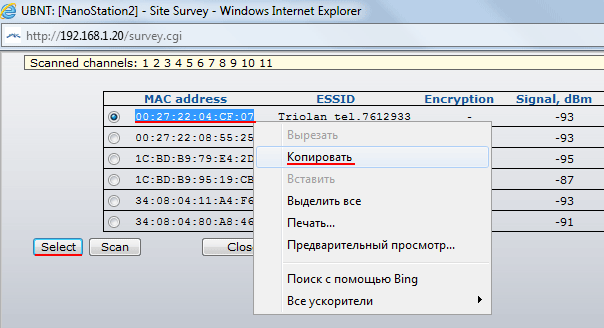
In field "Lock to AP MAC" paste the copied MAC address.
Encryption and password settings
If the Wi-Fi access point uses data encryption, then in the "Wireless Security" select the necessary encryption method (it is usually determined automatically) and enter the password. In the "WPA Preshared Key" field, you enter a password if WPA encryption is used. In the "WEP Key" field, you enter a password if WEP encryption is used.
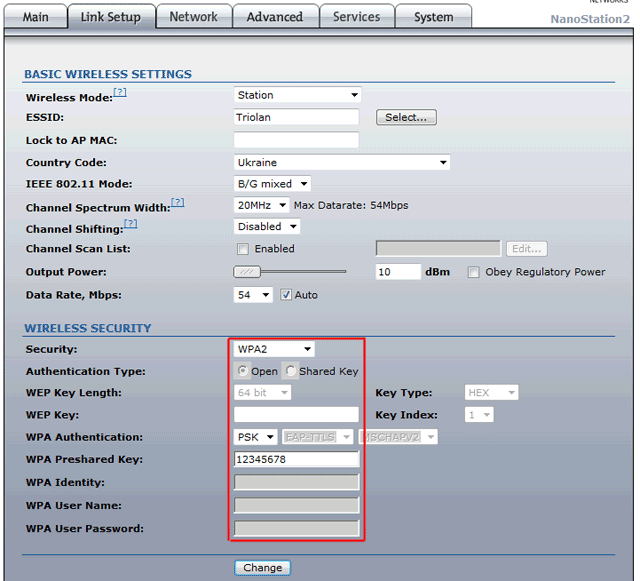
To save the settings, press the button Change.
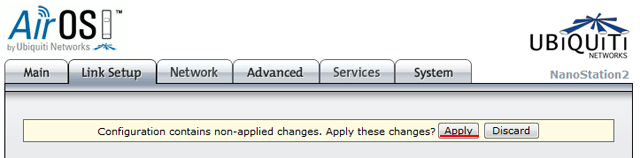
Apply.
Run the utility and it determines the IP addresses of all Ubiquiti devices.
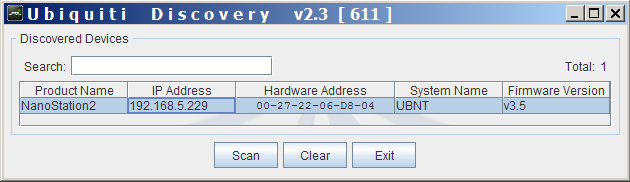
Open the browser, enter the address found by the Discovery Tool and get into the settings of the NanoStation.
Security Settings NanoStation
Only the administrator must change the NanoStation settings. To no one else can access the settings, you need to change the access password.
To do this, go to the "System" tab, in the "Administrative Account" section we change standard password to enter the settings.
- In the field "Current Password" we specify the current password ubnt.
- In the field "New Password" we specify a new password (preferably at least 10 symbols) and
- In the "Verify New Password" field, enter the new password again.
- Next, go to the bottom of the page and press the button Change to change network settings.
The top of the page is confirmed by changing the settings by clicking the button Apply.
A warning: nothing special in the article there, people who even put a couple of times wifi-bridges, everything described here is well-represented.
Formulation of the problem
1) to connect to itself providers absent in the house2) to throw your internet to friends
3) get experience setting up Ubiquiti equipment
Choice of equipment
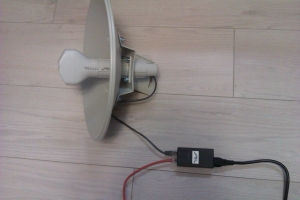
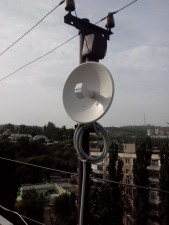
Passed quickly and easily - I have often heard about inexpensive and well-proven bridges from Ubiquiti.The choice of the NanoBridge M5 was due to the frequency range (works in a less noisy 5 GHz) integrated with the antenna transmitter (my model with 300mm 22 dBi), ready for battle kit (transmitter + antenna + PoE adapter), MIMO 2x2 support.
One and a half weeks of the weary expectation of the parcel were brightened up by reading the profile forums and how-to-shek on the setting, as well as reports on the launch of long links for 10-20-30 km are found in abundance. In my tasks such distances were not included - only 300 m above the three high-rise buildings, the final useful strip is much more critical.
And then it happened - the courier brings a coveted box. We reveal, we study the equipment:
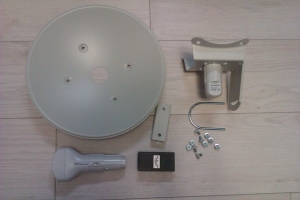
Laminate is piled up
We include, we change, we hammer minimally-necessary settings, we test work in a bunch. Nothing unforeseen - it just works.
Having played with the points on the stand we proceed to the most "fascinating" procedure - getting the keys from the roof. Having gone through this incredibly dreary quest (with cheats) we begin to look for a convenient place to install the equipment.
Criteria:
1) Do not drill anything
2) minimum distance for cable laying
3) the installed equipment should not interfere with anyone
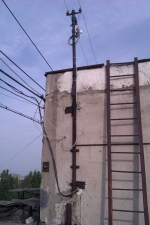
As the fixing point, the top of the radar support was chosen. Ideally, I wanted my brackets, but the point "1" was strictly required.
ATTENTION!! Try to avoid using strangers, especially with live wires! Do all the work very carefully!
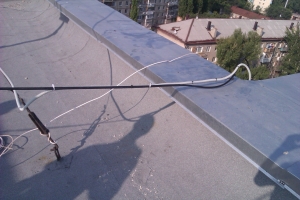
Installation
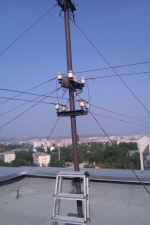
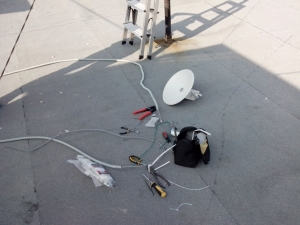
We violate the norms of electrical safety
Shadows took direct part in the editing, thank them
Reply line
Customize
Here it is necessary to make a small remark - no precise adjustment was carried out, the antennas were reduced to the eye. A very small distance (by the standards of the gland used) forgives us for this defect.Final settings of points:
It is also worthwhile to disable the reset button to the factory settings - there are reviews on the network when there is moisture on its contacts. Remove the flag System\u003e Miscellaneous\u003e Reset button
Comments on the parameters:
WDS - transparent bridge mode
Country Code - choose "Compilance test" to remove restrictions on the width of the channel
Frequency Scan List - set a fixed frequency, VERY much faster connection points
Aggregation - increases the utilization of the channel, is selected empirically
ATTENTION!! Be careful when changing parameters Wi-Fi connection!! Use the pre-test mode - this will save you from walking to the far side of the bridge.
The access point has a built-in connection speed tester, go to Tools\u003e Speed Test and see what happened:
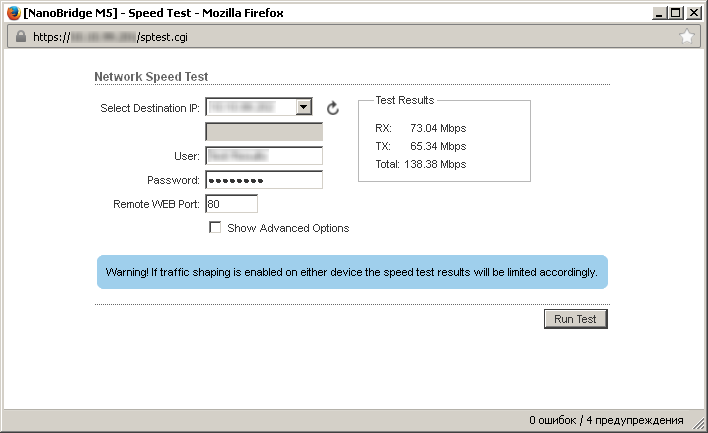
After a short hesitation it was decided - the speed is sufficient, we will implement the plan further.
VLAN and all-all-all
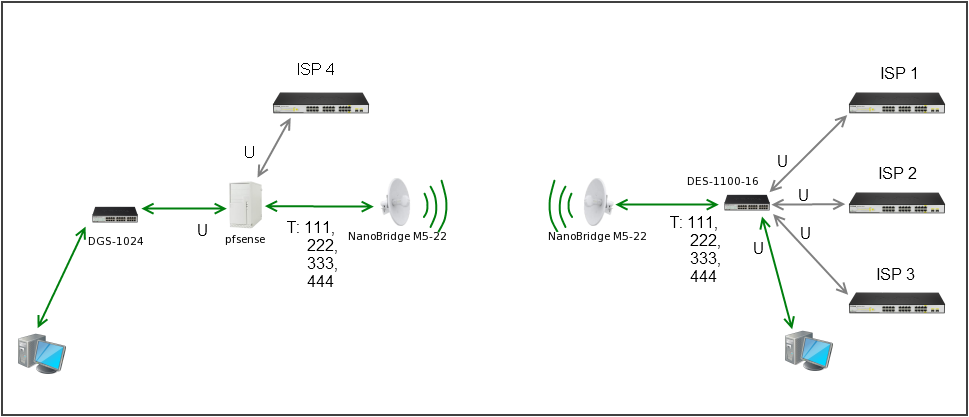
The scheme of the network is simple as three kopecks - the laces of the providers are set in DES-1100-16, tagged vlan tag 111, 222, 333, sent by air to the router on pfSense 2.0
The 444 tag is a management vlan and, in combination, localhost to friends.
We choose a secluded place, supply power, mount the switch:
![]()
Naked and overgrown by providers of switch
Afterword
The link is in operation since the summer - there are no problems. Rain, snow and wind on the signal quality do not affect. I think about lightning protection and UPS.Thank you for attention.
This article describes the main functions and capabilities of the NanoStation M2, as well as an example of setting up the NanoStation M2 with a description of the main parameters.
Before the review and description of the settings of the NanoStation M2 was started, the latest version sewing v5.3, available at that time. It is worth noting that this version of the software in comparison with the previous ones was greatly refined, and many new features appeared in it. Firstly, it should be noted that Ubiquiti Networks has decided to make a separate section of the configuration of its proprietary technology AirMax, as well as the built-in spectrum analyzer AirView.
Let's briefly say a few words about AirMax and AirView.
AirMax - a set of technologies that improve the ability to prioritize traffic, and optimize the operation of devices with a "point-to-multipoint" scheme.
AirView - spectrum analyzer based on NanoStation M2, allowing you to scan radio airways in order to select the optimal operating frequency.
Configuring the NanoStation M2 An all-weather access point and subscriber station WiMAX
Click image to enlarge
Let's go directly to the settings of the NanoStation M2.
We configure the first device in the Access Point mode.
Connect the NanoStation M2 to the PoE device (POE port), lAN port we connect to the local network or directly to the computer (the device needs several minutes to load the operating system).
In the address bar of the browser we type http://192.168.1.20 (IP-address is indicated on the product package).
In the login window that appears, enter the login and password by default: ubnt (login), ubnt (password). If you have already configured the device or configured it in the service, you may need to enter that login and password that were previously assigned. If you do not remember them, you need to reboot the devices using the Reset button (under the device cover).
Attention! When the device is rebooted, all settings are "reset" to the factory settings (default). In the case of correct authorization, you will be taken to the Main page of the main software running this device.
Configuring the NanoStation M2 All-weather access point and WiMAX subscriber station
Click image to enlarge
In the Wireless Mode item, select the Access Point mode.
Configuring the NanoStation M2 All-weather access point and WiMAX subscriber station
Click image to enlarge
Assign an access point to the SSID (network identifier) in order to select our access point when connecting subscriber stations.
In the Country Code field, you can leave the default United States or set the Compliance Test, this will allow you to use the maximum transmitter power and the extended frequency range. This parameter is responsible for the norms and standards adopted in different countries for Wi-Fi equipment.
The Channel Width parameter specifies the width of the speckle, the bandwidth depends on this value: 40 MHz to 300 Mbps, 20 MHz to 130 Mbps, 10 MHz to 65 Mbps, 5 MHz to 32.5 Mbps.
The Channel shifting parameter is set to Disabled by default, it allows you to transfer the center frequency of the working channel by several MHz up or down to reduce interference from other WiFi sources.
The Frequency value determines the operating channel (frequency) on which the access point will operate.
The Extension Channel option is enabled by default only when using the Access Point or Access Point WDS modes with a channel bandwidth of 40 MHz. This allows the system to use two channels of 20 MHz for data transmission simultaneously to increase bandwidth.
The Frequency List value allows you to select specific frequency channels that are available for scanning when searching for access points (used for Station and Station WDS modes).
In the Output Power field, set the output power of the transmitter.
In the Max TX Rate field, you can specify a fixed data rate or select Automatic. This will allow you to choose the optimal speed, based on communication quality conditions.
If you need to protect your network from unauthorized access in the Wireless Security section, you can select required mode encryption. If you are not familiar with the presented encryption modes, we advise you to configure the points using WPA2-AES.
Press the Change button, and then at the top of the active tab the Apply button to save the changes.
We configure the second NanoStation M2 device in the "Station" mode.
We connect NanoStation M2 to the computer, as it was mentioned above in points 1-3.
Since the IP address of this device is identical to the first one, it is necessary to change it, for example, to 192.168.1.21. To do this, go to the Network section and change the IP address.
Do not forget to save the settings after that.
Configuring the NanoStation M2 All-weather access point and WiMAX subscriber station
Click image to enlarge
After rebooting the device, you will be able to get to the menu for subsequent configuration already by the new IP address.
Go to the Wireless tab.
In the Wireless Mode item, select the Station mode, then additional items should appear in the window.
Configuring the NanoStation M2 All-weather access point and WiMAX subscriber station
Click image to enlarge
Press the Select button, in the window that appears, all access points that our subscriber could find point NanoStation M2.
Configuring the NanoStation M2 All-weather access point and WiMAX subscriber station
Click image to enlarge
Opposite the desired access point, put a point and click Lock to AP to copy the mac-address in the field Lock to AP MAC, press Select.
After that, you need to insert the previously copied mac in the Lock to AP MAC field and press the Change button, and then Apply to save the changes.
Attention! If the access point has encryption enabled, subscriber point she will determine which one she will offer to enter the key.
All subsequent devices are connected to the Access Point in exactly the same way.
From Ubiquiti to 5 GHz. An access point is used for both external and internal use. The box is standard white, there is a holographic sign with the company logo. The box on both sides shows the back and front sides of the device.
Overview and setup of the Ubiquiti Nanostation M5.
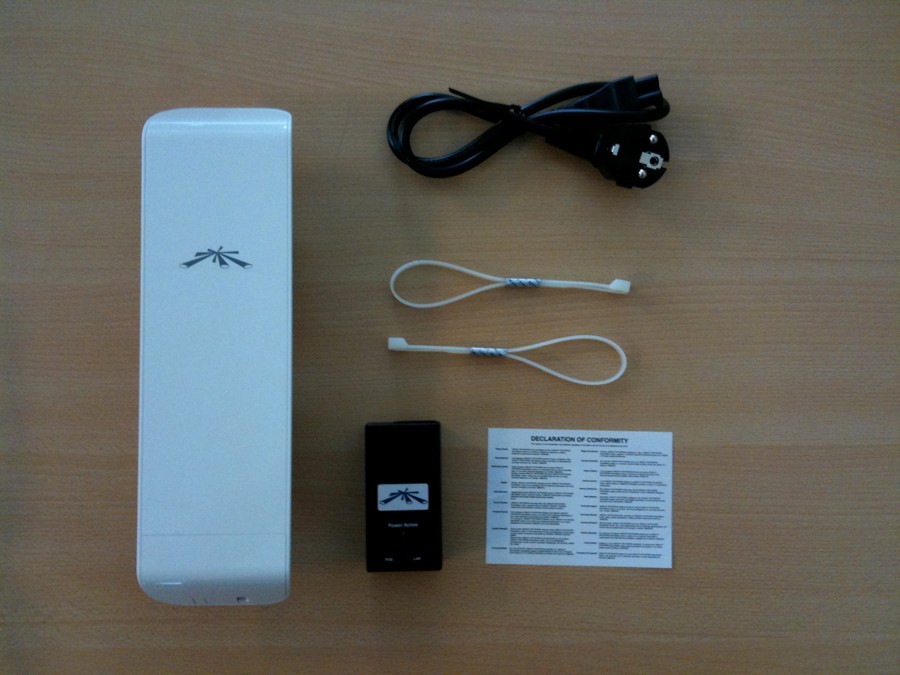
The complete set includes a brochure in English on quick installation device, the access point itself in the film, POE power supply unit at 24 V, 0.5 A and screed. Let's consider in more detail the technical characteristics of the device.
Specifications Ubiquiti Nanostation M5
A small point with a glossy coating, heat-resistant, moisture-proof case. The device can be installed both indoors and outdoors. Built-in 12 dB antenna with dual polarization and MIMO 2T2R technology allows you to transmit or receive a signal at a distance of up to 13 km of line of sight and provide throughput up to 50 Mb / s. ESD and EMP technologies protect equipment from most radio and wire interference. The power of the access point passes through POE 24 V, 0.5 A, as already mentioned above. It is not necessary to conduct 220 V, the unit is fed through a twisted pair. The device contains a system of remote hardware reboot through a special POE-adapter, it is purchased separately for 24 V, 1 A, if necessary. Manages a simple functional point operating system Air OS version 5.0.
The device is based on the processor Atheros MIPS 24KC with a clock speed of 400 MHz. It has a built-in RAM of 32 MB and 8 MB of flash memory. Connectors LAN 100 Mb / s RG45. It is recommended to buy lightning protection to avoid burnout of the port and the processor, in addition, damage from a thunderstorm is not a warranty case. Ubiquiti Nanostation M5 operates in the standard 802.11an technology airMAX. AirMAX can be turned off, then all devices that run at 150 MB / s will be able to connect to the point. The transmitter's power of the device is 23 dBm, which is about 200 mV. The operating frequency is 5-5.9 GHz. Double polarization can be noted: in horizontal polarization, the opening angle is 45 °, in vertical direction - 45 °. To enter the access point control panel, you need to drive IP to the browser address: 192.168.1.20. Login: ubnt, password: ubnt. Ubiquiti Nanostation M5 is great for receiving and transmitting Wi-Fi signal for long distances at temperatures from -30 ° to + 80 ° and humidity 95%. You can use it to build a point-to-point connection or as a client device CPE. The price largely depends on the seller's warranty obligations.
Customize
We connect the access point to the POE adapter and to the computer via the LAN port. Then go to the settings network adapter and in the main gateway we write the IP address of the access point (it is written on the box). Open the browser and enter the IP access point in the address bar. In order for all frequencies to be open, we select test mode Compliance Test. Enter username and password, by default: ubnt and ubnt. Go to the Wireless tab and set the Access Point mode in the settings. In the SSID field, we can change the name of the Wi-Fi network. If we do not want to distribute Vai-Fay to anyone, we select the type of protection in the Security field and set the password a little lower. Press the Change button.
In the Network tab, we can configure a static or dynamic IP address. There is also a router mode. In Advanced, we can adjust the exact distance between the access points. In Service, you can change ports and also configure DDNS for a remote connection to Ubiquiti Nanostation M5. Confirm all the settings with the Apply button and wait for the point to reboot.
Let's move on to setting up the second access point, which will be used as Station. Before entering the admin panel, all the settings are left the same, the Compliance Test still stands as a country. If previously changed username and password, then we enter new values into the form. We are inside, go to the Wireless tab and next to the SSID field click on the Select button. Here we need to select the network that we just created. Use the Scan button to refresh the page, new networks will need time to be displayed in the search. Enter the password from the network to connect to it. Press the Change button.
In the Network tab, you need to change the IP address so that access points do not conflict with each other. Click on the Change and Apply buttons.
In the Main tab, we can see at what frequency and width the access point works, the approximate distance is also indicated. There you can trace the signal level.
Conclusion
In general, the Ubiquiti Nanostation M5 is configured in the same way as its younger brother - the M2 version. Differences between devices end with power characteristics. The entire line of Nanostation has proven itself with a very good side, usually users do not have any problems when working with these devices. Use, the benefit of customizing products from Ubiquiti is not difficult.
If you have any questions or suggestions - write in the comments.